Share your milestones and memories with "Post iT"
 Shreyas Chaliha
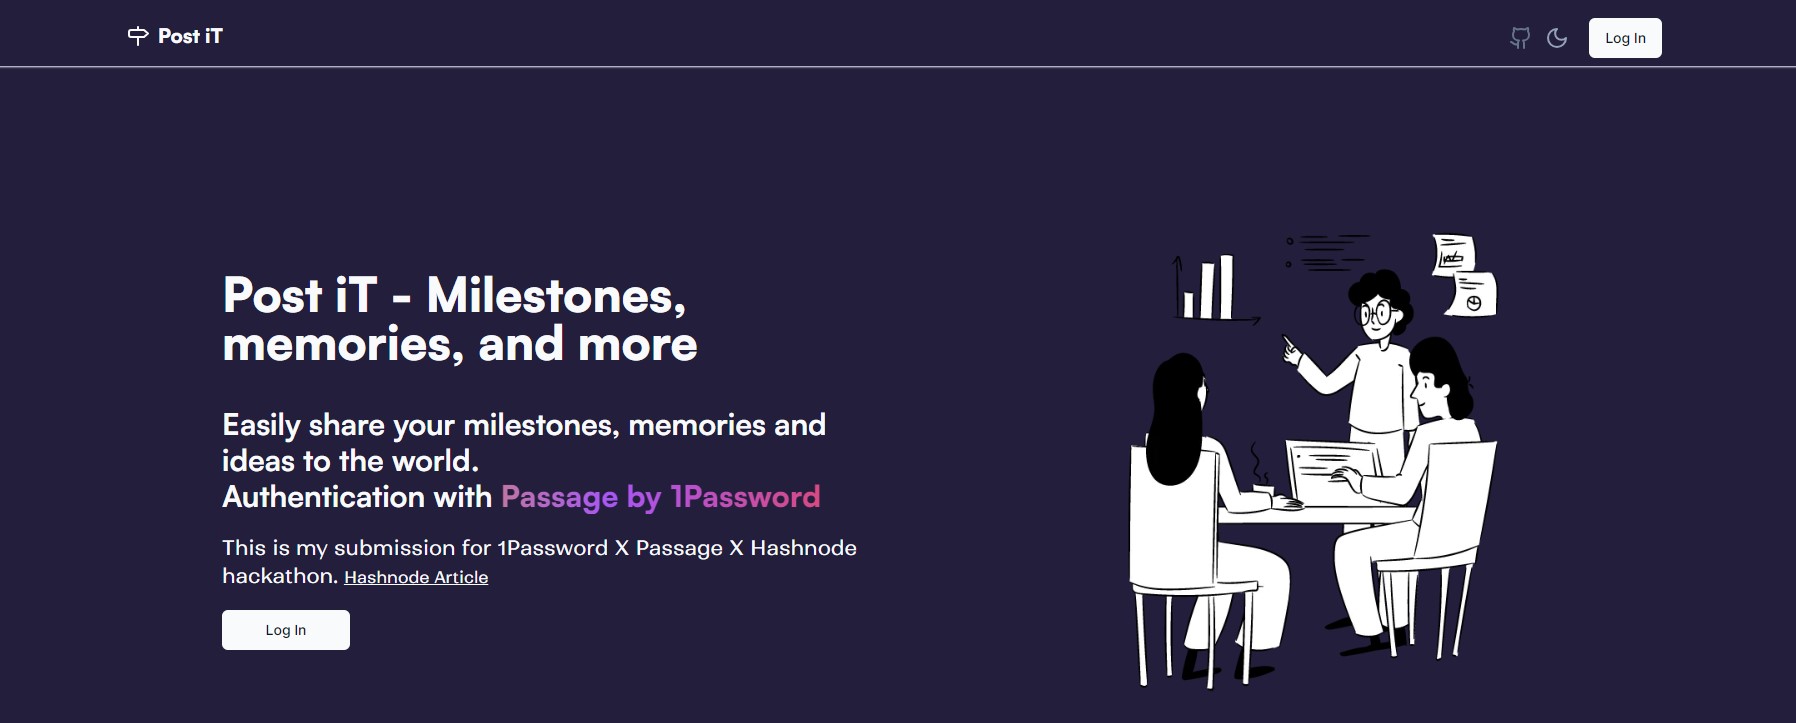
Post iT is a web application where you can share your milestones and memories. For this application, authentication is done through Passage by 1Password.
I would like to express my sincere gratitude to Hashnode and 1Password for providing this incredible opportunity. Participating in this event has been an enriching learning experience and a true privilege.
What is Post iT?
Post iT is an application where you can post your milestones, memories, or anything you like to share with others. The application uses Passage by 1Password for authentication.
How to use Post iT?
Once the application is running in your local environment, in the section called "Setting Up the Post iT App in Your Local Environment: A Step-by-Step Guide" I have explained in detail how you can set it up in your local environment or if you visit the deployed link.
You should be greeted with a home page. On the home page, you will have the option to log in or register. This will take you to the auth page where you can toggle between login and register using the passage-auth element.
Once you are logged in, you will be taken to the Discover (/discover) page where you can see everyone's published posts. This route is not middleware protected so you have the option to check posts without logging in too. But if you are logged in you get an option to add posts from there too.
In the navbar on the right side, side there is a Menu Button. When you click on it, a drop-down Menu will pop up. The drop-down menu has four options: Discover (/discover), Dashboard (/dashboard), Settings (/settings), and Sign Out.
Discover (/discover): Here all the published posts are visible.
Create (/create): Here you can create a post.
Dashboard (/dashboard): This is where all your published posts will be visible. On this page, you also have the option to edit your post. Just click on the post you want to edit, and it should take you to the edit page.
Settings (/settings): This page contains information about your account.
Sign Out: Clicking this button will sign you out of the application. This button calls the
signOutmethod to delete the user's authentication token from local storage and revoke their refresh token. Once sign-out is successful, a toast should appear too.Note: On Passage's support channel in their discord server I found that the Passage Team recommends "to make the auth token session limit pretty short, like a couple of minutes, and the refresh token session limit long"
In the section below called "Changing time for Auth Token and Enabling Refresh Token" I have explained how you can do that.
Why did I choose this project?
I was inspired to create the Post iT manager for the 1Password X Hashnode Hackathon because I saw an opportunity to make a positive impact by allowing people to share their milestones, achievements, and thoughts in a simple and accessible manner. The application is built using Passage by 1Password authentication, ensuring secure access to user data.
While perusing Passage's GitHub repository, I discovered the few project examples they had all contained Supabase. So for this project, I decided to integrate PlanetScale using Prisma as an ORM.
What is Passage?
Passage is an identity and authentication platform that provides developers with the tools to add secure user authentication and authorization to their applications. It offers a range of features, including user registration, login, password reset, and multi-factor authentication (MFA). Passage aims to simplify the implementation of authentication in web and mobile applications while maintaining high-security standards.
Passage also promotes passwordless authentication, eliminating the need for users to remember and manage passwords. Instead, it utilizes secure tokens, biometrics, and other factors to authenticate users, offering a more convenient and secure authentication experience.
By utilizing Passage, I was able to offload the complexities of user authentication and identity management, focusing more on building their application's core features and providing a secure and seamless authentication experience to the users.
What is the tech stack used?
When building an application, it’s important to carefully choose the technologies and tools that will be used in its development. In this section, I will take a closer look at the tech stack used to build Post iT and explore how each technology contributes to the functionality and user experience of the app:
Next.js 13.4.6 /app directory as the React-based framework for building the application
Passage by 1Password for authentication.
TypeScript for adding static typing to JavaScript.
Tailwind CSS as the utility-first CSS framework for styling the application.
Prisma as the ORM.
PlanetScale as the database.
Radix UI (shadcn/ui) for components.
Lucide React for adding SVG icons
Next Themes for adding light and dark mode support
Hashnode for providing this opportunity and platform to share and write great articles.
Zod forvalidation
Did I face any challenges while building the app?
Embarking on the journey of building an app is always an adventure filled with challenges and rewards. As I developed Post iT for the1Password X Hashnode Hackathon, I encountered numerous obstacles that tested my abilities and spurred me to expand my knowledge and skills as a developer.
From mastering the use of Passage for authenticating web apps to understanding server-side rendering on a deeper level, each step presented its own unique hurdles.
Yet, with unwavering determination and steadfast perseverance, I triumphed over these challenges and crafted an application of which I am immensely proud. Before this project, I had no experience with Passage, but the thrill of learning how to incorporate it was exhilarating.
The knowledge I gained has left me confident in my ability to utilize Passage in future projects, particularly because of how easy it is to use.
One major problem that I faced while working on this project was when I was using the "Passage.js" library. At that time (for 2 days), I was trying to call it in a server component and was just getting errors. I even tried calling it in different ways.
Finally, it popped into my mind that I could just use '@passageidentity/passage-node' package since it can be used for server-side operations. By using that package I was able to eliminate the problem I was facing, and the application worked exactly as I expected.
This problem I faced almost at the time of submission. The problem was with the update API, since I have made the post id visible anyone could update a post by going to the dashboard/POST_ID slug. To fix that problem I had to add a condition to check if the author id matches the user id. Now if someone tries to update someone else's post an error will pop up.
This was one of the many problems I faced, and I took it as a great learning experience. Got more mountains to climb and just can't give up.
Setting Up the Post iT App in Your Local Environment: A Step-by-Step Guide
Fork the repository on GitHub to create a copy of the project in your own account.
Clone the forked repository to your local machine using
git clone.Navigate to the project directory and run
npm ito install all the necessary dependencies.Set up the environment variables for Passage, PlanetScale database by copying the
.env.examplefile to a new file named.envand filling in the values. Below is a section called "Setting up your Passage App Id and API key" where I will be explaining how you can set up your NEXT_PUBLIC_PASSAGE_APP_ID and NEXT_PUBLIC_PASSAGE_API_KEY. There is another section called "Creating Database" where I have taken the process to follow to get the database URL, the value for "DATABASE_URL"Once the dependencies are installed and the environment variables are set up, run
npm run devto start the development server.
The project should now be running on your local machine, and you can experiment with it or, better learn from the code.
Setting up your Passage App Id and API key
You can follow these steps to get those values.
Go to https://passage.1password.com/ and log in. If you do not have an account, create one.
Once you are logged in click on "+ Create a New App".
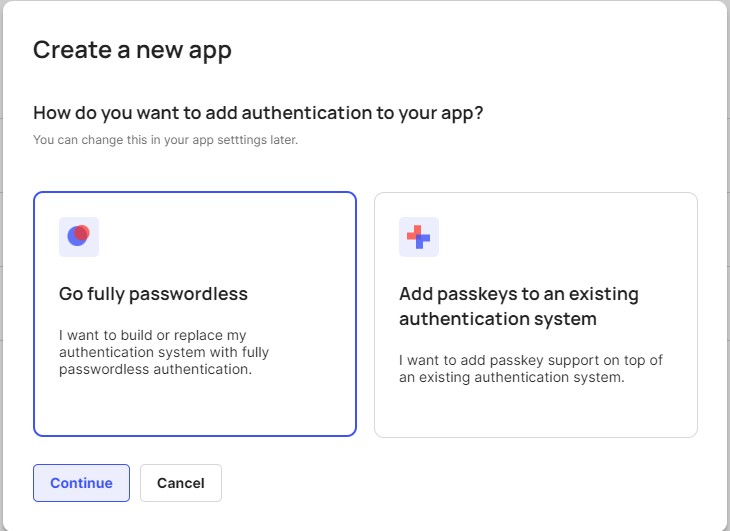
A modal should appear. For it to work properly with my repo, choose "Go Fully Passwordless" --> Continue.
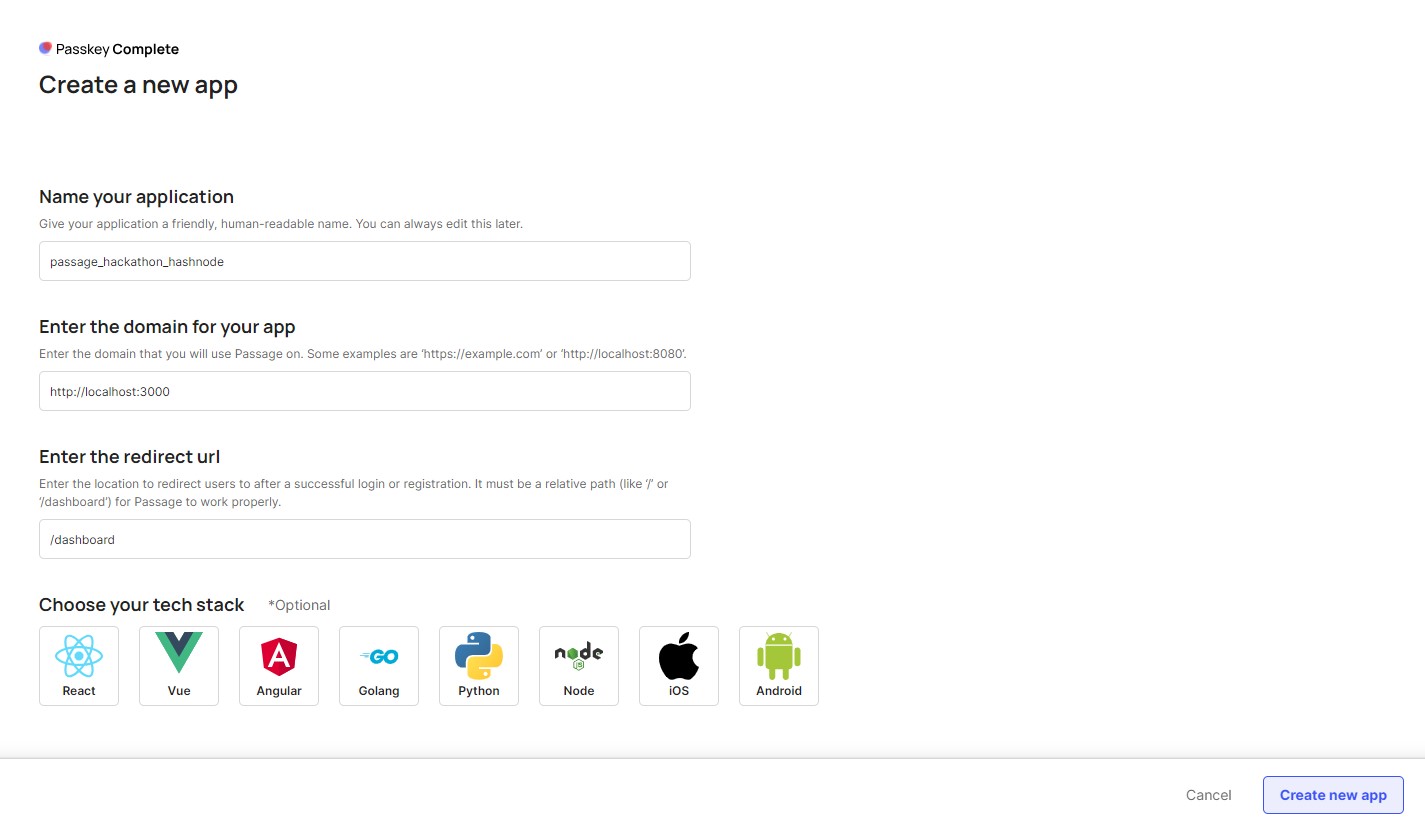
Then a form should appear. Fill up with your desired name, domain for me it is 'http://localhost:3000' (if you deploy the website later, you will need to change it to your deployed domain here), and your desired redirect route. For me, it is '/discover'. You have an optional option to choose a Tech Stack too, but I did not choose anything since I am using Next.Js. Then click on 'Create New App'.
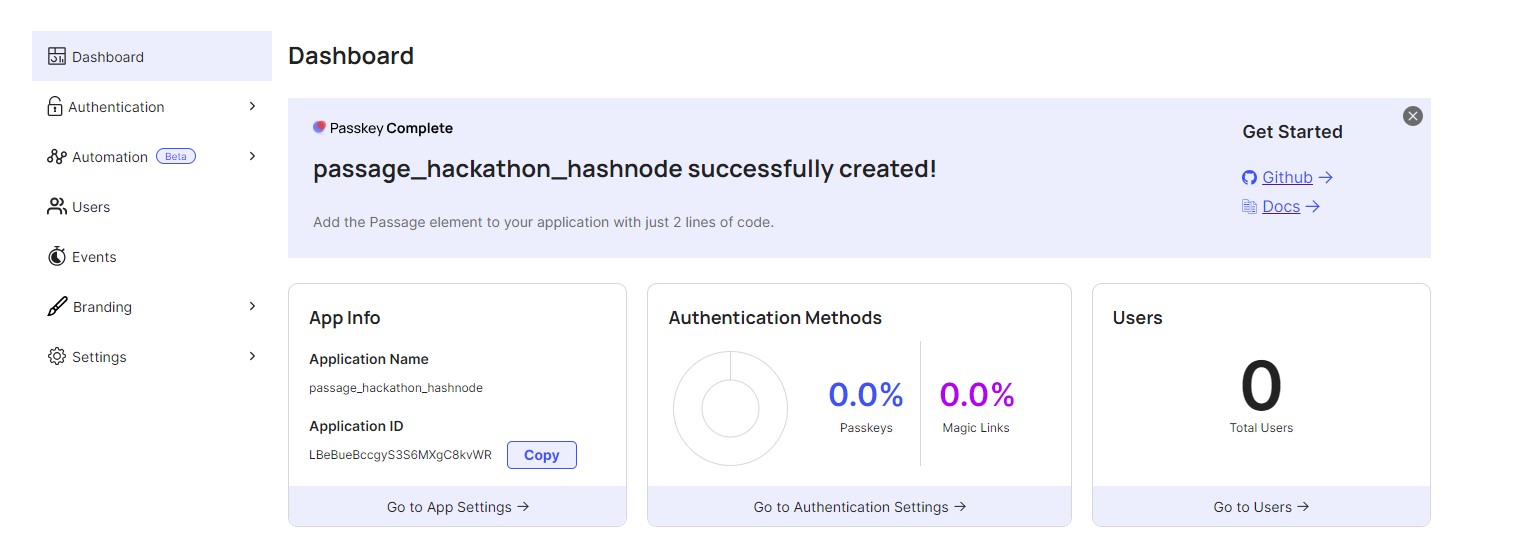
Now you should be greeted by a dashboard. Here the Application ID is the value for NEXT_PUBLIC_PASSAGE_APP_ID.
Now for the API key, Click on Settings --> API KEYS --> Create Api Key --> Provide your desired name --> Create Key. Your API key will be shown now so make sure you Copy it now. For security reasons, it will not be shown again.
This API key value is the value for NEXT_PUBLIC_PASSAGE_API_KEY.
Changing time for Auth Token and Enabling Refresh Token
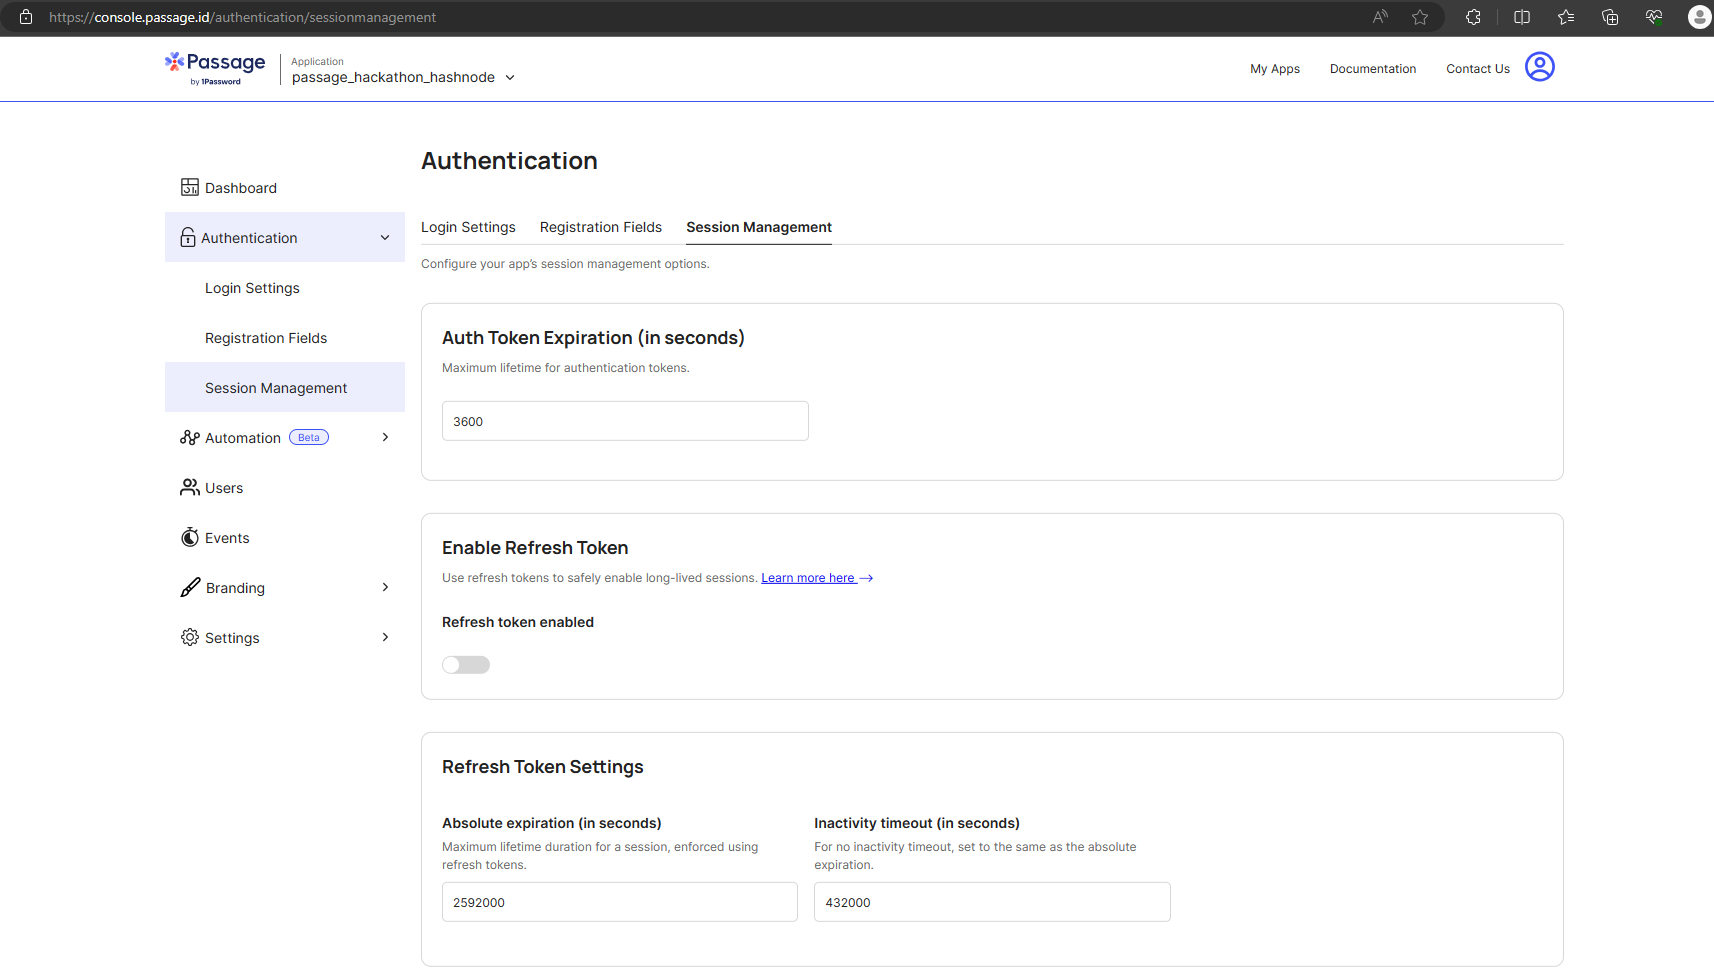
- On the dashboard above as mentioned above, click on Authentication (a drop-down menu should appear) --> Click on Session Management --> Enable Refresh Token (by default it was turned off in mineyo)--> Save. You also have the option to select a time in seconds.
Behind the Scenes: Understanding the Code for Post iT
The app was built using Next.js 13.4.6 and React 18.2.0. I integrated Passage for authentication to handle user authentication. For the user interface, I used TailwindCSS 3.3.2 for styling, along with shadcn/ui for UI components. I also incorporated lucide react for Icons. The code was written in TypeScript 5.1.3. For the database, I am using PlanetScale and Prisma as the ORM.
How Passage is being used in this application?
In the application, I have used the following package form Passage:
@passageidentity/passage-auth: It renders a UI element for users to register and log in to your website.
@passageidentity/passage-node: This Node.js SDK allows for verification of server-side authentication for applications using Passage
@passageidentity/passage-js: This package offers a set of APIs and methods that allow interaction with the Passage Identity service from their client-side code.
For my application, I have used both '@passageidentity/passage-node' and '@passageidentity/passage-js' where they see fit.
Logging in and Registering User
In my application, authentication is handled on the /auth route, which displays the UI for the Auth component. This component uses the useEffect hook to dynamically import the passage-auth element from the @passageidentity/passage-elements package when the component mounts. The element is then rendered inside a div with some styling applied. The app-id attribute of the passage-auth element is set to the value of the NEXT_PUBLIC_PASSAGE_APP_ID environment variable.
Since I am using the passage-auth element, I did not have to create separate pages for login and registration. The element includes a function to toggle between login and registration. If you prefer to have individual pages for login and registration, you can use the <passage-login> and <passage-register> elements instead.
Once a user is logged in, they are directed to their dashboard page. This page is protected by middleware, so it cannot be accessed without a valid token. If an unauthorized user tries to access the dashboard page, they will be redirected to the auth page
Initialising Prisma
For the application, I am using Prisma as an ORM so I will be using Prisma to communicate with the database. The steps I took are:
On the terminal run, "npm install prisma --save-dev"
Then "npx prisma init", this command will generate a folder called Prisma and inside it, there will be a file called 'schema.prisma'. This is where we define our schema.
After that we need to create a database to fill in the value for "DATABASE_URL=" I have explained how you can do that below.
Creating Database
For this application, I am using PlanetScale for a database.
To create a database in PlanetScale, you can follow these steps:
Click the “Create a database” button on your organization’s overview page.
Name your database using lowercase, alphanumeric characters, or underscores. You may also use dashes, but it is not recommended as sharded databases require them to be escaped.
Select a region that is closest to you or your application’s hosting location for the lowest latency.
Finally, click the “Create database” button to deploy your database.
Once the database is created put the Database Url value to "DATABASE_URL="
Defining and connecting database
Once you have the database URL, you can define the schema. In the application, a user can create posts, so we define the Post model. In my schema.prisma file, I have the following:
// This is your Prisma schema file,
// learn more about it in the docs: https://pris.ly/d/prisma-schema
datasource db {
  provider     = "mysql"
  url          = env("DATABASE_URL")
  relationMode = "prisma"
}

generator client {
  provider        = "prisma-client-js"
  previewFeatures = ["jsonProtocol"]
}

model Post {
  id        String   @id @default(cuid())
  createdAt DateTime @default(now())
  updatedAt DateTime @updatedAt
  content   String   @db.VarChar(255)
  authorId  String

  @@index([authorId])
}
Since I am using Passage for authentication, I did not need to create a User model. The authorId field value will be the Passage User ID.
Also, I have limited the content of a post to 255 characters.
Here's a paragraph with exactly 225 characters:
"The sun set over the calm horizon, painting the sky in hues of orange and pink. The gentle breeze whispered through the trees, carrying with it the sweet scent of blooming flowers. As evening descended, the world embraced a tranquil stillness, inviting a moment of peace and reflection before the night unfurled its mysteries."
Note: The above paragraph contains exactly 225 characters, including spaces and punctuation.
Once we have defined our model, we need to run the command npx prisma db push to push the model to our database.
To verify that the command was successful, we can run npx prisma studio in our terminal. This will open Prisma Studio, where we can see the defined model. If we see it, that means our command was successful.
Note: The command failed for me when I was using a VPN.
Now, I would like to provide an explanation of the functions defined in two important files located in the actions folder. These functions are called in other components to get user and session information.
Understanding getCurrentUserInfo.tsx
The getCurrentUserInfo function performs the following actions:
It creates a new instance of the
Passageclass from the@passageidentity/passage-jsmodule, passing in theNEXT_PUBLIC_PASSAGE_APP_IDenvironment variable as an argument.It calls the
passage.getCurrentUsermethod to get the current user object and then calls theuser.userInfomethod to retrieve information about the user.It returns an object with several properties, including
userInfo,email,created_at,name, andid, extracted from the user information object.If an error occurs, the function returns an object with default values indicating that no user information is available.
This function can be used to retrieve information about the currently authenticated user from Passage.
Understanding getUserInfo.tsx
An asynchronous function named getUserInfo that performs the following actions:
It creates a new instance of the
Passageclass from the@passageidentity/passage-nodemodule, passing in theappID,apiKey, andauthStrategyoptions.It uses the
cookiesfunction from thenext/headersmodule to get the cookies from the incoming request.It retrieves the value of the
psg_auth_tokencookie and uses it to create an authorization header for a request object.It calls the
passage.authenticateRequestmethod with the request object to authenticate the request and get the user ID.If a user ID is returned, it calls the
passage.user.getmethod to retrieve the user’s email and phone number from Passage. It then returns an object with several properties, includingisAuthorized,username,appID, anduserID.If an error occurs or if no user ID is returned, the function returns an object with default properties indicating that the user is not authorized.
This function can be used to check if a user is authenticated and to retrieve information about them from Passage.
Creating a Post and connecting Passage User
Once you are logged in you should be redirected to the discover route where you can Create a Post or you can click on Menu and go to click on "Create". It will take you to create route (/create).
The Post is what we defined in our schema where authorId will be our passage user id.
On the create page, I am rending a Create Post Component.
Create Post Component
The component uses the useState hook from React to manage the state of the input field for the post’s content. It also uses the useMutation hook from the @tanstack/react-query library to handle the creation of the post. The mutation function sends a POST request to the /api/post/create an Fendpoint with the content of the post. If the request is successful, the page is refreshed, a success toast is displayed using the toast function from the ui/use-toast module, and the input field is cleared. If there is an error, an error toast is displayed using the same toast function.
The component also includes an input field for entering the post’s content and two buttons for canceling or submitting the creation of the post. The input field uses the Input component from the ui/input module and its value is controlled by the state managed by the useState hook. The cancel button uses the Button component from the ui/button module and calls the router.back method when clicked to navigate back to the previous page. The publish button also uses the Button component and calls the createPost function returned by the useMutation hook when clicked to submit the creation of the post.
Create API
An API route handler for a POST request in a Next.js application. The handler takes in a Request object as its argument and uses the req.json method to parse the request body as JSON. The parsed body is then validated using the PostValidator from the lib/validators/post module, which uses the zod library to ensure that the body contains a valid content property.
After validating the request body, the handler calls the getUserInfo function from the actions/getUserInfo module to get information about the current user. This function returns an object that contains information about the current user, including their userID. If the user is not authenticated (i.e., if the userID property of the returned object is falsy), the handler returns a 401 Unauthorized response.
If the user is authenticated, their userID is stored in a variable called id. The handler then uses this id along with the validated content from the request body to create a new post in the database. This is done using the db.post.create method from the db module. The method takes in an object with a data property that specifies the data for the new post. The data includes the content of the post and its authorId, which is set to the current user’s ID (i.e., the value of the id variable).
In summary, the process of creating a post and connecting it with a Passage user involves several steps. First, the user must be logged in and redirected to the discover route, where they can access the create route by clicking on “Create” or through the menu. On the create page, the CreatePost component is rendered, which allows the user to enter the content of their post and submit it using the useMutation hook from the @tanstack/react-query library. The mutation function sends a POST request to the /api/post/create endpoint with the content of the post. The API route handler then validates the request body, retrieves information about the current user using the getUserInfo function, and creates a new post in the database using the db.post.create method.
The new post’s authorId is set to the current user’s ID, connecting the post with its author.
CustomFeed.tsx
So this file is responsible to render the post feed in the dashboard route.
It is an asynchronous function and does the following:
It calls the
getUserInfofunction from the@/actions/getUserInfomodule to get information about the current user and extracts theuserIDproperty from the returned object.
While working on this application I got stuck in this part for a good time since I was trying to use getCurrentInfo to get the userID but that runs client-side and in this code I also need to query post from the database and filter it based on userID which is a server-side function. I do not know why but at that time it did not pop into my mind to use@passageidentity/passage-nodepackage while I was experiencing the errors.It uses the
db.post.findManymethod from thedbobject imported from the@/lib/dbmodule to find all posts in the database where theauthorIdproperty matches theuserID.If no posts are found, it returns a JSX fragment that displays a message and an image to the user.
If posts are found, it returns a JSX fragment that displays a heading and a
PostFeedcomponent with theinitialPostsprop set to the array of posts.
Updating a Post
To update a post you will need to go to your dashboard and then click on the post you want to edit, it will take you to the edit page for that post.
The edit page takes in a slug parameter from the URL, which represents the id of the post to be updated. The page uses the db.post.findFirst method from the db module to find the post with the given id. If the post is not found, the notFound function is called to display a 404 page. If the post is found, its content and authorId are passed as props to the UpdatePost component along with the slug (which represents the postId) to allow the user to update the post.
Update Post Component
The component takes in three props: postId, content, and author_id. These props are used to pre-populate the input field with the current content of the post and to send the updated content, author_id, and postId to the server when the user submits the update.
The component uses several hooks, including useState from React, useMutation from the @tanstack/react-query library, useRouter from Next.js, and a custom hook called useCustomToasts. The useState hook is used to manage the state of the input field. The useMutation hook is used to handle the update of the post. The mutation function sends a PATCH request to the /api/post/update endpoint with the updated content, author_id, and postId. If the request is successful, the page is refreshed, a success toast is displayed using the toast function from the ui/use-toast module, and the user is redirected to the /discover page using the router.push method. If there is an error, an error toast is displayed using the same toast function.
The component also includes an input field for updating the post’s content and two buttons for canceling or submitting the update. The input field uses the Input component from the ui/input module and its value is controlled by the state managed by the useState hook. The cancel button uses the Button component from the ui/button module and calls the router.back method when clicked to navigate back to the previous page. The update button also uses the Button component and calls the updatePost function returned by the useMutation hook when clicked to submit the update.
Update API
The api handler takes in a Request object as its argument and uses the req.json method to parse the request body as JSON. The parsed body is then validated using the PostUpdateValidator from the lib/validators/post module, which uses the zod library to ensure that the body contains valid content and postId properties.
The handler then calls the getUserInfo function from the actions/getUserInfo module to get information about the current user. If the user is not authenticated (i.e., if the userID property of the returned object is falsy), the handler returns a 401 Unauthorized response.
It then fetches a post from the database using the db.post.findUnique method, searching for a post with a matching id field. If the post exists but its authorId does not match the user's id, a 403 Forbidden response is returned.
If the user is authenticated, the handler uses the db.post.update method from the db module to update the post with the given postId in the database. The post’s content and authorId are updated with the values from the request body and the current user’s ID, respectively.
If everything goes well, the handler returns a 200 OK response. If there is an error, such as a validation error from the zod library, an appropriate error response is returned with a status code of either 400 Bad Request or 500 Internal Server Error.
Settings route
Location: https://passage-fullstack.vercel.app/settings
If you visit the settings page, you will notice a card with your account information. To display that information, I used the getCurrentUserInfo function. The content for the settings page is coming from the component called SettingsContent. Here is what the code from SettingsContent is doing
It uses the
useStatehook to define two state variables:userInfoandisLoading. TheuserInfostate variable is initially set toundefinedand theisLoadingstate variable is initially set totrue.It uses the
useEffecthook to call thegetCurrentUserInfofunction from the@/actions/getCurrentUserInfomodule when the component mounts. This function retrieves information about the currently authenticated user and sets theuserInfostate variable to the returned value. It also sets theisLoadingstate variable tofalse.It defines a local variable named
formattedCreatedAtthat holds a formatted version of the user’s creation date if it is available.It defines a local variable named
infothat holds an array of objects representing information about the user.If the
isLoadingstate variable istrue, it returns a JSX fragment that displays a loading state using aCardcomponent and aBounceLoadercomponent.If the
isLoadingstate variable isfalse, it returns a JSX fragment that displays aCardcomponent with information about the user.
I have also used the getCurrentUserInfo function from the @/actions/getCurrentUserInfo to display the logged-in user's email in the dropdown-menu.
Discover route
Location: https://passage-fullstack.vercel.app/discover
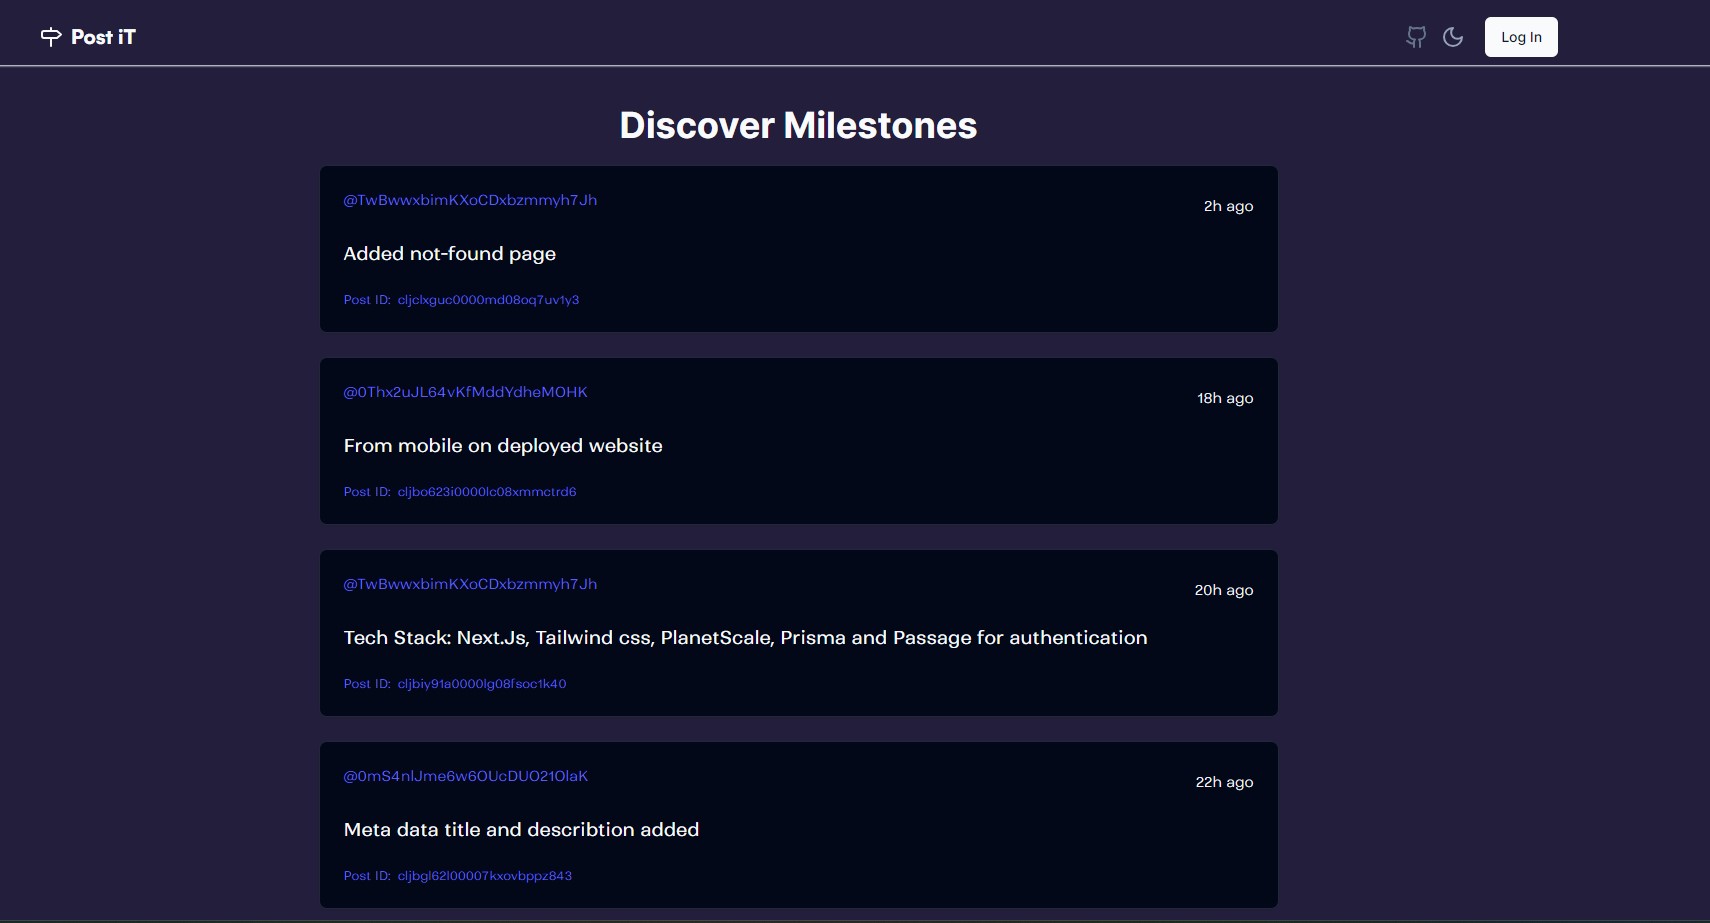
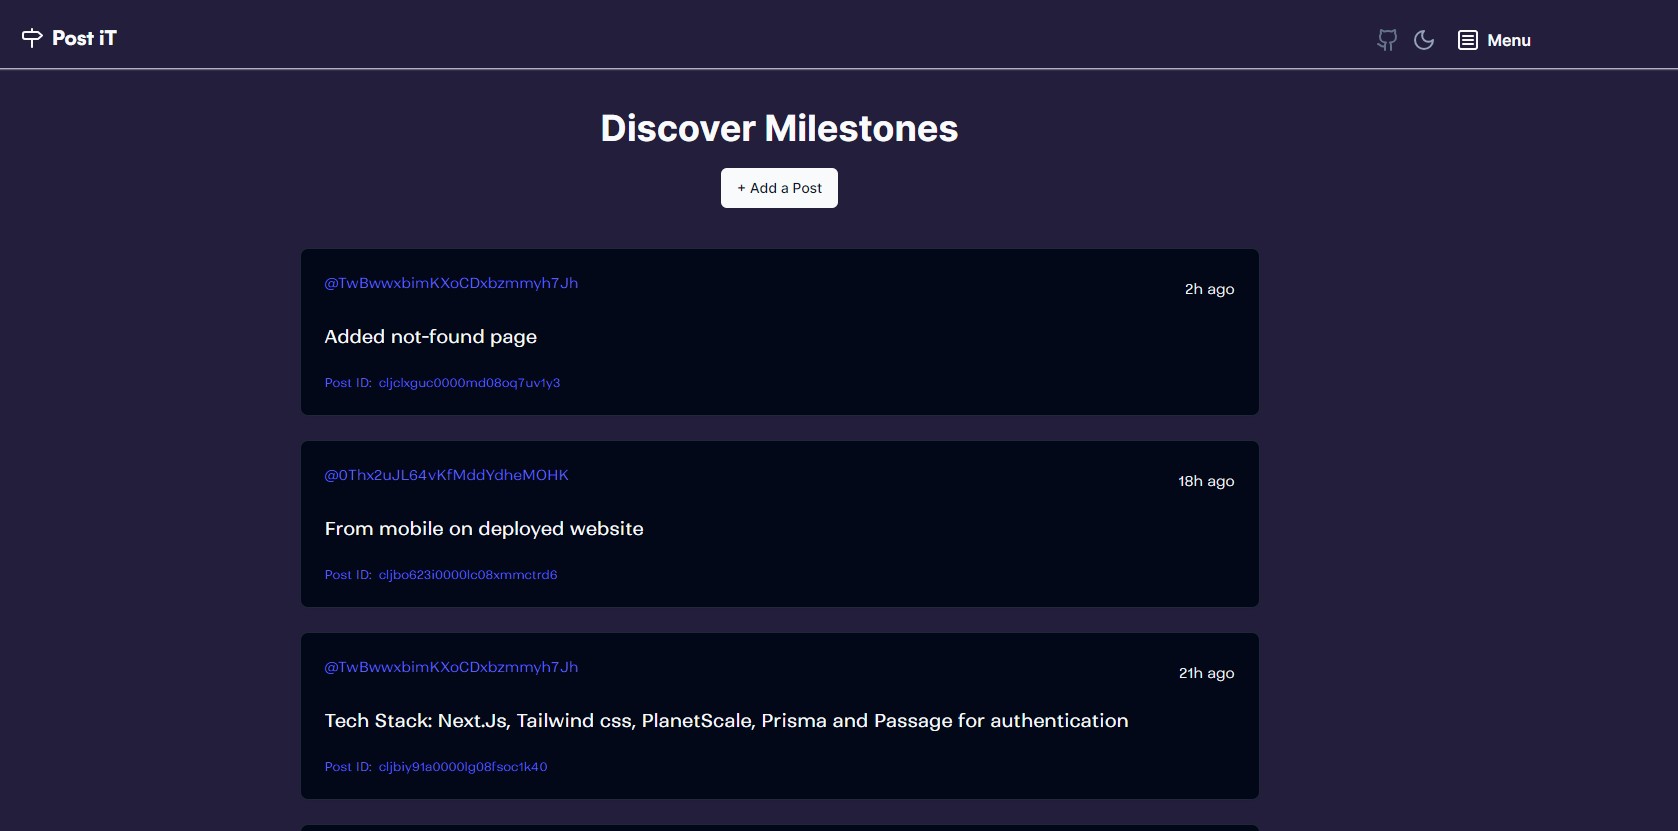
This is where you can see all the posts published by users. This route is not middleware protected so anyone can check the post but if the user is logged in they have the option to publish a post from there too.
What non-logged user sees:
What a logged-in user sees:
middleware.ts
A middleware function for a Next.js application that uses Passage for authentication. Here’s an explanation of what the code does:
The
NextResponseandNextRequesttypes are imported from thenext/servermodule. These types represent the request and response objects in a Next.js middleware function.The
Passageclass is imported from the@passageidentity/passage-nodemodule. This class is used to interact with the Passage API.The
middlewarefunction is defined as an asynchronous function that takes arequestobject of typeNextRequestas its argument.Inside the
middlewarefunction, the value of thepsg_auth_tokencookie is retrieved from therequest.cookiesobject and stored in theauthTokenvariable.A new instance of the
Passageclass is created and stored in thepassagevariable. TheappIDoption is set to the value of theNEXT_PUBLIC_PASSAGE_APP_IDenvironment variable.The
validAuthTokenmethod of thepassageobject is called with the value of theauthTokenvariable as its argument. This method returns a Promise that resolves to the user ID associated with the auth token if it is valid, ornullif it is not valid. The result of this method call is stored in theuserIDvariable.If the value of the
userIDvariable is falsy (i.e., if it isnull, indicating that the auth token is not valid), then a redirect response is returned using theNextResponse.redirectmethod. The URL to redirect to is constructed by concatenating the/authpath with the base URL of the request.The
configobject is exported and defines a property calledmatcher. This property specifies an array of path patterns that this middleware function should be applied to.
In summary, this middleware function checks if a valid auth token is present in the request cookies and redirects to an authentication page if it is not present or not valid. It only applies to requests that match one of the path patterns specified in the matcher property of the exported config object.
A brief on styling and responsiveness of the application
In the application, I have used tailwind css to do all the styling. I have tried to make the application as responsive as possible. But there may be some parts that I missed.
I also used custom fonts from FontShare for the application, the names of the font families are Satoshi and Ranade.
The application also features Light and Dark mode which has been utilized with the use of the class strategy.
Background
Light mode: I have used a shade of white [#e5e5e5] as the background color.
Dark mode: I have used a shade of black [hsl(250.2 32.6% 17.5%)] as the background color since pure black might cause eye strain to some users.
Home page
For the words "Passage by 1Password" I added an anchor tag to link it to their home page and also so that I can provide custom animation and color.
"bg-gradient-to-r" class applies a gradient effect from yellow-500 to purple-500 and then red-500.
For the transition, I have also used animate-text class, a custom animation. It has been defined in the tailwind.config.js file.
The animation property specifies that the text animation should have a duration of 5 seconds (5s), use an ease timing function, and repeat infinitely (infinite).
The keyframes property defines the keyframes for the text animation. At the beginning (0%) and end (100%) of the animation, the background-size is set to 200% 200% and the background-position is set to left center. At the halfway point (50%) of the animation, the background-size remains the same but the background-position changes to right center.
Miscellaneous
What happens if a user switches devices away from where they previously authenticated with?
If the device is not recognized, a magic link will be sent to the email you are trying to log in with and once you add the code you can set up a passkey with that device.
Public Repo Link
Github Repo: https://github.com/trace2798/passage_fullstack
Current Demo Deployment: Post-iT - Home (https://passage-fullstack.vercel.app/) (I might un-deploy it in the future so I have provided the demo video.) (No demo credentials provided since you can always trust Passage by 1Password to keep your information safe.)
Demo Video Link
Youtube Link: https://www.youtube.com/watch?v=iXuKCdvHBLY
I hope this article helped you. If you have any questions, feel free to leave a comment and I will respond to it as soon as possible.
Happy Hacking !!!
Subscribe to my newsletter
Read articles from Shreyas Chaliha directly inside your inbox. Subscribe to the newsletter, and don't miss out.
Written by

Shreyas Chaliha
Shreyas Chaliha
I am a full-stack developer with a passion for coding and a love of cooking, I'm always discovering the perfect recipe for success. With a keen eye for detail and a knack for problem-solving, I can create beautiful, fully functional web applications and when I'm not behind the computer, you can find me in the kitchen, working on my latest culinary creation I find the kitchen to be a great creative outlet that complements my work as a developer. In my free time, I also enjoy going for long walks, reading, swimming, or playing Tennis.