Supercharging the 1Password SSH Agent
 Mike Almeloo
If you're like me, you probably have a unique SSH key for each remote host you connect to. 1Password makes this super easy by providing an SSH agent which will automatically serve those keys from your vault. However, it has one very annoying issue:

What's the problem?
It's not 1Password's fault! To understand what the problem is, you'll first need to understand how the SSH client and agent are separated. Simply said, the agent is responsible for keeping track of your keys, while the client will connect to the agent and retrieve a list of keys, among other tasks. In this context, the client is the actual SSH program you interact with, such as OpenSSH. The 1Password Desktop App includes a custom SSH agent which the client can then connect to. It's important to note that according to the protocol, your private keys never leave the agent.
The SSH client is kind of dumb: it simply asks for all keys from the SSH agent and then tries them one by one until authentication succeeds. However, most servers have a low maximum number of authentication attempts - the default is 6. This causes issues when you have more than 6 keys in your vault, and 1Password happens to offer the correct one last.
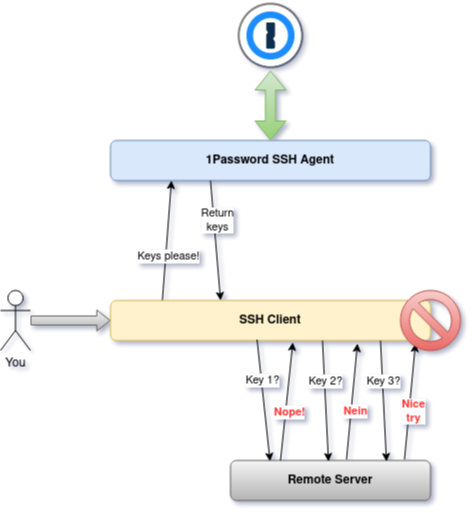
Unfortunately, this problem is not easy to fix. The SSH agent protocol simply does not support providing any context when requesting a list of keys. You can read more about the process in this section of the RFC.
Existing solutions (and why they're bad!)
As you can probably imagine, this problem is fairly common. The solutions however are not very diverse: they all have drawbacks in one way or another.
Solution #1
The most common solution is to simply change the config on your remote host to allow more authentication attempts. However, this might not always be possible, and even if it is, it's quite undesirable from a security standpoint. An ideal solution would have no such compromises - the client is the problem here, so why fix the server?
Solution #2
The "official" solution suggested by 1Password is to configure the SSH client to match your host with the correct public key. Sounds good, right? Well, kind of. This method works by downloading a copy of your public key, then specifying which key to use for which host in your .ssh/config file. I dislike this solution because I don't want to store my public keys on disk - I want 1Password to handle everything! It's also rather annoying to do this for every new host you add. There has to be a better fix, right?
The Proper Fix™
I realized that a potential solution needs something more sophisticated - the SSH agent protocol is too dumb for 1Password to fix something on their end, and OpenSSH (or other clients, for that matter) doesn't allow for the fine-grained configuration options that we need. What we actually need is some kind of connector - a glue if you wish - that integrates the SSH client even more tightly with 1Password than it already is. Preferably, it should be completely transparent to maximize compatibility across SSH clients. A difficult task for sure, but not impossible!
I settled on a solution that implements its own SSH agent. "But the agent protocol is dumb, right?" Well, yes, but it does have a formal specification for protocol extensions. In theory, we could use this to supply additional information about the remote host to the agent, which can then shuffle the keys to prioritize the (likely) correct one. In other words, if we can tell the agent "Hey, I want to connect to 1.2.3.4," it should be able to figure out which key to serve you first. We just need to make sure that any other message is forwarded to 1Password because the SSH client can only connect to a single agent at once.
That's not all, though. To actually be useful, we must also intercept the SSH_AGENT_IDENTITIES_ANSWER that we receive from the 1Password agent. This message contains the actual public keys that the SSH client will try, and we should reorder the keys to put the most likely match first. How do we know which keys belong to which host? We'll get to that in a second. In the meantime, here's a flow diagram of the agent's tasks which should help the confused among you:
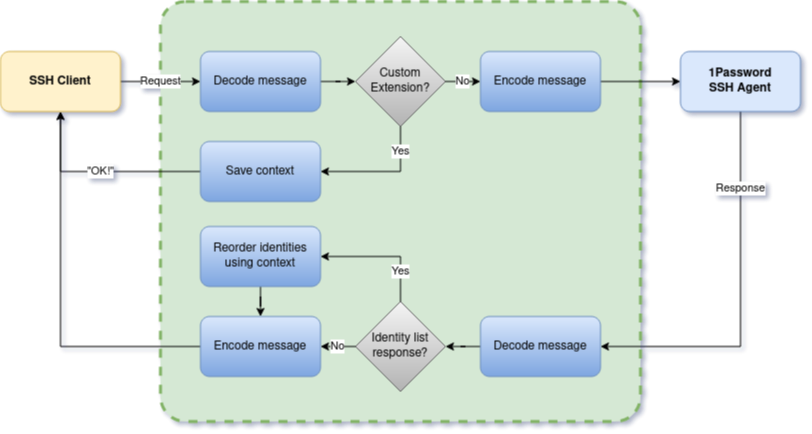
It sits nicely in the middle of our client and agent. Super transparent!
More than just the agent
The above solution sounds great in theory, but you may have noticed one major flaw: how do we make the SSH client understand our protocol extension? Implementing this very specific extension into every major SSH client doesn't sound very fun, and could take ages (if they're even willing to implement it at all!) "Hey major SSH client devs, could you implement this real quick? I have a Hackathon deadline to meet!"
The simple answer is that we don't bother! Instead of modifying the client itself, we can execute our own special program which will then set up the SSH client. This allows us to quickly send the custom extension message before actually starting the client. Even cooler, we can replace our initializer process by the client once we're done using the execv() syscall. This allows for even better transparency and security.
Together with our agent process, we would have a solution that looks like this:
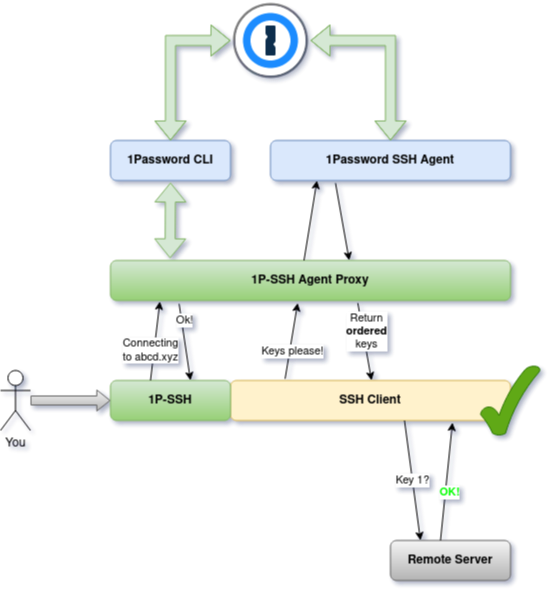
Much better! I almost forgot, but we can use the excellent 1Password CLI to help us match our SSH keys with the host. I've promised this before, but we'll get to that in a second :)
Piecing it all together
Now that you hopefully understand how the entire project will fit together, I think it's time to talk about the details. There's a lot to cover, so buckle up.
Matching the keys
Let me address the elephant in the room first: how do we match the keys with our hosts? I've mentioned before that I want to have a solution that's managed completely on the 1Password side, without having to download my keys or edit config files. Do you know what would be even cooler? If we could sync the configuration across all of our devices, by securely storing it as fields in our vault. Something like this, perhaps:
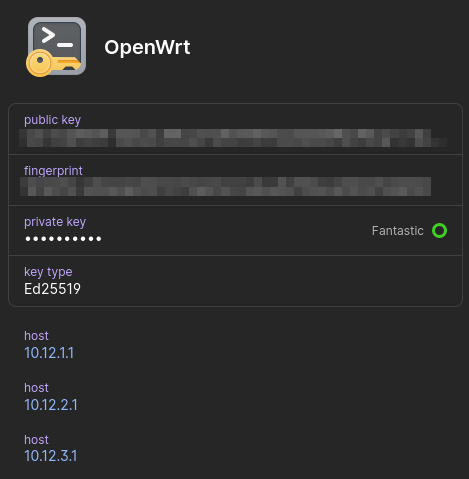
Well, it turns out we actually can! Since our agent is running locally, we can interface with the 1Password CLI to retrieve items from our vault. Since we know which host the user wants to connect to, we can match it against the host fields in the key items that are stored in our vault. If we have a match, we know to serve that key first. If you have the CLI installed, you can try the below command:
op item list --categories SSHKey --format=json | op item get -
This will show all your SSH keys, including their fields. For our purposes, we only need the fingerprint and the host fields; therefore we simply filter out the rest. This ensures that we don't touch more sensitive data than necessary. Yay, security!
Advanced matching
The host matching is cool, but the temperature can drop further! If you want to access a host by both IP address and hostname, or if the IP regularly changes, it can still be quite annoying. Furthermore, if any of those two change only ever so slightly, it could still serve the wrong keys. We need a smarter way to match against our hosts.
To fix the first problem, the agent will try to resolve any hostname it can find in your host fields, and add them to its internal list. This means that if you have a router that's accessible via both router.local and 192.168.1.1, you can simply add router.local to your hosts, and it will still function if you tell SSH to connect to 192.168.1.1 . Furthermore, if the router's IP address ever changes, your keys will still be matched correctly as long as the domain name is resolvable!
To truly get a good matching algorithm though, we don't just want to check whether hostnames or IPs are equal. Ideally, we want to find the similarity between the host we're connecting to and the hosts that are stored in our vault. We can do this using a metric called the Levenshtein distance, which tells us how many characters we need to modify (insert, delete or replace) to go from string a to b. Since the minimum distance is 0 (if they are equal) and the maximum is equal to our longest host value, we can assign a score from 0 to 1 for every host in our vault to determine a relative similarity. Subtract this score from 1, and we can start maximizing our score!
To find the key offer order, we want to match against all hosts for every key that we have. So we define the key-specific score to be the maximum of all scores, calculated on the host stored alongside the key and our target host. Finally, we give a little boost to the key score if we detect that the score gets lower when we only include resolved hosts. This ensures that if we have two keys - let's call them x and y - and key x contains a host that resolves to an IP in one of y's hosts, key y will always be served before key x. In other words, we prefer direct matches over resolved ones.
Going full stealth mode
To make the experience as smooth as possible for the end user, we need to make the program even more transparent. We can do this by creating a local symlink called ssh in the user's PATH and setting it to our custom executable. We can then "catch" the ssh command by checking argv in our program, and immediately executing the ssh subcommand if we detect we're being run as ssh. Stealthy!
$ ls -l $(which ssh)
lrwxrwxrwx 32 mike  1 Jul 03:22 /home/mike/.local/bin/ssh -> /home/mike/.local/bin/op_ssh_fix
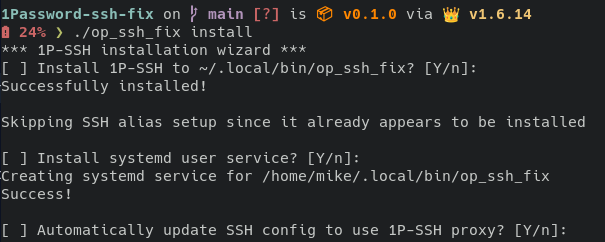
Since the program needs quite some hooks into the user's environment, it comes bundled with a handy installer. The installer will take care of the following things:
Installing the standalone binary to the user's local bin directory
Setting up the SSH alias
Installing and configuring a local systemd service to run the agent proxy
Automatically updating or adjusting the user's SSH config to point to the new agent
Wrapping up
All in all, I am very happy with how this project turned out. I absolutely love turning my ideas into code, but something that has always bothered me is that some of those ideas are too crazy to execute :). Unlike other products however 1Password really does not stand in the way of my imagination: the CLI is honestly the only thing making this project possible at all, and it's super easy to use in your programs (it supports JSON output!!)
In an ideal world, I would like to see this project be integrated into 1Password itself. That would prevent some issues such as the incorrect executable path when authenticating (since the request comes from the proxy) and would make the entire progress much smoother overall. One downside of my current project is the lack of Windows support: the nature of this project unfortunately makes it quite platform-dependent, and since I do not have a Windows machine I am unable to test on that platform. I could totally see it happen though, I'm sure it's possible in theory!
Finally, I would like to thank everyone at 1Password and Hashnode for this great hackathon, I've had nothing but positive experiences communicating with you guys. See you at the next event!
Subscribe to my newsletter
Read articles from Mike Almeloo directly inside your inbox. Subscribe to the newsletter, and don't miss out.
Written by

Mike Almeloo
Mike Almeloo
Hey! My name's Mike, and I'm a 20 year old developer from the Netherlands. I am passionate about beautifully written, efficient, open source software. Although new technologies can be super cool, I can also be quite critical about the disadvantages they can bring; especially on a societal or environmental level. Anyway, let's skip the small talk; what are you working on today? 👀