Restricting Access to App Engine in GCP with Cloud Identity Aware Proxy (IAP)
 Goodycyb
Introduction
Google Cloud Identity Aware Proxy (IAP) is a powerful security tool that provides secure access to applications and services deployed on Google Cloud Platform (GCP). With IAP, organizations can establish fine-grained access control and authentication policies for their web applications, enabling them to protect sensitive resources from unauthorized access. This enables administrators to easily manage user access and permissions, ensuring that only authorized individuals can access protected applications.
Lab Scenario
Google Cloud IAP enforces access controls for applications and resources. IAP can be used to implement application-level access control. With IAP, a cloud security engineer can restrict user access to an application by implementing fine-grained access control without the need for a VPN.
Disclaimer
Please note that the GCP management console is subject to change over time. While the instructions provided are accurate at the time of writing, there may be updates or modifications to the console's interface or functionality. It is advisable to refer to the official GCP documentation for the most up-to-date and accurate information regarding the GCP management console.
Lab Tasks
NB: You should have created a GCP Free Trial account before starting this lab.
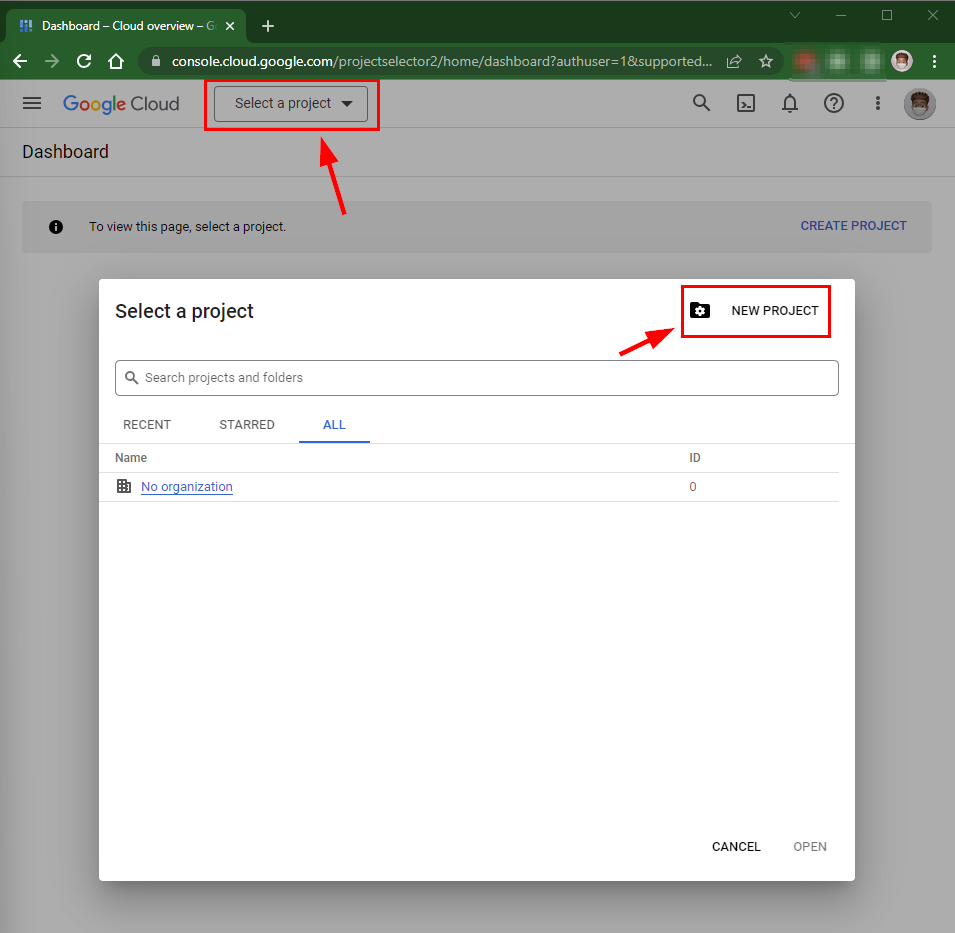
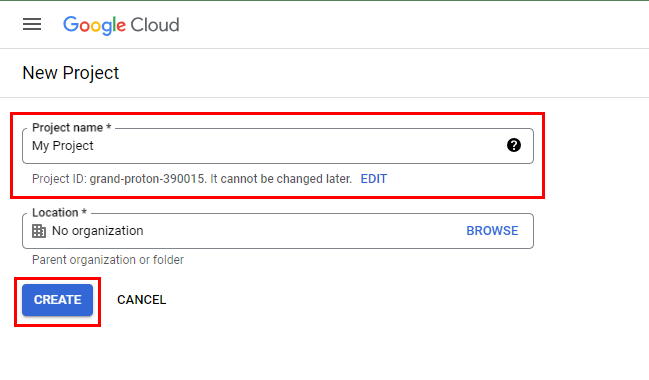
- Create a New Project if you don’t have any already created. Select New Project as shown in the image below, Give it a project Name of your choice, and then Click the Create Button.
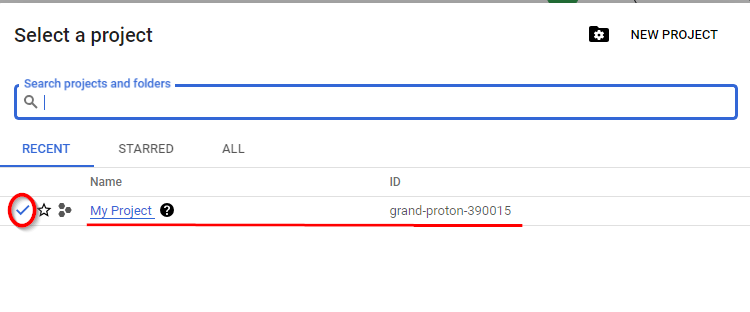
- Make sure the New project Name is Selected as the default project. shown below.

- Now, you need to deploy the App Engine application, open Cloud Shell by clicking on the Cloud Shell icon at the top right corner of the console

- At the bottom of your screen, a Cloud shell will open. Click on the icon at the top right corner of the Cloud Shell editor to open it in a new tab.


Now, to set the newly created project “My Project ” in the current Cloud Shell session, you need to get the project id. Run the command on the terminal (Cloud Shell)
gcloud projects listto list all project details.NB: A window pops up to Authorize Cloud Shell, click on Authorize.
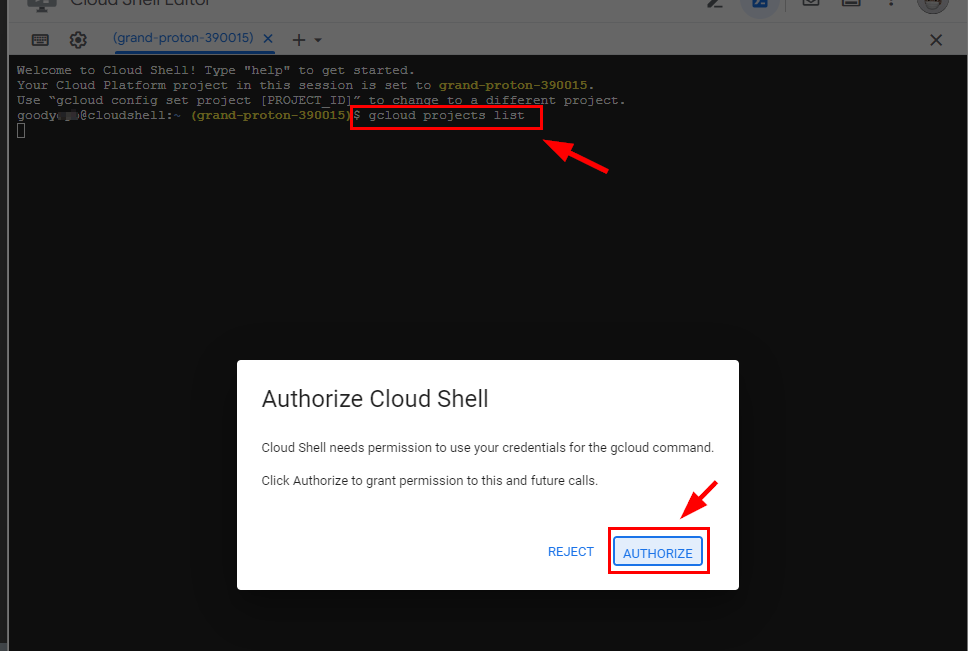

Now that you have the details of the project “My Project” with the Project ID, set the project ID using the command.
gcloud config set project [project_ID]
NOTE: The project ID, initially established during the deployment of Cloud Shell (grand-proton-390015), may not always be set. Therefore, if the project ID is not configured by default, you should follow the above steps to configure Cloud Shell with the project ID.
Deploying a Simple Application from GitHub
Now Set-up a simple application by downloading and deploying from GitHub using the command:
git clone https://github.com/GoogleCloudPlatform/python-docs-samples.git
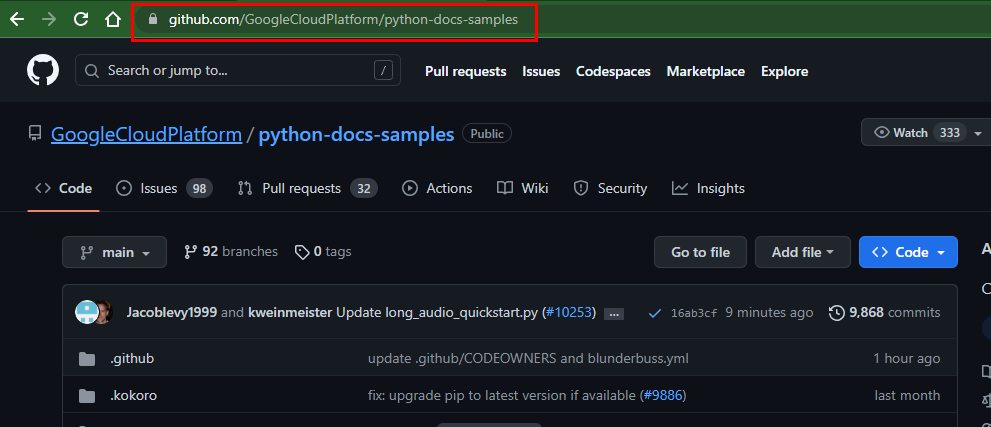

After the installation from GitHub, type the following command and press Enter to navigate to the directory containing the sample application.
cd python-docs-samples/appengine/standard/users/
NB: you will notice that the current working directory has changed to
/python-docs-samples/appengine/standard/users- Next, deploy the sample application to the App Engine standard environment using the command.
gcloud app deploy
- Next, deploy the sample application to the App Engine standard environment using the command.
Note: If you get an error saying that User Disabled. Go to App Engine -> Setting and Click on Enable Application.
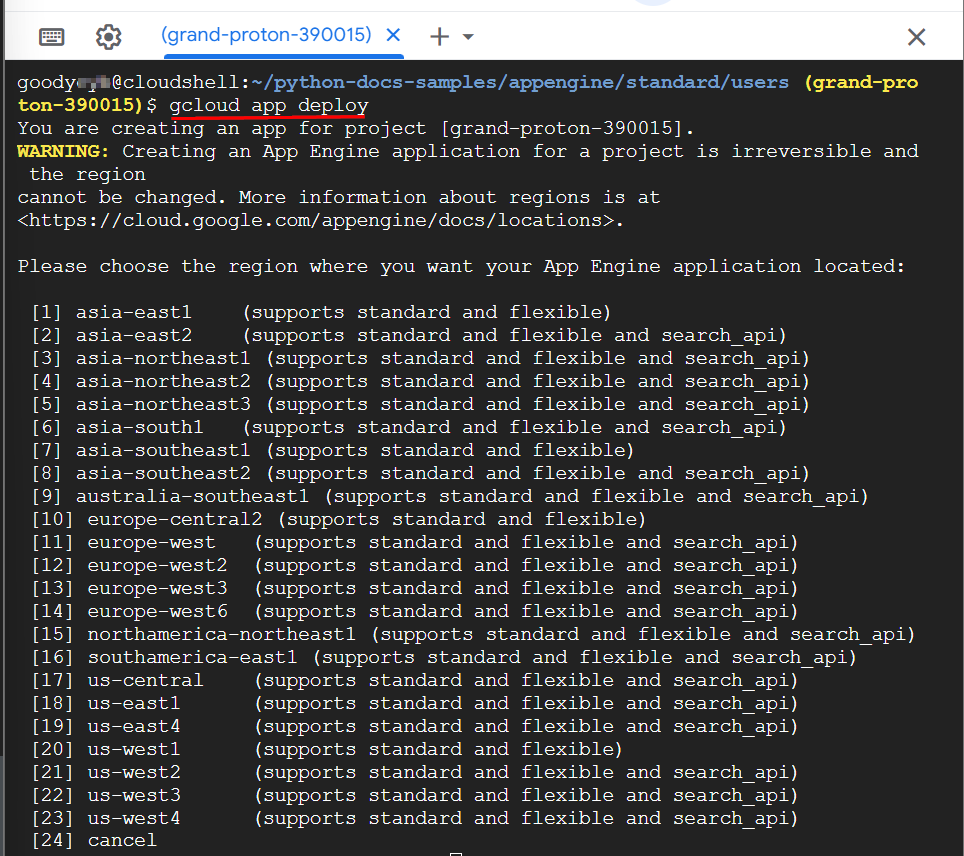
- When the command is run, it will list the locations available for deploying the application under Please choose the region where you want your App Engine application located: In Please enter your numeric choice: give the appropriate location number where you want to deploy the App and press Enter. In this lab, we have set the location to us-east1 by typing 18.
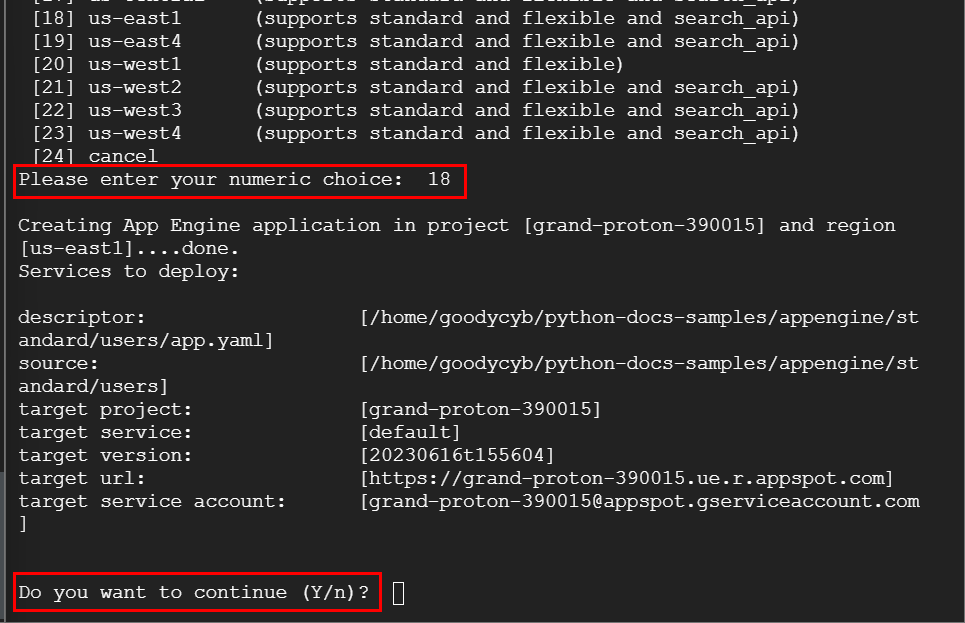
- You will be prompted, “Do you want to continue (Y/n)? Type Y and press Enter.

- Now, you will notice a URL link to the App Engine sample application generated, which means it was successfully deployed. Copy the target URL (the URL for accessing the sample application) and paste it into Notepad or a sticky note for future use.

- Now, open a new tab in the Google Chrome browser window and paste the target URL in its address bar to access the sample application. Press Enter. The sample application will open in the browser; click on Sign in.

- Click on Next to continue authentication.
Note: On this page, the Google account with which you are currently logged in to the GCP console will be automatically selected for signing in.
You will see a Welcome message with your Google account username. This way, anyone with a Google account can easily log in to the deployed sample application.

Restricting Access to App Engine (Sample App) using Identity-Aware Proxy
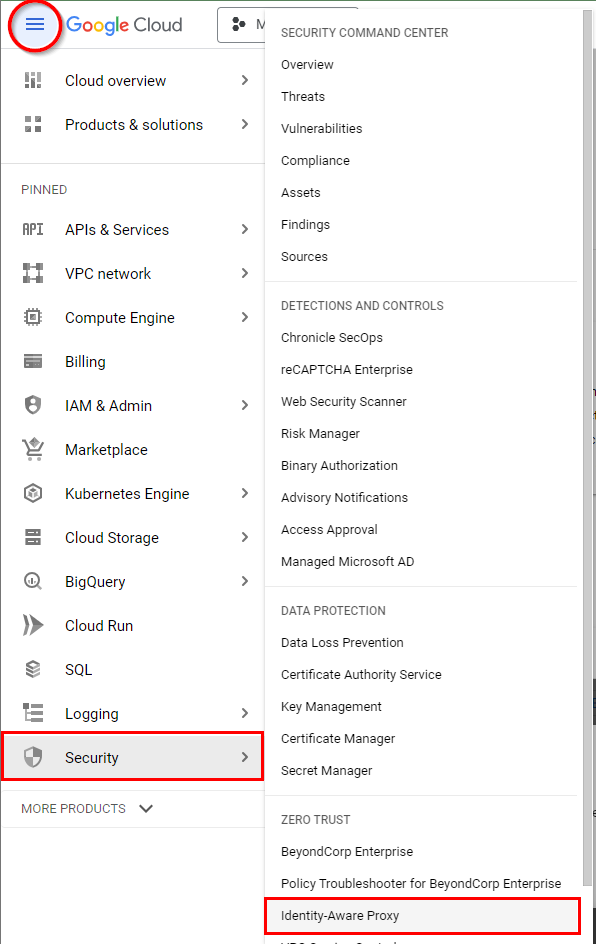
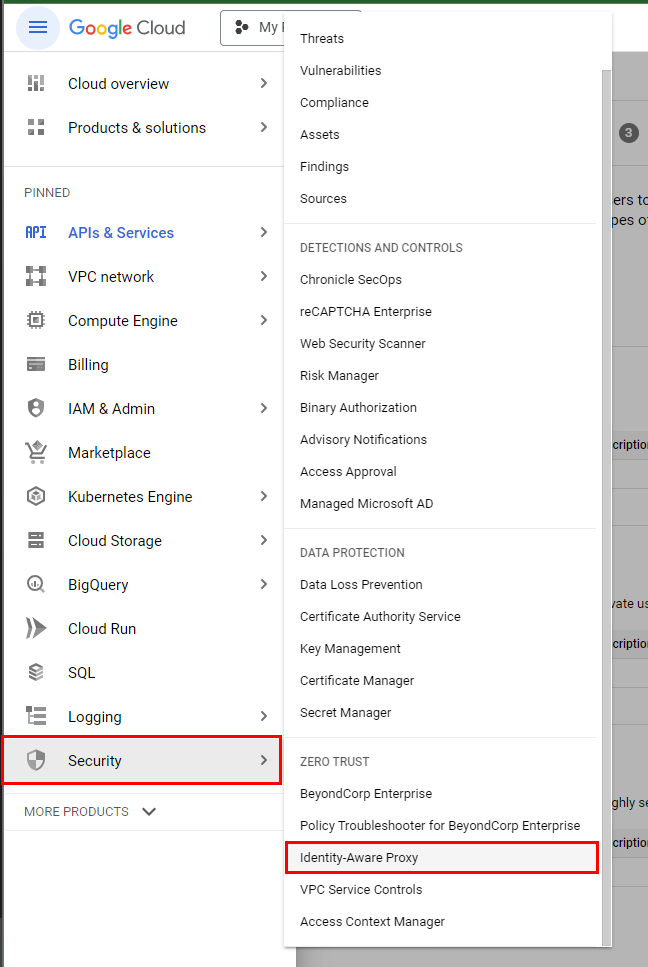
- Now, to implement Identity-Aware Proxy to restrict access to the App Engine sample application, navigate to the main GCP menu in the top left corner. Navigate to Security and select Identity-Aware Proxy from the console.
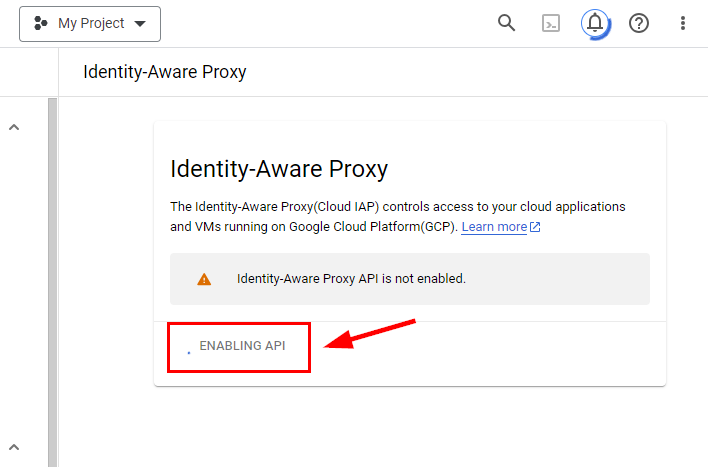
- In the Identity-Aware Proxy window that appears, click on Enable API. Wait for it to be enabled.
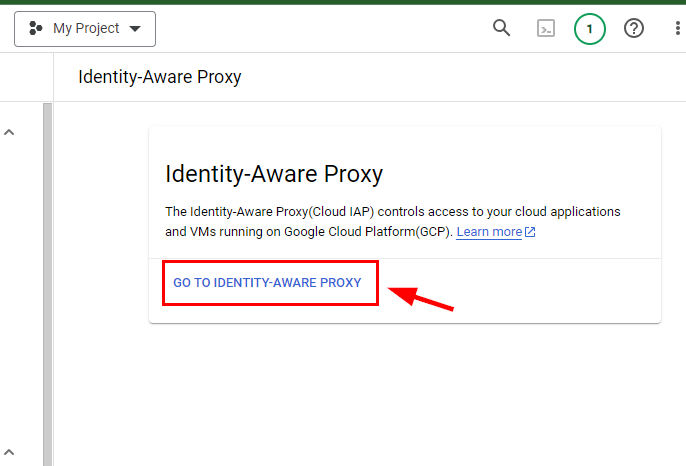
- Once IAP is enabled, click on GO TO IDENTITY-AWARE PROXY
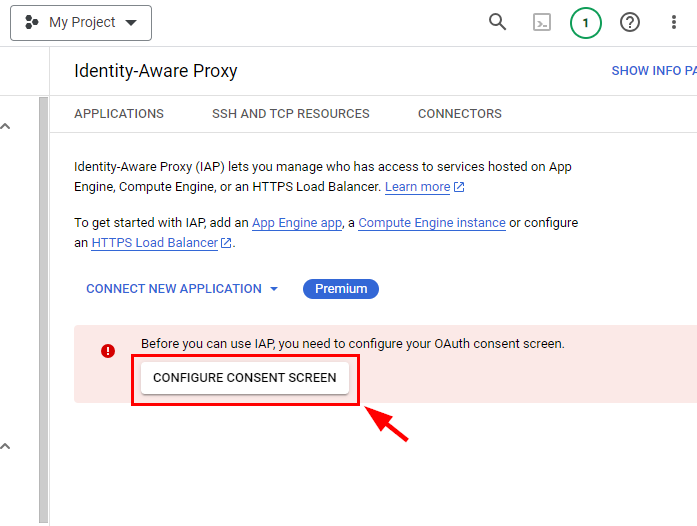
- Now, to start using IDENTITY-AWARE PROXY, you first need to configure the OAuth consent screen, which is a prompt that informs users requesting data access. Click on CONFIGURE CONSENT SCREEN to configure the OAuth consent screen.
Note: If the CONFIGURE CONSENT SCREEN button does not appear, navigate to API and Services, select the OAuth consent screen from the console, click on EDIT, and then go and enable the API for Identity-Aware Proxy as shown in the previous steps.
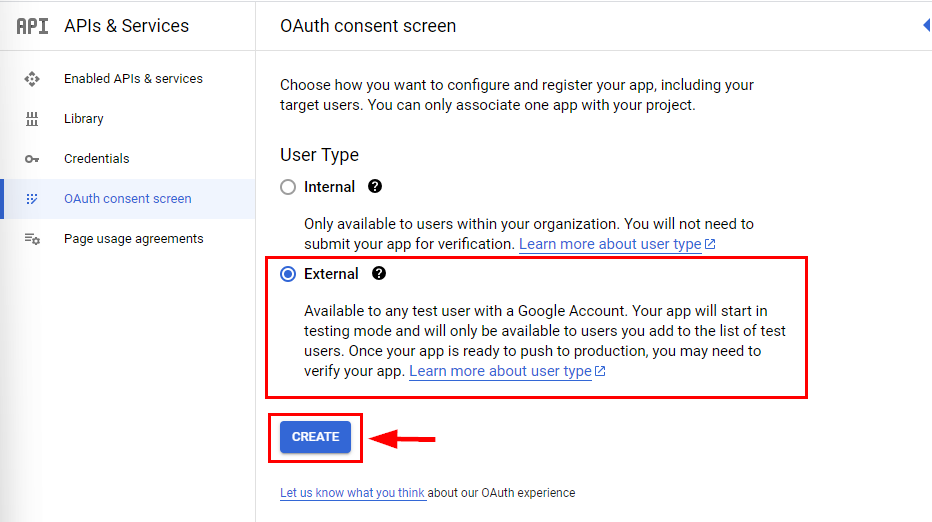
- In the OAuth consent screen page, select User Type as External to configure application access for any user with a Google account. Then, click on Create.
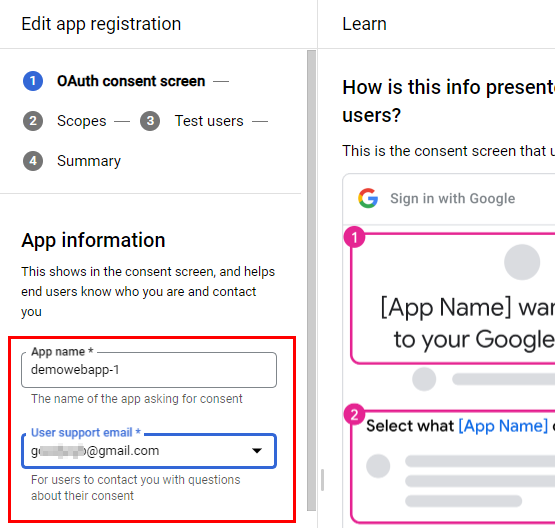
- In the Next window that opens for App information, enter demowebapp-1 in App name. In the User support email, type your GCP account Gmail id. This email ID is added for user support in case of any problems.
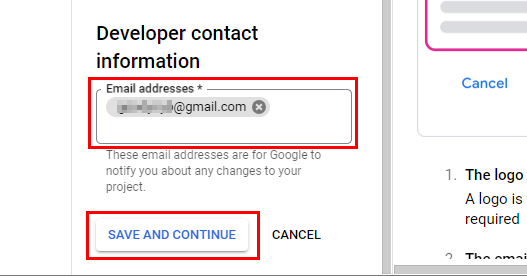
- Scroll down to the bottom. In Developer Contact Information under Email Addresses, enter your GCP account email ID. Any changes in your project will be notified by Google to this email ID. Click on Save AND Continue.
- After the OAuth consent screen is configured, click on the main menu in the top left corner, navigate to Security, and select Identity-Aware Proxy in the console.
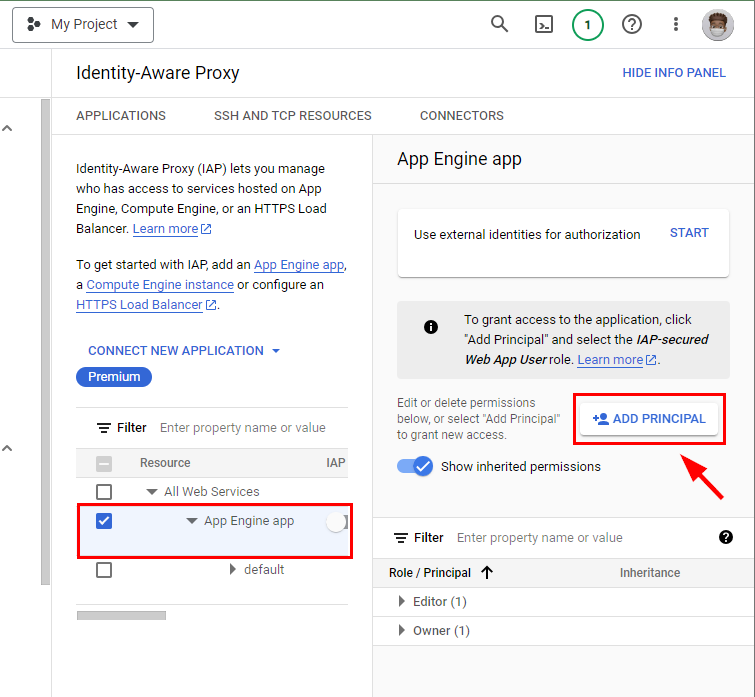
- First, select the checkbox for the App Engine app having the published URL of the sample application. To assign permissions to users, click on Add Principal to the right.
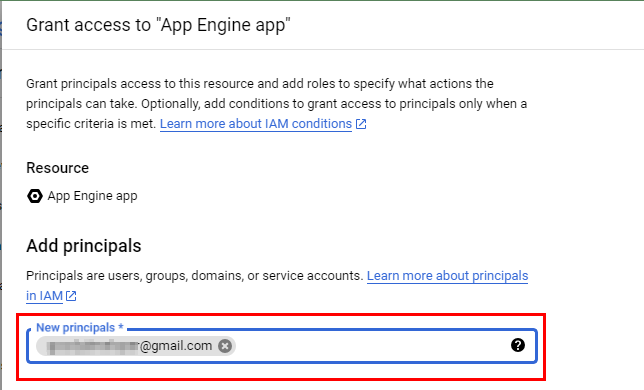
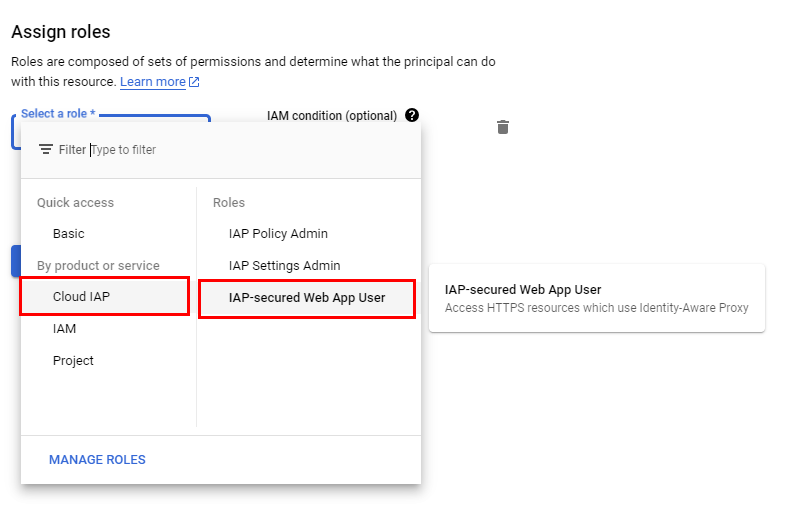
- In the Add Principals window that opens, you have to add the members to whom access should be granted. Under New Principals, add any active Gmail account. Now, to configure the Cloud IAP role of the added user, click on Select a role. Under All roles, select Cloud IAP, and then select IAP-secured Web App user.
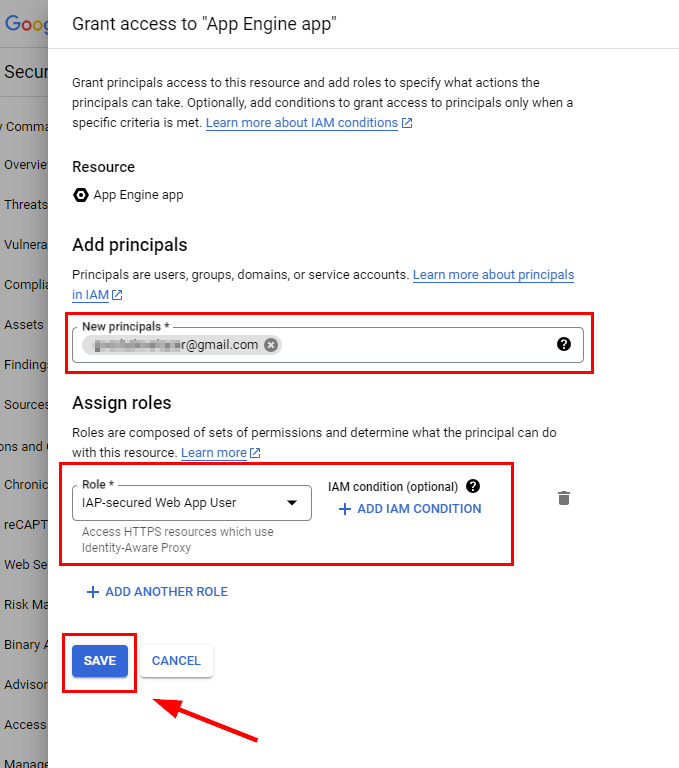
- Click SAVE to save the new member and the Cloud IAP role
- Now, turn on IAP by moving the slider under IAP for the App Engine app. A popup window appears, click on TURN ON.
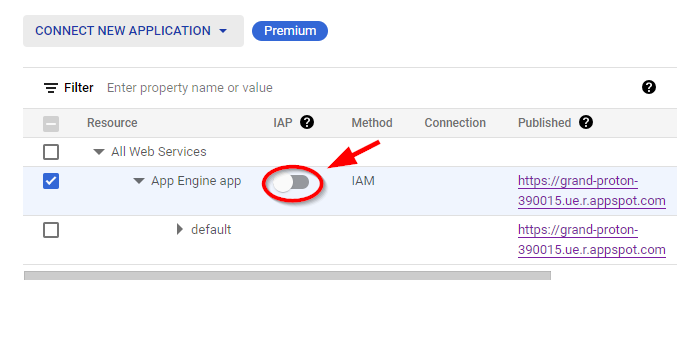
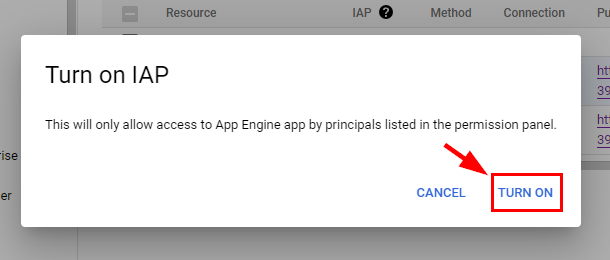
- Identity-Aware Proxy will be turned on successfully, and Status will be marked as OK. Now, to test access to the application after enabling Cloud IAP, click on the application link under the Published for App Engine app.

In the application web page that opens, click on Sign in.
Enter the Email address of the user to whom you granted access for the Cloud IAP role (done in the previous steps above) and click on Next.
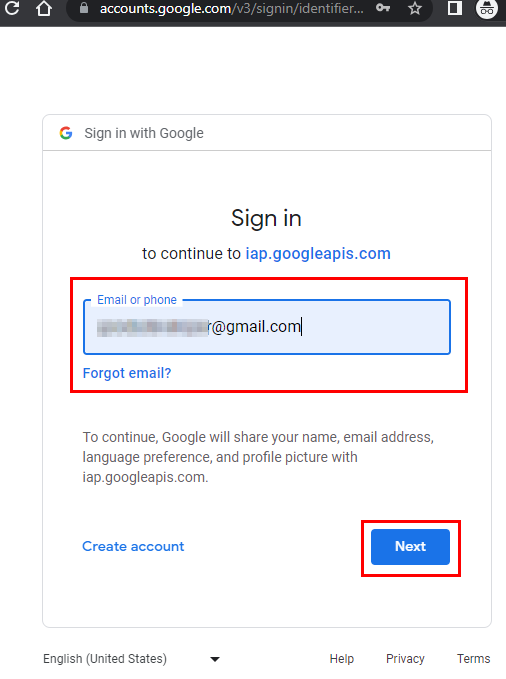
- Enter the account password and click on Next.
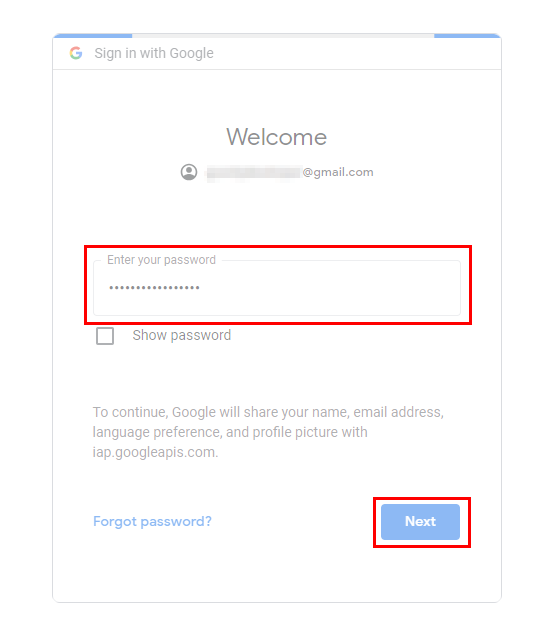
You will get a Welcome message with the username of the email address. Click sign out. Do not close the tab.
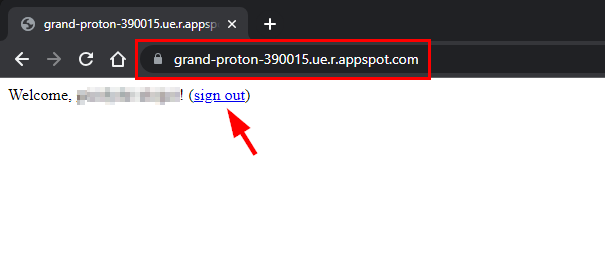
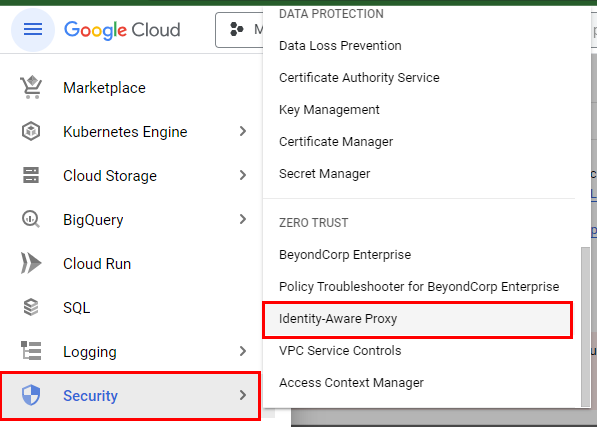
- Now, delete the role assigned to the user account and then try to access the application to confirm that Cloud IAP is enabled. To do this, navigate back to the GCP console, select Security, and then select Identity-Aware Proxy in the console.
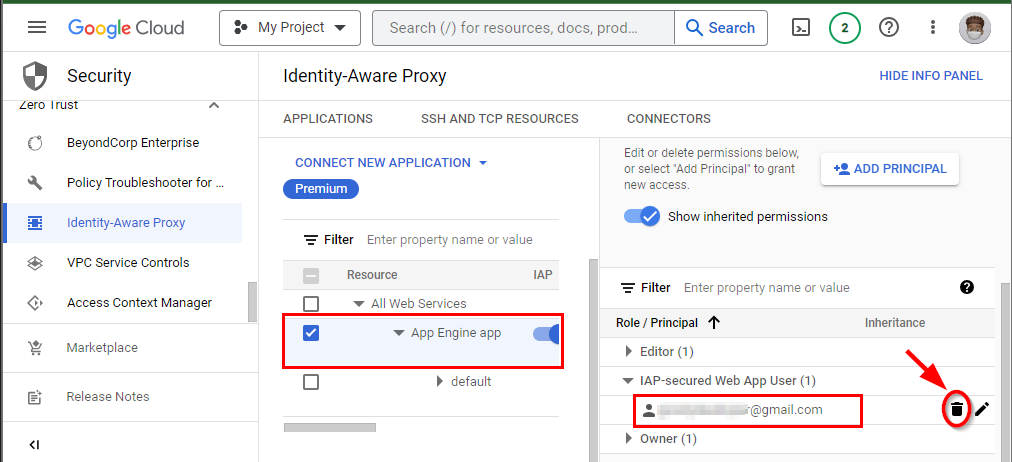
- Select the checkbox for the App Engine app. To delete the user and the IAP role, expand IAP-secured Web App User at the bottom right corner of the screen under Role/Member. Click on the delete icon on the right side of the username.
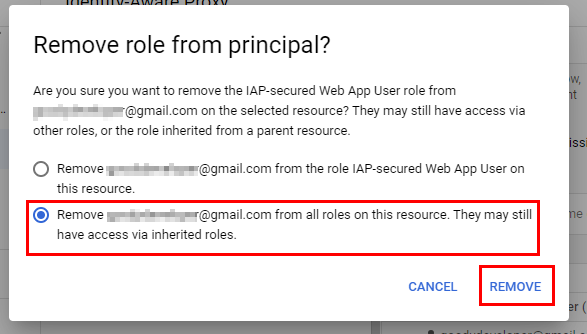
- In the Remove role from member popup that opens, select the checkbox for Remove the user account from all roles on this resource to confirm the deletion of the IAP-secured Web App User Role. Click on REMOVE.
- Now, try to authenticate to the application again. Go back to the App Engine application in the browser tab and click on Sign in.
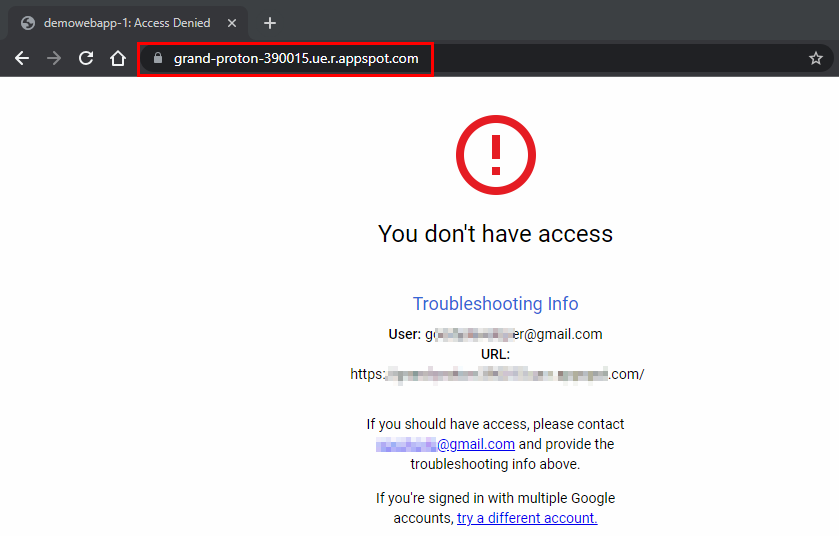
By employing Cloud IAP, a cloud security engineer can effectively limit unauthorized access to App Engine applications.
Deleting Created Resources
Please make sure to delete, shut down, or terminate all resources created and utilized in this lab to avoid incurring any charges.
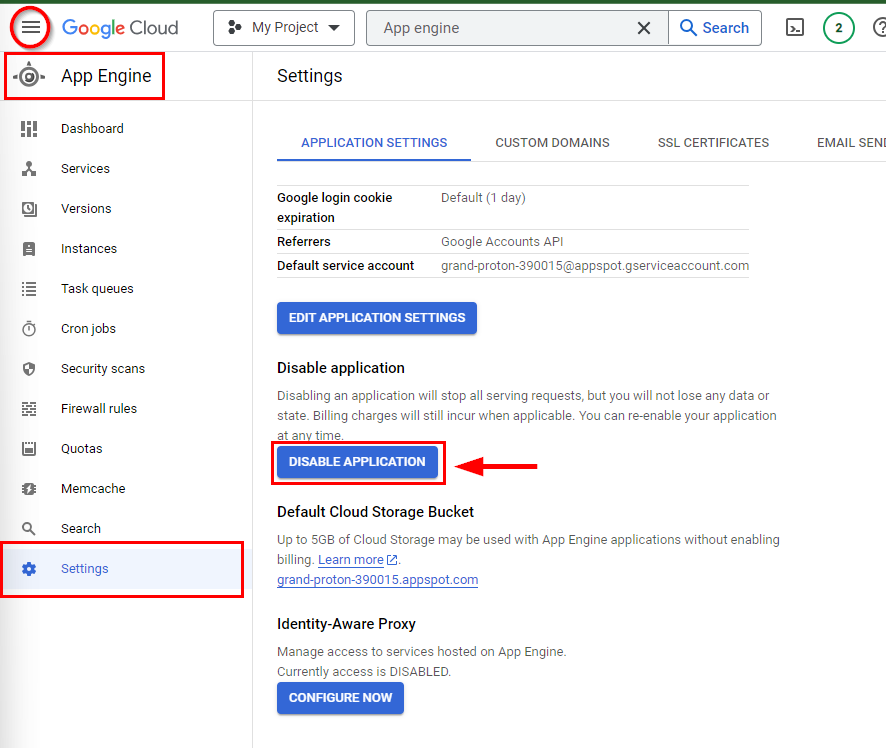
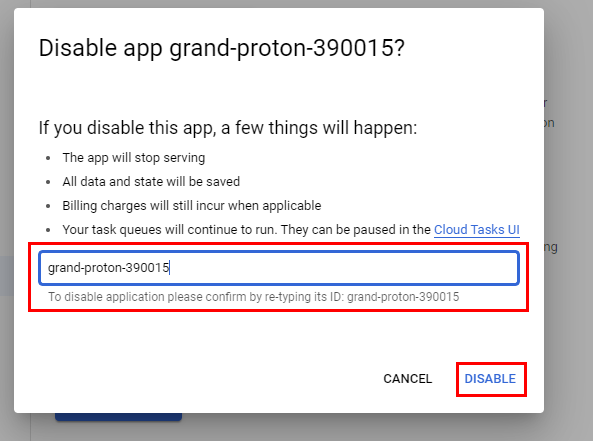
- Now, navigate to or search for App Engine and click on Settings in the left pane to disable the application you have deployed. Click on Disable application to disable the application to prevent further charges. In the pop-up window, type the application ID and click on Disable.
To delete the cloned repository and the associated folders, type the following command and press Enter.
rm -rf python-docs-samples.git
Subscribe to my newsletter
Read articles from Goodycyb directly inside your inbox. Subscribe to the newsletter, and don't miss out.
Written by

Goodycyb
Goodycyb
Hey there! 👋🏾 I'm Goody, a Cloud Threat Researcher by Day 🌞 and a Cloud Security Content Engineer by Night🌜. Join me on my journey as I explore the realm of Threat Detection in Cloud Security.