Transit Gateway: Single internet exit point from VPCs of multiple AWS accounts
 Sachin Vasle
Centralizing Outbound Internet Traffic from Multiple VPCs with AWS Transit Gateway
Many organizations have a growing number of VPCs, each with its own outbound internet traffic requirements. This can lead to a complex and fragmented network, with multiple NAT gateways and internet gateways to manage.
AWS Transit Gateway provides a solution for centralizing outbound internet traffic from multiple VPCs. With Transit Gateway, you can create a single hub VPC with multiple NAT gateways. This allows you to consolidate outbound traffic for all of your VPCs, while still maintaining VPC-to-VPC isolation.
To implement this solution, you will need to:
Create a Transit Gateway.
Attach your VPCs to the Transit Gateway.
Create a NAT gateway in the hub VPC.
Update the route tables in your spoke VPCs to route outbound traffic to the NAT gateway in the hub VPC.
Once you have implemented this solution, you will be able to centrally manage all of your outbound internet traffic. This will simplify your network management and reduce your costs.
What is hub-and-spoke topology?
A hub-and-spoke topology is a network design in which a central hub is connected to multiple spokes. The spokes are typically smaller networks that connect to the hub for resources such as internet access, routing, and security.
In a hub-and-spoke topology for multiple VPCs, the hub VPC would be responsible for routing traffic between all of the spoke VPCs. This can be done using a variety of methods, such as:
Centralized management: The hub VPC can be used to centrally manage routing, security, and other network policies. This can simplify the management of multiple VPCs and improve security.
Reduced complexity: With a hub-and-spoke topology, you only need to manage a single network connection between the hub and each spoke. This can simplify the overall network architecture and reduce the risk of errors.
Scalability: Hub-and-spoke topologies can be easily scaled by adding additional spoke VPCs. This can be done without having to make any changes to the hub VPC.
However, hub-and-spoke topologies also have some disadvantages, including:
Single point of failure: If the hub VPC fails, all of the spoke VPCs will lose connectivity. This can be a major problem for businesses that rely on their workloads to be available 24/7.
Increased latency: Traffic between spoke VPCs must pass through the hub VPC, which can add latency. This can be a problem for applications that require low latency, such as multiplayer games or financial trading systems.
Cost: Hub-and-spoke topologies can be more expensive than other network topologies, such as a full mesh topology. This is because you need to pay for the resources in the hub VPC, even if you are not using them all.
The best way to decide whether a hub-and-spoke topology is right for you depends on your specific needs and requirements. If you need a centralized network management solution and you are concerned about scalability, then a hub-and-spoke topology may be a good choice. However, if you are concerned about single points of failure or latency, then you may want to consider a different network topology.
Prefer hub-and-spoke topologies over many-to-many mesh
If more than two network address spaces (for example, multiple VPCs and on-premises networks) are connected via VPC peering, AWS Direct Connect, or VPN, then use a hub-and-spoke model, like that provided by AWS Transit Gateway.
If you have only two such networks, you can simply connect them to each other, but as the number of networks grows, the complexity of such meshed connections becomes untenable. AWS Transit Gateway provides an easy-to-maintain hub-and-spoke model, allowing the routing of traffic across your multiple networks.
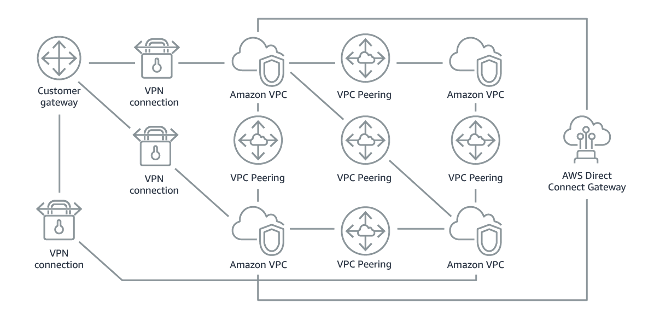
Figure 1: Without AWS Transit Gateway: You need to peer each Amazon VPC to each other and to each onsite location using a VPN connection, which can become complex as it scales.

Figure 2: With AWS Transit Gateway: You simply connect each Amazon VPC or VPN to the AWS Transit Gateway and it routes traffic to and from each VPC or VPN.
Common anti-patterns:
Using VPC peering to connect more than two VPCs.
Establishing multiple BGP sessions for each VPC to establish connectivity that spans Virtual Private Clouds (VPCs) spread across multiple AWS Regions.
Benefits of establishing this best practice: As the number of networks grows, the complexity of such meshed connections becomes untenable. AWS Transit Gateway provides an easy-to-maintain hub-and-spoke model, allowing the routing of traffic among your multiple networks.
Deploying the example :
In this section, we demonstrate how to deploy AWS Transit Gateway and three VPCs in three different AWS SSO account(AdminAWS, staging-env, prod-env) with non-overlapping IP space in a single Region and attach & share the transit gateway using AWS Resourece Access Manager to these 2 (staging-env, prod-env) . Within the hub VPC, we show you how to deploy NAT gateways (one in each Availability Zone) and an internet gateway. Finally, we demonstrate how to configure the route tables in all the VPCs and use test instance in the spoke VPC to verify outbound internet connectivity.
Creating and configuring the VPCs
To implement this example, i have created 3 SSO account in the AWS organization:
AdminAWS: this is the main account, which will have the hub vpc(consist of Internet Gateway & NAT Gateway)
Staging-env & prod-env: this accounts are having staging and production environment, which is consist of spoke vpc(without IGW & NAT Gateway)

First, we show you how to deploy the essential components of this design, including the VPCs, subnets, an internet gateway, NAT gateway and route tables. The following instructions deploy this example in the N. Virginia (us-east-1) Region. However, you can deploy this procedure in any Region by adjusting the Region and AZ parameters.
First login to the AdminAWS accont, and create the VPC names as "Main-vpc" Provide values for vpc, as shown in the following table
VPC name tag | IPv4 CIDR | IPv6 CIDR | Tenancy |
Main-vpc | 192.168.0.0/16 | No IPv6 CIDR Block | Default |
Create the subnets in the Main-vpc as described in the following table :
Subnet name tag | VPC | AZ | IPv4 CIDR |
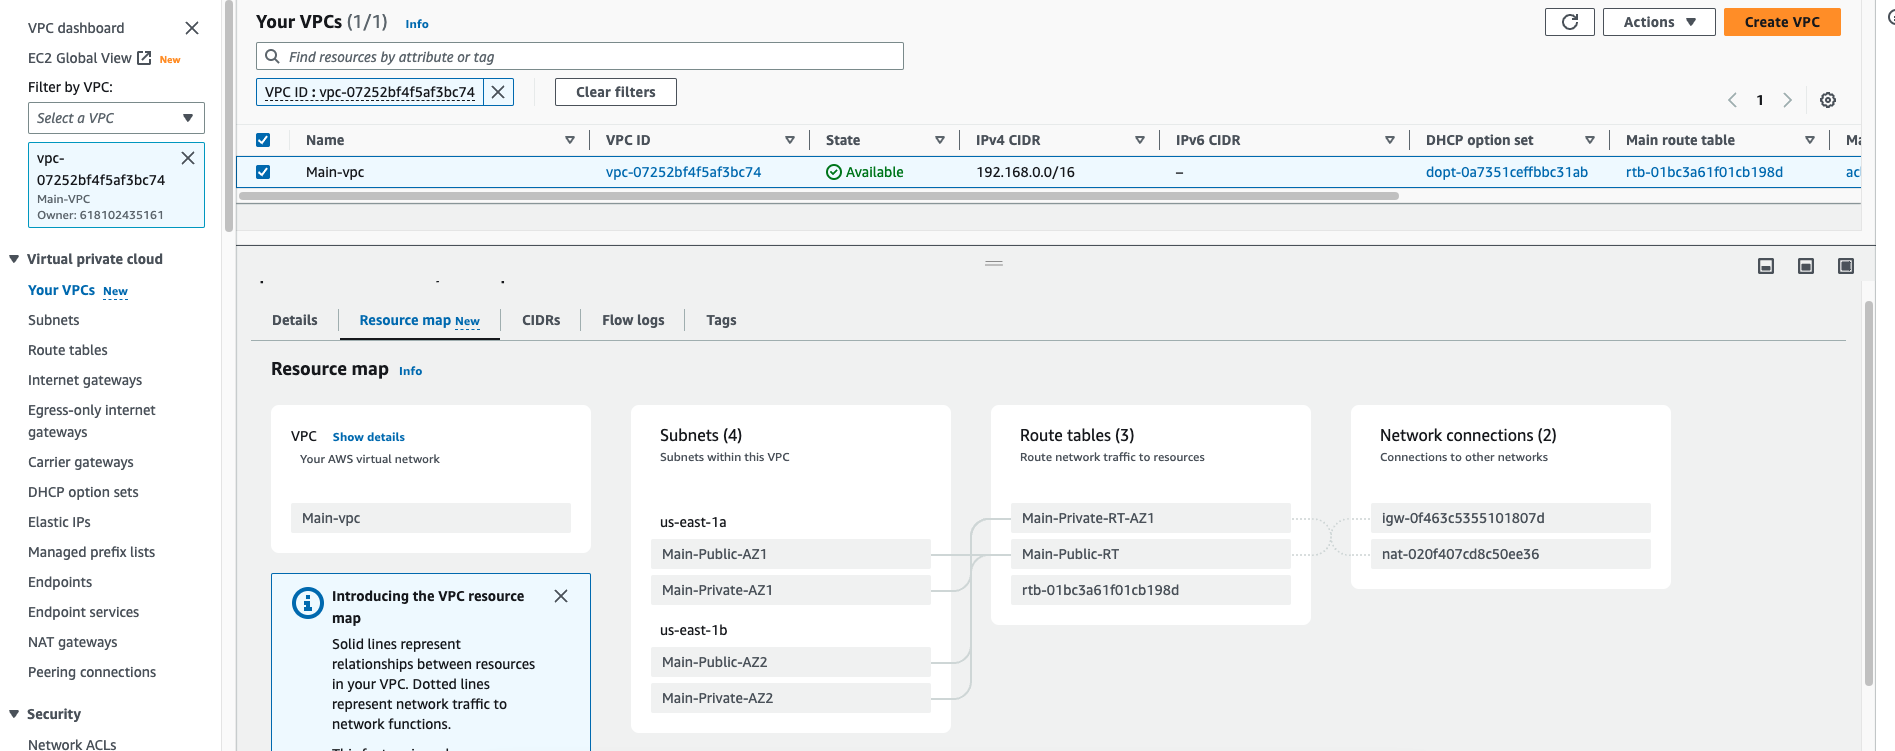
Main-Public-AZ1 | Main-vpc | us-east-1a | 192.168.1.0/24 |
Main-Public-AZ2 | Main-vpc | us-east-1b | 192.168.2.0/24 |
Main-Private-AZ1 | Main-vpc | us-east-1a | 192.168.3.0/24 |
Main-Private-AZ2 | Main-vpc | us-east-1b | 192.168.4.0/24 |
The rousource-map of the Main-vpc should look like below snap
Create and attach an internet gateway to the VPC Main-vpc. Use IGW as the Name tag for this internet gateway.
Create a NAT gateway in the VPC Main-vpc
For Subnet, enter Egress-Public-AZ1.
For Elastic IP Allocation ID, choose Create new EIP.
Create two new route tables in Main-vpc. For Name tags, use Main-Public-RT and Main-Private-RT.
Add a new default route in the route table Main-Public-RT, with the destination set to 0.0.0.0/0. Associate the route with the internet gateway IGW.
Add a new default route in the route table Main-Private-RT, with the destination 0.0.0.0/0. Associate the route with the NAT gateway
in AdminAWS account we have creted a VPC which is having IGW & NAT Gateway, so it will work as Hub vpc for us.
Now it's time to create spoke vpc's on 2 different account.
Login to the staging-env AWS sso account, and create the staging-vpc, provide values for vpc and subnets, as shown in the following table
VPC name tag | IPv4 CIDR | IPv6 CIDR | Tenancy |
staging-vpc | 10.0.0.0/16 | No IPv6 CIDR Block | Default |
Subnet name tag | VPC | AZ | IPv4 CIDR |
stage-Private-AZ1 | stage-vpc | us-east-1a | 10.0.1.0/24 |
stage-Private-AZ2 | stage-vpc | us-east-1b | 10.0.2.0/24 |

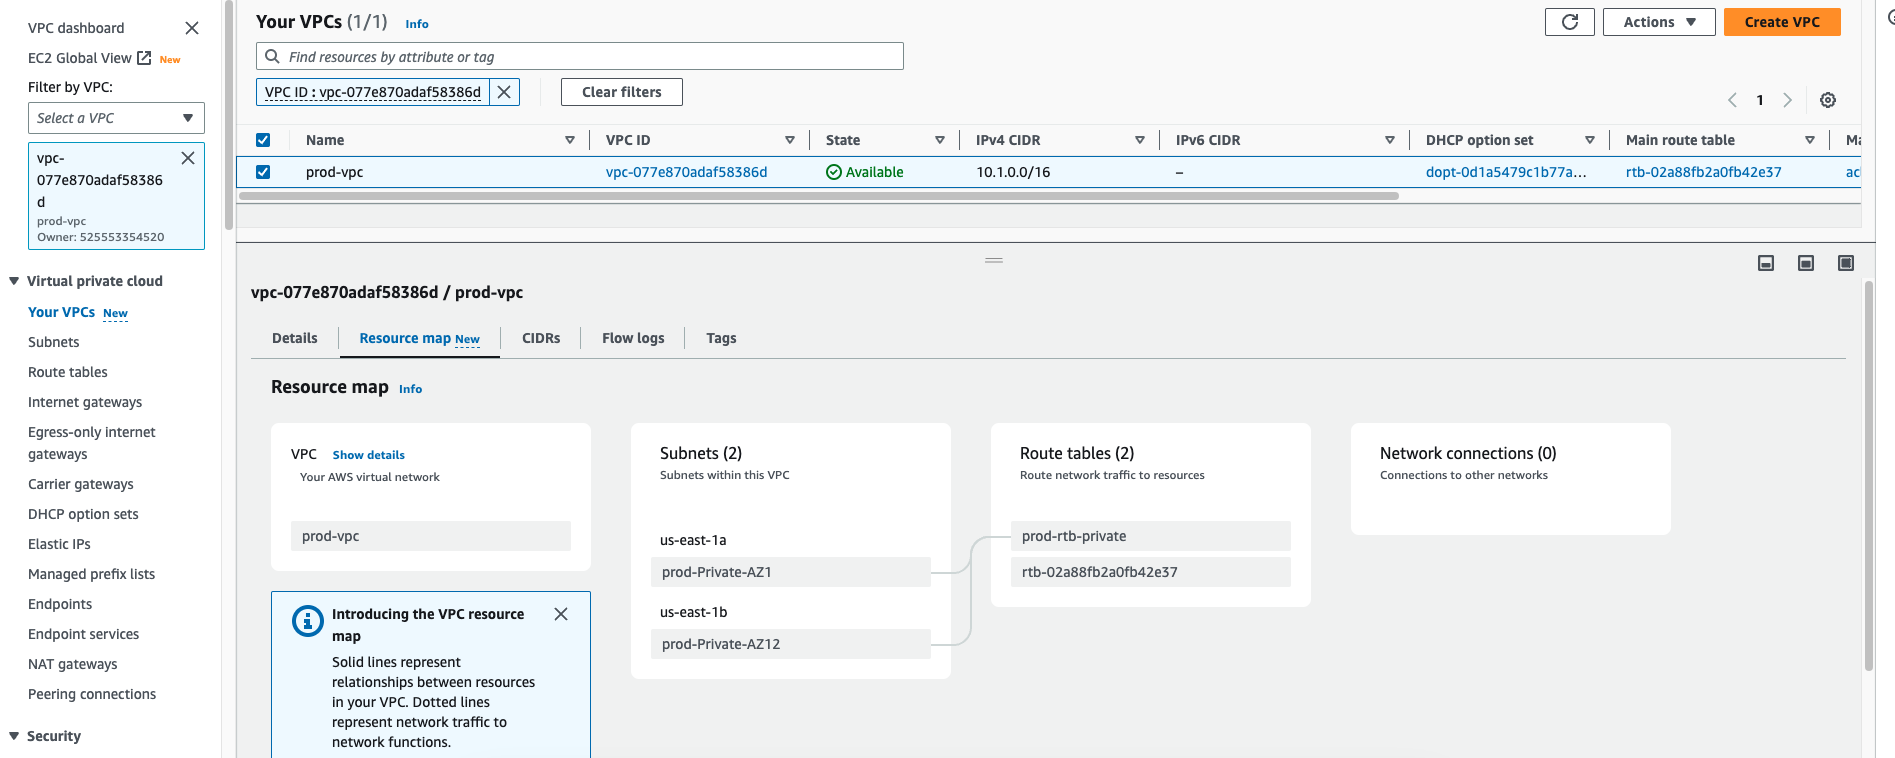
Now repeat the same step for the prod-env account, provide values for vpc and subnets as shown in the following table
VPC name tag | IPv4 CIDR | IPv6 CIDR | Tenancy |
prod-vpc | 10.1.0.0/16 | No IPv6 CIDR Block | Default |
Subnet name tag | VPC | AZ | IPv4 CIDR |
prod-Private-AZ1 | prod-vpc | us-east-1a | 10.1.1.0/24 |
prod-Private-AZ2 | prod-vpc | us-east-1b | 10.1.2.0/24 |
Deploying and configuring the transit gateway:
Next, we show you how to deploy & share a new transit gateway to 2 account(staging-env and prod-env) and attach it to all the VPCs , routing traffic to the internet through the NAT gateway. You accomplish this by connecting the transit gateway to all the VPCs:
In the VPC console(in AdminAWS account), choose AWS Transit Gateway and create a new transit gateway. Use the name TGW-Internet, add a suitable description, and make sure to uncheck Default route table propagation and Default route table association.

AWS RAM – Resource Access Manager:
As we have creted the Transit Gateway in the AdminAWS account, we need to use the same TGW in the other two accounts(staging-env and prod-env), to accomplish it we need to share the TGW for that we will use the AWS RAM.
AWS RAM service that allows you to simply and securely share AWS resources with any AWS account or, if you are a member of AWS Organization, with Organizational Units (OUs) or your entire organization. If you share resources with accounts outside of your Organization, those accounts will receive an invitation to the Resource Share and can begin using the shared resources after they accept the invitation.
Only the master account has the ability to share with AWS Organizations.
All functionalities must be enabled for the organisation.
Create a resource share
To share a transit gateway with RAM, you will need to:
Go to the RAM console in the AWS Management Console.
Click on the Create resource share button.
In the Name field, enter a name for the resource share.
In the Resource type field, select Transit Gateways.
In the Resources field, select the transit gateway that you want to share.
In the Principals field, enter the AWS account IDs of the accounts that you want to share the transit gateway with.
Click on the Create resource share button.
Once you have created the resource share, the other accounts will be able to see the transit gateway in the RAM console. They will also be able to attach the transit gateway to their VPCs.
- Specify the resource name and select the resource, then click on next

- Associate the Permission, for this i have used the default permissions.

- Grant access to principals with whom you want to share the resources, here i have specified the other 2 account ID(staging-env & prod-env) and created the RAM.

TGW got shared from RAM service, now you need to accept the invitation of shared TGW from staging-env and prod-env, login to both account one by one and accept the request from RAM console.

Now, as you have accepted the request of shared TGW, it should be visible in both account's VPC Console, as you can see below TGW from staging-env account, same should appear in the prod-account as well.

Next, you need to login in staging-env and prod-env account attach this shared TGW with the staging-vpc in staging-env account and prod-vpc in prod-env account one by one.
AWS Transit Gateway ID | Attachment type | Attachment name tag | Subnet IDs |
TGW-Internet | VPC | stage-Attach | stage-Private-AZ1 |
TGW-Internet | VPC | prod-Attach | prod-Private-AZ1 |
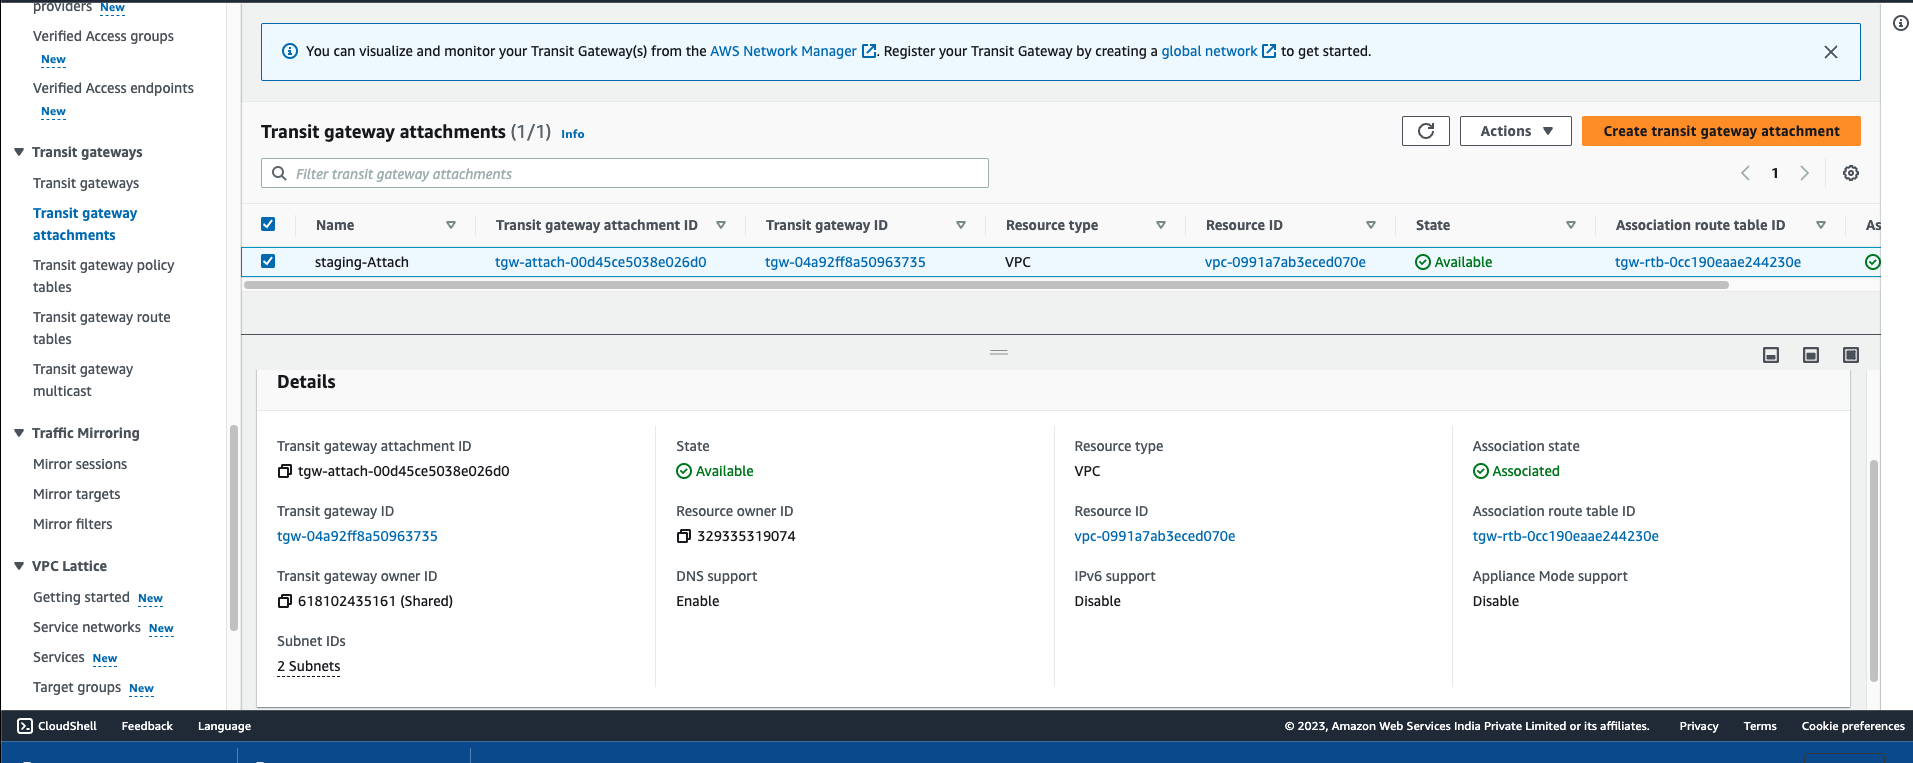
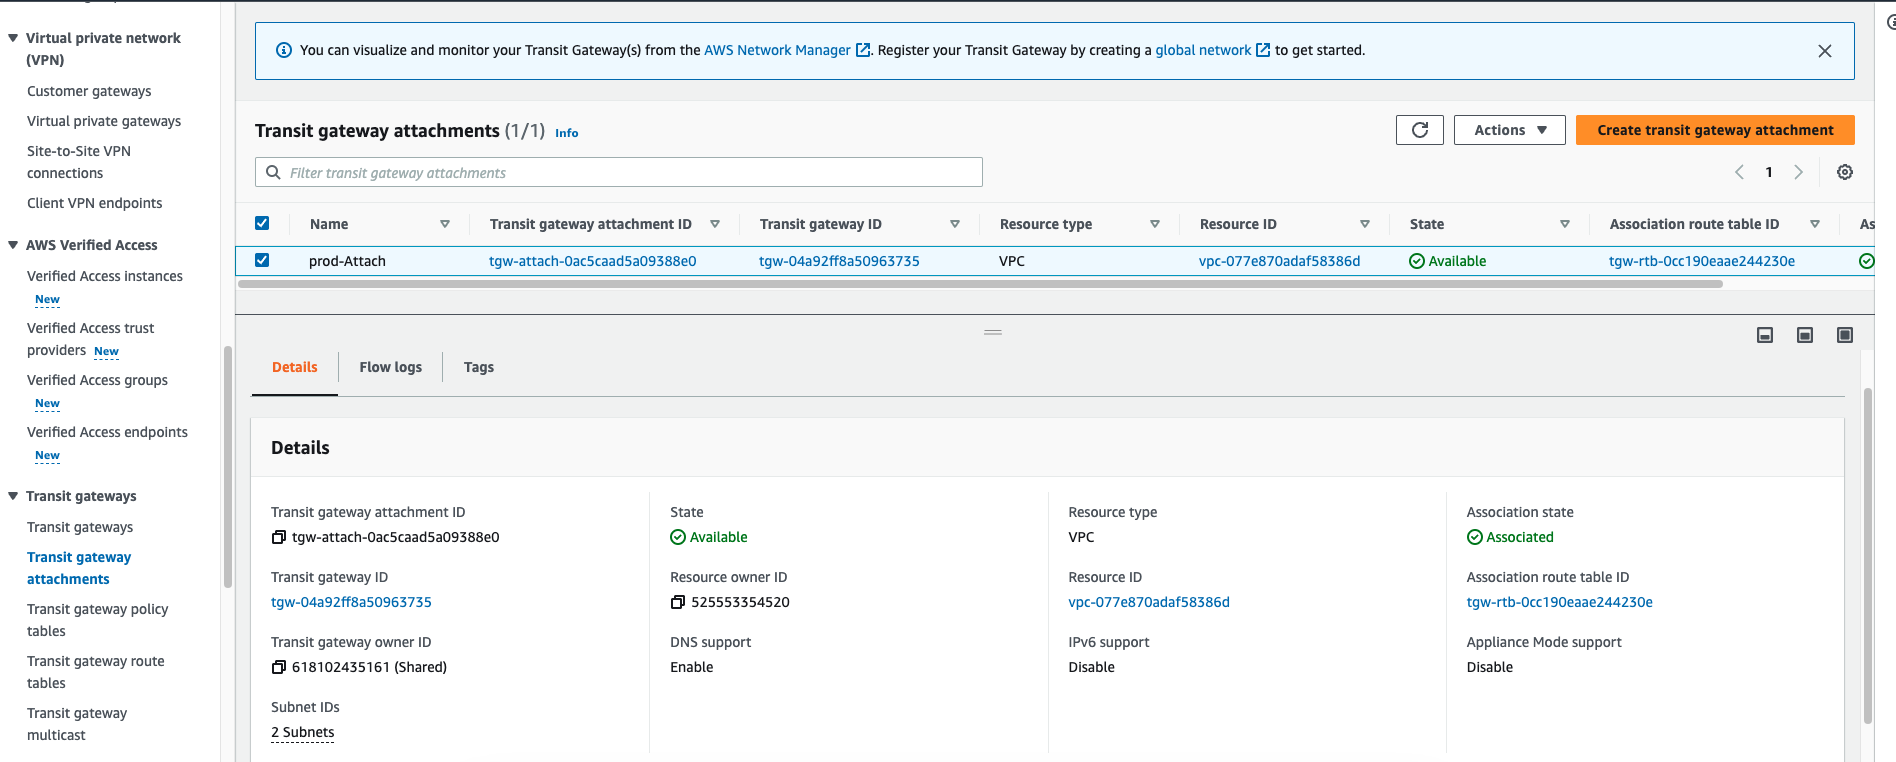
Next Login to the AdminAWS account and Repeat the same step for this account as well, attach the TGW with the Main-vpc, and tag attachment as "Main-Attach"
AWS Transit Gateway ID | Attachment type | Attachment name tag | Subnet IDs |
TGW-Internet | VPC | Main-Attach | Main-Private-AZ1 |
Now as we have already attach the TGW with all the 3 vpc in our 3 different account, we need to configure the routing, if we want to enable the communication between this 3 vpc
- Choose AWS Transit Gateway Route tables and create two route tables. Name the route tables Main-RouteTable and stage-prod-RouteTable and associate both route tables with the TGW-Internet transit gateway.

Under AWS Transit Gateway route tables, choose Main-RouteTable, Associations, Create association. Associate Main-Attach to this route table.

On the same route table, choose Routes, choose Create route, and enter 10.0.0.0/16 with the attachment stage-Attach. Then enter a second route for 10.1.0.0/16 with the attachment prod-Attach.

Under AWS Transit Gateway route tables, choose stage-prod-RouteTable, Associations, Create association. Associate both stage-Attachment and prod-Attachment to this route table.


On the same route table, choose Routes, Create route, enter the 0.0.0.0/0 route, and choose the attachment: Egress-VPC. Add these additional routes: 192.168.0.0/16, 172.16.0.0/12 and 10.0.0.0/8 as Blackhole to make sure VPCs can’t communicate with each other through the NAT gateway.

Next, login to the stage-env account, navigate to the VPC console, select stage-vpc, choose Route Tables and edit the staging-rtb-private associated with stage-VPC, adding a 0.0.0.0/0 route and set TGW-Internet as the target.


Repeat the same step for prod account as well, login to the prod-env account, navigate to the VPC console, select prod-vpc, choose Route Tables and edit the prod-rtb-private associated with prod-VPC, adding a 0.0.0.0/0 route and set TGW-Internet as the target.

Launch test instances:
To test this setup, launch three EC2 instances. Launch the first in a public subnet in the Main-vpc of AdminAWS account as the bastion host. Launch the remaining two instances in stage-VPC of stage-env account and prod-vpc of prod-env account
Launch an EC2 Instance(tag: main-ec2) in the main-VPC with the following configuration:
AMI: Amazon Linux 2 AMI (HVM)
Instance Type: t2.large
Network: Main-vpc
Subnet: Main-vpc-AZ1
Auto Assign Public IP: Enabled
Tags: Add a tag with Key: Name and Value: Bastion
Security Group: Create a new security group to allow SSH traffic from your Public IP address (you can find your current IP address by browsing to www.myipaddress.com)
Launch two EC2 instances, one(tag: stage-ec2) in stage-env account and second (prod-ec2)prod-vpc of prod-env account with the following configuration:
AMI: Amazon Linux 2 AMI (HVM)
Instance Type: t2.large
Network: stage-vpc
Subnet: stage-Private-AZ1
Auto Assign Public IP: Disabled
Tags: Add a tag with Key: Name and Value: App1VM
Inbound Security Group: Create a new security group to allow SSH & All ICMP – IPV4 traffic from 10.0.0.0/16, 10.1.0.0/16 & 192.168.0.0/16.
AMI: Amazon Linux 2 AMI (HVM)
Instance Type: t2.large
Network: prod-vpc
Subnet: prod-Private-AZ1
Auto Assign Public IP: Disabled
Tags: Add a tag with Key: Name and Value: App2VM
Inbound Security Group: Create a new security group to allow SSH & All ICMP – IPV4 traffic
Testing the deployment :
Log in to the bastion host instance using SSH. Then use SSH to connect to stage-ec2. To verify that AWS Transit Gateway routes traffic correctly to the NAT gateway in the Main-vpc, use curl to connect to several websites, below is the process to test it :
In the EC2 console, identify the public IP address or public DNS name of the bastion host you launched in the previous step.
as we have launched the "stage-ec2" ec2 instance in stage-env, and we are going to test the internet connection in that "stage-ec2" EC2 instance, we will need to copy the ssh-key in the main-ec2, as we are going to ssh from main-ec2 to stage-ec2.

Use SSH to connect to the bastion host:

Again use the SSH to connect with the "stage-ec2" of staging-env :

Now we are logged into the "stage-ec2" instance, and this instane is configured in the spoke vpc which is not having IGW and NAT Gateway for internet, but we have added the TGW routing for internet for this, so this instance should be able to communicate with the internet, lets check it out......

So i tried to run the following command, which has given me the expected result, which means internet is working in this instance, you can perform the same in the "prod-ec2" of prod-env account, it will give the same result
curl http://www.google.com
Cost implications
In most cases, a centralized NAT gateway provides a better return on your investment than multiple gateways. Even considering the NAT gateway expense and the data transfer cost per GB, the process should reduce your per-hour charges for multiple NAT gateways and simplify solution management.
If you already use NAT gateways, the amount of data processed by the NAT gateway remains constant, whether it is channeled through a single NAT gateway or multiple NAT gateways.
The following items affect the cost of this solution:
Transit gateway attachment (per hour)
Transit gateway data processing (per GB)
NAT gateway (per hour)
NAT gateway data processing (per GB)
Refer to our AWS Transit Gateway pricing page and NAT gateway pricing page for more information.
Conclusion
In this post, we showed you how to use AWS Transit Gateway to build this centralized exit point to the internet. By consolidating your outbound traffic, you can manage outbound communications security, scaling, and configuration in one place. If you run more substantial numbers of VPCs, we believe that this centralization can save you work, money, and stress. However, while this design reduces the number of NAT gateways and internet gateways you have to manage, bear in mind that it also requires you to deploy and manage transit gateways at scale.
References:
Subscribe to my newsletter
Read articles from Sachin Vasle directly inside your inbox. Subscribe to the newsletter, and don't miss out.
Written by
