CEHv12 Cloud Penetration Testing On AWS S3 Buckets Part-I
 Goodycyb
INTRODUCTION
Amazon S3 allows AWS customers to upload and retrieve data anytime, from anywhere on the web. Amazon S3 uses buckets to store objects. An object refers to any type of file, such as a text file, a video, or a photo. While adding files to Amazon S3, customers have the option to include their metadata and set permissions to control access to them. Customers can control access to each bucket (for example, who can list, create, and delete objects in a bucket), choose the geographical region where the bucket will be stored, and view the access logs for a bucket and its objects. Cloud security engineers can provide groups of users with read/write access to S3 buckets or objects within them. By default, public access to S3 buckets is blocked. If a cloud security engineer accidentally configures a bucket for public read and write access, it becomes vulnerable, and anyone with the bucket name can access the data and perform malicious activities.
LAB OBJECTIVE
The objective of this lab is to utilize penetration testing techniques to identify misconfigured S3 buckets in AWS and uncover potential vulnerabilities.
Please note that to complete this lab, you will require a registered AWS account, such as an IAM User account with administrative privileges.
Disclaimer
Please note that the AWS management console is subject to change over time. While the instructions provided are accurate at the time of writing, there may be updates or modifications to the console's interface or functionality. It is advisable to refer to the official AWS documentation for the most up-to-date and accurate information regarding the AWS management console.
Creating a secure S3 bucket
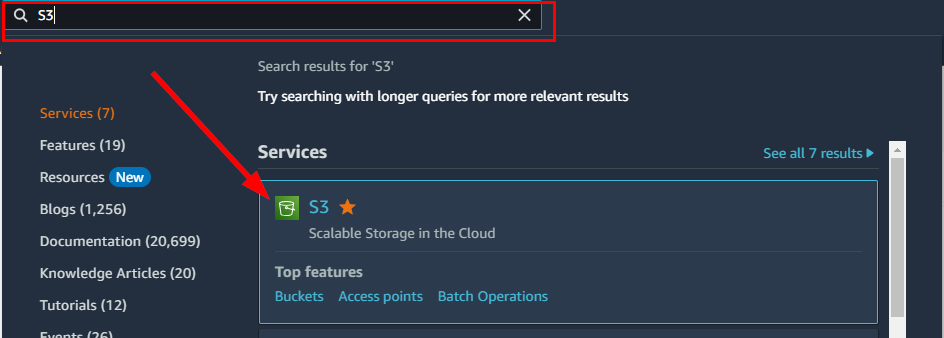
- Sign in to your AWS Management Console. Search for S3 under Services from the search box
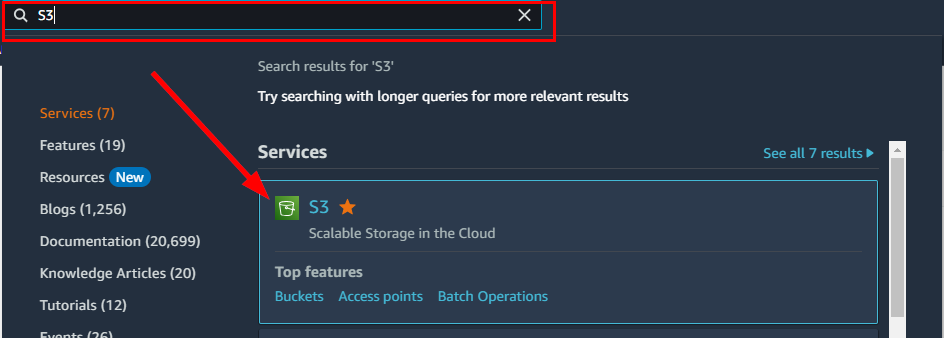
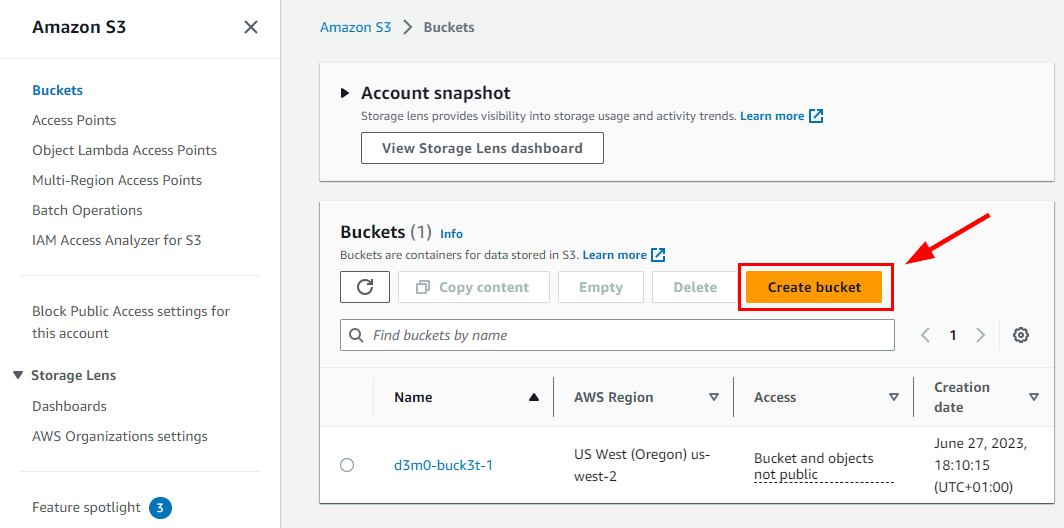
- on the Amazon S3 page. Navigate to the right corner of the Buckets pane and select "Create Bucket.”
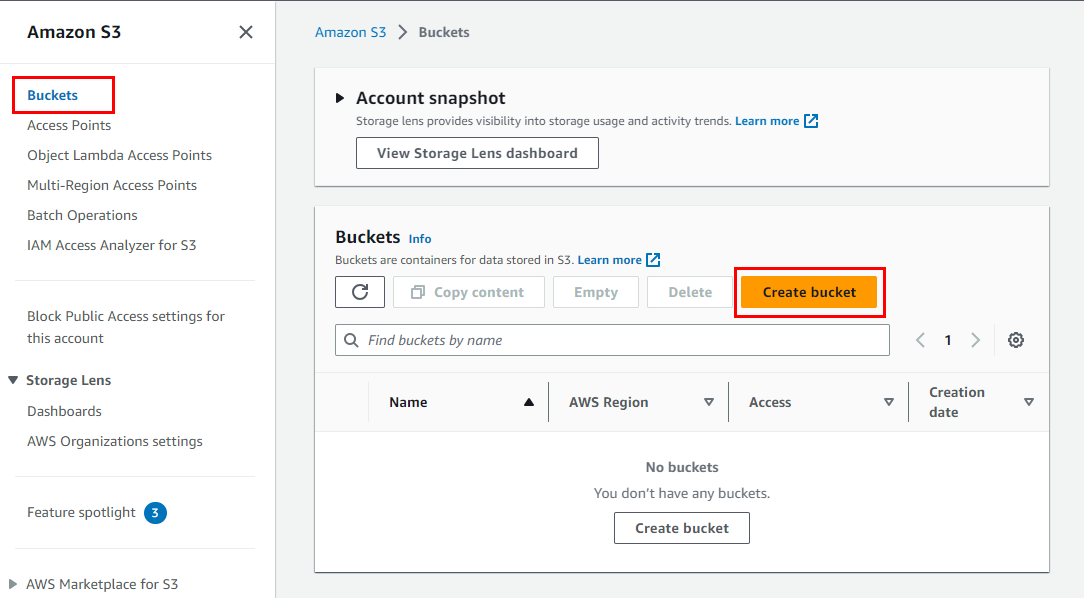
Within the Create bucket page, provide a suitable name and AWS region for the bucket in the General Configuration section. For this particular lab, the following General configuration details are recommended:
Bucket name: d3m0-buck3t-1
AWS Region: us-west-2 (Oregon)
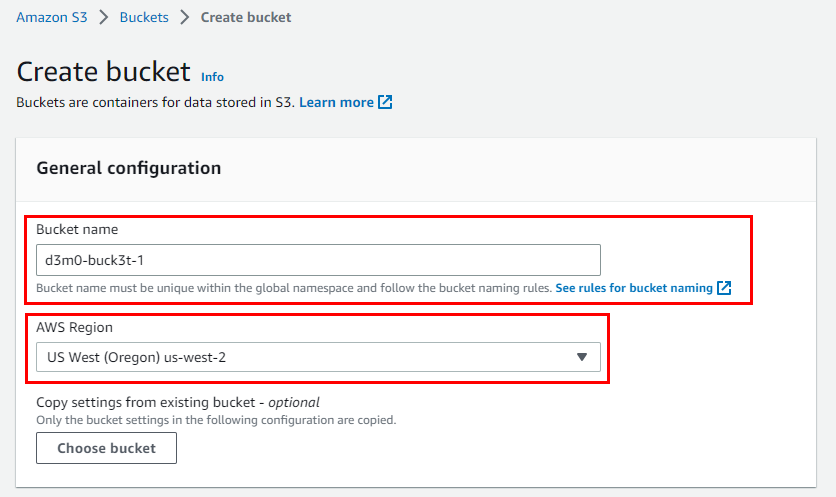
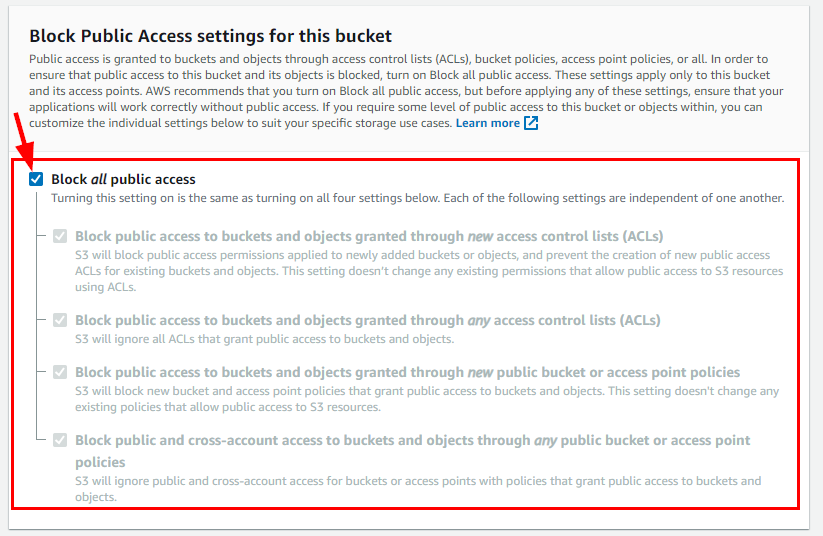
- Under the Object Ownership Section, click on the radio button “ACLs enabled”. Scroll down to the bottom and make sure to select the checkbox for "Block all public access" under the Block Public Access settings for this bucket.
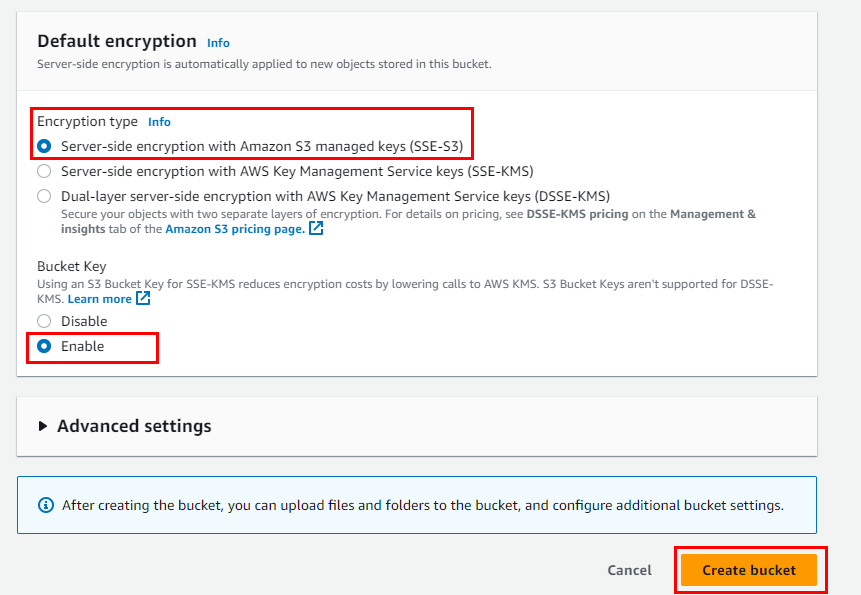
- Retain other default Settings, scroll down to the bottom, and click on Create bucket to create your bucket.
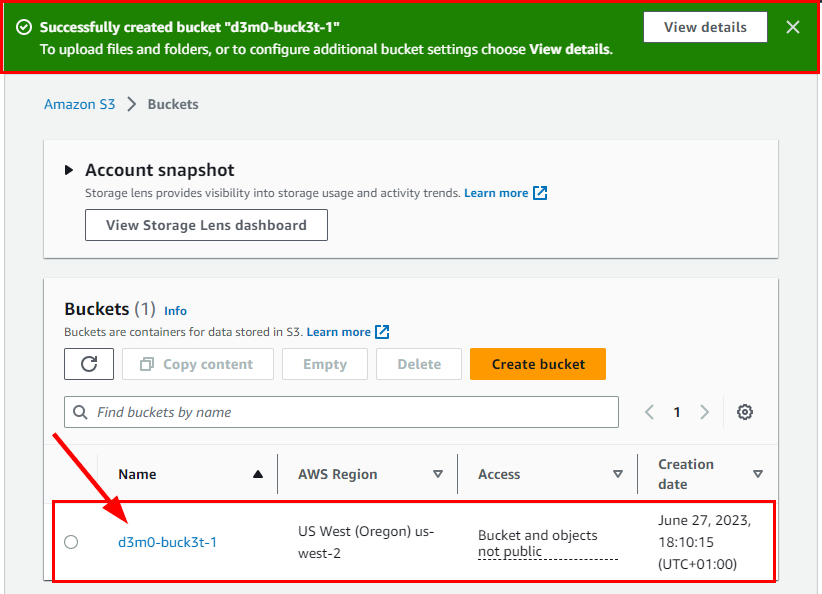
The bucket name d3m0-buck3t-1 is successfully created.
- To upload objects into the bucket, simply navigate to the Amazon S3 dashboard, find your newly created bucket named d3m0-buck3t-1, and click on it.
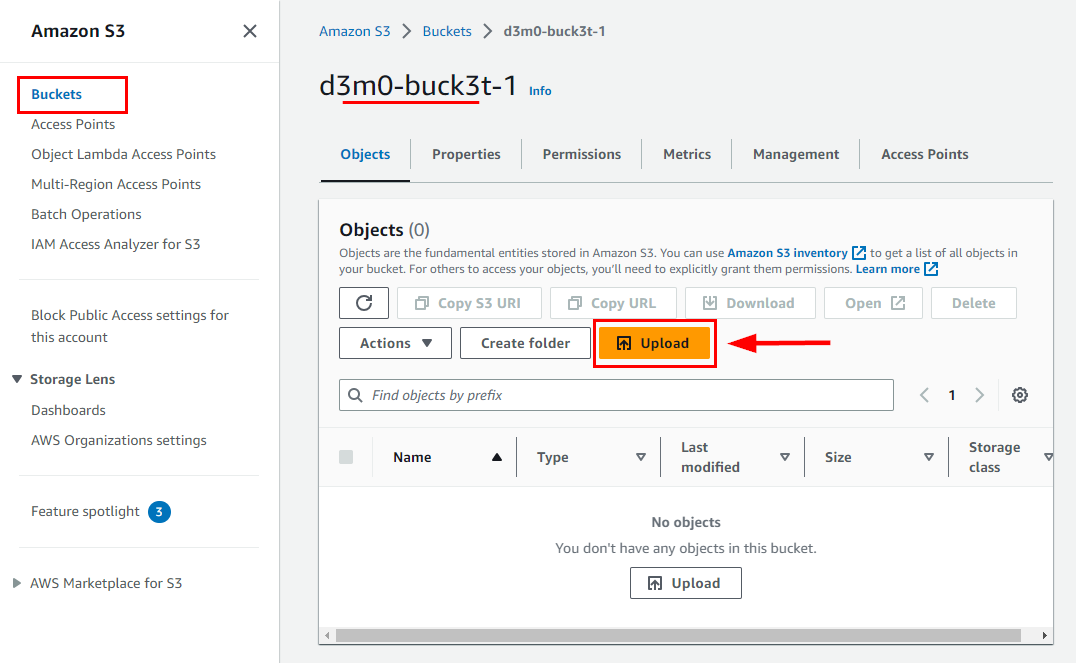
Before proceeding to the next step, create two (2) .txt files with a name like "d3m0-buck3t-1" and "d3m0-buck3t-2" or any alternative name of your preference.


- Click on Upload under the Objects tab
- On the Upload page, click on Add Files and select the file you previously created. d3m0-buck3t-1.txt
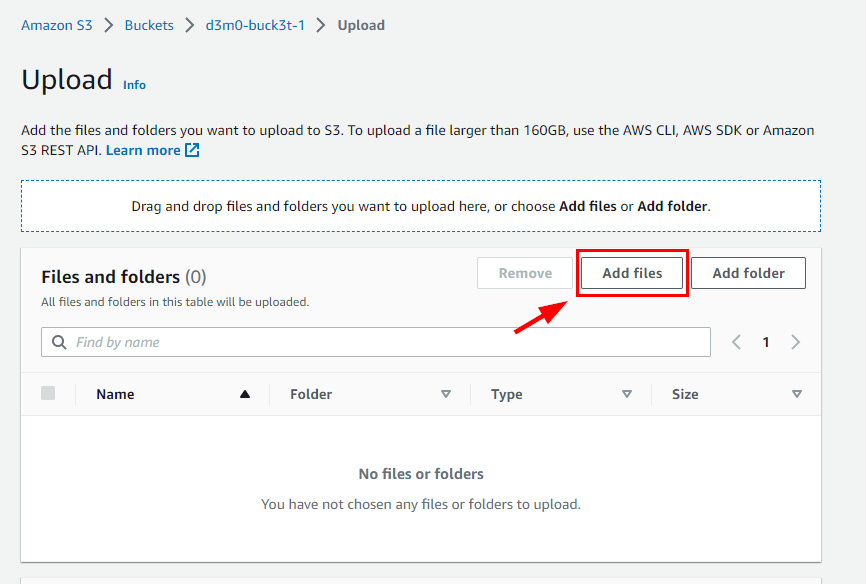
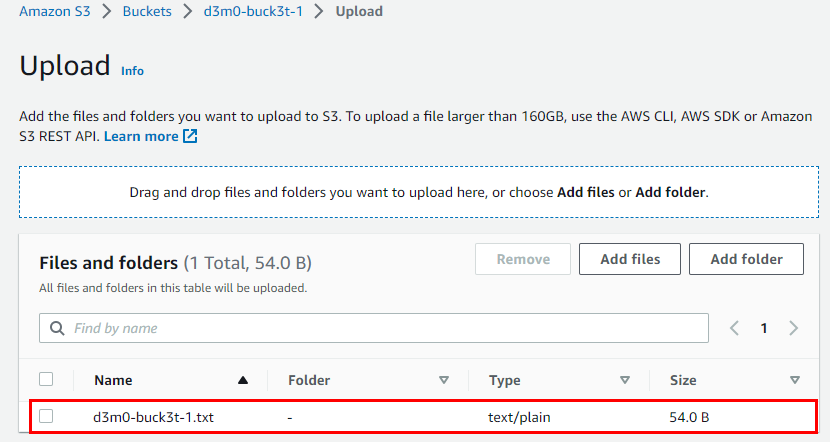
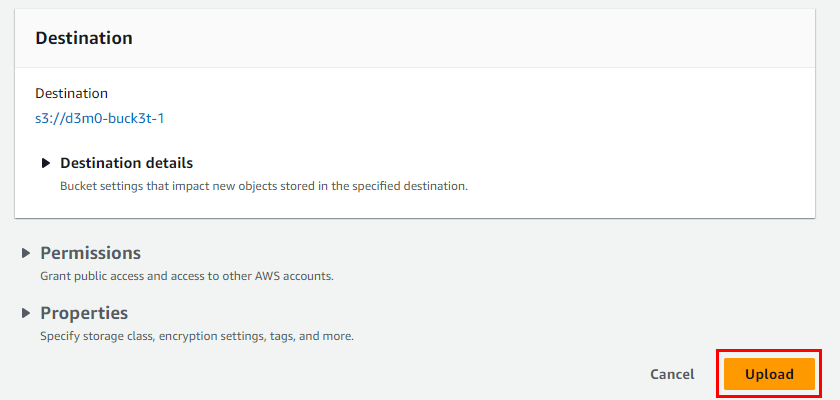
- Scroll down and click on Upload at the bottom
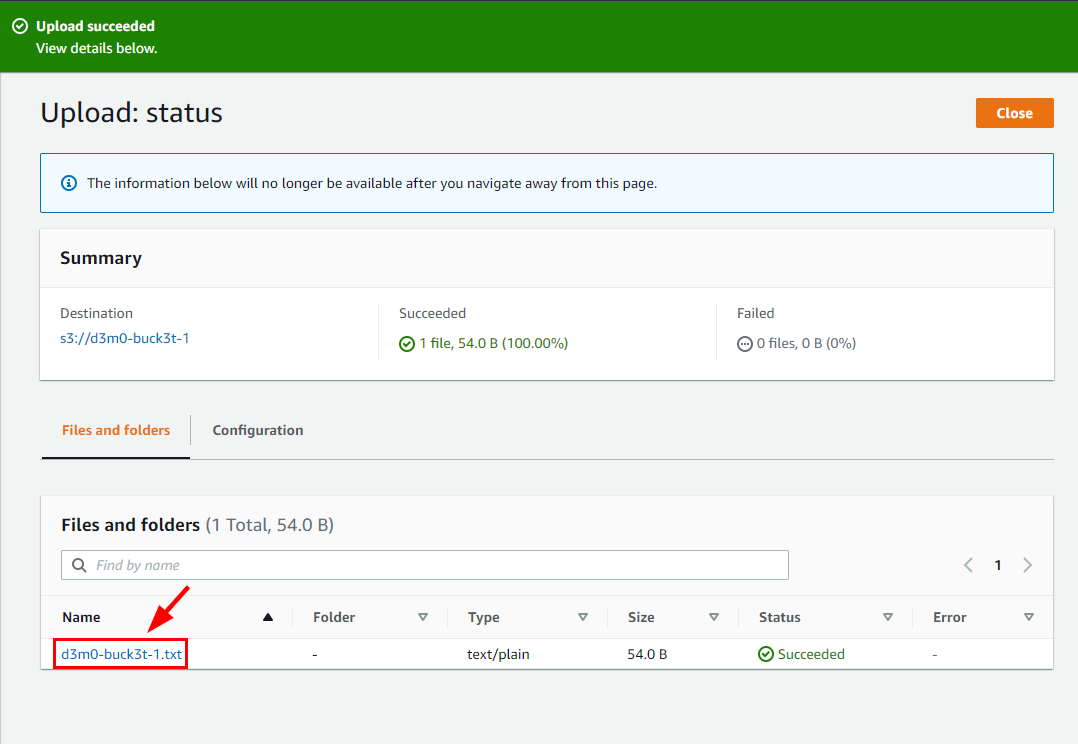
- Next, click on the file named d3m0-buck3t-1.txt," located under the Files and Folders section in the following window tab.
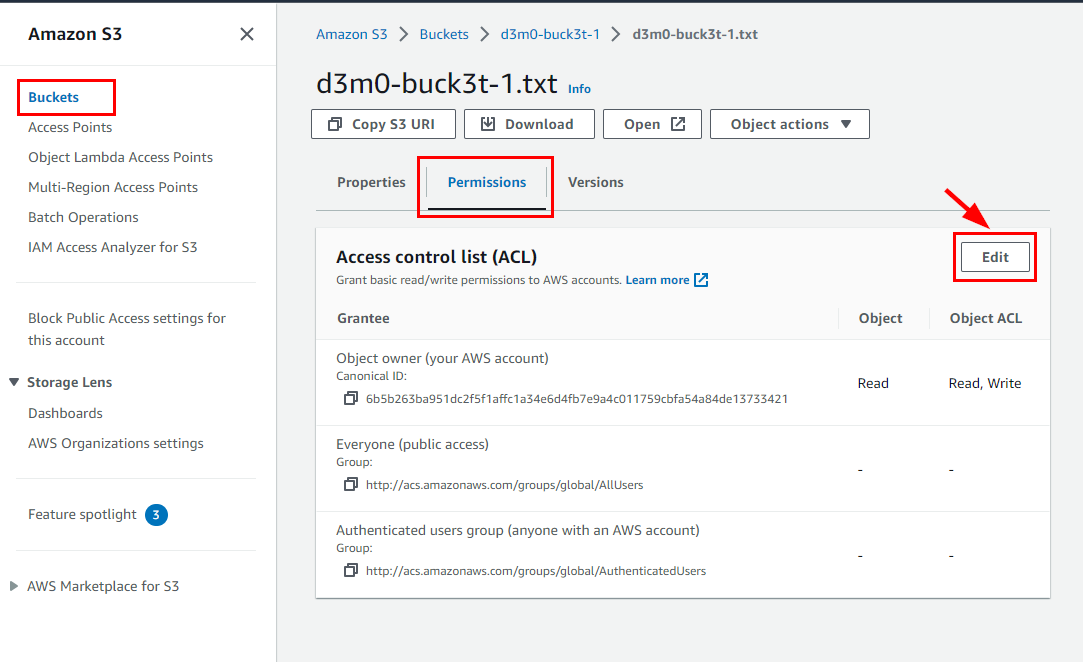
By clicking on it, you will be redirected to another window labeled d3m0-buck3t-1.txt. Navigate to the Permissions tab.
Click on Edit at the right corner of the Access Control List (ACL).
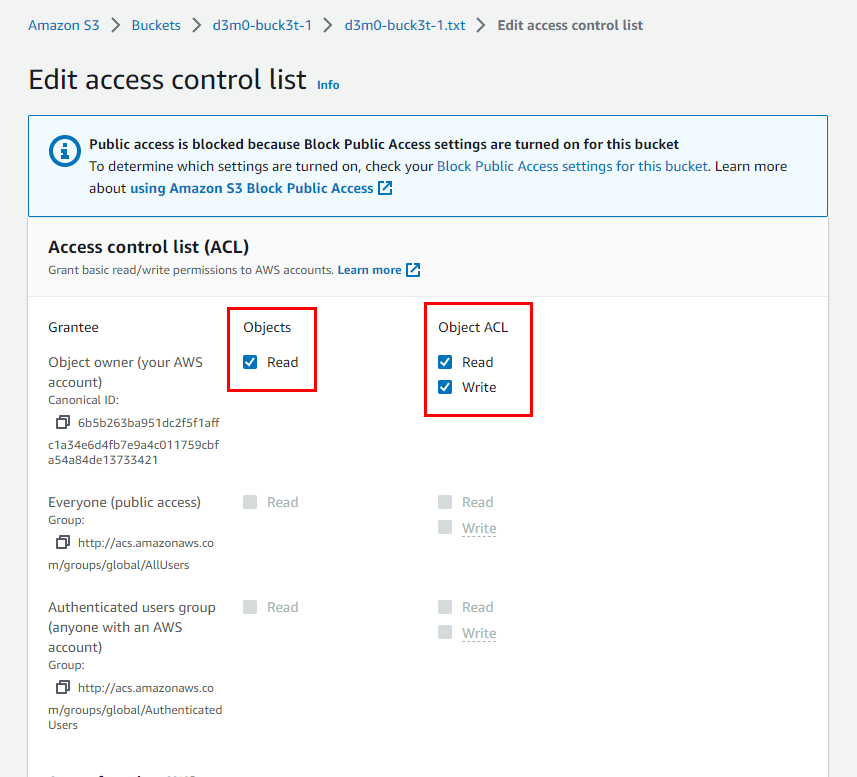
- When you open the Access Control List (ACL) window, you will notice that the Read/Write options are disabled for the "Everyone" (public access) group. This ensures the security of the S3 bucket named d3m0-buck3t-1, preventing unauthorized access to its objects.
Creating a vulnerable S3 bucket
- To create an insecure S3 bucket, search for S3 under Services from the search box
- Within the Amazon S3 dashboard, locate the Buckets section and click on the "Create bucket" option situated in the right corner.
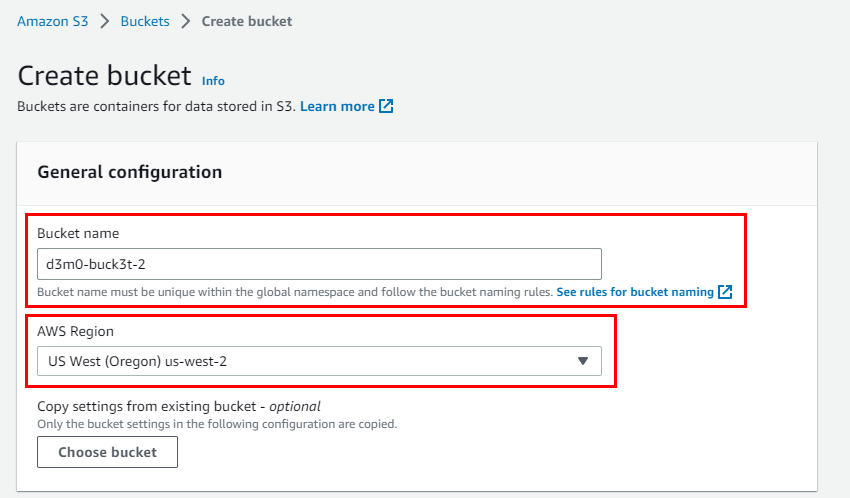
Within the Create bucket window, provide a suitable name and AWS region for the bucket in the General Configuration section. For this lab, the following General configuration details were used:
Bucket name: d3m0-buck3t-2
AWS Region: us-west-2 (Oregon)
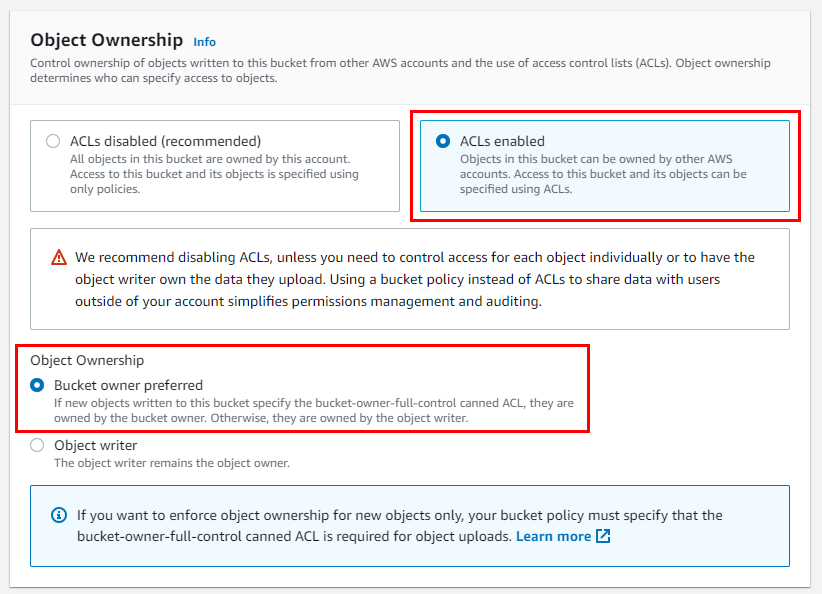
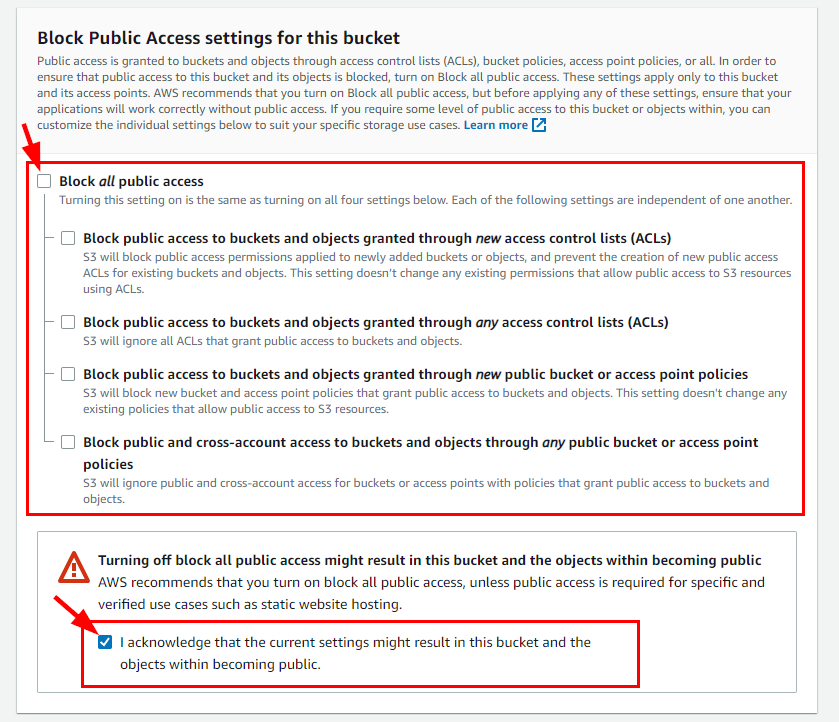
- Click on the ACLs enabled radio button for Object Ownership. Scroll down and uncheck Block all public access under the Block Public Access settings for this bucket.
At the bottom, check the box “I acknowledge that the current settings might result in this bucket and the objects within becoming public.”
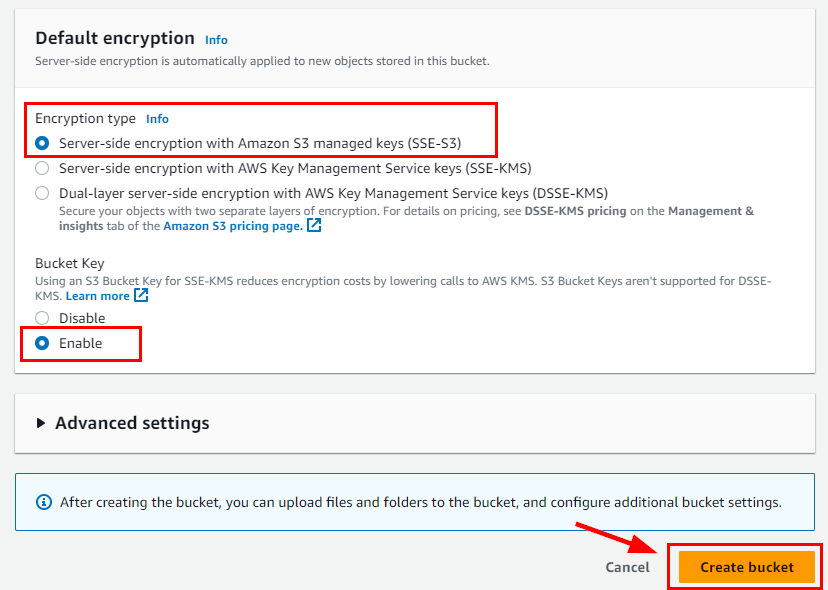
- Retain other default Settings, scroll down, and click on Create bucket.
The bucket name d3m0-buck3t-2 is successfully created.
- To upload objects into the bucket, simply navigate to the Amazon S3 dashboard, find your newly created bucket named d3m0-buck3t-2, and click on it.
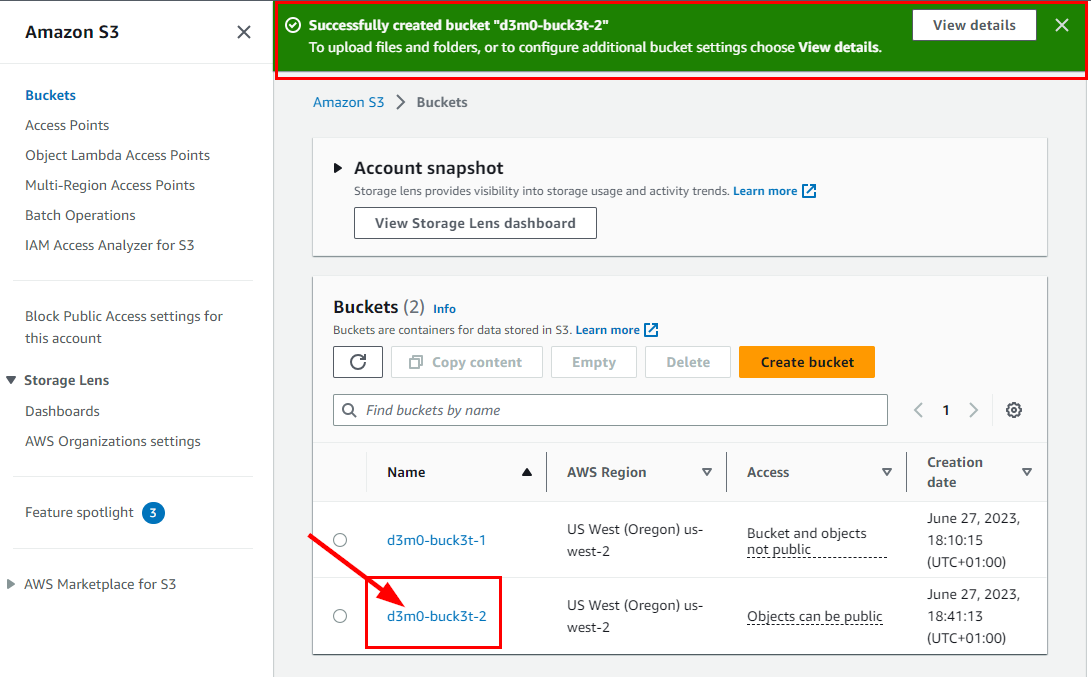
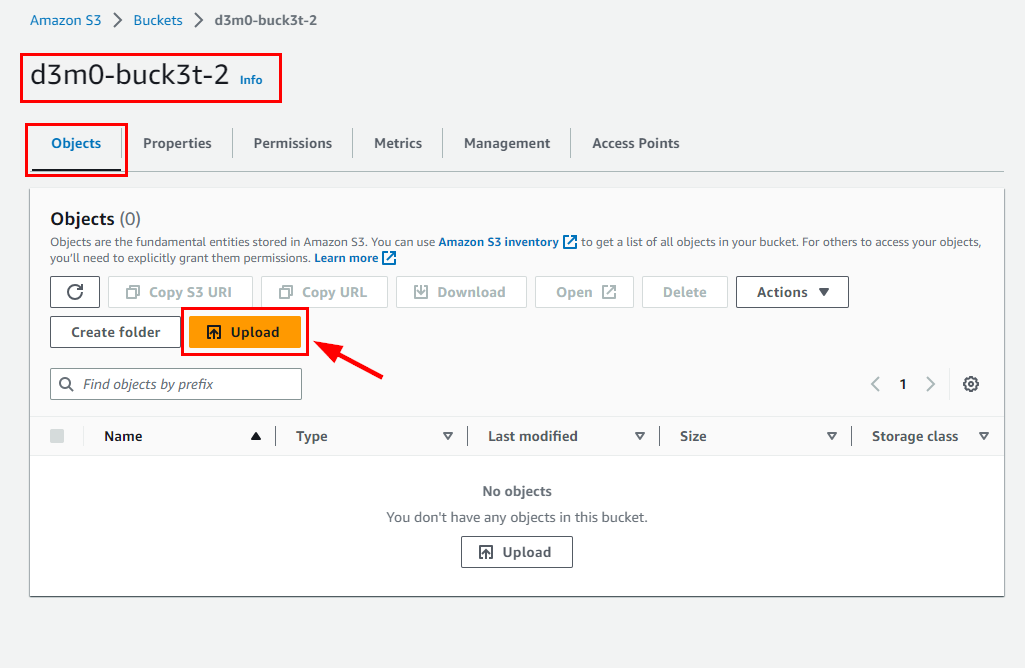
- In the d3m0-buck3t-2 Objects tab, click on Upload.
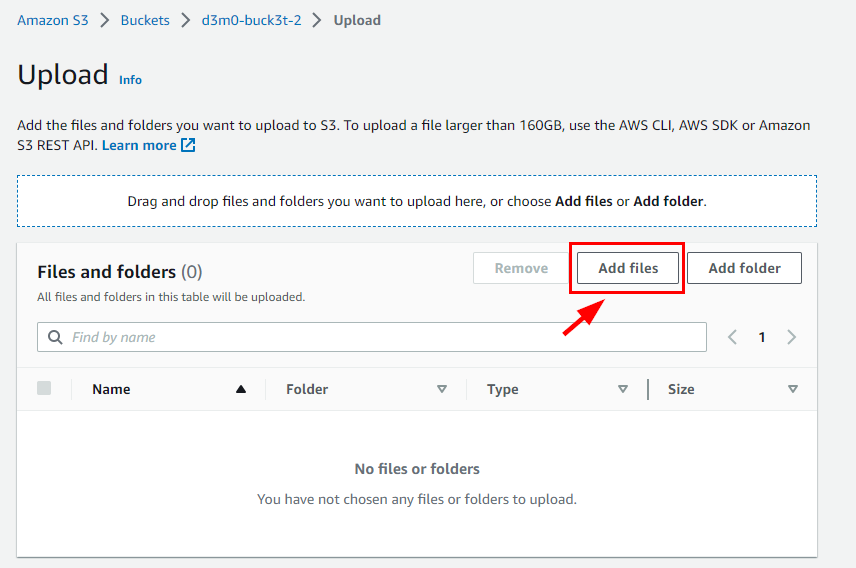
- Click on Add Files on the Upload page, and select the d3m0-buck3t-2.txt previously created.
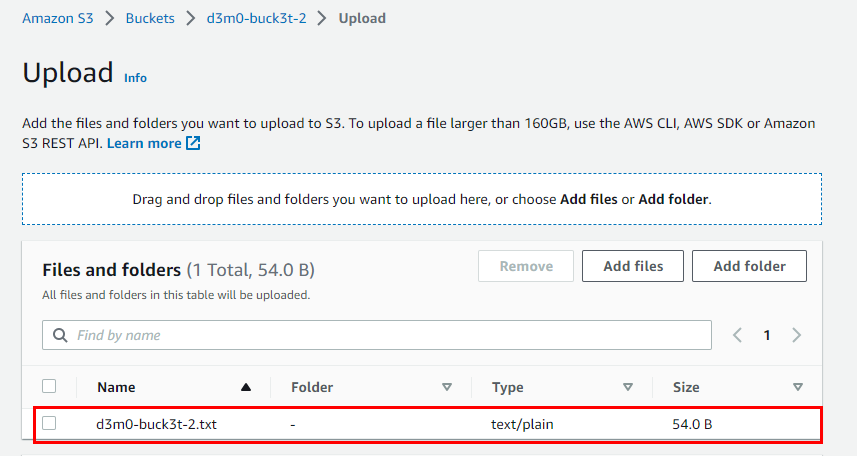
- Scroll down and click on Upload.
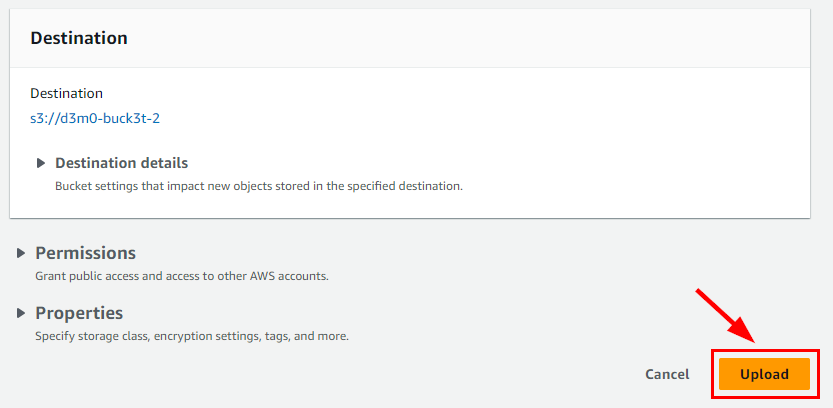
Next, click on the file named "d3m0-buck3t-2.txt" located under the Files and Folders section in the following window tab.
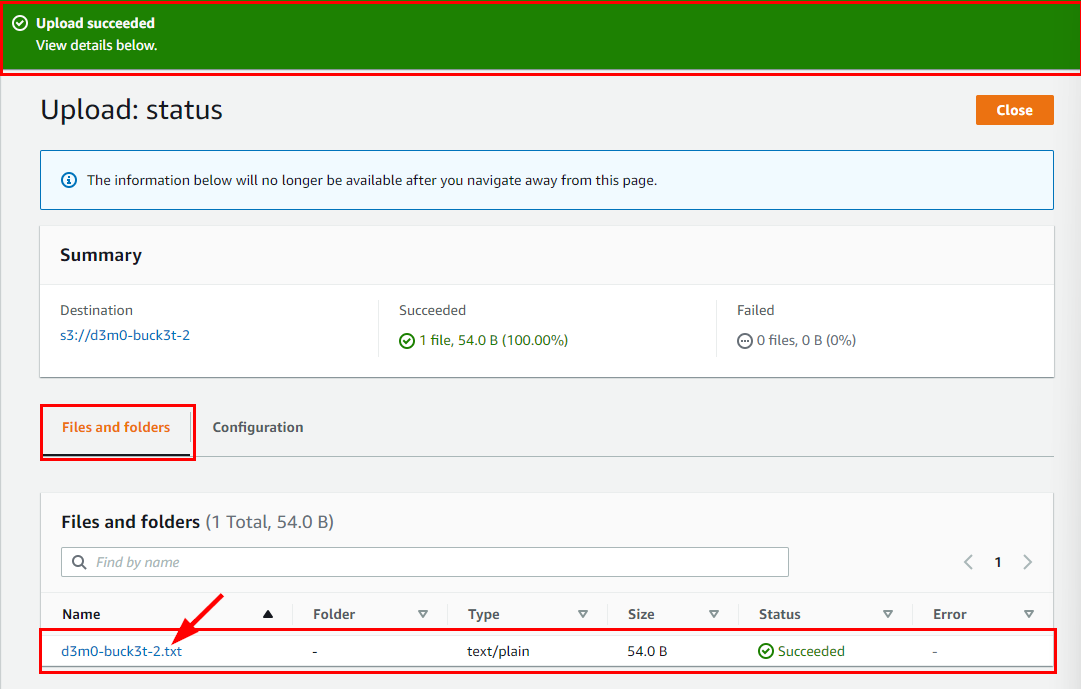
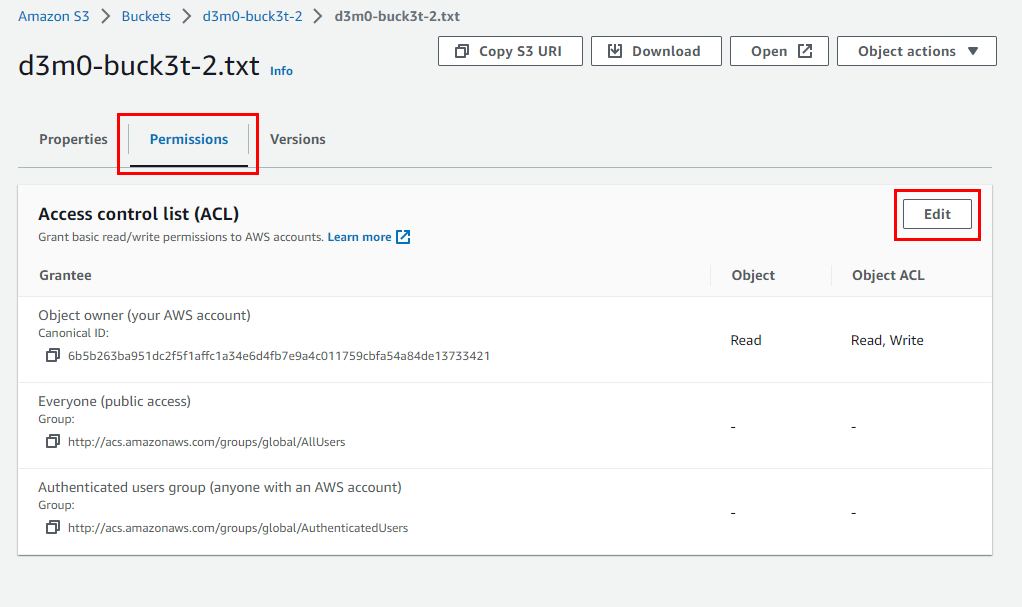
By clicking on it, you will be redirected to another window labeled d3m0-buck3t-2.txt. Navigate to the Permissions tab.
Click on Edit at the right corner of the Access Control List (ACL)
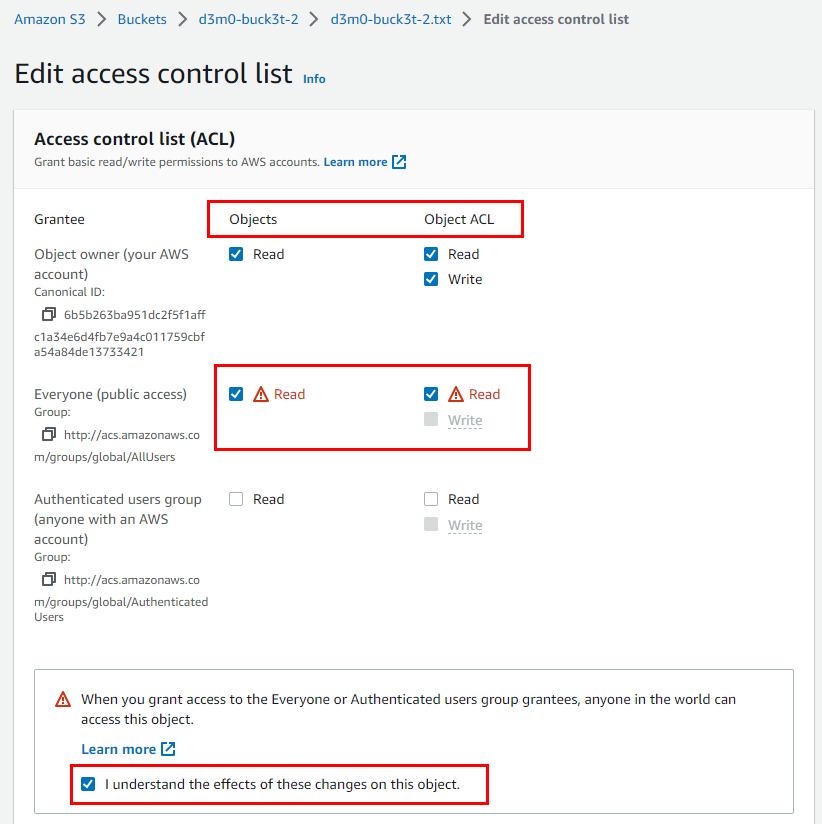
Under the Access Control List (ACL), select the Read checkboxes for Objects and Object ACL next to Everyone (public access).
Scroll down and select the acknowledgment checkbox.
- Then, click on Save Changes.
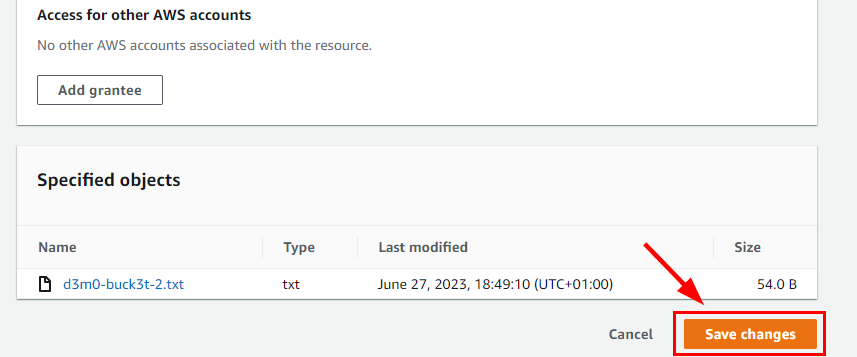
Enabling Full Access for Vulnerable S3 Bucket
- Now, you need to enable full access to everyone for d3m0-buck3t-2 using CloudShell. Click on the CloudShell icon at the bottom right corner of the AWS console.
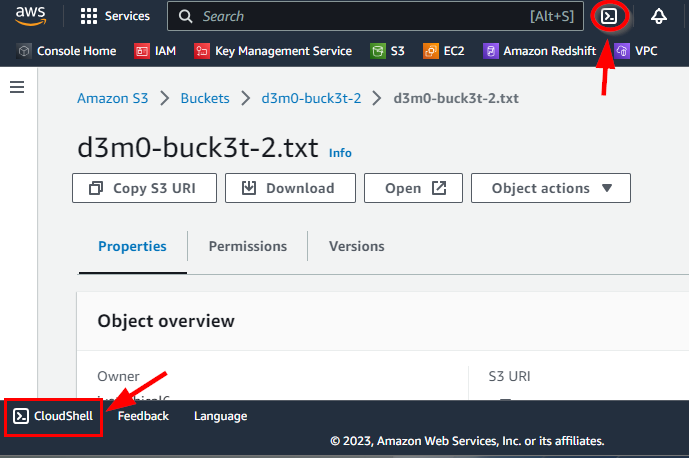
In the CloudShell window, type the following command in CloudShell, to enable the write access control list and press Enter.
Note: In the following command, replace the vulnerable S3 bucket name(d3m0-buck3t-2) with the name of your vulnerable bucket in the CloudShell window.
aws s3api put-bucket-acl --bucket d3m0-buck3t-2 --grant-write-acp uri=http://acs.amazonaws.com/groups/global/AllUsers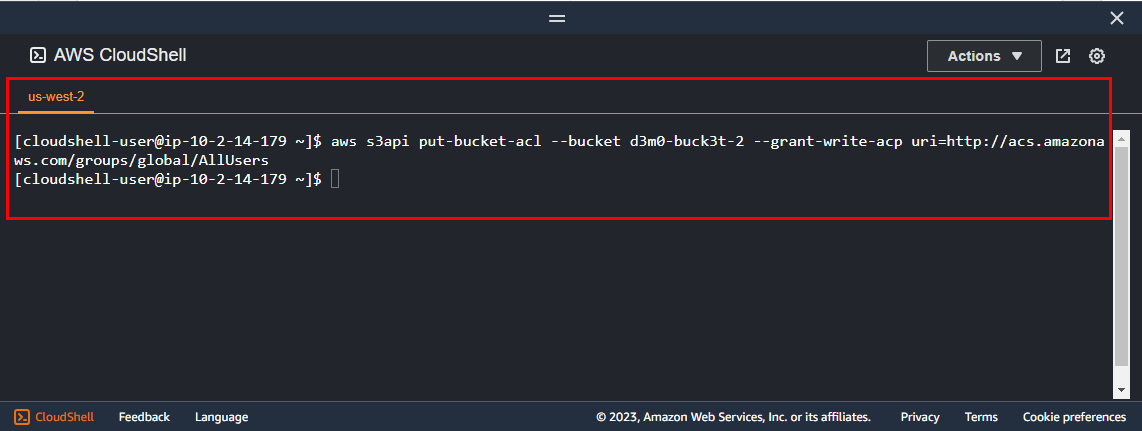
Next, type the following command in CloudShell and press Enter to grant full control to the resources.
Note: In the following command, replace the vulnerable S3 bucket name (d3m0**-buck3t-2**) with the name of your vulnerable bucket in the CloudShell window.
aws s3api put-bucket-acl --bucket d3m0-buck3t-2 --grant-full-control uri=http://acs.amazonaws.com/groups/global/AllUsers
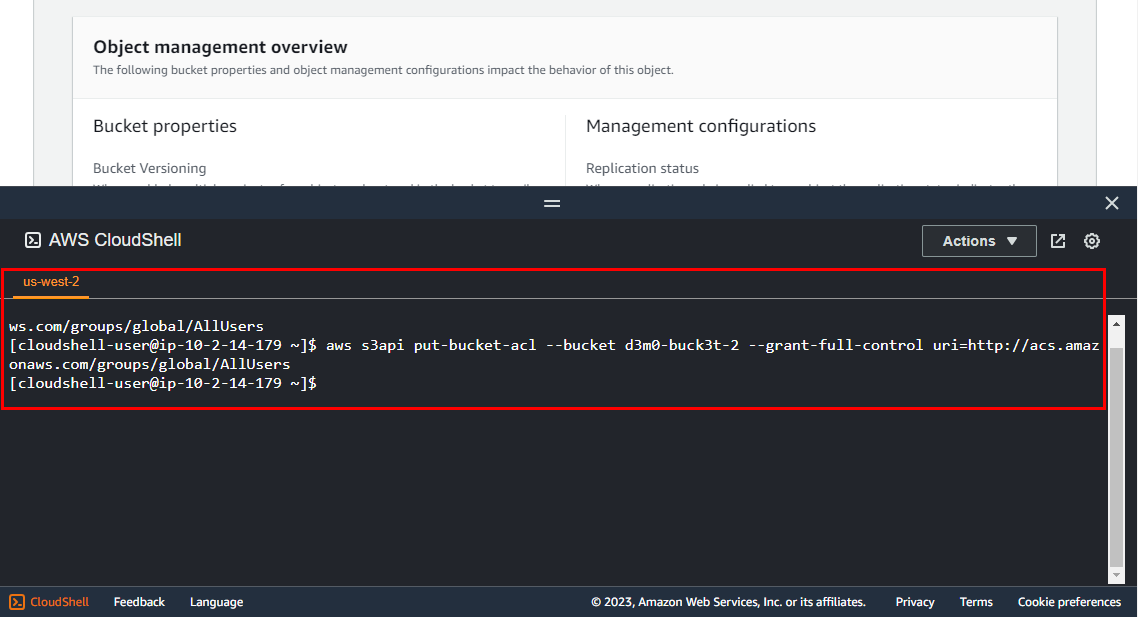
NOTE: Executing the command does not result in any visible output, but it does have an impact on the S3 bucket named "d3m0-buck3t-2.”
Once done, close CloudShell as shown above.
- Now navigate back to the S3 dashboard and click on d3m0-buck3t-2
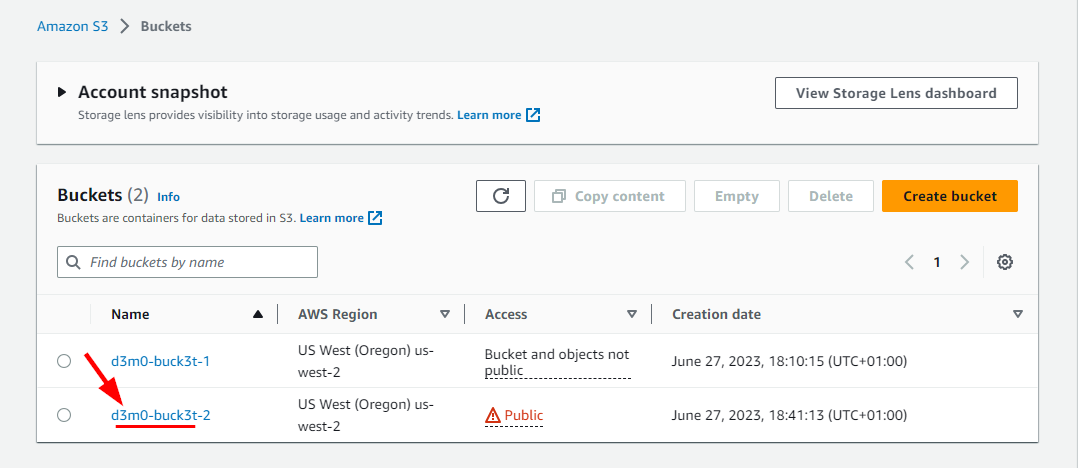
- Next, click on Permissions, then scroll down to the Access Control List (ACL) section and click on Edit.
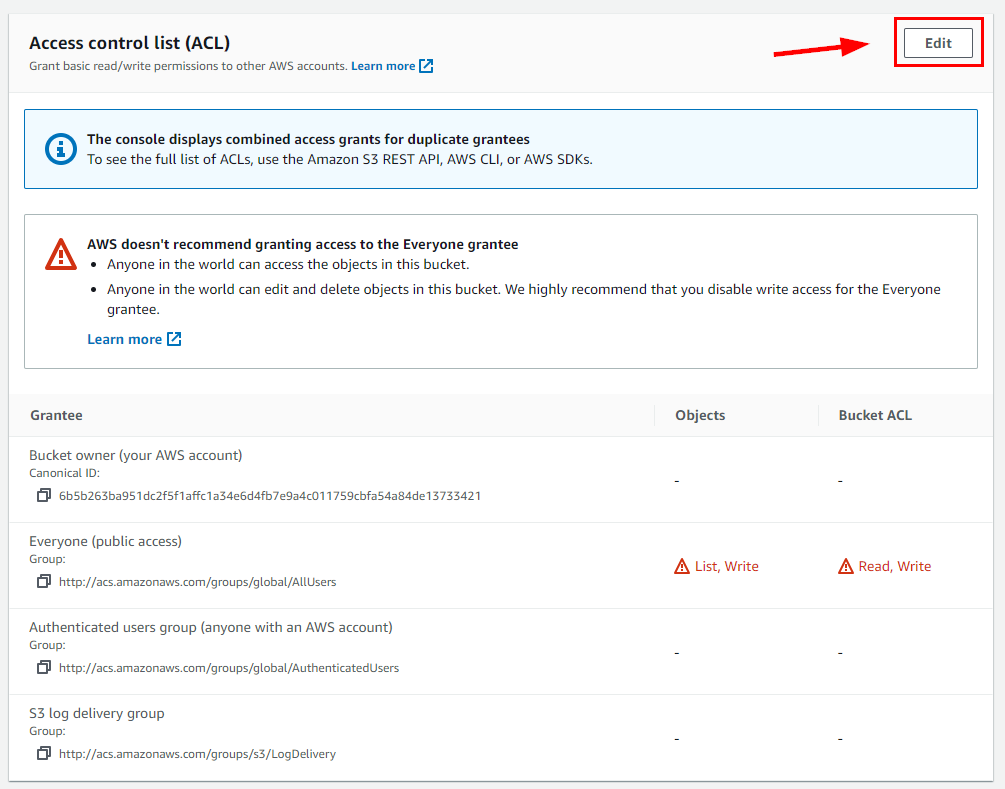
- Upon inspection, it will become evident that both the object and Bucket ACLs have been configured to grant permissions to Everyone (public access).
This happen because of the commands that were previously executed on CloudShell
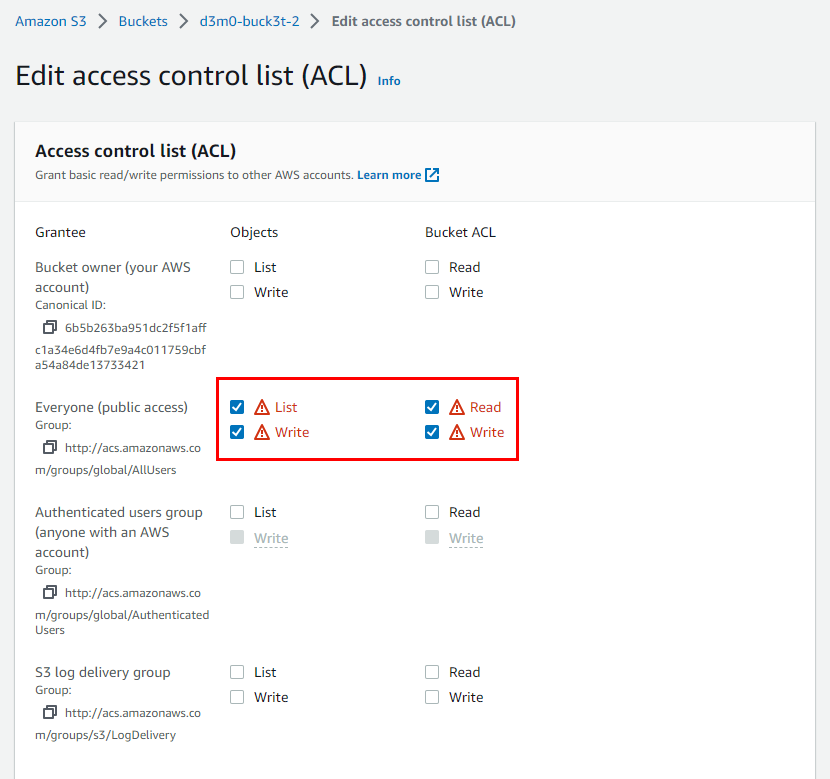
Now you have Successfully created a vulnerable S3 bucket (d3m0-buck3t-2) with full public access.
Perform penetration testing on Created S3 buckets
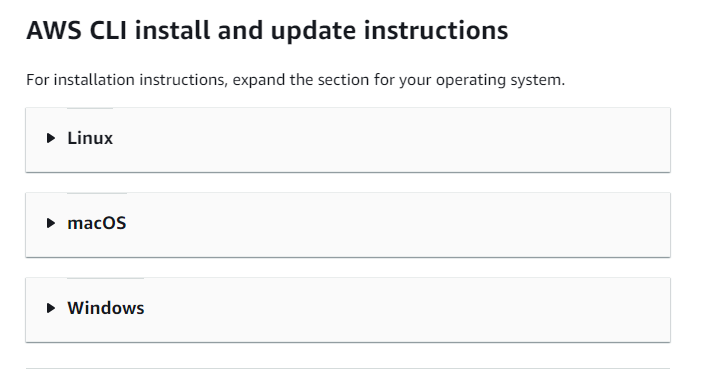
- Next, To create a penetration testing environment, you need to install AWS CLI.
Check AWS Doc for AWS CLI installation and update instructions Install based on your computer spec.
Here is a Video to install AWS CLI on Windows
Setting UP AWS CLI on Linux
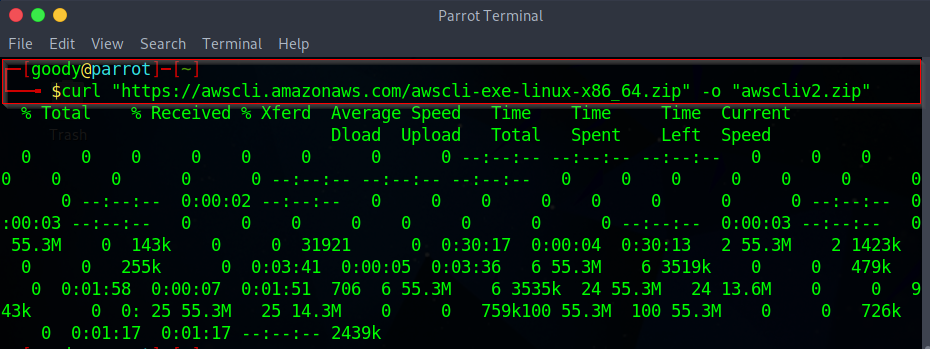
- To install AWS CLI on any Linux Distro, use the command
kali$:curl "https://awscli.amazonaws.com/awscli-exe-linux-x86_64.zip" -o "awscliv2.zip"
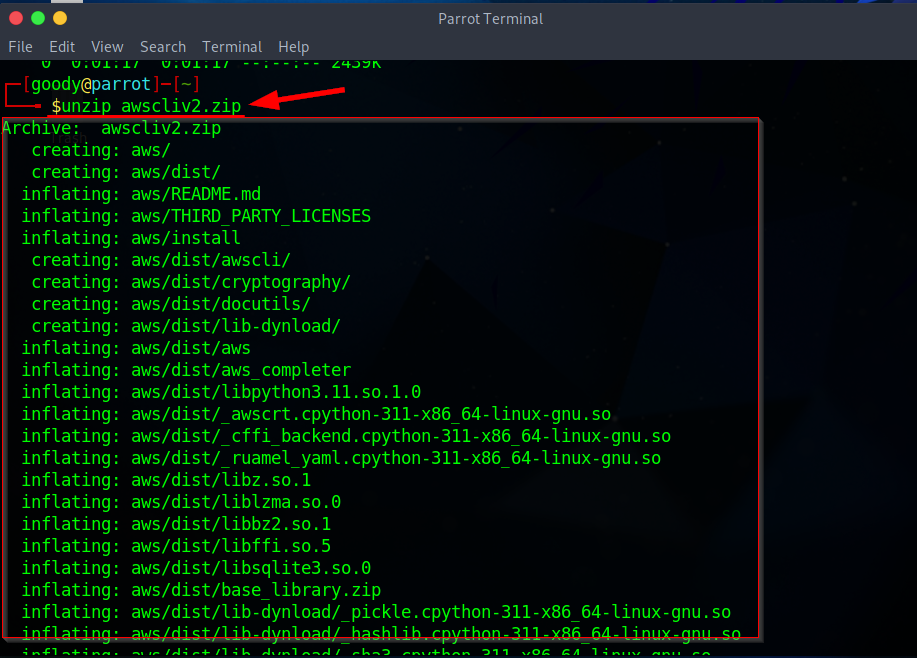
kali$:unzip awscliv2.zip
kali$:sudo ./aws/install
Open your Linux terminal and execute each line of command above
Download the AWS CLI tool
Unzip file
Install (
sudo apt install)

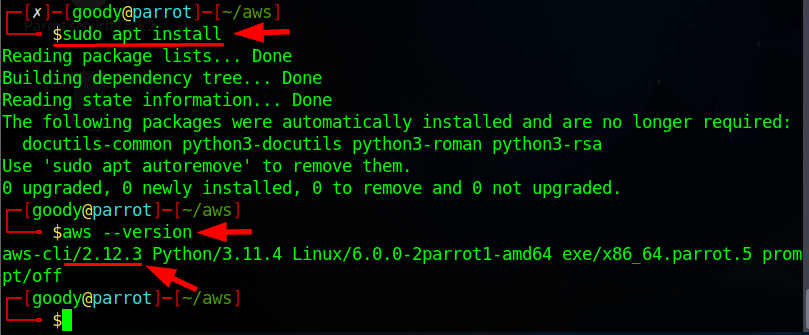
Now using the command aws --version you should have the latest version of AWS CLI as shown in the above image.
Exploiting Vulnerable S3 bucket
Accessing S3 bucket d3m0-buck3t-1
- On your Linux terminal, type the following command to list the objects in the S3 bucket named d3m0-buck3t-1 and Press Enter.
NB: In the command below, replace the secure S3 bucket name (d3m0-buck3t-1) with the name of your secure S3 bucket.
aws --no-sign-request s3 ls s3://d3m0-buck3t-1
The command --no-sign-request is used to disable the automatic signing of requests in AWS CLI (Command Line Interface) operations.
- Due to proper security measures and configurations, attempting to access the bucket will result in an "Access Denied" message.

Accessing S3 bucket d3m0-buck3t-2
- Now, run the following command to perform penetration testing on the second S3 bucket named d3m0-buck3t-2
NB: In the command below, replace the vulnerable S3 bucket name (d3m0-buck3t-1) with the name of your secure S3 bucket.
aws --no-sign-request s3 ls s3://d3m0-buck3t-2
- After executing the command, the resulting output will be an object in the form of a text file called "d3m0-buck3t-2.txt," which is stored within the S3 bucket referred to as "d3m0-buck3t-2" The reason for this occurrence is due to the misconfiguration of the bucket, allowing public access.

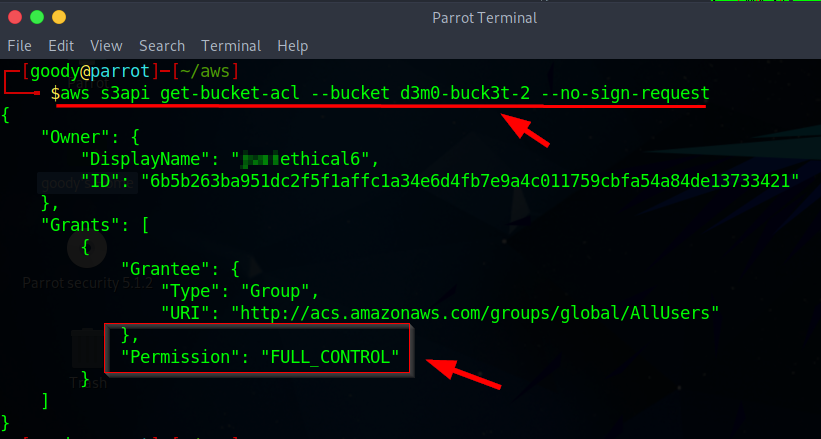
- Now, to get the access control list of the second vulnerable S3 bucket named d3m0-buck3t-2, run the following command:
aws s3api get-bucket-acl --bucket d3m0-buck3t-2 --no-sign-request
- The permission output will indicate FULL_CONTROL, revealing that d3m0-buck3t-2 is misconfigured, resulting in the public accessibility of the information.
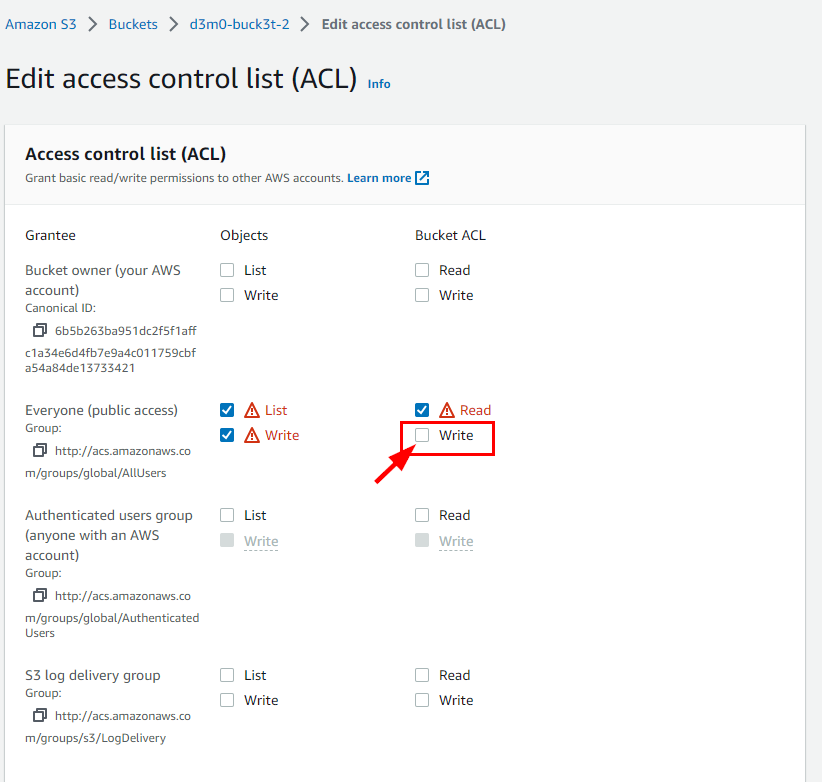
- To ensure that no users can write to the d3m0-buck3t-2 bucket, return to the Edit access control list (ACL) of d3m0-buck3t-2 and deselect the Bucket ACL Write permissions for Everyone (public access).
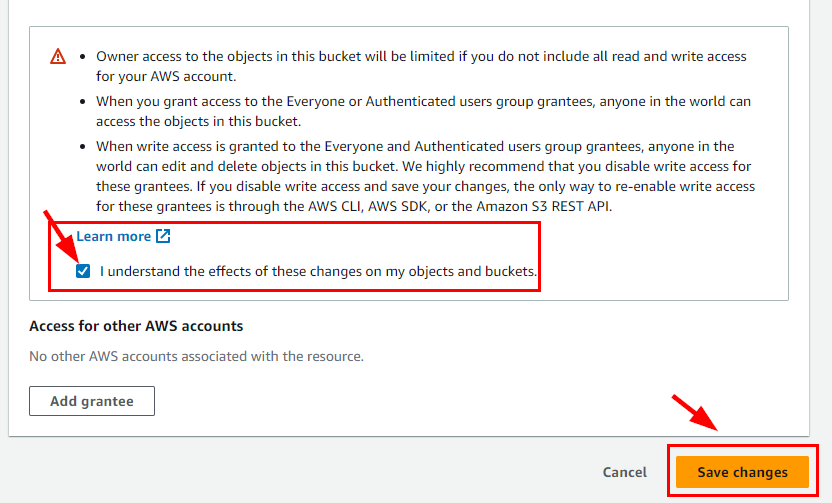
- Scroll down and select the acknowledgment checkbox. Click on Save Changes.

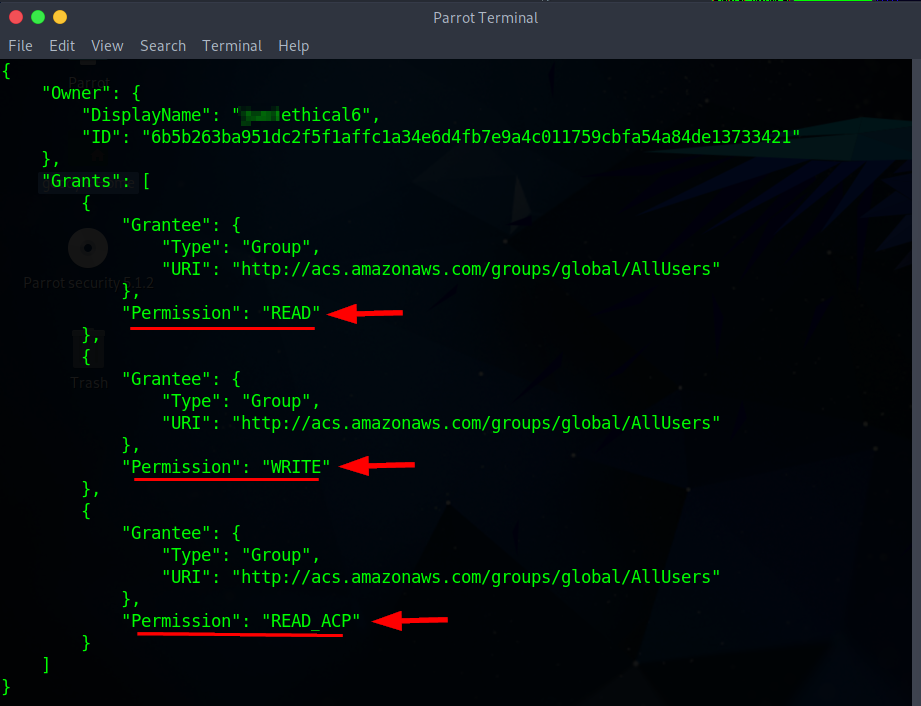
- Return to the Command Prompt window and execute the same command once more to verify the ACL.
Note: In the command below, replace the vulnerable S3 bucket name (d3m0-buck3t-2) with the name of your vulnerable S3 bucket.
aws s3api get-bucket-acl --bucket d3m0-buck3t-2 --no-sign-request
- You will notice that the permissions have been modified from Full Control to include READ, WRITE, and READ_ACP.
Deleting Created Resources
Please make sure to delete, shut down, or terminate all resources utilized and created during this lab to avoid incurring any charges.
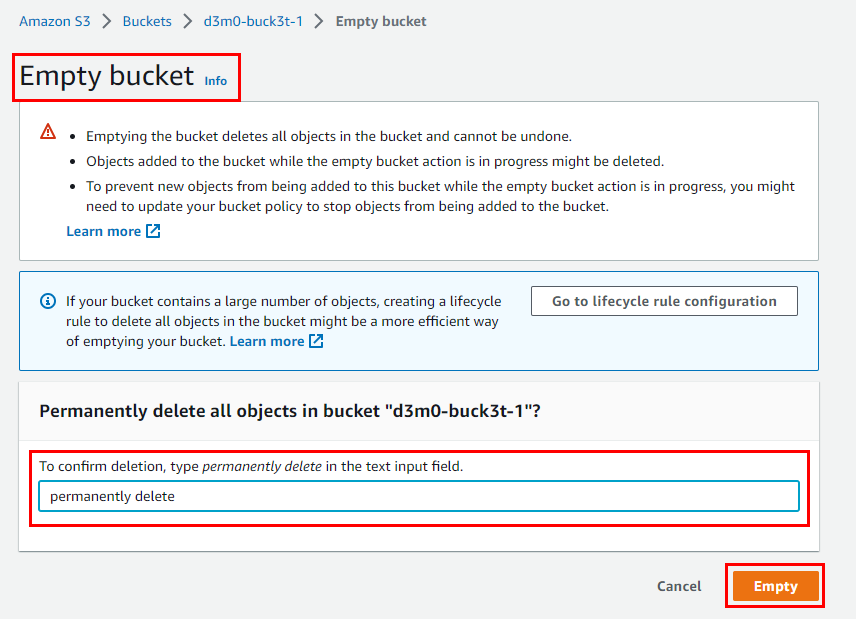
- To remove the instances generated in this lab, follow these steps: Go to the Buckets section in Amazon S3 and locate the bucket created for this lab (named d3m0-buck3t-1). Select the checkbox next to the bucket. Click on the Empty button to clear out the contents of the bucket prior to deletion. In the ensuing window, input "permanently delete" and then select Empty to proceed.
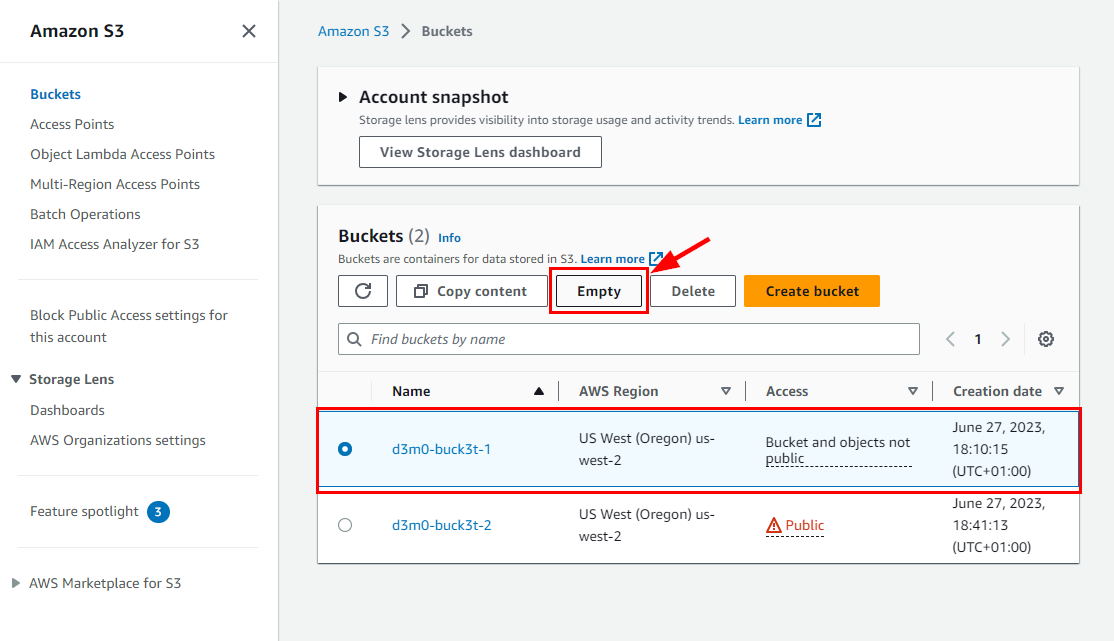
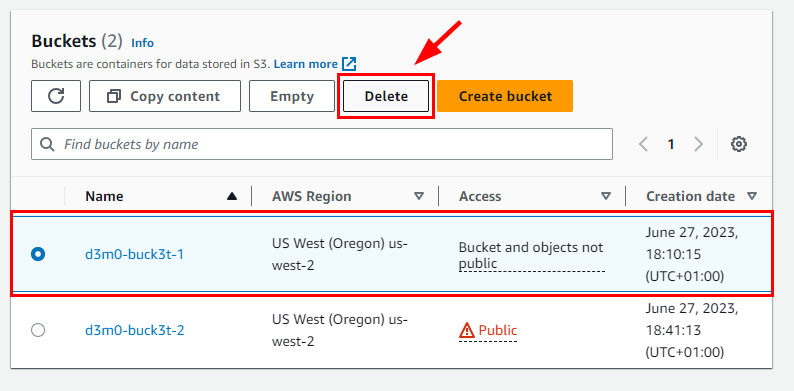
- Once you are done emptying the object in d3m0-buck3t-1, select it and Delete
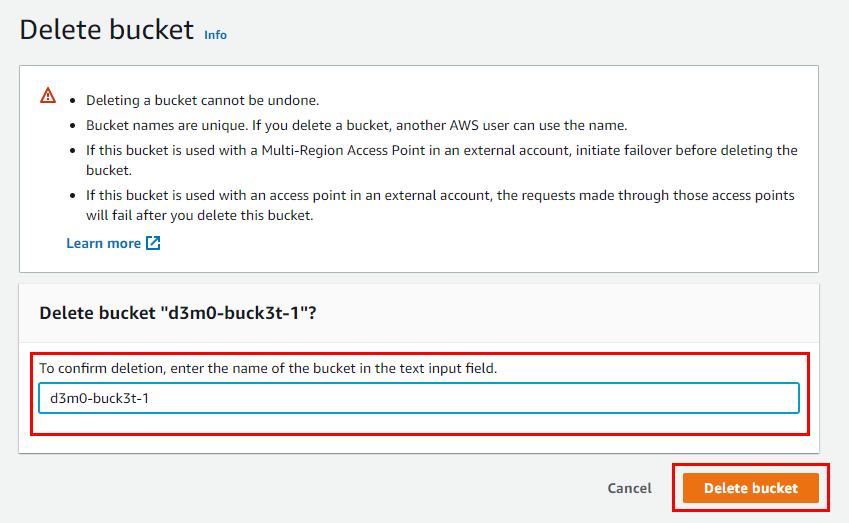
Repeat same process for d3m0-buck3t-2 to empty and delete the bucket.
Key-Note
Performing penetration testing on an AWS S3 bucket is crucial for a cloud security engineer to identify misconfigurations and implement necessary security measures to enhance its protection.
A misconfigured S3 bucket can pose several potential threats when exploited by a threat actor. Some possible threats include:
Unauthorized Data Access: A misconfigured S3 bucket might have overly permissive access control settings, allowing unauthorized individuals or entities to access sensitive data stored within the bucket.
Data Leakage: If an S3 bucket is configured to allow public access or has incorrect permissions, sensitive data can be unintentionally exposed to the public, resulting in data leakage and potential privacy violations.
Data Modification or Deletion: In cases where a threat actor gains unauthorized access to a misconfigured S3 bucket, they may modify, delete, or manipulate the stored data, leading to data integrity issues and potential loss of critical information.
Distributed Denial of Service (DDoS): By exploiting a misconfigured S3 bucket, a threat actor can use it to launch a DDoS attack by flooding the bucket with an overwhelming amount of requests, potentially impacting the availability and performance of the bucket or related services.
Malware Distribution: If a threat actor gains control of a misconfigured S3 bucket, they can upload malicious files or executables, using the bucket as a distribution point for spreading malware or conducting further cyberattacks.
Account Compromise: A misconfigured S3 bucket might provide an entry point for an attacker to gain unauthorized access to associated AWS accounts, leading to a broader compromise of other resources and services within the account.
It is crucial to ensure proper configuration and security measures are implemented for S3 buckets to mitigate these potential threats and protect sensitive data from unauthorized access or manipulation.
Subscribe to my newsletter
Read articles from Goodycyb directly inside your inbox. Subscribe to the newsletter, and don't miss out.
Written by

Goodycyb
Goodycyb
Hey there! 👋🏾 I'm Goody, a Cloud Threat Researcher by Day 🌞 and a Cloud Security Content Engineer by Night🌜. Join me on my journey as I explore the realm of Threat Detection in Cloud Security.