01 - Kubernetes Fundamentals
 Rohit Pagote
What is Kubernetes?
Kubernetes, also known as K8s, is an open-source container orchestration tool for automating the deployment, scaling, and management of containerized applications.
Kubernetes Architecture
In Kubernetes, we have MASTER NODE and WORKER NODES.
Master Node consists of:
ETCD Cluster
Kube Scheduler
Kube Controller
Kube APIServer
Worker Nodes consist of:
Kubelet
Kube Proxy
Container Runtime Engine (Docker, containerd, rkt)
ETCD
ETCD is a distributed, reliable key-value store that is simple, secure and fast.
ETCD stores the information regarding the cluster such as nodes, pods, configs, secrets, accounts, roles, bindings, and others.
Every information you see when you run kubectl get command is from etcd server.
Every change you make to your cluster such as adding nodes, deploying pods or replica sets is updated in the etcd server.
Kube-APIServer
It is a primary management component in Kubernetes.
When you run a kubectl command, the kubectl utility first reaches to kube-api server. The kube-api server first authenticates the request and validates it. It then retrieves the data from etcd cluster and responds with the requested information.
With the help of Kube APIServer, instead of using kubectl command line, we can also invoke the APIs directly by sending a POST request.
It is the only component that interacts directly with the etcd data store.
Kube Controller Manager
The Kube Controller Manager manages various controllers in Kubernetes.
It is a process that continuously monitors the state of various components within the system and works towards bringing the whole system to the desired functioning state.
There are many controllers available in Kube Controller Manager like
Node Controller
Replication Controller
Deployment Controller, etc
Kube Scheduler
The Kube Scheduler is responsible for scheduling pods on nodes.
It is responsible for deciding which pod goes on which node. It does not actually place the pod on the nodes, as that is the job of Kubelet.
Kubelet
- The Kubelet in the Kubernetes worker node is responsible for registering the node with a Kubernetes cluster, creating pods, and monitoring nodes and pods.
Kube Proxy
Kube-proxy is a process that runs on each worker node in the Kubernetes cluster.
Its job is to look for new services, and every time a new service is created, it creates appropriate rules for each node to forward traffic to those services to the backend pods.
It does it using IP tables rules.
PODS
Kubernetes does not deploy containers directly on the worker nodes.
The containers are encapsulated into a Kubernetes object known as pods.
A pod is a single instance of an application.
A pod is the smallest object that you can create in Kubernetes.
Pods have a one-to-one relationship with containers running an application.
To scale up, you create new pods and to scale down, you delete existing pods.
You do not add additional containers to an existing pod to scale an application.
Multi-Container PODS
A single pod can have multiple containers, except for the fact that the multiple containers are not of the same kind, this pod is known as Multi-Container Pod.
Multi-Container Pod includes one main container which is responsible to perform the main task, and other helper containers that may be needed to perform some side tasks to help the main container.
The two containers can communicate with each other directly by referring to each other as localhost since they share the same network space.
Plus they can easily share the same storage space as well.
PODS with YAML
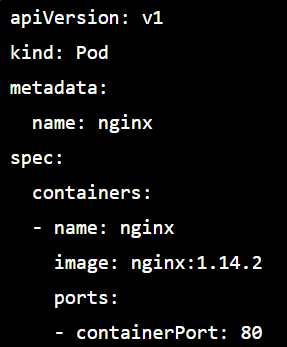
Kubernetes uses a YAML file as input for the creation of objects such as pods, replicas, deployments, services, etc known as the Kubernetes Object Definition File.
Kubernetes definition file always contains 4 top-level/root-level properties and all of them are required fields:
apiVersion
This is the version of Kubernetes API we will use to create the object.
Depending on which object we are going to create, we must use the right API version.
POD - v1
Service - v1
ReplicaSet - apps/v1
Deployment - apps/v2
DaemonSet - apps/v1
Namespace - v1
Binding - v1
LimitRange - v1
ResourceQuota - v1
kind
- The kind refers to the type of object we are trying to create.
metadata
The metadata is the data about the object like its name, labels, etc.
The metadata is created in the form of a dictionary (key-value pair).
Here, the name is a string and the label is a dictionary that can have any key and value pairs.
spec
The spec is the specification section, where we define additional information about the object we are going to create, like the image, ports, links, etc.
It is different for different objects and we need to refer to the documentation to get the right format for each.
PODS with YAML Example
POD Commands
kubectl get pods- To get all the pods that exist in the default namespace.
kubectl run <pod_name> --image=<image_name>To create a pod with the defined image name.
kubectl run nginx --image=nginx
kubectl describe pod <pod_name>- To get the details of the pod.
kubectl delete pod <pod_name>- To delete the pod.
kubectl create | apply -f pod-definition.yml- To create a pod using the YAML file.
kubectl replace -f pod-definition.yml- To replace the already created pod with the new configuration.
kubectl expose pod redis --port=6379 --name redis-service- To create a service with exposing defined port.
kubectl get pods --selector <label1, label2, ...>- To get the pods based on the label.
--dry-run:By default as soon as the command is run, the resource will be created.
If you simply want to test your command, use the
--dry-run=clientoption.This will not create the resource, instead, tell you whether the resource can be created and if your command is right.
-o yaml:This will output the resource definition in YAML format on the screen.
kubectl run nginx --image=nginx --dry-run=client -o yaml- Generate POD Manifest YAML file (-o yaml). Don't create it(--dry-run)
Replication Controller | Replica Set
The Replication Controller helps us run multiple instances of a single pod in the Kubernetes cluster, thus providing High Availability.
The Replication Controller ensures that the specified number of pods are running at all times even if it's just 1 or 100.
The Replication Controller helps in Load Balancing by managing the user load across all the available pods.
Scalability is also managed by adding or removing the pods as per the demand.
But Replication Controller is the older technology that is now replaced with Replica Set (recommended).
All the above terms apply to Replica Set as well.
There is one major difference between Replication Controller and Replica Set, Replica Set requires a selector definition. The selector section helps the Replica Set identify what pods fall under it.
Replica Set can also manage pods that were not created as a part of Replica Set creation using the selector.
Replication Controller Commands
kubectl create -f replicationcontroller-definition.yml- To create a replication controller.
kubectl get replicationcontroller- To get the list of created replication controllers.
Replica Set Commands
kubectl create -f replicaset-definition.yml- To create a replica set.
kubectl get replicaset | replicasets | rs- To get the list of created replica sets.
kubectl delete replicaset <replicaset_name>- To delete the defined replica set with all the underlying pods.
kubectl replace -f replicaset-definition.yml- To replace or update the replica set.
kubectl scale replicaset <replicaset_name> --replicas=<number>- To scale replica set simply from the command line without having to modify the actual YAML file.
kubectl describe replicaset <replicaset_name>- To describe the given replica set.
kubectl edit replicaset <replicaset_name>- To edit the running replica set.
kubectl explain replicaset- To get detailed information about the properties (apiVersion, kind, metadata, spec) and their associated value for the replica set.
Deployments
The Deployment is the Kubernetes object that comes higher in the hierarchy.
The Deployment provides us with the capability to upgrade the underlying instances seamlessly using rolling updates, undo changes, and pause and resume changes as required.
The deployment automatically creates the Replica Set with defined replicas and then the Replica Set ultimately creates the pods.
Commands
kubectl create -f deployment-definition.yml- To create a deployment using the YAML file.
kubectl get deployments- To get the list of created deployments.
kubectl get all- To list down all the created Kubernetes objects i.e. deployments, replica sets and pods.
kubectl rollout status <deployment_name>- To view the status of rollot.
kubectl rollout history <deployment_name>- To view the revisions and history of the rollout.
kubectl rollout undo <deploymentt_name>- To undo the update.
kubectl edit deployment <deployment_name>- To edit the running deployment.
Services
Kubernetes Services enables communication between various components within and outside of the application.
Services help us to connect applications with other applications or users.
For ex:
Our application has groups or pods running various sections, such as a group for serving frontend to users, other group for running backend processes, and a third group connecting to an external data source.
It is services that enables connectivity/communication between these groups of pods.
Services enable the frontend application to be made available to end users.
It helps communication between backend and frontend pods, and helps in establishing connectivity to an external data source.
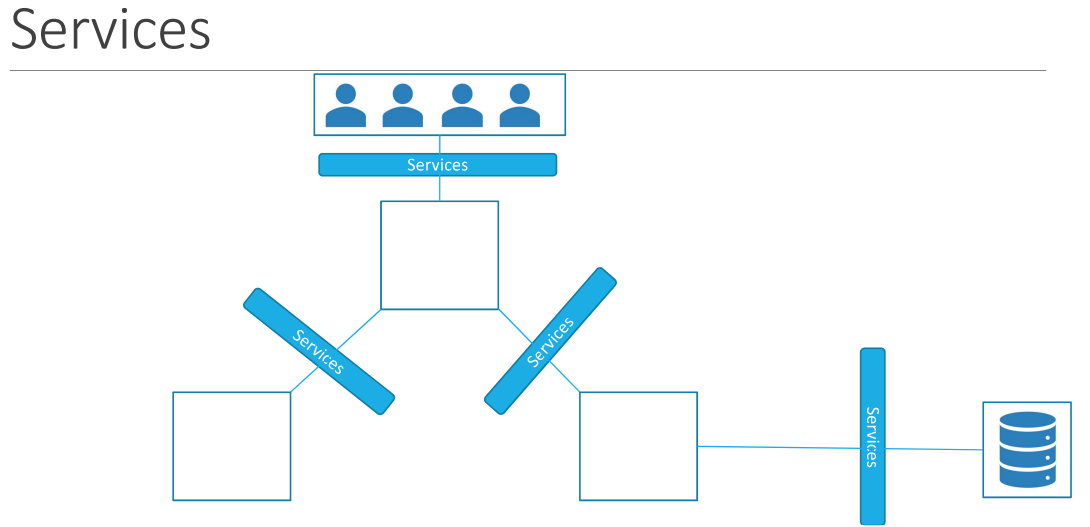
It enables loose coupling between microservices in an application.
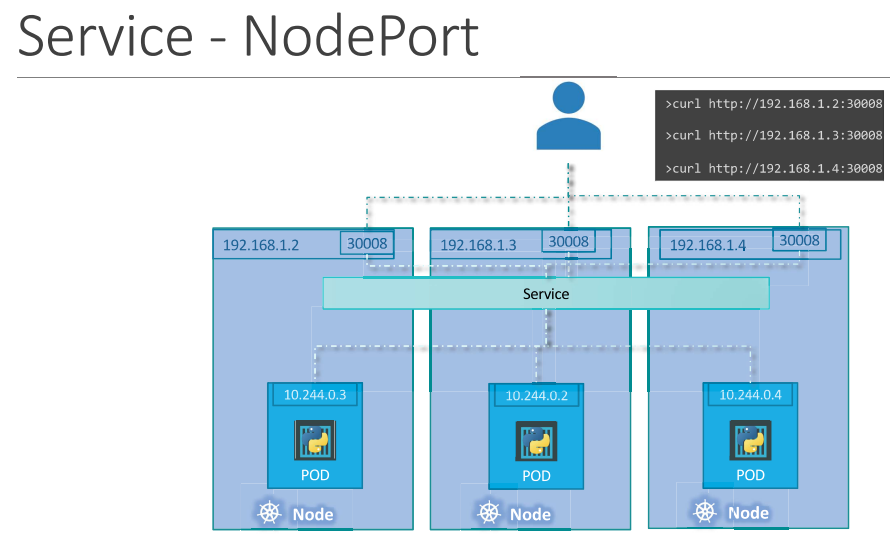
In any case, whether it be a single pod on a single node, multiple pods on a single node or multiple pods on multiple nodes, the service is created the same without having to do any additional steps.
Types of Services
NodePort
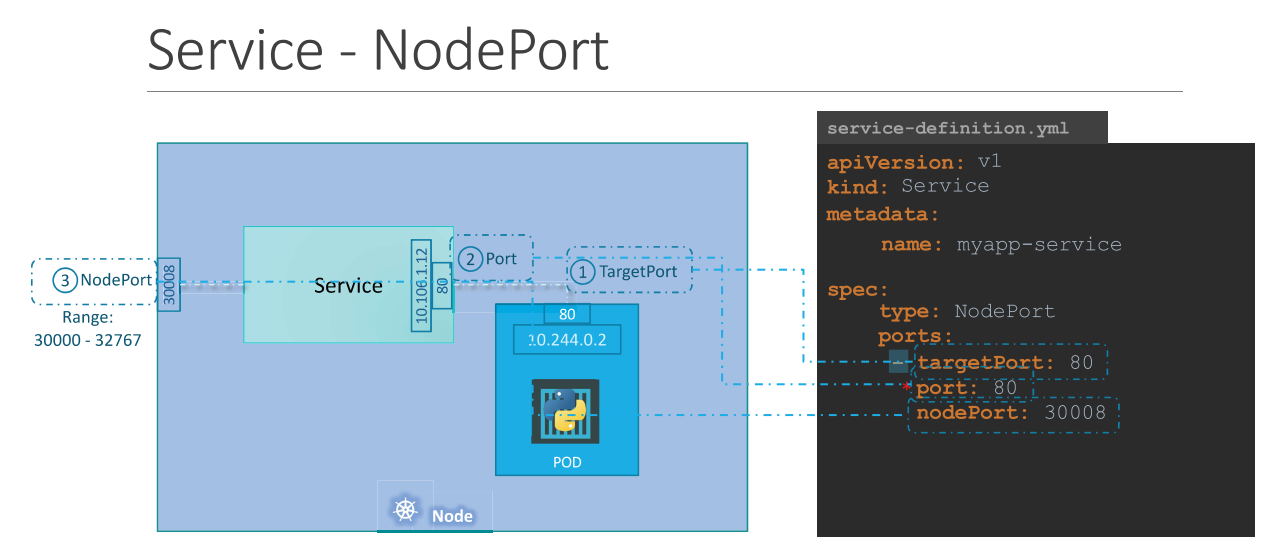
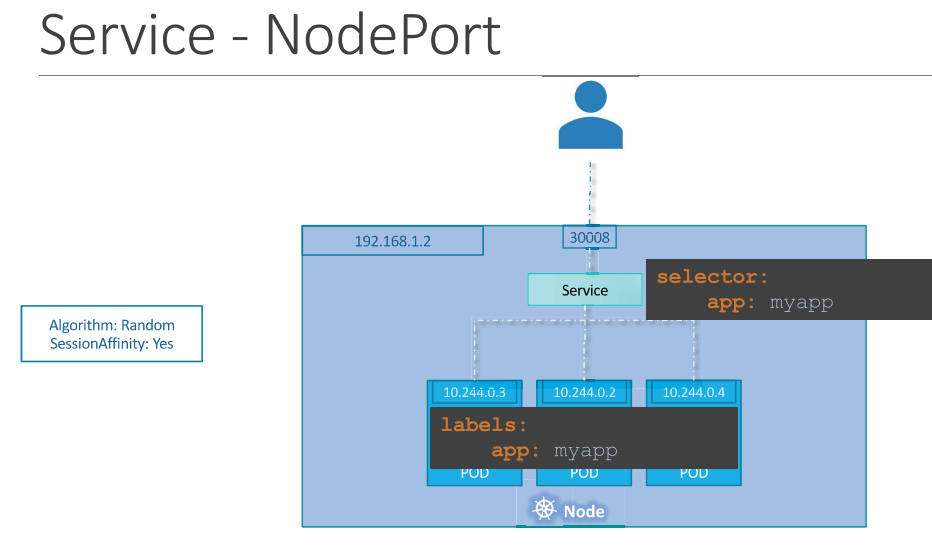
NodePort is a service that makes an internal port accessible on a port on the node.
NodePort service listens to a port on the node and forward requests to the pods.
All the ‘port’ terms are from view point of Service
NodePort - port on the node (optional, gets selected automatically between range 30000-32767)
Port - port on the service (mandatory)
TargetPort - port on the pod (optional, if not specified it assumes the same as Port)
ClusterIP (Default)
The pods have an IP address assigned to them, but these IPs are not static. The pods can go down anytime and new pods are created so you cannot rely on these IP addresses for internal communication between the application.
ClusterIP service helps us group the pods together and provide a single interface to access the pods in a group.
For ex: a service created for backend pods will help group all the backend pods together and provide a single interface for other pods to access this service.
Each service gets an IP and name assigned to it inside the cluster and that is the name that should be used by other pods to access the service. This type of service is known as ClusterIP.
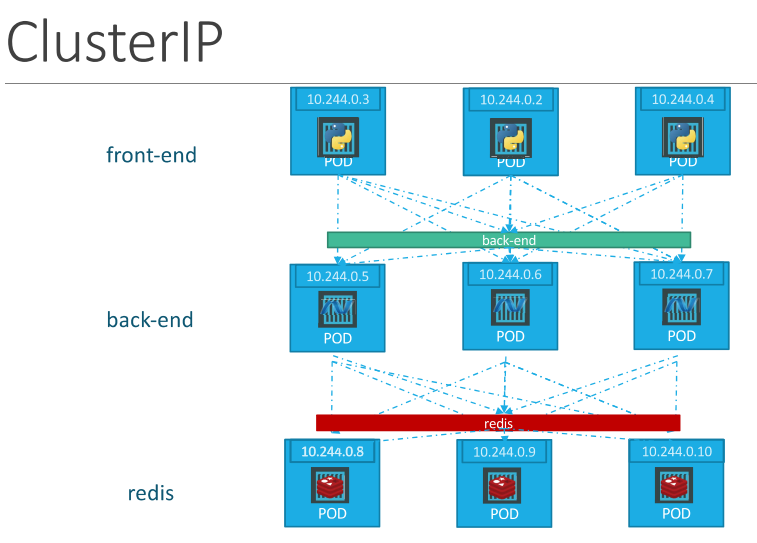
ClusterIP is a service that creates a Virtual IP inside the cluster to enable communication between different services.
LoadBalancer
LoadBalancer is a service that provisions a load balancer for our application in supported cloud providers.
Ex: AWS, Azure, GCP, etc.
Commands
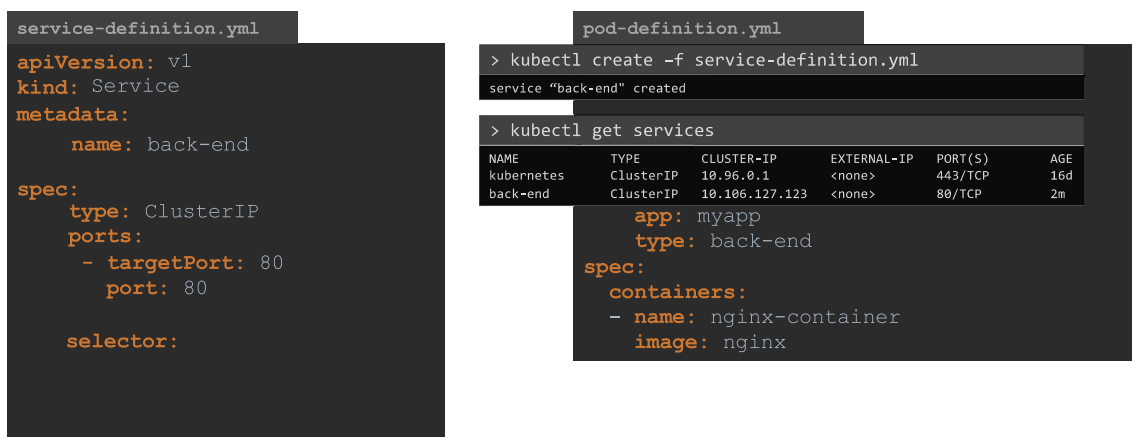
kubectl create -f service-definition.yml- To create a service using the YAML file.
kubectl get services | svc- To get the list of created services.
Namespaces
Namespaces are a way to organize clusters into virtual sub-clusters, they can be helpful when different teams or projects share a Kubernetes cluster.
Any number of namespaces are supported within a cluster, each logically separated from others but with the ability to communicate with each other.
Namespaces cannot be nested within each other.
Any resource that exists within Kubernetes exists in the default namespace.
Default Namespaces
Kubernetes comes with three pre-created namespaces. They are:
default: As its name implies, this is the namespace that is referenced by default for every Kubernetes command, and where every Kubernetes resource is located by default. Until new namespaces are created, the entire cluster resides in ‘default’.
kube-system: Used for Kubernetes components and should be avoided.
kube-public: Used for public resources. Not recommended for use by users.
Commands
kubectl get namespaces | ns- To get the list of all namespaces.
kubectl get pods --namespace=<namespace_name>- To get the list of pods that exist in another namespace other than the default.
kubectl run <pod_name> --image=<image_name> -n=<namespace_name> | --namespace=<namespace_name> | -n <namespace_name>- To create a pod in another namespace other than the default via cli.
kubectl get pods --all-namespaces- To get all the pods in all namespaces.
Imperative VS Declarative
The imperative approach includes providing the final desired stage and step-by-step instructions about how to reach the final desired stage.
The declarative approach includes only providing the final stage that we want to reach and the system takes care of the steps that it needs to follow to reach that desired stage.
In Kubernetes, the imperative way of managing infrastructure is using commands like kubectl run command to create a pod, creating a pod using an object configuration file, etc.
In Kubernetes, the declarative way of managing infrastructure is using commands like kubectl apply command to create a pod using an object configuration file.
Subscribe to my newsletter
Read articles from Rohit Pagote directly inside your inbox. Subscribe to the newsletter, and don't miss out.
Written by

Rohit Pagote
Rohit Pagote
I am an aspiring DevOps Engineer proficient with containers and container orchestration tools like Docker, Kubernetes along with experienced in Infrastructure as code tools and Configuration as code tools, Terraform, Ansible. Well-versed in CICD tool - Jenkins. Have hands-on experience with various AWS and Azure services. I really enjoy learning new things and connecting with people across a range of industries, so don't hesitate to reach out if you'd like to get in touch.
