Building an app that stores data using Shared Preferences
 Krunal Dhapodkar
In this tutorial, we will be building a simple Android app that uses Shared Preferences to store user data. The data we will be storing is the user's email address and password. This data will be persistent even if the user closes the app. The only time the data will be deleted is when the app is uninstalled or the app data is cleared from the Android settings.
What are Shared Preferences?
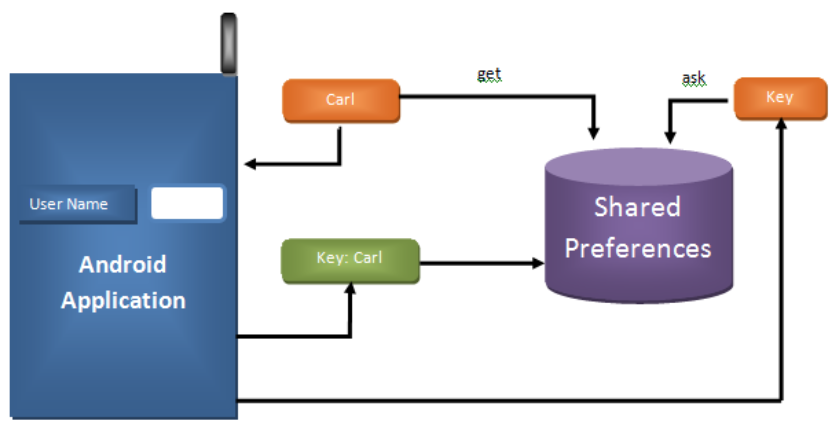
Shared Preferences is a simple way to store private primitive data in key-value pairs. It's a part of the Android framework that allows you to save and retrieve persistent key-value pairs of primitive data types. This is a great way to save data that doesn't need to be stored in a database or saved to a file.
Setting Up Your Layout
First, we need to set up the layout for our MainActivity. This layout will contain two EditText fields for the user to input their email address and password, and three buttons: "Save", "Get", and "Clear".
xml
<androidx.constraintlayout.widget.ConstraintLayout xmlns:android="http://schemas.android.com/apk/res/android"
    xmlns:app="http://schemas.android.com/apk/res-auto"
    xmlns:tools="http://schemas.android.com/tools"
    android:layout_width="match_parent"
    android:layout_height="match_parent"
    tools:context=".MainActivity">
     <EditText
        android:id="@+id/editTextTextEmailAddress"
        android:layout_width="wrap_content"
        android:layout_height="wrap_content"
        android:layout_marginTop="138dp"
        android:ems="10"
        android:hint="Enter email adress"
        android:inputType="textEmailAddress"
        app:layout_constraintEnd_toEndOf="parent"
        app:layout_constraintStart_toStartOf="parent"
        app:layout_constraintTop_toTopOf="parent" />
     <EditText
        android:id="@+id/editTextNumberPassword"
        android:layout_width="wrap_content"
        android:layout_height="wrap_content"
        android:layout_marginTop="34dp"
        android:ems="10"
        android:hint="Enter password"
        android:inputType="numberPassword"
        app:layout_constraintStart_toStartOf="@+id/editTextTextEmailAddress"
        app:layout_constraintTop_toBottomOf="@+id/editTextTextEmailAddress" />
     <Button
        android:id="@+id/button"
        android:layout_width="wrap_content"
        android:layout_height="wrap_content"
        android:layout_marginEnd="9dp"
        android:onClick="onSave"
        android:text="Save"
        app:layout_constraintBaseline_toBaselineOf="@+id/button2"
        app:layout_constraintEnd_toStartOf="@+id/button2"
        app:layout_constraintStart_toStartOf="parent" />
     <Button
        android:id="@+id/button2"
        android:layout_width="wrap_content"
        android:layout_height="wrap_content"
        android:layout_marginEnd="15dp"
        android:onClick="onGet"
        android:text="Get"
        app:layout_constraintBottom_toBottomOf="parent"
        app:layout_constraintEnd_toStartOf="@+id/button3"
        app:layout_constraintStart_toEndOf="@+id/button"
        app:layout_constraintTop_toTopOf="parent" />
     <Button
        android:id="@+id/button3"
        android:layout_width="wrap_content"
        android:layout_height="wrap_content"
        android:layout_marginEnd="3dp"
        android:onClick="onClear"
        android:text="Clear"
        app:layout_constraintBaseline_toBaselineOf="@+id/button2"
        app:layout_constraintEnd_toEndOf="parent"
        app:layout_constraintStart_toEndOf="@+id/button2" />
</androidx.constraintlayout.widget.ConstraintLayout>
Creating Shared Preferences
Next, we will create the Shared Preferences in our MainActivity.java. We will also create two EditText fields and initialize them in our onCreate method.
public class MainActivity extends AppCompatActivity {
     EditText emailEditText,passwordEditText;
    SharedPreferences sharedPreferences;
    public static final String MY_PREFERENCE = "mypreference";
    public static final String EMAIL_KEY = "email";
    public static final String PASSWORD_KEY = "password";
     @Override
    protected void onCreate(Bundle savedInstanceState) {
        super.onCreate(savedInstanceState);
        setContentView(R.layout.activity_main);
        emailEditText = findViewById(R.id.editTextTextEmailAddress);
        passwordEditText = findViewById(R.id.editTextNumberPassword);
        sharedPreferences = getSharedPreferences(MY_PREFERENCE,MODE_PRIVATE);
    }
}
Saving Data to Shared Preferences
We will now create a method called onSave(). This method will be called when the user clicks the "Save" button. It will take the text from the EditText fields, convert them to strings, and then store them in the Shared Preferences.
public void onSave(View view){
    String email = emailEditText.getText().toString();
    String password = passwordEditText.getText().toString();
    SharedPreferences.Editor editor = sharedPreferences.edit();
    editor.putString(EMAIL_KEY,email);
    editor.putString(PASSWORD_KEY,password);
    editor.commit();
}
Retrieving Data from Shared Preferences
Next, we will create the onGet() method. This method will be called when the user clicks the "Get" button. It will retrieve the email and password from the Shared Preferences and set the text of the EditText fields to these values.
public void onGet(View view){
    if(sharedPreferences.contains(EMAIL_KEY)){
        emailEditText.setText(sharedPreferences.getString(EMAIL_KEY,""));
    }
    if(sharedPreferences.contains(PASSWORD_KEY)){
        passwordEditText.setText(sharedPreferences.getString(PASSWORD_KEY,""));
    }
}
Clearing the EditText Fields
Finally, we will create the onClear() method. This method will be called when the user clicks the "Clear" button. It will clear the text from the EditText fields.
public void onClear(View view){
    emailEditText.setText("");
    passwordEditText.setText("");
}
And that's it! You have now created an Android app that uses Shared Preferences to store user data. This data will persist even if the user closes the app, and will only be deleted when the app is uninstalled or the app data is cleared from the Android settings.
Subscribe to my newsletter
Read articles from Krunal Dhapodkar directly inside your inbox. Subscribe to the newsletter, and don't miss out.
Written by
