A Beginners' Handbook into MKDocs
 Onyeanuna Prince
Static site generators are tools that you can use to generate HTML, CSS, and JavaScript files from templates using various languages such as Markdown, HTML, etc. Static site generators have a faster load time because they pre-build all their pages, unlike dynamic websites that generate content on the server side. This ability makes it more secure and very valuable for creating technical documentation.
MKDocs is a fast and easy-to-use static site generator that focuses on building technical documentation websites. Its source files are written in Markdown, and its configuration is compiled in a single YAML file. MKDocs is a simple, lightweight static site generator that creates fast, lightening, easy-to-configure documentation.
In this article, I will guide you through getting started with MKDocs. You will learn how to install and set up MKDocs, and the basics of the Markdown language. By the end of this article, you will have sufficient knowledge to build your documentation page from scratch using MKDocs.
Installation and Setup
An outstanding feature of MKDocs is that it has a simple onboarding process. With the following steps, you can install MKDocs:
MKDocs installation:
Ensure you have Python installed on your PC. To confirm if you have Python on your computer, you can run the following command via the CLI:
python --versionThis will give you the version of Python currently installed on your computer.
If you need help, you can go to the official Python website, select the version that fits your operating system and follow the steps to download it.
Once Python is installed, you can go ahead and install MKDocs using the command below:
pip install mkdocs
Create a new project:
On your terminal, navigate to your desired directory and run the command below:
mkdocs new [project]Replace
projectwith the name of your project.This command will create a directory containing a
docsfolder for all your documentation files while all the configuration happens in themkdocs.ymlfile. Thedocsfolder comes with anindex.mdfile by default.
Preview documentation:
After customizing your project, you can preview it on your browser. In the same directory where your configuration files were created, run the command below:
mkdocs serveNavigate to
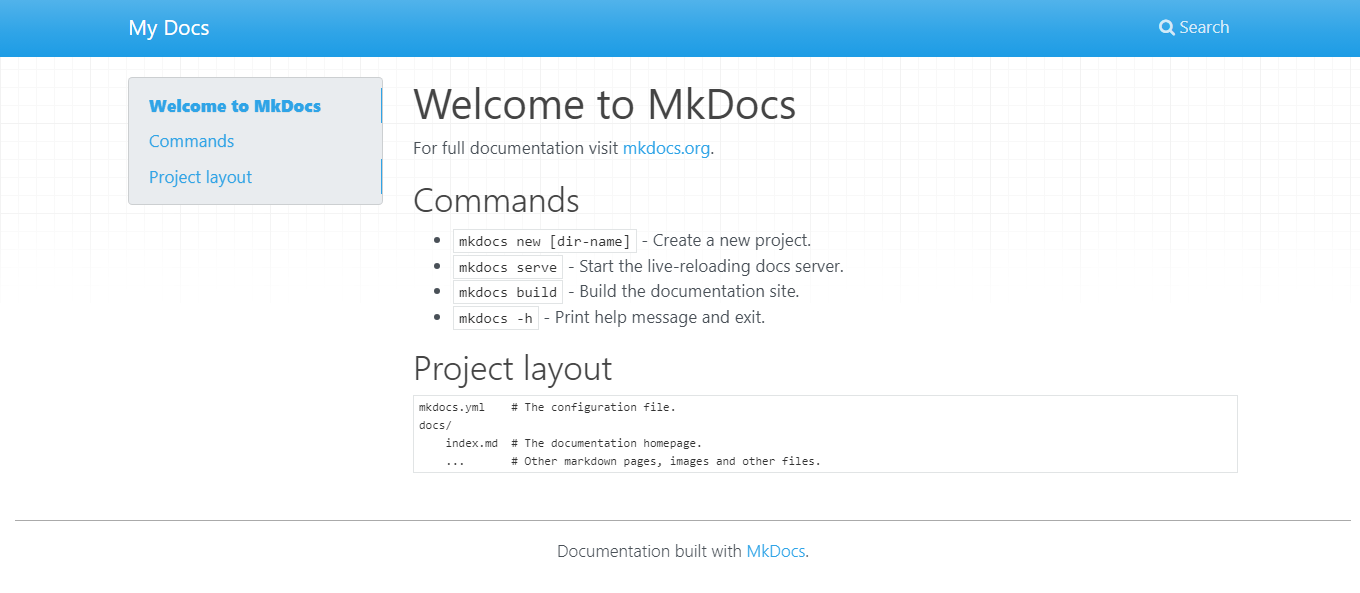
localhost:8000to access your documentation via the browser. If you didn't customize the defaultindex.mdfile, you should see the default MKDocs page.
Figure 1. Default MKDocs page.
Easy! With those three steps, you have completed the setup of MKDocs on your PC. In the next section, you will get a breakdown of the MKDocs architecture so you can configure your documentation.
Configuring Your MKDocs Project
Before customizing your MKDocs project, take a moment to understand the default file structure that MKDocs sets up for you. This will give you a clear picture of how your documentation is organized.
When you create a new MKDocs project, you'll have a basic structure that looks like this:
my-project/                  ## Your project directory
├── docs/                    ## Folder for your documentation content
│   ├── index.md             ## Main documentation page (example)
│   └── ...                  ## Additional documentation pages (example)
│
└── mkdocs.yml               ## Configuration file for your MKDocs project
The following is a breakdown for each component of the default project structure:
my-project/: This is the main directory for your project. You can name it whatever you like.docs/: This folder is where you'll store your documentation content. It contains Markdown files that represent your documentation pages. Thedocs/folder includes a default file calledindex.md. However, you can create additional files as needed.mkdocs.yml: This is the configuration file for your MKDocs project. It's a YAML file that controls various aspects of your documentation, such as the site name, theme, navigation, and more. You'll modify this file to customize your project according to your preferences.
With this understanding of the default file structure, you can move on to customizing your MKDocs project:
Understanding the
mkdocs.ymlFile: Open themkdocs.ymlfile in a text editor. You'll find different configuration options to modify and customize your project in this file.Customizing the Site Name: One of the first things you can do is change the site name to match your project. In the
mkdocs.ymlfile, look for thesite_nameoption and update it with your desired name.Choosing a Theme: MKDocs provides a variety of themes to give your documentation site a visually appealing look. In the
mkdocs.ymlfile, you can set thethemeoption to the name of the desired theme. Popular themes includemkdocs-materialandreadthedocs.Configuring Navigation: The
navsection in themkdocs.ymlfile controls the navigation menu in your documentation. To fit your content structure, you can add, remove, or rearrange pages.Exploring Additional Configuration Options: MKDocs offers many other configuration options to enhance your documentation, such as enabling syntax highlighting, adding a custom logo or favicon, configuring the navigation sidebar, and more. These options are documented within the
mkdocs.ymlfile.
Customizing the mkdocs.yml file allows you to tailor your documentation project to meet your specific requirements. Remember to save your changes and preview the updated project by running mkdocs serve in the terminal. This allows you to see the impact of your customizations in real-time.
Writing Content with Markdown
One of the significant advantages of using MKDocs is that it leverages the power of Markdown for writing documentation content. Markdown is a simple and widely used markup language that allows you to create well-structured and visually appealing text documents easily. It uses plain text formatting that can be easily converted to HTML or other formats. In this section, you'll learn basic markdown syntax, which you can use to create top-notch documentation.
Below is a description of the markdown syntax:
Headings: Use hashtags (#) to create headings. One hashtag makes a top-level heading, while more hashtags indicate lower-level headings. That means the more hashtags, the smaller the heading size.
Formatting Text: In your document, you can emphasize text by surrounding it with asterisks (*) or underscores (_). Similarly, double asterisks (**) or double underscores (__) are used for bold text.
Lists: Create ordered lists by starting lines with numbers. For unordered lists, use hyphens (-), plus signs (+), or asterisks (*).
Links: Enclose the linked text in square brackets ([]) and the URL in parentheses (()).
Images: Similar to links, you can insert images by using an exclamation mark (!), square brackets ([]), and parentheses (()). The square brackets contain an optional alt text, and the parentheses contain the path or URL to the image.
The table below contains a more elaborate description of the markdown syntax:
| Syntax | Result |
# Heading 1 | Heading 1 |
## Heading 2 | Heading 2 |
## Heading 3 | Heading 3 |
*Italic* or _Italic_ | Italic |
**Bold** or __Bold__ | Bold |
- Unordered list | - Unordered list |
1. Ordered list | 1. Ordered list |
[Link](URL) | Link |
 | Image |
`Code` | Code |
This table concisely overviews common Markdown syntax and its resulting output. Remember to use these elements to structure and format your documentation effectively.
One of the advantages of using MKDocs is the ability to preview your Markdown content in real-time. As you change your Markdown files, run mkdocs serve in the terminal, and it will automatically update the preview in your web browser.
Building and Deploying Your Documentation
Deploying it so others can publicly access your work is an essential stage when making documentation. This is the step where you package your documentation into a single folder and deploy it online for easy accessibility. MKDocs provides a command to build the documentation, which will create a directory called site. You can now upload this directory to any hosting platform like GitHub pages or Netlify to get access to your documentation.
Below are the steps to build and deploy your documentation using MKDocs:
Once you've finished customizing your documentation, you can build it using the command below:
mkdocs buildThis will create a directory called
site.This directory will contain the source code for the static site of your documentation.With the source code in the
sitedirectory, you can deploy your documentation on a web hosting platform such as GitHub pages or Netlify. They will provide a link from which you can access your documentation site anywhere on the internet.
Following these steps, you can build and deploy your documentation using MKDocs. Whether you choose GitHub Pages or another hosting platform, your documentation will be readily accessible to your audience.
Conclusion
You have successfully embarked on your journey to get started quickly with MKDocs and create beautiful documentation. Throughout this article, we have covered the essential aspects of using MKDocs as a beginner, from installation and setup to configuring your project, writing content with Markdown, and deploying your documentation.
If you want to see an example of a documentation site built using MKDocs, please visit my GitHub repository. You can explore the structure, layout, and content of a real documentation site created with MKDocs.
Subscribe to my newsletter
Read articles from Onyeanuna Prince directly inside your inbox. Subscribe to the newsletter, and don't miss out.
Written by

Onyeanuna Prince
Onyeanuna Prince
Prince is a technical writer and DevOps engineer who believes in the power of showing up. He is passionate about helping others learn and grow through writing and coding.