Mastering Linux Administration
 SARTHAK SHINDE
Hey, What's up guys, Sarthak here, Welcome back to another blog. In this blog, I will cover all the relevant points that have been covered in today's Linux Workshop, carried out byPranav Jambare at Dr.Babasaheb Ambedkar Technological University, Lonere. Those who didn't check my previous blogs please check it out first.
On the sixth day of the workshop, the following points were covered.
Booting Process.
ACL.
Processes.
Booting Process
The booting process is the sequence of steps that a computer system goes through when it is turned on or restarted. It involves loading and initializing the operating system and other essential software components.
Stages of the Booting Process
BIOS:
When the computer is powered on, the Basic Input/Output System (BIOS)starts executing.
BIOS performs a Power-On Self Test (POST) to check the essential hardware components for proper functionality.
It identifies and initializes various hardware devices, such as the CPU, memory, storage controllers, and peripherals.
Then it loads MBR.
MBR:
If the system is using the legacy BIOS, it reads the Master Boot Record (MBR) from the bootable storage device.
The MBR contains the partition table and the location of the active partition.
The storage capacity of MBR is 512kb.
In which, 446kb is used for the Primary Boot loader. The Primary Boot Loader's main responsibility is to locate and load the secondary boot loader or the actual operating system's boot code.
64kb is used for Partition Boot Loader. The Partition Boot Loader is responsible for loading and executing the operating system's boot code or the secondary boot loader specific to that partition.
And last 2kb is used for Magic Number(Parity bits). The Magic Number serves as a signature that helps identify a valid MBR. It is used by the BIOS and the operating system to determine if the MBR is correctly formatted and contains a bootable partition.
Grub:
GRUB (Grand Unified Bootloader) is a popular bootloader used in many Linux and Unix-based operating systems. It plays a crucial role in the booting process, enabling users to select and load different operating systems installed on their computers.
The first stage of GRUB is typically stored in the MBR itself.
Stage 1.5 (sometimes used) is an intermediate stage that helps GRUB access file systems.
Stage 2 contains most of GRUB's functionality and is loaded from the boot partition's file system.
GRUB takes the code from MBR and then Filesystem communicates with hardware components.
Configuration File Path of GRUB:
/boot/grub2/grub.conf
Kernel:
It initializes and configures computer memory and hardware.
Uncompressed itself and mount it.
It is the central component that gets loaded into memory and manages the system's resources, processes, and hardware.
The kernel is typically stored as a file on the boot partition, and the boot loader reads it from there.
The kernel is responsible for initializing the system's hardware, including CPU, memory, and devices. It sets up data structures and starts the essential kernel subsystems.
Init.d/System.d:
Init.d and Systemd are two different initialization systems used in Linux distributions to manage the booting process and control system services.
They handle the startup and management of various system processes, including services, daemons, and user-level applications, during the booting process and while the system is running.
Init.d stands for "Initialization Directory" and is based on the traditional System V init system. It is commonly found in older Linux distributions.
The init.d system uses a collection of shell scripts stored in the
/etc/init.ddirectory.System.d is a modern initialization system and service manager that has largely replaced Init.d in newer Linux distributions.
Run level:
- Commands that were used:
#This command is used to display current runlevel
who -r
#This command is used to initialize given runlevel
init 5
#It is used to set default to multiuser target
systemctl set-default multi-user.target
#It is used to display default target
systemctl get-default

 #Following are the Runlevels
 0 - Halt state poweroff.target
 1 - Single user mode / rescue.target
 2 - Mutliuser mode without networking
 3 - Mulituser mode with networking
 4 - User Definable
 5 - GUI graphical.target
 6 - Reboot.target
ACL
ACL (Access Control List) in Linux is a feature that extends the standard file permissions to provide more fine-grained control over access to files and directories.
While standard file permissions (user, group, and others) in Linux allow you to set read, write, and execute permissions, ACLs allow you to define more specific permissions for individual users and groups.
With ACLs, you can grant or deny permissions to multiple users and groups, giving you more flexibility in managing access to files and directories.
ACLs are particularly useful in scenarios where you need to allow different levels of access to specific users or groups without changing the default permissions of the files or directories.
To set an ACL:
#Syntax
#To set the permission given to that user
setfacl -m u:<user>:<permission> <directory name>
#Example
setfacl -m u:sarthak:rwx /tmp/testacl
#To display the permission or ACL
getfacl <directory name>
#Example
getfacl testacl
#Output
file: testacl
owner: root
group: root
user:sarthak:rwx
group::rwx
mask::rwx
other::r-x
To remove ACL:
#Removing a specific user
setfacl -x sarthak /tmp/testacl
#Removing multiple user
setfacl -b /tmp/TestACL
Processes
The processes are the events that have been tracked in logs.
Processes are created when a new program is executed.
Each process in Linux is assigned a unique identifier called the Process ID (PID).
When a process completes its execution, it terminates.
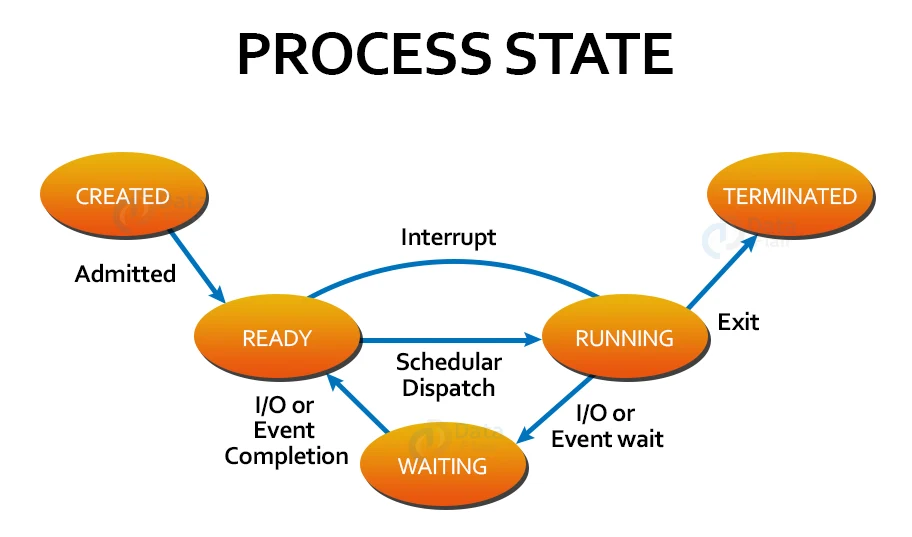
States of Processes
Created: The process is being set up and initialized but has not yet started executing.
Ready: The process is loaded into the main memory (RAM) and is waiting for the CPU to be assigned to execute.
Running: The process is actively using the CPU and executing its instructions.
Waiting: The process is waiting for an event to occur, such as an input/output (I/O) operation, user input, or the completion of another process.
Terminate: This is the final state of a process when it completes its execution or is forcefully terminated.

Types of Processes:
Parent Process: When a process creates another process, it becomes the parent process of the newly created process.
Child Process: A child process is a new process that is created by an existing process known as the parent process.
Orphan process: When a parent process terminates, the child process is left without a parent, and the system automatically adopts the orphan process by assigning it a new parent process.
Zombie process: A zombie process is a terminated process that has completed its execution but still has an entry in the process table.
Commands in Processes:
Top command
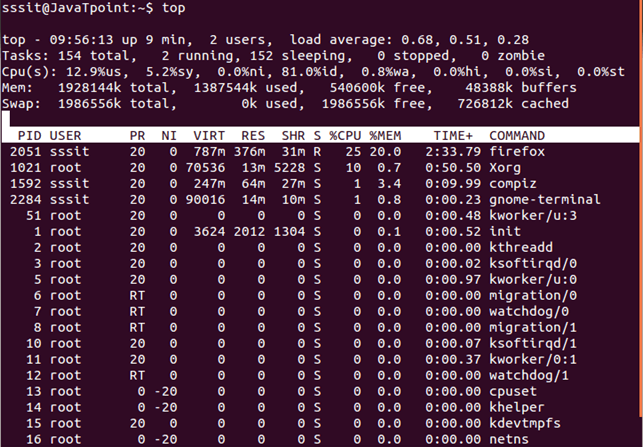
The top command is in the interactive shell. When you run the top command in the terminal, it displays a dynamic and interactive view of the system's processes, sorted by various criteria such as CPU usage, memory usage, and more.
Output:

Where,
PID: Process ID.
User: User name.
PR: Priority.
NI: Nice.
VIRT: Virtual memory.
RES: Reserve memory.
SHR: Shared memory.
S: State.
%CPU: CPU usage.
%MEM: Memory usage.
Time: Total CPU Time.
Command: Command name.
Kill
  #Syntax
  kill -9 <PID>
  #Example
  kill -9 1021
Terminate
  #Syntax
  kill -15 <PID>
  #Example
  kill -15 1592
Resume
#Syntax
kill -18 <PID>
#Example
kill -18 1021
Suspend
 #Syntax
  kill -19 <PID>
  #Example
  kill -19 1592
To check Status
 #Command
  jobs
Run Background process :
  #Syntax
  bg %<jobno>
Run Foreground Process :
  #Syntax
  fg %<jobno>
Nice command: The
nicecommand is used to adjust the priority of a running process. It allows users to modify the priority at which a process runs.
 #Syntax
 nice -n <nicevalue> <command>
Renice Command: The
renicecommand is used to change the priority of running processes. It allows users with appropriate permissions to adjust the priority of existing processes, influencing how much CPU time the processes receive compared to other processes.
 #Syntax
 renice -n <nicevalue> <pid>
That's it for the Day 6...
Thank you for reading! Keep supporting, Learning and growing with each other.
Subscribe to my newsletter
Read articles from SARTHAK SHINDE directly inside your inbox. Subscribe to the newsletter, and don't miss out.
Written by

SARTHAK SHINDE
SARTHAK SHINDE
Hey guys, I am Sarthak Shinde . Currently studying Diploma in Computer Engineering at Dr. Babasaheb Ambedkar Technological University, Lonere, Raigad.