✍️Don't Miss This Kubernetes Installation blog with Kubeadm issues and solution on VMware Machine✏️
 Sajid
SajidTable of contents
- 🍃🍃🍃Before you begin🍃🍃🍃
- 1 :- Now, put # on swap line.
- ❄❄Two important entities in Kubernetes❄❄
- 1 :- Master Node 2 :- Worker Node
- ❄<mark>It Shows 2 CPU in both system</mark>❄
- ❄Finally, installation starts in both the machine master-node and worker-node.
- ❄All Command runs in Master Node and Worker Node.
- su master-node or su worker-node
- 🐋Command run only on Master Node
- 🐋Command run only on Master Node
- 🐋Command run only on Worker Node
- 🐋Command run only on Master Node🐋
- 🐋Command run only on Worker Node🐋
- 🐋Command run only on Master Node🐋
- 🐋Command run only on Worker Node🐋
- 🐋Command run only on Master Node🐋
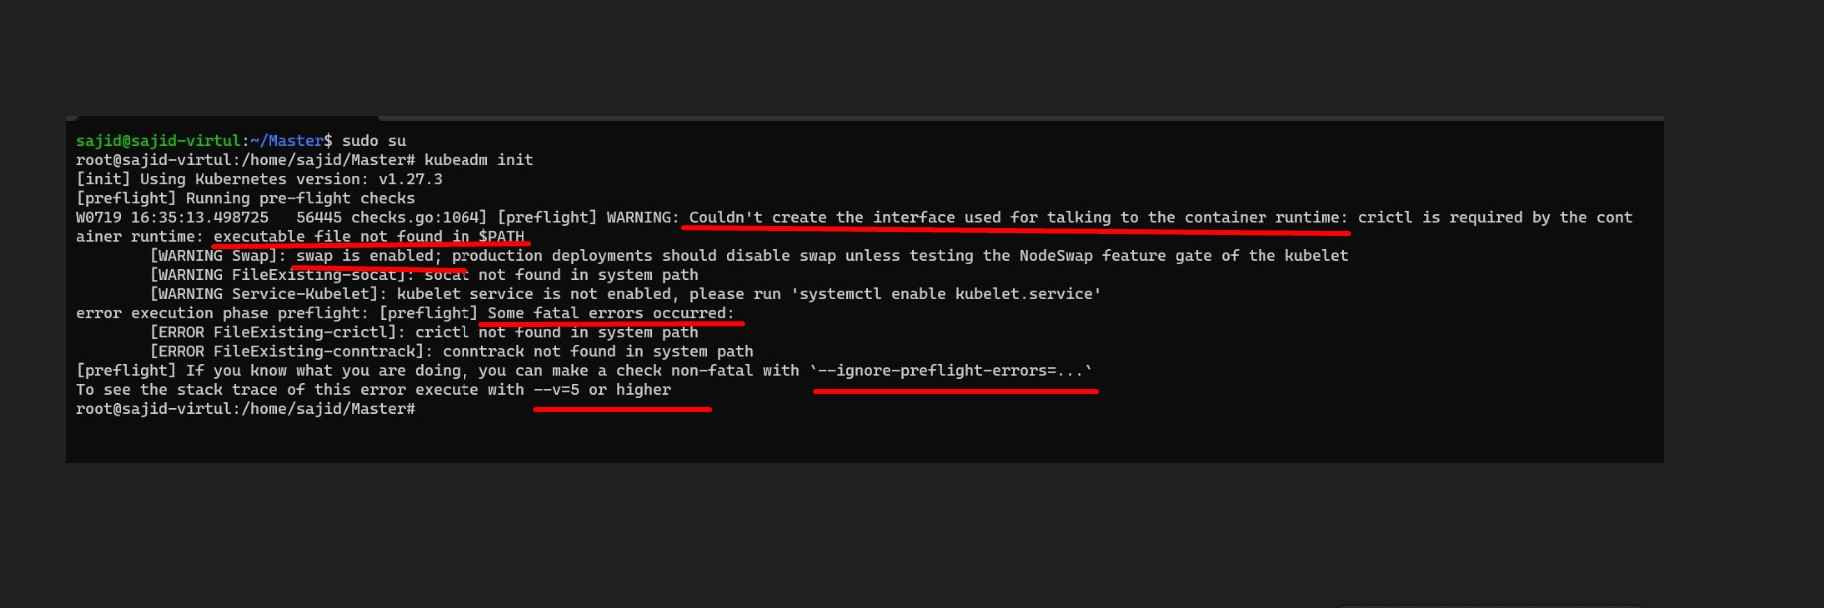
🍃🍃🍃Before you begin🍃🍃🍃

A compatible Linux host. The Kubernetes project provides generic instructions for Linux distributions based on Debian and Red Hat, and those distributions without a package manager.
4 GB for Master node and 1 GB or more RAM for Worker node (any less will leave little room for your apps).
2 CPUs or more.
Full network connectivity between all machines in the cluster (public or private network is fine).

Swap disabled. You MUST disable swap in order for the kubelet to work properly.
- For example,
sudo swapoff -awill disable swapping temporarily. To make this change persistent across reboots, make sure swap is disabled in config files like/etc/fstab,systemd.swap, depending how it was configured on your system.
- For example,


1 :- Now, put # on swap line.

❄❄Two important entities in Kubernetes❄❄
1 :- Master Node 2 :- Worker Node
To run the master node, it will take 2 CPU and 4 GB RAM at least.
Worker node can be of any type, highly skilled and low skilled.
So worker node will also run in 1 CPU and 1 GB RAM.
2 :- First of all we will create 2 Ubuntu machines in our VMware. After that both the machine, which is in the name of a master node, and a worker node.
Run some same commands on both nodes(Master Node & Worker Node).
First of all we will check the version of OS in both system.


3 :- Now, check CPU in both system.


❄It Shows 2 CPU in both system❄
4 :- Swap disabled. You MUST disable swap in order for the kubelet to work properly in both node.

sudo swapoff -a will disable swapping temporarily. To make this change persistent across reboots, make sure swap is disabled in config files like /etc/fstab, systemd.swap, depending how it was configured on your system.

❄Now, disabled swap with command in root user :- sudo swapoff -a
and vim /etc/fstab and Restart your system.

5 :- Now, install docker. (Mater Node and Worker Node)


6 :- Now we will start and enable Docker service so that Docker will continue to run even after system restart.
(Mater Node and Worker Node)

7 :- Switch to master-node and also switch to worker-node.

8 :- Update the apt package index and install packages needed to use the Kubernetes apt repository,
(Mater Node and Worker Node)

9 :- Download the Google Cloud public signing key,
(Mater Node and Worker Node)

10 :- Add the Kubernetes apt repository,
(Mater Node and Worker Node)

11 :- Now, Update apt package index,
(Mater Node and Worker Node)

12 :- Now, install kubeadm=1.20.0-00 kubectl=1.20.0-00 kubelet=1.20.0-00 -y
(Mater Node and Worker Node)

❄Finally, installation starts in both the machine master-node and worker-node.

13 :- Check the Version of kubelet, kubeadm, and kubectl.
(Mater Node and Worker Node)
❄Kubelet :- kubelet --version
❄Kubeadm :- kubeadm version
❄Kubectl :- kubectl version --short

❄❄❄Now my master node and worker node are individually ready. But still, these two are not connected to each other❄❄❄
14 :- Now first of all we have to go to the master node and work as root user.
(Master Node)

15 :- Now I am starting a cluster of Kubernetes on the master node only.
🐋🐋For this, I will do kubeadm init command.
(Master Node)
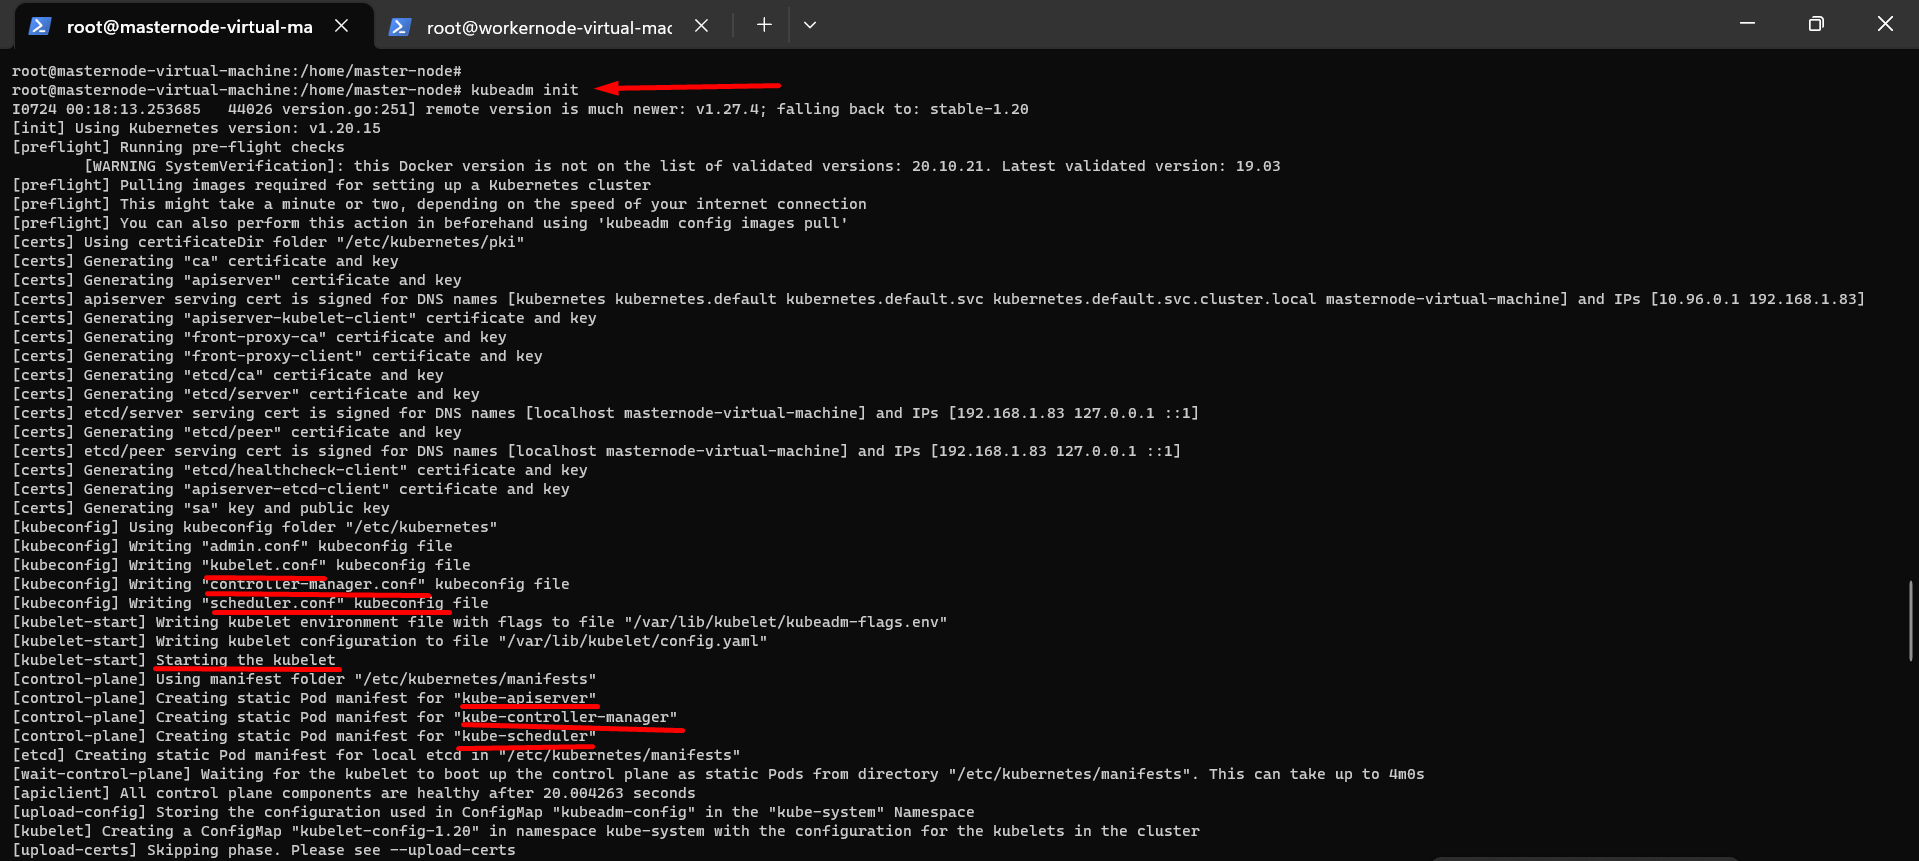
🎯Your Kubernetes control-plane has initialized successfully!
🎯To start using your cluster, you need to run the following as a regular user:
mkdir -p $HOME/.kube sudo cp -i /etc/kubernetes/admin.conf $HOME/.kube/config sudo chown $(id -u):$(id -g) $HOME/.kube/config
🎯Alternatively, if you are the root user, you can run:
export KUBECONFIG=/etc/kubernetes/admin.conf
(Master Node)

16 :- See file on /etc/kubernetes/admin.conf
(Master Node)
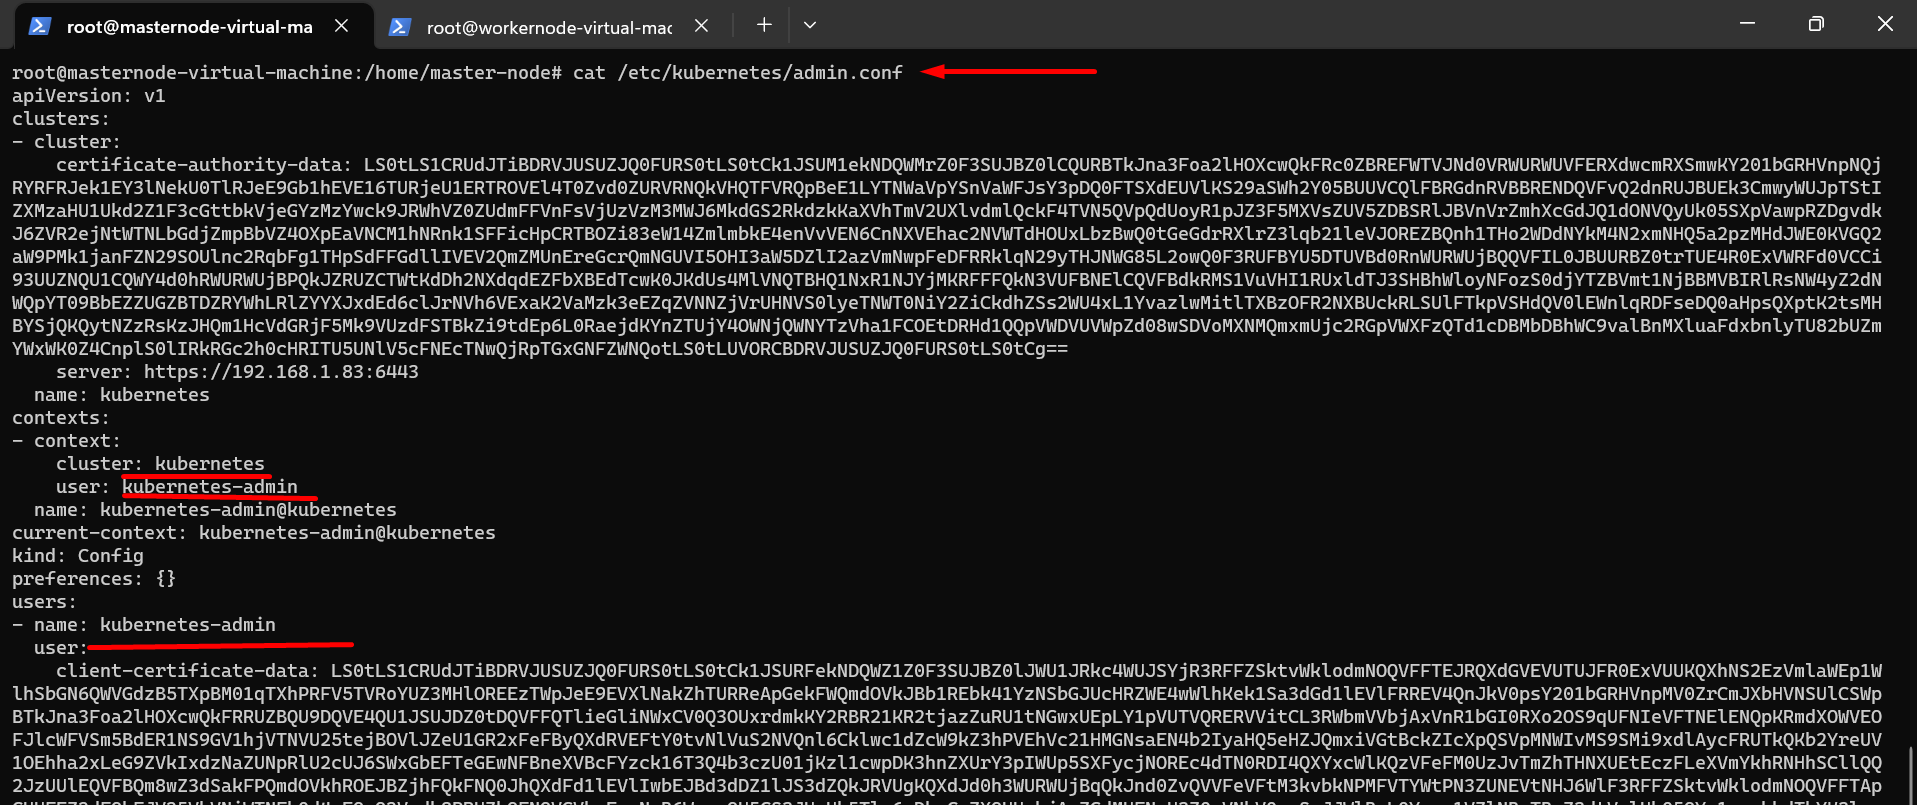
🎯Now if I want to use Kubernetes then my user name is kubernetes-admin. The key of that user is given,
🎯I am going to connect the data of the certificate with my worker using this key, so I should have this key
17 :- I am going to connect the data of the certificate with my worker using this key, so I should have this key,
🎯Now apply kubectl apply on a master node, this particular file so that setup of your master node is finished.
Daemonset
(Master Node)

🎯serviceaccount/weave-net created :- This means that no random user can enter on your master node. This means that no random user can enter on your master node.
🎯The one who has the token, the one who has the authentication key, only that user can enter.
18 :- Now, tell or command kubeadam to create a token so that if I give this token to any worker, It will join my cluster.
(Master Node)
🐋🐋Command :- kubeadm token create --print-join-command

29 :- Now go to Worker Machine with root user, Will reset pre-flight checks first.
(Worker Node)
🐋If I mistakenly put kubeadm-init on the worker node, it will become the master node.
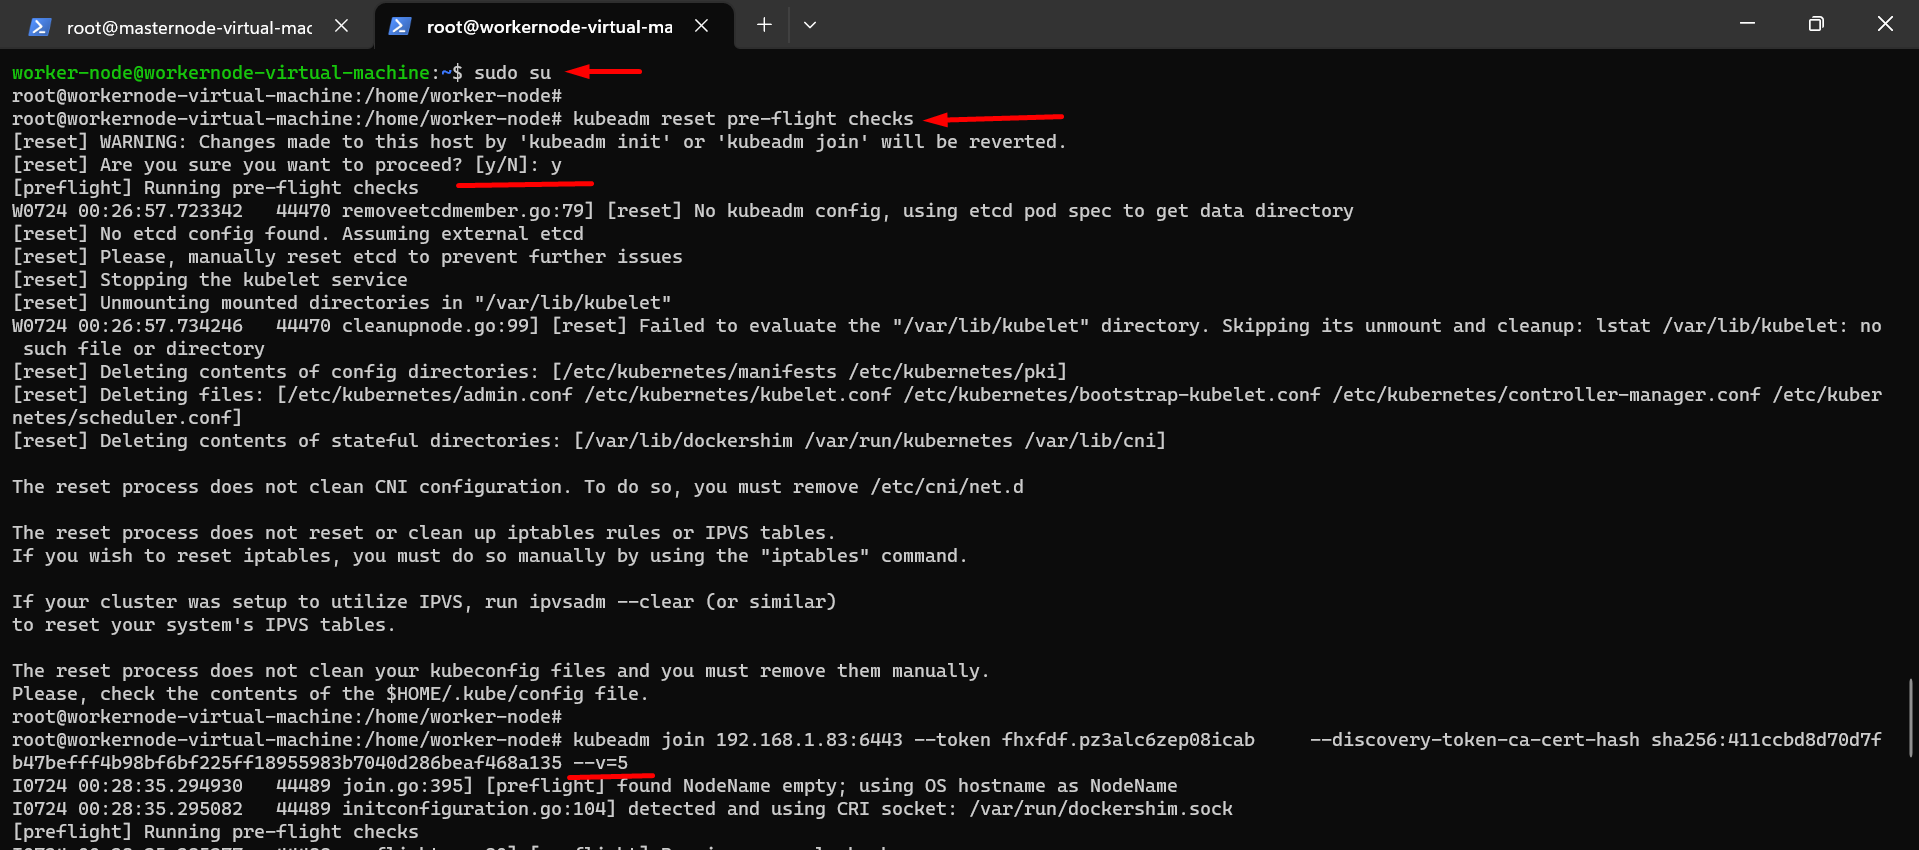
20 :- Now, give token to Worker Node,
🎯Whenever we do join through token we have to give --v=5, version 5 has to be given.
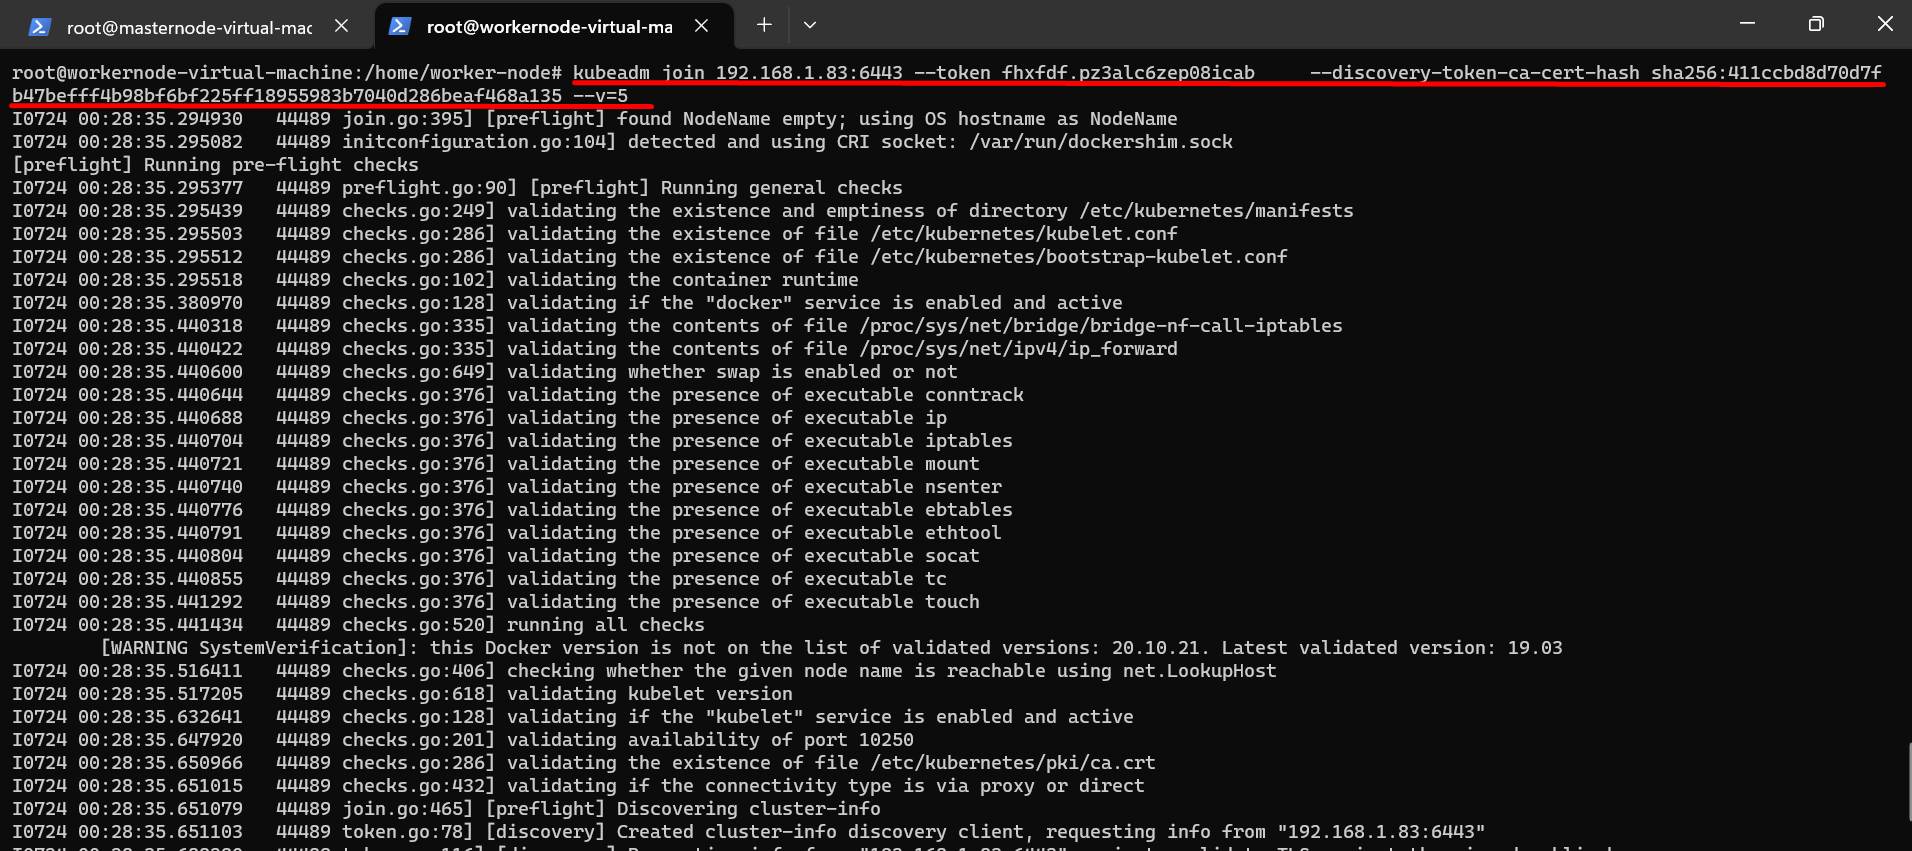
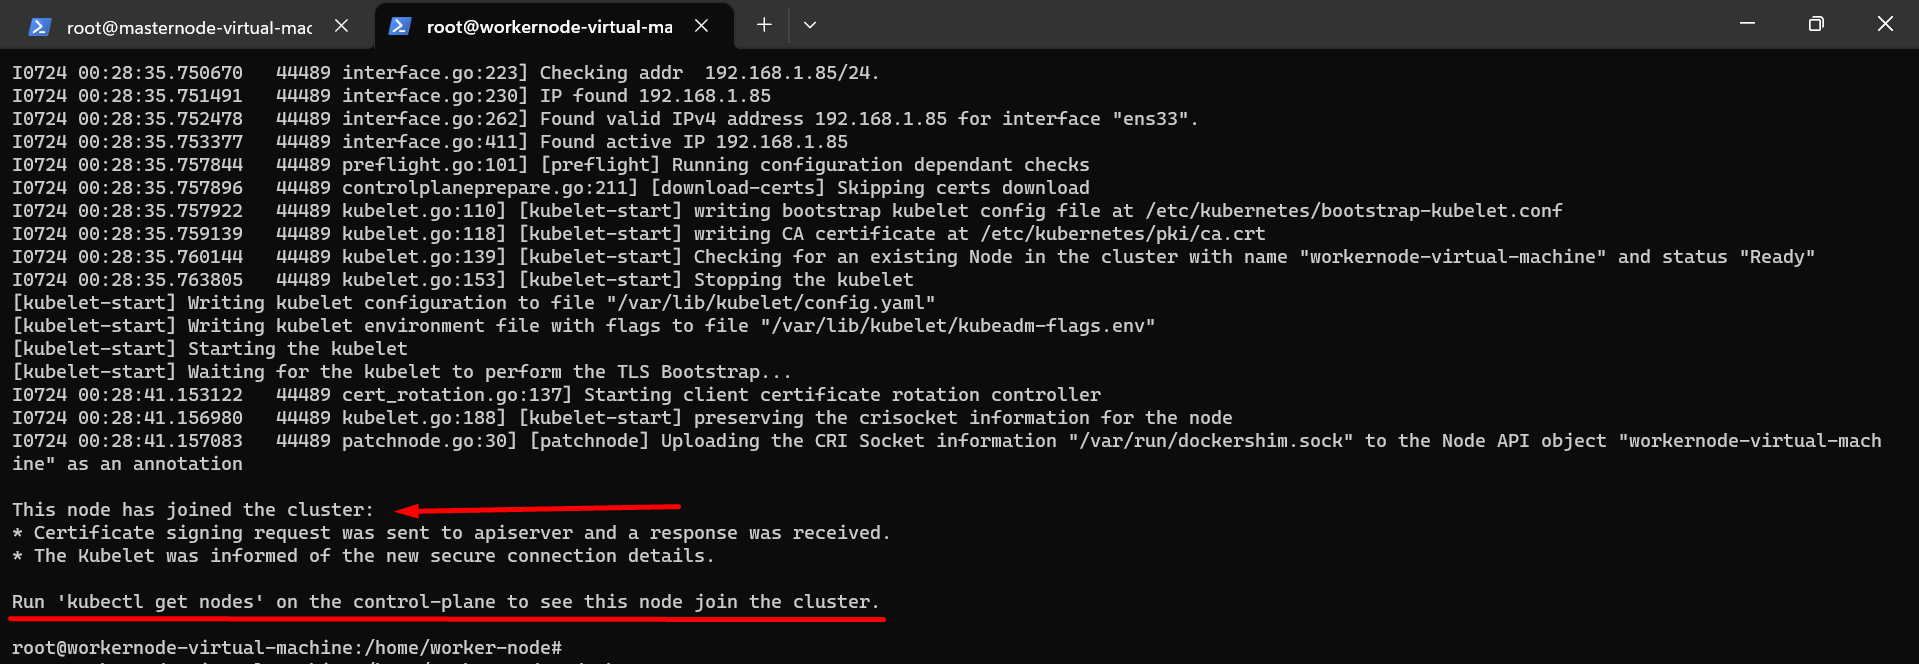
21 :- By running the kubectl get nodes command in master node, we will see whether the worker node has joined the master node or not.

(Master Node)

Now we can see that the worker node has joined master node.
22 :- If I want to run nginx pod now, I have to enter this command on master node.
(Master Node)

23 :- Now we will run the docker ps command to check whether the nginx pod is running on the worker node or not.
(Worker Node)
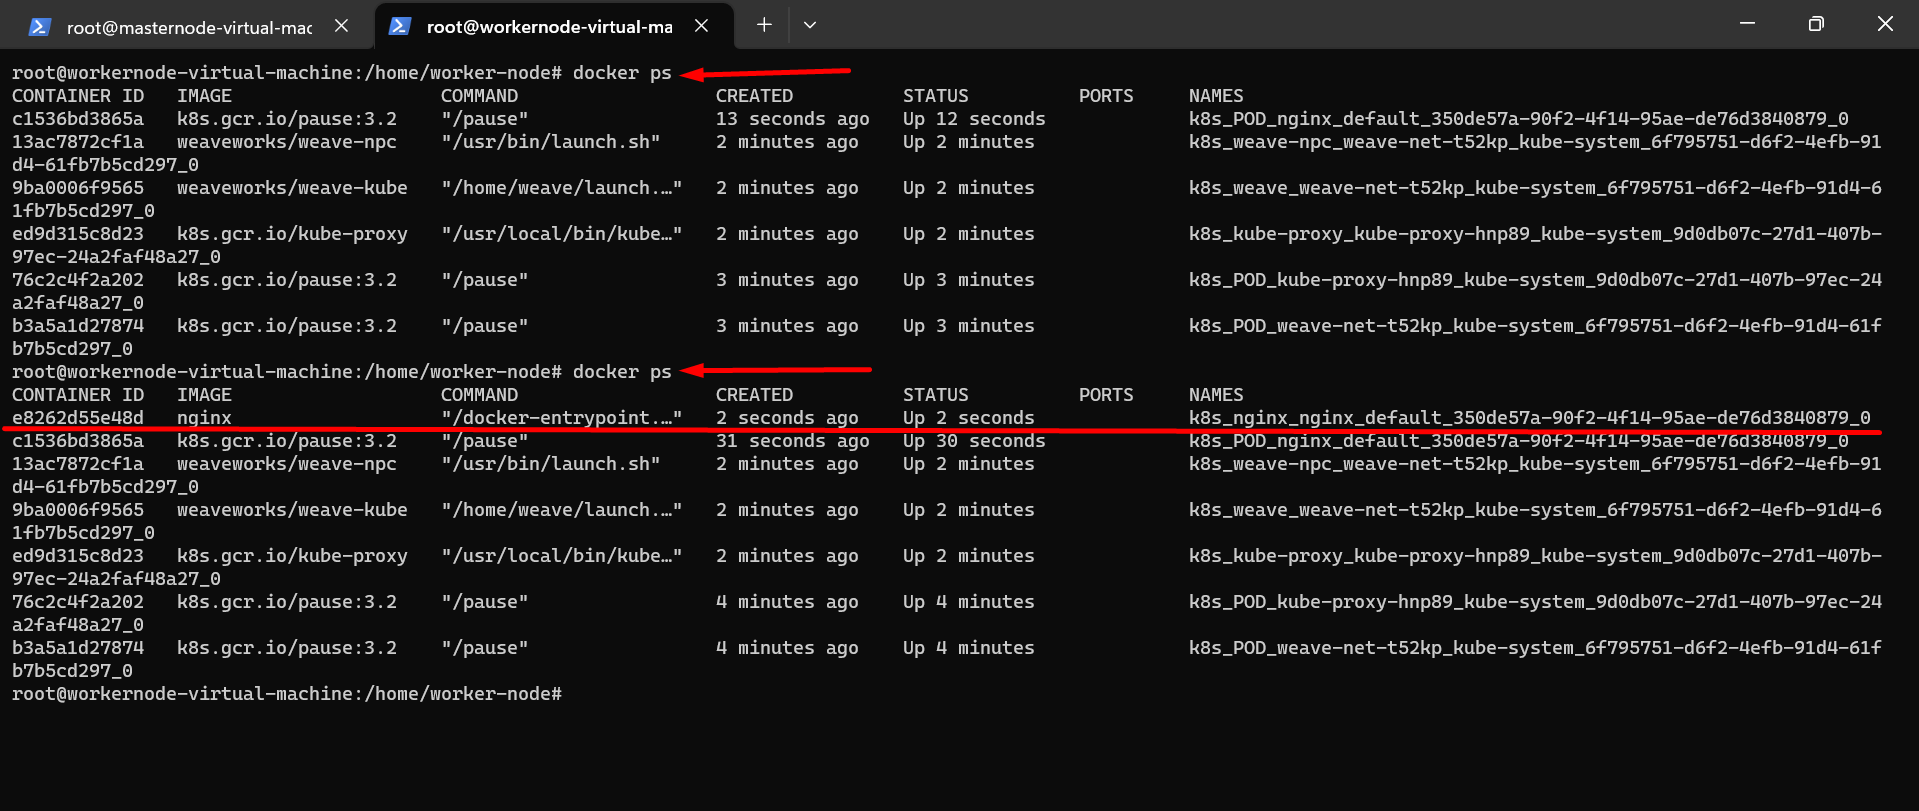
🎯Now, we will check with kubectl get pod command that nginx pod is running.
(Master Node)


🍃🍃🍃**Now we are done Kubeadm's installation project in VMware is successfully deployed without errors**🍃🍃🍃

❄All Command runs in Master Node and Worker Node.
cat /etc/os-releasenprocsudo sufree -hswapoff -avim /etc/fstabcat /etc/fstabsudo apt installdocker.io-ysudo systemctl start dockersudo systemctl enable dockersu master-nodeorsu worker-nodesudo apt-get update
sudo apt-get install -y apt-transport-https ca-certificates curlcurl -fsSLhttps://packages.cloud.google.com/apt/doc/apt-key.gpg| sudo gpg --dearmor -o /etc/apt/keyrings/kubernetes-archive-keyring.gpgecho "deb [signed-by=/etc/apt/keyrings/kubernetes-archive-keyring.gpg]https://apt.kubernetes.io/kubernetes-xenial main" | sudo tee /etc/apt/sources.list.d/kubernetes.listsudo apt-get updatesudo apt install kubeadm=1.20.0-00 kubectl=1.20.0-00 kubelet=1.20.0-00 -ykubelet --version kubeadm version kubectl version --short
🐋Command run only on Master Node
sudo sukubeadm initexport KUBECONFIG=/etc/kubernetes/admin.confcat /etc/kubernetes/admin.conf
🐋Command run only on Master Node
kubectl apply -fhttps://github.com/weaveworks/weave/releases/download/v2.8.1/weave-daemonset-k8s.yaml
🐋Command run only on Worker Node
kubeadm reset pre-flight checks
🐋Command run only on Master Node🐋
kubeadm token create --print-join-command
🐋Command run only on Worker Node🐋
kubeadm join 192.168.1.83:6443 --token fhxfdf.pz3alc6zep08icab --discovery-token-ca-cert-hash sha256:411ccbd8d70d7fb47befff4b98bf6bf225ff18955983b7040d286beaf468a135 --v=5Here, in place of this command, do only the token generated on the master node of your system and put --v=5 in the last
🐋Command run only on Master Node🐋
kubectl get nodeskubectl run nginx --image=nginx --restart=Never
🐋Command run only on Worker Node🐋
docker ps
🐋Command run only on Master Node🐋
kubectl get pod
📚📖📝Feel free to ask me, if you need any help regarding this docker project📚📖📝
❄Thank you for reading! I hope you find this article helpful❄
❄❄❄❄❄❄❄The End❄❄❄❄❄❄❄❄
Subscribe to my newsletter
Read articles from Sajid directly inside your inbox. Subscribe to the newsletter, and don't miss out.
Written by

Sajid
Sajid
Driven Systems Administrator with 3 years of experience in software implementation and maintenance. Proven history of managing complex infrastructures and data center operations. Expert in solutions-oriented business application problem-solving and dedicated to providing best-in-class service. Skilled at troubleshooting, communication and collaboration.