T3 Stack Template : Supabase (w/ Auth + DB) and Shadcn-UI Basic Setup
 Remus
RemusIntroduction
In this guide, we will cover how to convert the base T3 stack config to use Supabase auth instead of NextAuth.js coupled with Supabase DB and Shadcn-UI. We'll also cover how to use SQL triggers so that we can use the more stable single-schema db with Prisma and still get access to the Supabase client-side APIs.
Starting Out
npm create t3-app@latest
You can use pnpm or yarn instead of npm
T3 setup Flow
Create Project Name
Typescript (only typescript)
You can use nextAuth, prisma, tailwind and trpc, nextAuth is optional as we’re going to change that to supabase auth so whether you click yes on that option it doesn’t really matter since it’s going to be changed anyways.

Setting Up the .env & .env.example files
Go to the .env.example and copy the lines below, this will be a reference to modifying the .env file with all the environment variables
# PostgreSQL connection string with pgBouncer config — used by Prisma Client
DATABASE_URL = "insert_database_url_here"

# PostgreSQL connection string used for migrations
DIRECT_URL="insert_direct_url_here"

# Supabase
NEXT_PUBLIC_SUPABASE_URL="insert_supabase_public_url"
NEXT_PUBLIC_SUPABASE_ANON_KEY="insert_supabase_anon_key"
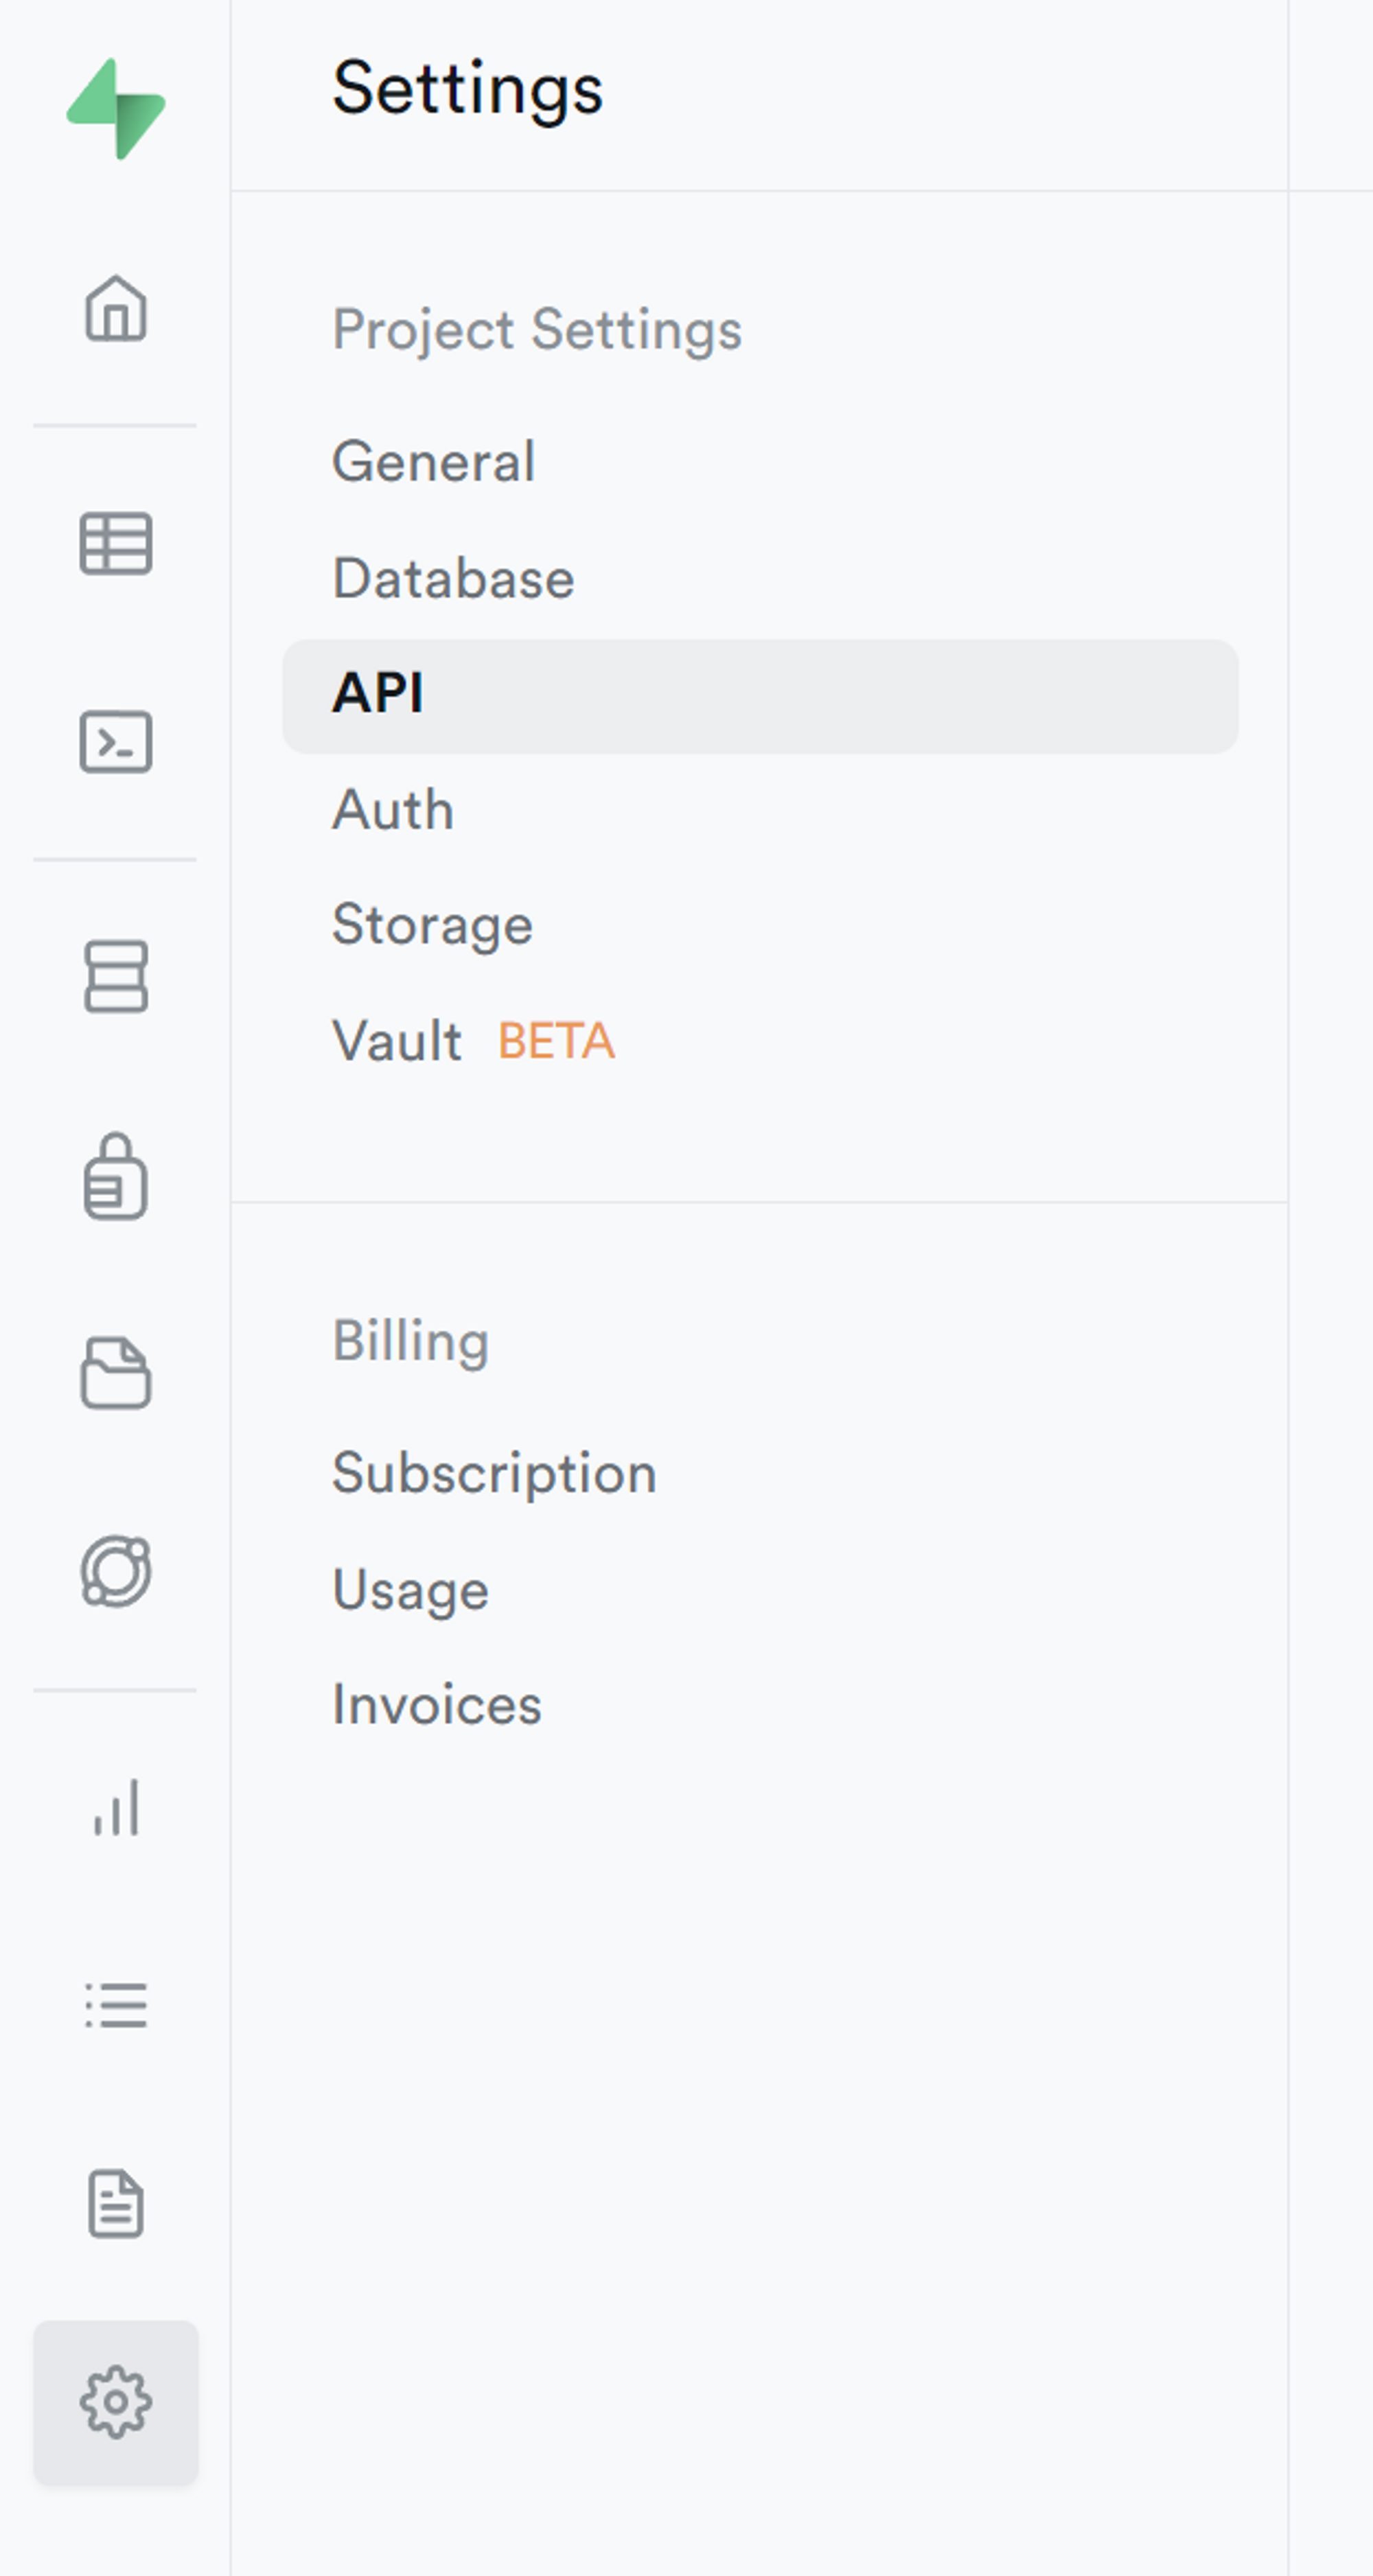
After creating a new project in Supabase, go to the project settings at the gear icon in the sidebar, then click on API.
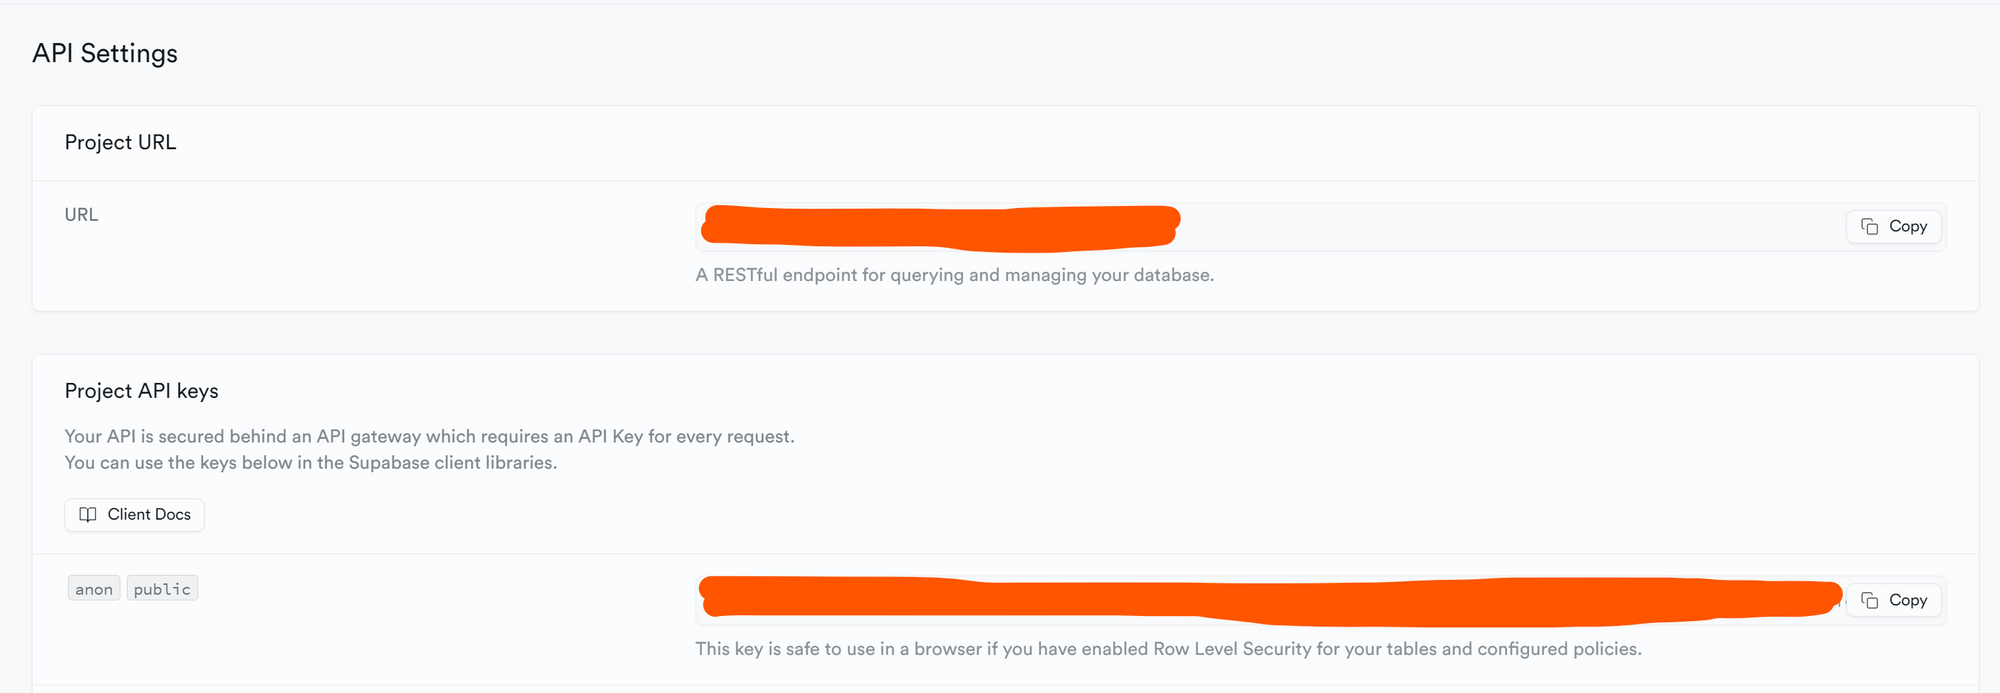
Copy the Supabase URL in the NEXT_PUBLIC_SUPABASE_URL variable in the .env file
Copy anon key in the NEXT_PUBLIC_SUPABASE_ANON_KEY variable in .env file
Switch from the API to the Database Menu

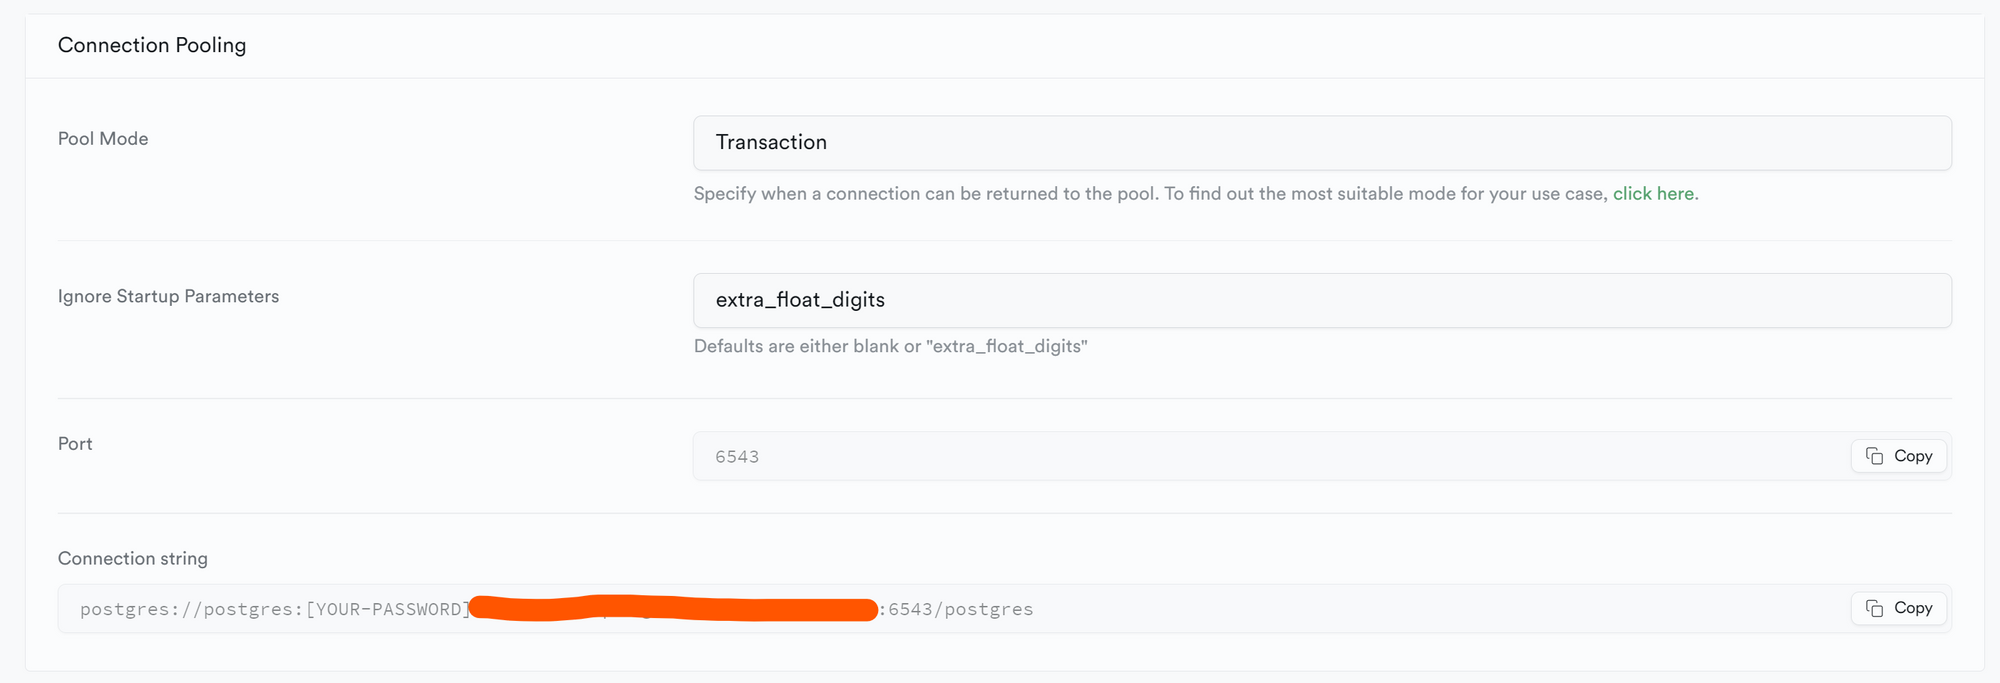
Copy the Connection String URI in the DATABASE_URL variable in the .env file — should end with 5432
Copy the Connection Pooling - Connection String in the DIRECT_URL variable in .env file — should end with 6543
Add your password in the area below, REPLACING the brackets highlighted in green

NOT in the area below (inside the brackets)

Single-Schema DB + auth.users table trigger
The codebase below provided much of the inspiration for making this tutorial, however, it uses a multi-schema db which introduced some challenges when trying to access Supabase from the SupabaseJS client-side library.
https://github.com/supabase-community/create-t3-turbo
Due to there being some issues with multi-schema databases, I recommend using a single-schema database until those issues get resolved as it’s still a preview feature in Prisma as of when this article was published. Below is a GitHub thread discussing some real-world examples of the challenges of using the multi-schema db option in Prisma.
https://github.com/supabase/gotrue/issues/1061
Below is a thread from the Supabase discord channel where I posted the challenges I was having trying to modify the public schema.
Discord - A New Way to Chat with Friends & Communities
Below is the official guide from the Supabase docs on how to set up a Supabase project using a single schema db, however, it does not leverage the t3 stack. We’re going to be using the example SQL code for the auth.users trigger so the user_id variable can be accessed from the public.users table.
Build a User Management App with NextJS | Supabase Docs
SQL code reference
Below is the SQL users table trigger directly from the user management Supabase demo app.
-- Create a table for public profiles
create table profiles (
  id uuid references auth.users not null primary key,
  updated_at timestamp with time zone,
  username text unique,
  full_name text,
  avatar_url text,
  website text,

  constraint username_length check (char_length(username) >= 3)
);
-- Set up Row Level Security (RLS)
-- See <https://supabase.com/docs/guides/auth/row-level-security> for more details.
alter table profiles
  enable row level security;

create policy "Public profiles are viewable by everyone." on profiles
  for select using (true);

create policy "Users can insert their own profile." on profiles
  for insert with check (auth.uid() = id);

create policy "Users can update own profile." on profiles
  for update using (auth.uid() = id);

-- This trigger automatically creates a profile entry when a new user signs up via Supabase Auth.
-- See <https://supabase.com/docs/guides/auth/managing-user-data#using-triggers> for more details.
create function public.handle_new_user()
returns trigger as $$
begin
  insert into public.profiles (id, full_name, avatar_url)
  values (new.id, new.raw_user_meta_data->>'full_name', new.raw_user_meta_data->>'avatar_url');
  return new;
end;
$$ language plpgsql security definer;
create trigger on_auth_user_created
  after insert on auth.users
  for each row execute procedure public.handle_new_user();

-- Set up Storage!
insert into storage.buckets (id, name)
  values ('avatars', 'avatars');

-- Set up access controls for storage.
-- See <https://supabase.com/docs/guides/storage#policy-examples> for more details.
create policy "Avatar images are publicly accessible." on storage.objects
  for select using (bucket_id = 'avatars');

create policy "Anyone can upload an avatar." on storage.objects
  for insert with check (bucket_id = 'avatars');

create policy "Anyone can update their own avatar." on storage.objects
  for update using (auth.uid() = owner) with check (bucket_id = 'avatars');
We’re not going to need most of what is used because we’re not using Supabase storage for this example but you're mileage may vary. Instead of profiles we’re going to call this table users.
-- Create a table for public users without a foreign key reference
CREATE TABLE users (
  user_id uuid NOT NULL PRIMARY KEY,
  updated_at timestamp with time zone
);

-- Set up Row Level Security (RLS)
ALTER TABLE users
ENABLE row level security;

-- Public users are viewable by everyone
CREATE POLICY "public_users_are_viewable_by_everyone" ON users
FOR SELECT USING (true);

-- Users can insert their own user
CREATE POLICY "users_can_insert_their_own_user" ON users
FOR INSERT WITH CHECK (auth.uid()::uuid = user_id);

-- Users can update their own user
CREATE POLICY "users_can_update_own_user" ON users
  FOR UPDATE USING (auth.uid()::uuid = user_id);

-- This trigger automatically creates a user entry when a new user signs up via Supabase Auth.
CREATE FUNCTION public.handle_new_user()
RETURNS trigger AS $$
BEGIN
  INSERT INTO public.users (user_id)
  VALUES (new.id);
  RETURN new;
END;
$$ LANGUAGE plpgsql SECURITY DEFINER;

CREATE TRIGGER on_auth_user_created_v2
  AFTER INSERT ON auth.users
  FOR EACH ROW EXECUTE PROCEDURE public.handle_new_user();
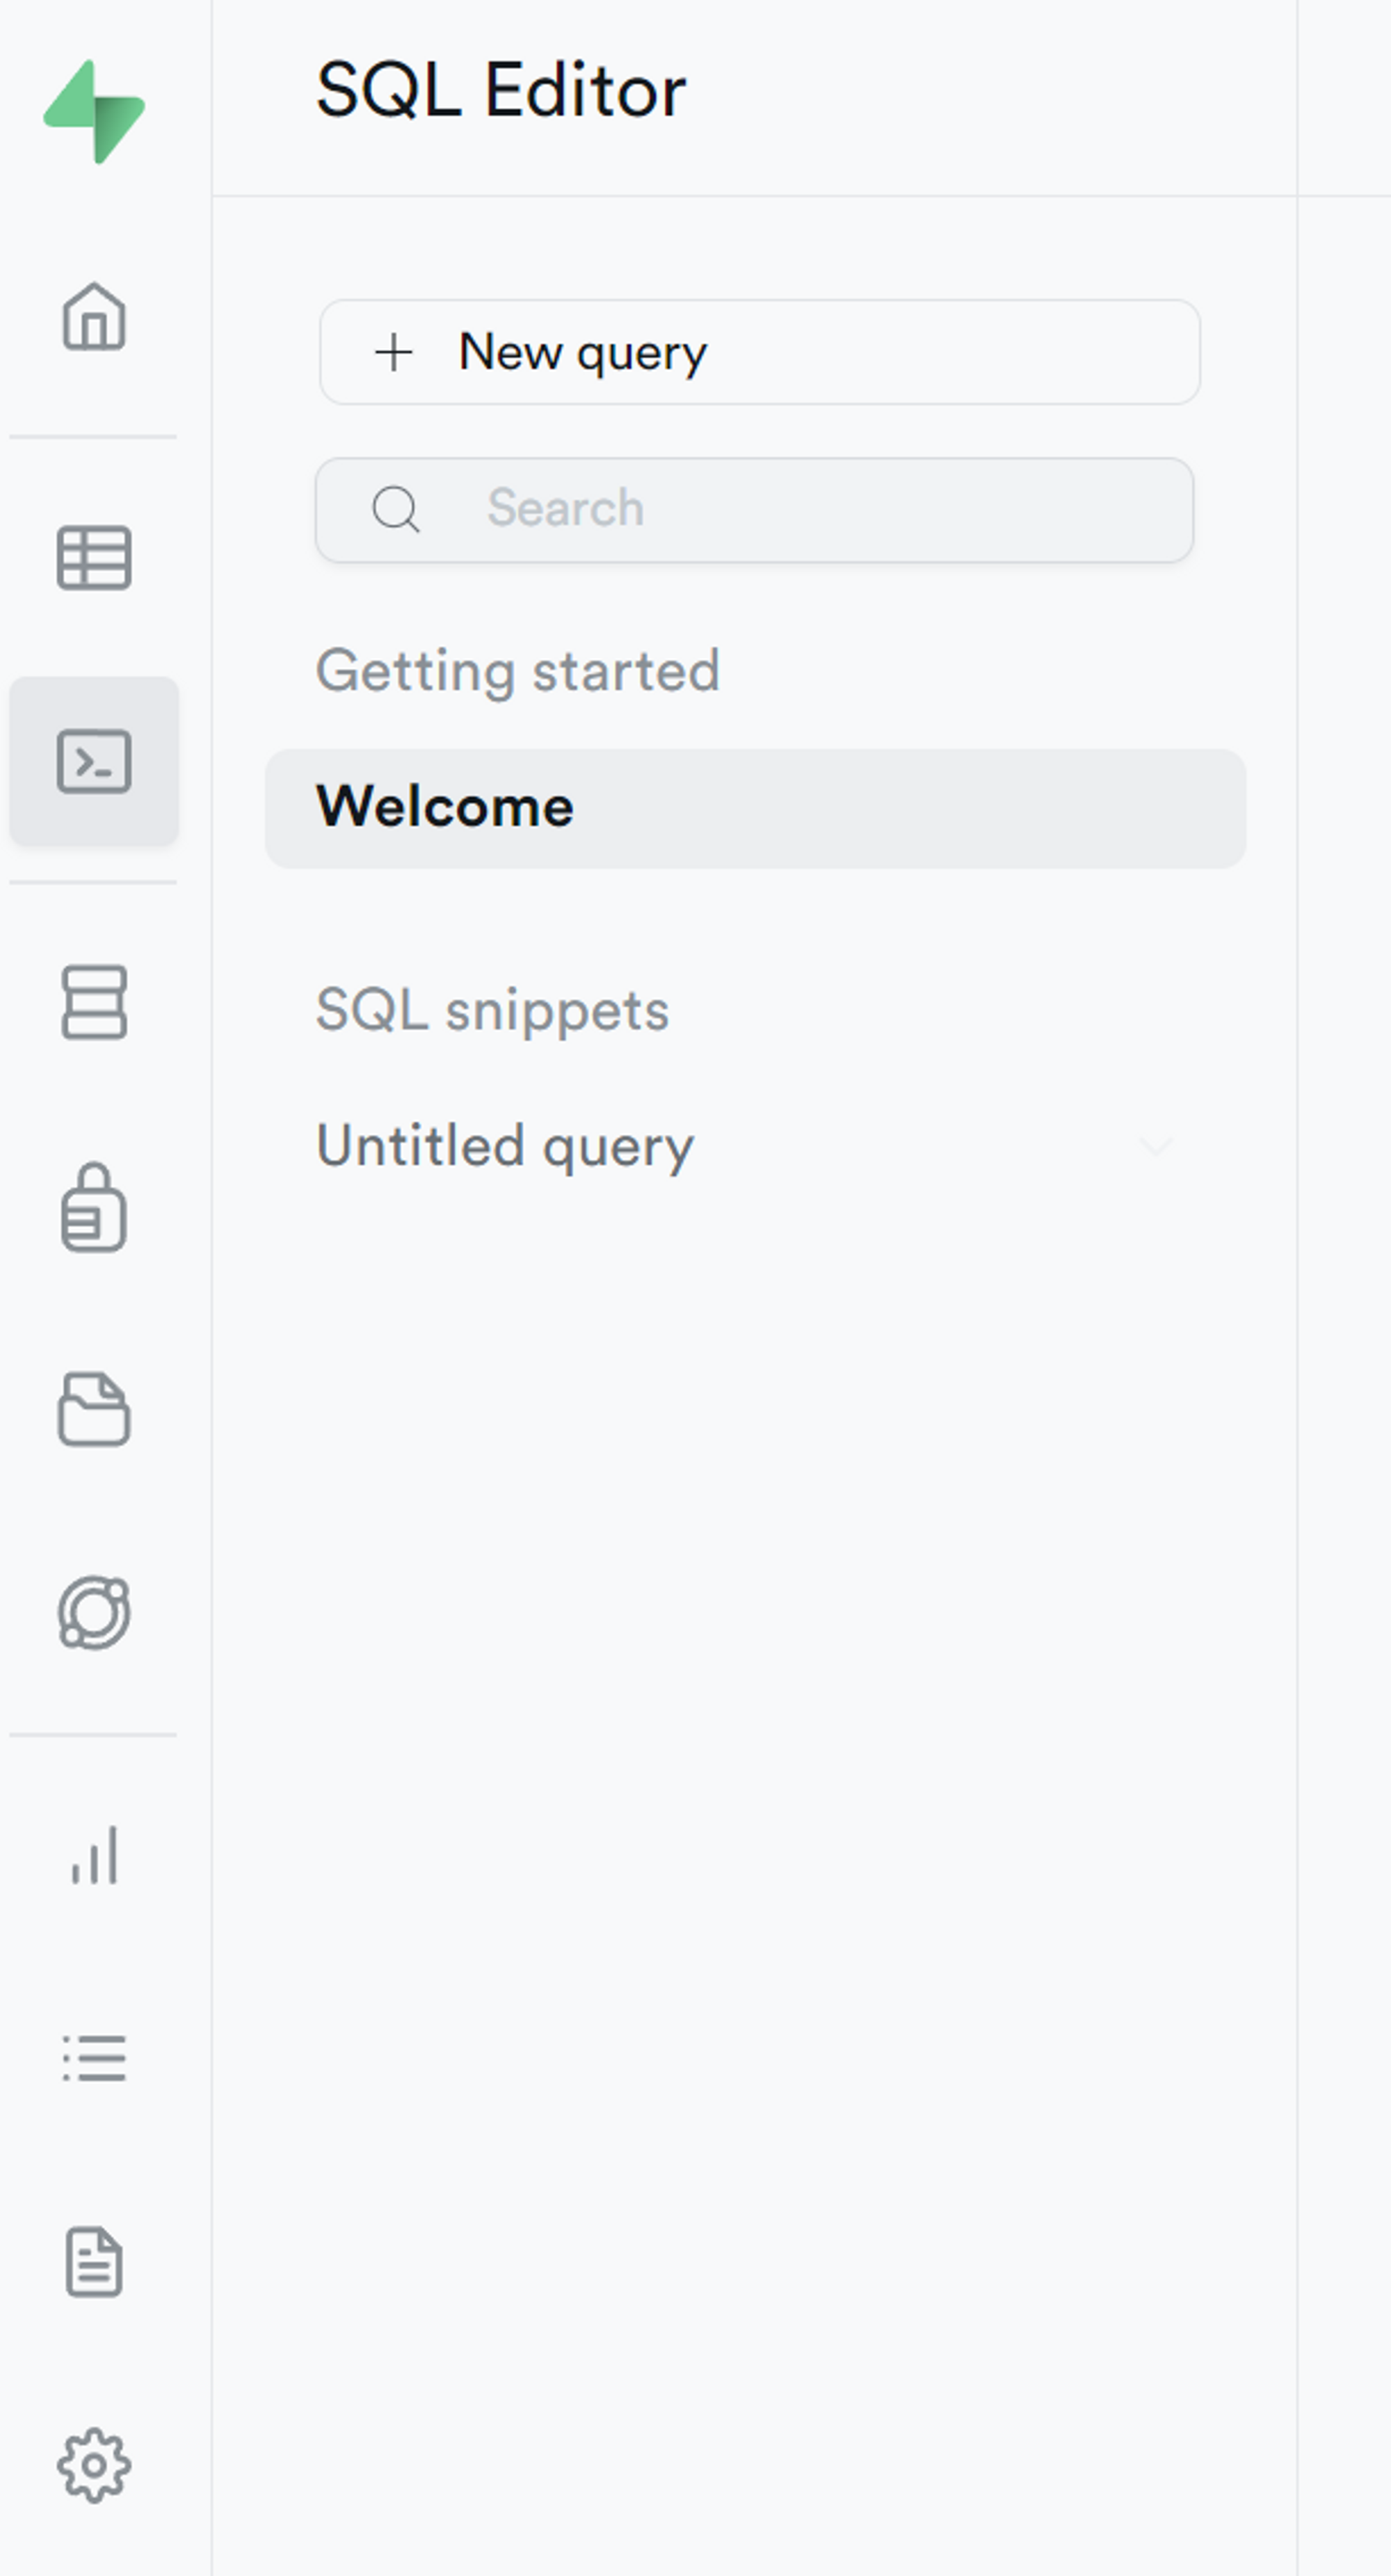
Add the trigger in the SQL Editor
Other SQL Trigger Articles
Below are some other reference articles for creating auth triggers for single-schema Supabase projects.
https://www.sandromaglione.com/techblog/supabase-database-user-sign-up-and-row-level-security
https://nextdev1111.hashnode.dev/triggers-in-supabase-for-making-new-rows
Set Up signin.tsx and signup.tsx
With the SQL code set up, we can go to the signin and signup pages next. Both the signin and signup functionality can be merged into one page but we’re just going to separate them out for clarity.
Download and Setup Shadcn-UI
Below is the page for getting started with Shadcn-UI, for a NextJS project.
https://ui.shadcn.com/docs/installation/next
pnpm dlx shadcn-ui@latest init
You can yarn or npm if your project needs other options.

Select the options above
Yes for
src/directoryNo for the app router (this might change if t3 stack switches to the app router)
No
In a default T3-app configuration the globals.css is in the root → src → styles → globals.css

Shadcn UI Components
There’s also a manual installation available, but since the Shadcn CLI was set up, we can use the CLI instead to download all the additional dependencies.
https://ui.shadcn.com/docs/components/form
This is the link for setting up a form in Shadcn-ui.
pnpm dlx shadcn-ui@latest add form
pnpm dlx shadcn-ui@latest add toast
pnpm dlx shadcn-ui@latest add input
pnpm dlx shadcn-ui@latest add button
pnpm dlx shadcn-ui@latest add input
pnpm dlx shadcn-ui@latest add table
If the Shadcn CLI was set up correctly, this should add the UI components in the src → components → ui path.
Go to the path where each of the components was added, and double-check if there are any missing dependencies. In the toast.tsx file, there might be a missing dependency, it’ll be highlighted below.

Add the dependency manually.
pnpm add @radix-ui/react-toast
Import the following components into the signin.tsx file in the pages directory for Shadcn forms components, it uses react-hook-forms under the hood.
import * as z from "zod";
import { useForm, Resolver } from "react-hook-form";
import { zodResolver } from "@hookform/resolvers/zod";
import { Button } from "../components/ui/button";
import {
  Form,
  FormControl,
  FormDescription,
  FormField,
  FormItem,
  FormLabel,
  FormMessage,
} from "../components/ui/form";
import { Input } from "../components/ui/input";
import { useToast } from "../components/ui/use-toast";
import { Toaster } from "../components/ui/toaster";
Adding the Supabase Components
Add in the Supabase components below.
pnpm add @supabase/auth-helpers-react
Putting it together
Set up the form schema below, and define the maximum or minimum inputs contingent on your project needs.
const formSchema = z.object({
  email: z.string().min(2).max(50),
  password: z.string().min(2),
});
Import the Supabase library component.
import { useSupabaseClient } from "@supabase/auth-helpers-react";
Create a React component that will be exported, the formSchema constant is outside of this function. Add in the Supabase library components and have it integrate with the react-forms-hook component.
function SignIn() {
  const supabase = useSupabaseClient();
  const router = useRouter();
  const { toast } = useToast();
  const [isSignUp, setIsSignUp] = useState(false);

  const signInWithPassword = async (email: string, password: string) => {
    const { error, data } = isSignUp
      ? await supabase.auth.signUp({
          email,
          password,
        })
      : await supabase.auth.signInWithPassword({
          email,
          password,
        });
    if (error) {
      toast({
        variant: "destructive",
        title: "Something went wrong",
        description: "Error with auth" + error.message,
      });
    } else if (isSignUp && data.user) {
      setIsSignUp(false);
    } else if (data.user) {
      router.push("/app/overview").catch((err) => {
        console.error("Failed to navigate", err);
      });
    }
  };

  const signOut = async () => {
    const { error } = await supabase.auth.signOut();
    if (error) {
      console.error("Error signing out:", error.message);
    } else {
      toast({
        variant: "default",
        title: "Signed out successfully",
      });
      router.push("/signin").catch((err) => {
        console.error("Failed to navigate", err);
      });
    }
  };

  // 1. Define your form.
  const form = useForm<z.infer<typeof formSchema>>({
    resolver: zodResolver(formSchema),
    defaultValues: {
      email: "",
      password: "",
    },
  });

  // 2. Define a submit handler.
  function onSubmit(values: z.infer<typeof formSchema>) {
    // Do something with the form values.
    // ✅ This will be type-safe and validated.
    signInWithPassword(values.email, values.password).catch((err) => {
      console.error(err);
    });
  }

  return (
    <div className="flex min-h-screen items-center justify-center">
      <Toaster></Toaster>
      <div className="w-96">
        <div className="flex flex-col items-start">
          <Form {...form}>
            <h1 className="mb-4 text-3xl font-bold">T3 Demo Sign-In</h1>

            <form onSubmit={form.handleSubmit(onSubmit)} className="space-y-8">
              <FormField
                control={form.control}
                name="email"
                render={({ field }) => (
                  <FormItem>
                    <FormLabel>Email</FormLabel>
                    <FormControl>
                      <Input className="w-96" placeholder="email" {...field} />
                    </FormControl>
                    <FormMessage />
                  </FormItem>
                )}
              />
              <FormField
                control={form.control}
                name="password"
                render={({ field }) => (
                  <FormItem>
                    <FormLabel>Password</FormLabel>
                    <FormControl>
                      <Input
                        className="w-96"
                        placeholder="password"
                        {...field}
                      />
                    </FormControl>
                    <FormMessage />
                  </FormItem>
                )}
              />
              <div className="flex justify-end">
                <Button type="submit">Login</Button>
                <Button onClick={signOut}>Sign Out</Button>
                <Button onClick={() => setIsSignUp((s) => !s)}>
                  {isSignUp
                    ? "Already have an account?"
                    : "Don't have an account?"}
                </Button>
              </div>
            </form>
          </Form>
        </div>
      </div>
    </div>
  );
}

export default SignIn;
signup.tsx
The signup.tsx should be nearly the same, the only difference being the signInWithPassword gets replaced with signUpWithPassword and the onSubmit function uses signUpWithPassword instead of signInWithPassword
const signUpWithPassword = async (email: string, password: string) => {
    const { error, data } = await supabase.auth.signUp({
      email,
      password,
    });

    if (error) {
      toast({
        variant: "destructive",
        title: "Something went wrong",
        description: "Error with auth" + error.message,
      });
    } else if (data.user) {
      toast({
        variant: "default",
        title: "Check your email",
      });
      router.push("/signin").catch((err) => {
        console.error("Failed to navigate", err);
      });
    }
  };
function onSubmit(values: z.infer<typeof formSchema>) {
    signUpWithPassword(values.email, values.password).catch((err) => {
      console.error(err);
    });
  }
Modifying the T3 Scaffold
env.mjs
Below is the default env.mjs setup that is located in src → env.mjs directory
import { createEnv } from "@t3-oss/env-nextjs";
import { z } from "zod";

export const env = createEnv({
  /**
   * Specify your server-side environment variables schema here. This way you can ensure the app
   * isn't built with invalid env vars.
   */
  server: {
    DATABASE_URL: z.string().url(),
    NODE_ENV: z.enum(["development", "test", "production"]),
    NEXTAUTH_SECRET:
      process.env.NODE_ENV === "production"
        ? z.string().min(1)
        : z.string().min(1).optional(),
    NEXTAUTH_URL: z.preprocess(
      // This makes Vercel deployments not fail if you don't set NEXTAUTH_URL
      // Since NextAuth.js automatically uses the VERCEL_URL if present.
      (str) => process.env.VERCEL_URL ?? str,
      // VERCEL_URL doesn't include `https` so it cant be validated as a URL
      process.env.VERCEL ? z.string().min(1) : z.string().url()
    ),
    // Add `.min(1) on ID and SECRET if you want to make sure they're not empty
    DISCORD_CLIENT_ID: z.string(),
    DISCORD_CLIENT_SECRET: z.string(),
  },

  /**
   * Specify your client-side environment variables schema here. This way you can ensure the app
   * isn't built with invalid env vars. To expose them to the client, prefix them with
   * `NEXT_PUBLIC_`.
   */
  client: {
    // NEXT_PUBLIC_CLIENTVAR: z.string().min(1),
  },

  /**
   * You can't destruct `process.env` as a regular object in the Next.js edge runtimes (e.g.
   * middlewares) or client-side so we need to destruct manually.
   */
  runtimeEnv: {
    DATABASE_URL: process.env.DATABASE_URL,
    NODE_ENV: process.env.NODE_ENV,
    NEXTAUTH_SECRET: process.env.NEXTAUTH_SECRET,
    NEXTAUTH_URL: process.env.NEXTAUTH_URL,
    DISCORD_CLIENT_ID: process.env.DISCORD_CLIENT_ID,
    DISCORD_CLIENT_SECRET: process.env.DISCORD_CLIENT_SECRET,
  },
  /**
   * Run `build` or `dev` with `SKIP_ENV_VALIDATION` to skip env validation.
   * This is especially useful for Docker builds.
   */
  skipValidation: !!process.env.SKIP_ENV_VALIDATION,
});
We’re going to remove all the NEXTAUTH and discord references as we’re not using discord authentication in this scaffold.
import { createEnv } from "@t3-oss/env-nextjs";
import { z } from "zod";

export const env = createEnv({
  /**
   * Specify your server-side environment variables schema here. This way you can ensure the app
   * isn't built with invalid env vars.
   */
  server: {
    DATABASE_URL: z.string().url(),
    NODE_ENV: z.enum(["development", "test", "production"]),
  },

  /**
   * Specify your client-side environment variables schema here. This way you can ensure the app
   * isn't built with invalid env vars. To expose them to the client, prefix them with
   * `NEXT_PUBLIC_`.
   */
  client: {
    NEXT_PUBLIC_SUPABASE_URL: z.string().min(1),
    NEXT_PUBLIC_ANON_KEY: z.string().min(1),
  },

  /**
   * You can't destruct `process.env` as a regular object in the Next.js edge runtimes (e.g.
   * middlewares) or client-side so we need to destruct manually.
   */
  runtimeEnv: {
    DATABASE_URL: process.env.DATABASE_URL,
    NODE_ENV: process.env.NODE_ENV,
    NEXT_PUBLIC_SUPABASE_URL: process.env.NEXT_PUBLIC_SUPABASE_URL,
    NEXT_PUBLIC_ANON_KEY: process.env.NEXT_PUBLIC_SUPABASE_ANON_KEY,
  },
  /**
   * Run `build` or `dev` with `SKIP_ENV_VALIDATION` to skip env validation.
   * This is especially useful for Docker builds.
   */
  skipValidation: !!process.env.SKIP_ENV_VALIDATION,
});
This is what we’re left with after the appropriate modifications.
src → pages → api → auth
We can delete the auth folder under API since we’re using Supabase auth instead.
Modify the trpc.ts file in src/server path
Below is the default, base configuration in the src → server → api → trpc.ts path.
import { initTRPC, TRPCError } from "@trpc/server";
import { type CreateNextContextOptions } from "@trpc/server/adapters/next";
import { type Session } from "next-auth";
import superjson from "superjson";
import { ZodError } from "zod";
import { getServerAuthSession } from "~/server/auth";
import { prisma } from "~/server/db";

/**
 * 1. CONTEXT
 *
 * This section defines the "contexts" that are available in the backend API.
 *
 * These allow you to access things when processing a request, like the database, the session, etc.
 */

interface CreateContextOptions {
  session: Session | null;
}

/**
 * This helper generates the "internals" for a tRPC context. If you need to use it, you can export
 * it from here.
 *
 * Examples of things you may need it for:
 * - testing, so we don't have to mock Next.js' req/res
 * - tRPC's `createSSGHelpers`, where we don't have req/res
 *
 * @see <https://create.t3.gg/en/usage/trpc#-serverapitrpcts>
 */
const createInnerTRPCContext = (opts: CreateContextOptions) => {
  return {
    session: opts.session,
    prisma,
  };
};

/**
 * This is the actual context you will use in your router. It will be used to process every request
 * that goes through your tRPC endpoint.
 *
 * @see <https://trpc.io/docs/context>
 */
export const createTRPCContext = async (opts: CreateNextContextOptions) => {
  const { req, res } = opts;

  // Get the session from the server using the getServerSession wrapper function
  const session = await getServerAuthSession({ req, res });

  return createInnerTRPCContext({
    session,
  });
};

/**
 * 2. INITIALIZATION
 *
 * This is where the tRPC API is initialized, connecting the context and transformer. We also parse
 * ZodErrors so that you get typesafety on the frontend if your procedure fails due to validation
 * errors on the backend.
 */

const t = initTRPC.context<typeof createTRPCContext>().create({
  transformer: superjson,
  errorFormatter({ shape, error }) {
    return {
      ...shape,
      data: {
        ...shape.data,
        zodError:
          error.cause instanceof ZodError ? error.cause.flatten() : null,
      },
    };
  },
});

/**
 * 3. ROUTER & PROCEDURE (THE IMPORTANT BIT)
 *
 * These are the pieces you use to build your tRPC API. You should import these a lot in the
 * "/src/server/api/routers" directory.
 */

/**
 * This is how you create new routers and sub-routers in your tRPC API.
 *
 * @see <https://trpc.io/docs/router>
 */
export const createTRPCRouter = t.router;

/**
 * Public (unauthenticated) procedure
 *
 * This is the base piece you use to build new queries and mutations on your tRPC API. It does not
 * guarantee that a user querying is authorized, but you can still access user session data if they
 * are logged in.
 */
export const publicProcedure = t.procedure;

/** Reusable middleware that enforces users are logged in before running the procedure. */
const enforceUserIsAuthed = t.middleware(({ ctx, next }) => {
  if (!ctx.session?.user) {
    throw new TRPCError({ code: "UNAUTHORIZED" });
  }
  return next({
    ctx: {
      // infers the `session` as non-nullable
      session: { ...ctx.session, user: ctx.session.user },
    },
  });
});

/**
 * Protected (authenticated) procedure
 *
 * If you want a query or mutation to ONLY be accessible to logged in users, use this. It verifies
 * the session is valid and guarantees `ctx.session.user` is not null.
 *
 * @see <https://trpc.io/docs/procedures>
 */
export const protectedProcedure = t.procedure.use(enforceUserIsAuthed);
We’ll need to import some types and functions from the supabase/auth-helpers-nextjs library that should already be installed from the signin.tsx code.
import {
  createPagesServerClient,
  type User,
} from "@supabase/auth-helpers-nextjs";
Change the interface from Session that maps to Nextauth.js to User which comes from Supabase.
interface CreateContextOptions {
  session: User | null;
}
The innerTRPCContext also needs to be changed from session to user .
const createInnerTRPCContext = (opts: CreateContextOptions) => {
  return {
    session: opts.session,
    prisma,
  };
};
export const createInnerTRPCContext = (opts: CreateContextOptions) => {
  return {
    **user: opts.user,**
    prisma,
  };
};
Next, the createTRPCContext also needs to be changed to communicate with Supabase, nearly all the code is replaced.
export const createTRPCContext = async (opts: CreateNextContextOptions) => {
  const { req, res } = opts;

  // Get the session from the server using the getServerSession wrapper function
  const session = await getServerAuthSession({ req, res });

  return createInnerTRPCContext({
    session,
  });
};
export const createTRPCContext = async (opts: CreateNextContextOptions) => {
  const supabase = createPagesServerClient(opts);

  // browsers will have the session cookie set
  const token = opts.req.headers.authorization;

  const user = token
    ? await supabase.auth.getUser(token)
    : await supabase.auth.getUser();

  return createInnerTRPCContext({
    user: user.data.user,
  });
};
The enforcedUserIsAuthed variable needs to be changed, below is the default to use the user properties instead
/** Reusable middleware that enforces users are logged in before running the procedure. */
const enforceUserIsAuthed = t.middleware(({ ctx, next }) => {
  if (!ctx.session?.user) {
    throw new TRPCError({ code: "UNAUTHORIZED" });
  }
  return next({
    ctx: {
      // infers the `session` as non-nullable
      session: { ...ctx.session, user: ctx.session.user },
    },
  });
});
const enforceUserIsAuthed = t.middleware(({ ctx, next }) => {
  if (!ctx.user?.id) {
    throw new TRPCError({ code: "UNAUTHORIZED" });
  }
  return next({
    ctx: {
      // infers the `user` as non-nullable
      user: ctx.user,
    },
  });
});
Modify the _app.tsx file
Below is the base configuration.
import { type Session } from "next-auth";
import { SessionProvider } from "next-auth/react";
import { type AppType } from "next/app";
import { api } from "~/utils/api";
import "~/styles/globals.css";

const MyApp: AppType<{ session: Session | null }> = ({
  Component,
  pageProps: { session, ...pageProps },
}) => {
  return (
    <SessionProvider session={session}>
      <Component {...pageProps} />
    </SessionProvider>
  );
};

export default api.withTRPC(MyApp);
We have to import the supabase/auth-helpers-react and supabase/auth-helpers-nextjs libraries.
import {
  createPagesBrowserClient,
  type Session,
} from "@supabase/auth-helpers-nextjs";
import { SessionContextProvider } from "@supabase/auth-helpers-react";
Change from AppType to AppProps and user the SessionContextProvider from the supabase/auth-helpers-nextjs library.
function MyApp({
  Component,
  pageProps,
}: **AppProps**<{ initialSession: Session | null }>) {
  const [supabaseClient] = useState(() => createPagesBrowserClient());

  return (
    <SessionContextProvider
      supabaseClient={supabaseClient}
      initialSession={pageProps.initialSession}
    >
      <Component {...pageProps} />
    </SessionContextProvider>
  );
}
Schema.Prisma File
For the schema.prisma file we’re going to be using a single-schema db, as was mentioned at the beginning of the article that there are some challenges with a multi-schema db as it’s still a preview feature in Prisma.
Below is the default configuration, we’re going to change the provider to postgresql from sqlite .
generator client {
    provider = "prisma-client-js"
}

datasource db {
    provider = "sqlite"
    // NOTE: When using mysql or sqlserver, uncomment the @db.Text annotations in model Account below
    // Further reading:
    // <https://next-auth.js.org/adapters/prisma#create-the-prisma-schema>
    // <https://www.prisma.io/docs/reference/api-reference/prisma-schema-reference#string>
    url      = env("DATABASE_URL")
}
We added three tables, only the users table is essential but the other two will be used as examples.
generator client {
    provider = "prisma-client-js"
}

datasource db {
    provider = "postgresql"
    url      = env("DATABASE_URL")
}

/// This model contains row level security and requires additional setup for migrations. Visit <https://pris.ly/d/row-level-security> for more info.
model users {
    user_id        String           @id @db.Uuid
    updated_at     DateTime?        @db.Timestamptz(6)
    privateExample privateExample[]
}

model example {
    id          String    @id @default(uuid()) @db.Uuid
    firstEntry  String?
    lastUpdated DateTime? @updatedAt @db.Timestamptz(6)
}

model privateExample {
    id          String    @id @default(uuid()) @db.Uuid
    user_id     String    @db.Uuid
    users       users     @relation(fields: [user_id], references: [user_id])
    firstEntry  String?
    lastUpdated DateTime? @updatedAt @db.Timestamptz(6)
}
The prisma.schema file above is for a single-schema db, all the tables above are in the “public” schema. The public.users table is mirroring the id property from the auth.users table, being copied over. The example table is like a public newsfeed and the privateExample is for private user content, hence the one-to-many relationship from the users table to the privateExample table.
tester.tsx page
On the tester.tsx page, we’re going to query the example and privateExample table and also add entries to it using an input area. This will show you to add data to a table both publicly and from an authenticated user.
Create New Route src → server → api → routers → firstRouter.ts
Import zod, createTRPCRouter, protectedProcedure and publicProcedure
import { z } from "zod";
import { createTRPCRouter, protectedProcedure, publicProcedure } from "../trpc";
Create Four Methods, getAll, create, getAllPrivate, createPrivate
The getAll is available publicly by any user, the create is for public upload, getAllPrivate is for all individual user contributions and createPrivate is for individual user upload.
export const firstRouter = createTRPCRouter({
  getAll: publicProcedure.query(({ ctx }) => {
    return ctx.prisma.example.findMany();
  }),

  create: publicProcedure
    .input(z.object({ firstEntry: z.string() }))
    .mutation(async ({ ctx, input }) => {
      return ctx.prisma.example.create({
        data: {
          firstEntry: input.firstEntry,
        },
      });
    }),

  getAllPrivate: protectedProcedure.query(({ ctx }) => {
    return ctx.prisma.privateExample.findMany({
      where: {
        user_id: ctx.user.id,
      },
    });
  }),

  createPrivate: protectedProcedure
    .input(z.object({ user_id: z.string(), firstEntry: z.string() }))
    .mutation(async ({ ctx, input }) => {
      return ctx.prisma.privateExample.create({
        data: {
          firstEntry: input.firstEntry,
          user_id: input.user_id,
        },
      });
    }),
});
Update root.ts in src → server → api → routers
First, import the new router in the root.ts file then add it in the export statement.
import { exampleRouter } from "~/server/api/routers/example";
import { createTRPCRouter } from "~/server/api/trpc";
**import { firstRouter } from "./routers/firstRouter";**

/**
 * This is the primary router for your server.
 *
 * All routers added in /api/routers should be manually added here.
 */
export const appRouter = createTRPCRouter({
  example: exampleRouter,
  **first: firstRouter,**
});

// export type definition of API
export type AppRouter = typeof appRouter;
Client-Side Code tester.tsx
Import the Shadcn-UI components.
import { Input } from "../components/ui/input";
import {
  Table,
  TableCaption,
  TableHeader,
  TableRow,
  TableHead,
  TableCell,
  TableBody,
} from "../components/ui/table";
import { Button } from "../components/ui/button";
Import React library components.
import { api } from "../utils/api";
import { useState } from "react";
import { useSupabaseClient, useUser } from "@supabase/auth-helpers-react";
import { Input } from "../../components/ui/input";
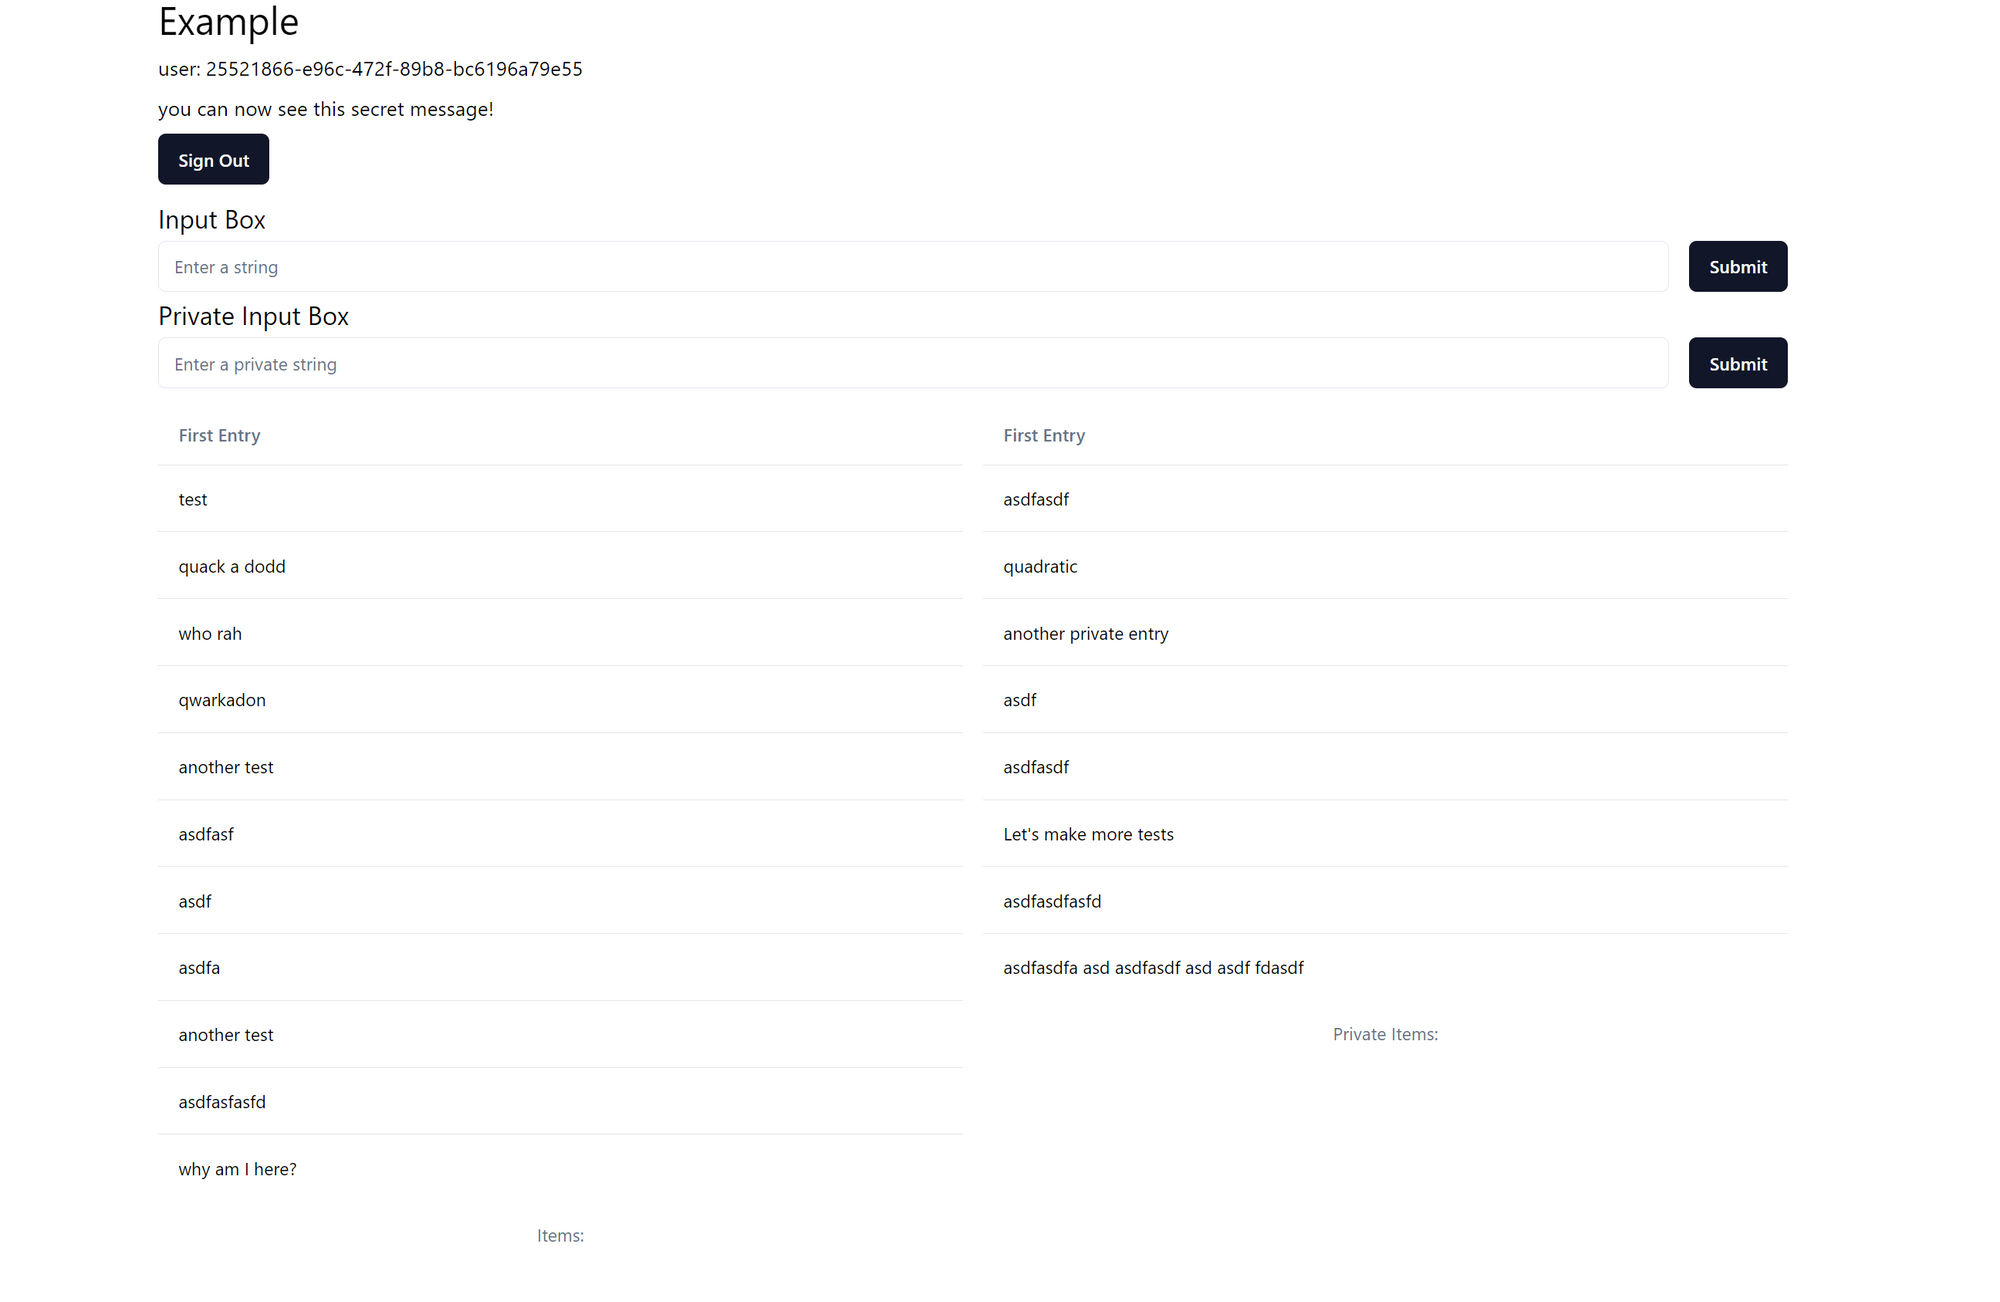
Put it all together and you should get two columns, one for the public user data and the other for private user data.
export default function Content() {
  const { data } = api.example.getSecretMessage.useQuery();
  const { data: items, refetch: refetchItems } = api.first.getAll.useQuery();
  const { data: privateItems, refetch: refetchPrivateItems } =
    api.first.getAllPrivate.useQuery();

  const [inputValue, setInputValue] = useState("");
  const [inputPrivateValue, setInputPrivateValue] = useState("");

  const user = useUser();

  const createExample = api.first.create.useMutation({
    onSuccess: () => {
      setInputValue("");
      void refetchItems();
    },
  });

  const createPrivateExample = api.first.createPrivate.useMutation({
    onSuccess: () => {
      setInputPrivateValue("");
      void refetchPrivateItems();
    },
  });

  const handleChange = (e) => {
    setInputValue(e.target.value);
  };

  const handleSubmit = (e) => {
    e.preventDefault();
    createExample.mutate({ firstEntry: inputValue });
  };

  const handleChangePrivate = (e) => {
    setInputPrivateValue(e.target.value);
  };

  const handlePrivateSubmit = (e) => {
    e.preventDefault();
    if (!!user) {
      createPrivateExample.mutate({
        firstEntry: inputPrivateValue,
        user_id: user.id,
      });
    }
  };

const signOut = async () => {
    const { error } = await supabase.auth.signOut();
    if (error) {
      console.error("Error signing out:", error.message);
    } else {
      router.push("/signin").catch((err) => {
        console.error("Failed to navigate", err);
      });
    }
  };

  return (
    <div className="mx-auto max-w-7xl space-y-3">
      <div className="space-y-2">
        <h1 className="text-3xl"> Example </h1>
        <h1>user: {user?.id}</h1>
        <h1>{data}</h1>
        <Button onClick={signOut}>Sign Out</Button>
      </div>

      <div className="space-y-1">
        <h1 className="text-xl">Input Box</h1>
        <form onSubmit={handleSubmit} className="flex space-x-4">
          <Input
            type="text"
            value={inputValue}
            onChange={handleChange}
            placeholder="Enter a string"
            className="flex-grow"
          />
          <Button type="submit">Submit</Button>
        </form>

        <h1 className="text-xl">Private Input Box</h1>
        <form onSubmit={handlePrivateSubmit} className="flex space-x-4">
          <Input
            type="text"
            value={inputPrivateValue}
            onChange={handleChangePrivate}
            placeholder="Enter a private string"
            className="flex-grow"
          />
          <Button type="submit">Submit</Button>
        </form>
      </div>

      <div className="mt-8 grid grid-cols-2 gap-4">
        {items && (
          <Table>
            <TableCaption>Items:</TableCaption>
            <TableHeader>
              <TableRow>
                <TableHead>First Entry</TableHead>
              </TableRow>
            </TableHeader>
            <TableBody>
              {items.map((item, index) => (
                <TableRow key={index}>
                  <TableCell>{item.firstEntry}</TableCell>
                </TableRow>
              ))}
            </TableBody>
          </Table>
        )}

        {privateItems && (
          <Table>
            <TableCaption>Private Items:</TableCaption>
            <TableHeader>
              <TableRow>
                <TableHead>First Entry</TableHead>
              </TableRow>
            </TableHeader>
            <TableBody>
              {privateItems.map((item, index) => (
                <TableRow key={index}>
                  <TableCell>{item.firstEntry}</TableCell>
                </TableRow>
              ))}
            </TableBody>
          </Table>
        )}
      </div>
    </div>
  );
}
You should get a screenshot that looks like this
Middleware Function
We’re also going to create a middleware function to protect routes in your web app. First, we’re going to create a new folder in the pages directory called protected located in src → pages → protected. From here we’re going to move the tester.tsx page to be nested inside this folder.
Using the code from this page below in the Supabase docs, we modify it for our needs.
https://supabase.com/docs/guides/auth/auth-helpers/nextjs-pages#auth-with-nextjs-middleware
Below is the reference middleware.ts code from Supabase.
import { createMiddlewareClient } from '@supabase/auth-helpers-nextjs'
import { NextResponse } from 'next/server'
import type { NextRequest } from 'next/server'

export async function middleware(req: NextRequest) {
  // We need to create a response and hand it to the supabase client to be able to modify the response headers.
  const res = NextResponse.next()
  // Create authenticated Supabase Client.
  const supabase = createMiddlewareClient({ req, res })
  // Check if we have a session
  const {
    data: { session },
  } = await supabase.auth.getSession()

  // Check auth condition
  if (session?.user.email?.endsWith('@gmail.com')) {
    // Authentication successful, forward request to protected route.
    return res
  }

  // Auth condition not met, redirect to home page.
  const redirectUrl = req.nextUrl.clone()
  redirectUrl.pathname = '/'
  redirectUrl.searchParams.set(`redirectedFrom`, req.nextUrl.pathname)
  return NextResponse.redirect(redirectUrl)
}

export const config = {
  matcher: '/middleware-protected/:path*',
}
We’re going to change the matcher so that it protects everything in the protected directory leaving the “/” for a welcome or landing page accessible without authentication alongside the signin page and signup page. The middleware.ts file will get added to the src → middleware.ts directory. It’s imperative that the middleware function be named middleware.ts otherwise it won’t work.
export async function middleware(req: NextRequest) {
  // We need to create a response and hand it to the supabase client to be able to modify the response headers.
  const res = NextResponse.next();
  // Create authenticated Supabase Client.
  const supabase = createMiddlewareClient({ req, res });
  // Check if we have a session
  const {
    data: { session },
  } = await supabase.auth.getSession();

  // Check if user is on the signin page
  if (req.nextUrl.pathname === "/signin" || req.nextUrl.pathname === "/") {
    return res;
  }

  // Check auth condition
  if (session) {
    // Authentication successful, forward request to protected route.
    return res;
  }

  // Auth condition not met, redirect to home page.
  const redirectUrl = req.nextUrl.clone();
  redirectUrl.pathname = "/signin";
  redirectUrl.searchParams.set(`redirectedFrom`, req.nextUrl.pathname);
  return NextResponse.redirect(redirectUrl);
}

export const config = {
  matcher: "/protected/:path*",
};
Conclusion
If you followed the tutorial you should have a working t3 project using Supabase auth and db with Shadcn-UI all ready to go. If this article helped you out feel free to give me a follow on Twitter. If there are any errors in this article or any other questions, free free to comment below or reach out to me on Twitter, my DMs are open. Check out the GitHub link below to use the template if you get stuck or just want to get started. https://github.com/remusris/t3_supabase_demo
Subscribe to my newsletter
Read articles from Remus directly inside your inbox. Subscribe to the newsletter, and don't miss out.
Written by
