Easy Configuration of ESLint, Cypress, StoryBook, and Prettier for Angular Projects with Nx
 Dany Paredes
As an Angular enthusiast, I frequently create solutions that consist of multiple projects, such as apps and libraries. The Angular CLI is instrumental in managing these projects through Angular workspaces.
I often use Angular in conjunction with other tools, including:
ESLint: Facilitates static code analysis.
Prettier: Simplifies code formatting.
Jest and Cypress: Enable component testing and end-to-end testing.
Storybook: Aids in developing isolated components, which is highly beneficial for testing and documentation.
These tools are crucial in my projects to ensure quality and streamline the development process, making it both safe and easy.
Given that I use Angular CLI, I will demonstrate the process of setting up these tools for a small project and discuss the amount of work involved:
Scenario
I'm building a solution for the NBA App, which has two modules: Players, Teams, and an NBA UI Components Library.
Because I'm using AngularCLI, I need to do the following for my projects:
Create the workspace: It helps to store multiple projects.
Create App: Angular Application.
Create the Library: NPM UI Library.
ng new --create-application=false nba
ng generate application nba-web
ng generate library nba-ui --prefix nba
Great, we've created the projects. Now we need to configure the tools for the web project and nba-ui.
Since I don't want to make the article longer, I will do this for the nba-web:
Set up ESLint, Prettier, Jest, Cypress, and Storybook
ESLint
It provides schematics to make the installation a bit easier.
ng add @angular-eslint/schematics
Read more about configuring ESLint in Angular
Prettier
It requires installing the Prettier package and adding a few configuration files:
npm install prettier --save-dev
Add the .prettierrc.json and .prettierignore files in the root with basic rules and set up the npm task in the package.json.
Read more about configuring Prettier in Angular
Jest
Similar to Prettier, we need to install the package and create some configuration files.
npm install jest jest-preset-angular --save-dev
Create a setup-jest.ts file in the root and import jest-preset-angular
import 'jest-preset-angular';
Edit the package.json to add the Jest configuration and update the script to run jest.
"scripts": {
    "test": "jest"
  }
{
  "jest": {
    "preset": "jest-preset-angular",
    "setupTestFrameworkScriptFile": "<rootDir>/setup-jest.ts"
  }
}
Read more about configuring Jest in Angular
Cypress
It's easier because after installing the package, we can open a wizard with the configuration steps.
Let's add Cypress to the nba-web by running the following command:
npm install cypress -D
And open cypress:
npx cypress open
We need to follow the configuration wizard and choose the type of testing we want to use, either end-to-end (e2e) or component testing.
Read more about installing Cypress in Angular
Storybook
Similar to Cypress, the package handles the configuration, so you only need to run the following command:
npx storybook@latest init
Learn more about Storybook in Angular
Alright, I just started with the NBA-web project, and we have the NBA-UI library pending. What happens if tomorrow we want to split our project or add more projects to the workspace and include the same tools?
Crazy, right? Thankfully, we can easily handle all these configurations using NX.
What Is Nx?
It's a build system that makes our lives easier by managing monorepos or standalone applications without hassle.
It helps to quickly and easily configure tools like Cypress, Jest, Storybook, ESLint, and more in applications. Nx offers plugins for other frameworks, but I'll be using Angular.
Learn more about Nx Packages
The best way to learn about Nx and see how easy it is to work with it is by following the same steps but using Nx; let's get started.
Setup Workspace
Nx provide the command to create the workspace; it provides a list of options for React, Node or Angular
To create the workspace, we run the command `npx create-nx-workspace`, which prompts us to choose the type of workspace we want.
The name of our workspace: `nba`
Which technology? Angular
What kind of workspace: standalone single app or multiple projects? Since we want an Angular application with a UI library, choose integrated.
Next, it asks about the configuration of our Angular application, similar to AngularCLI. It also asks if you want it to be a standalone application (moduleless).
Nx enables distributed caching to speed up our build and CI processes. It is free for open-source projects.
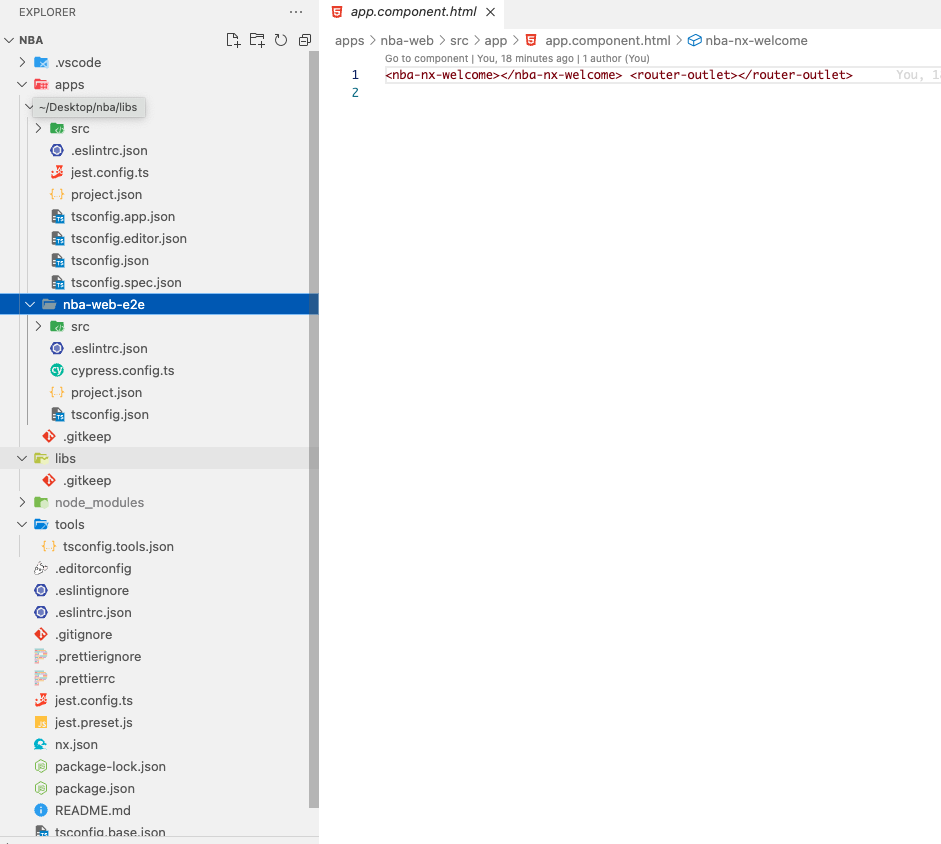
Create your workspace by running the command npx create-nx-workspace@latest

The outcome is a workspace prepared with Angular, Cypress, ESLint, and Prettier using just one command.
Create The Library
Nx offers a variety of commands for creating libraries, apps, generating components, and more.
Navigate to the NBA directory and create the library by using nx g @nx/angular along with the lib parameter and the library name.
cd nba
nx g @nx/angular:lib nba-ui
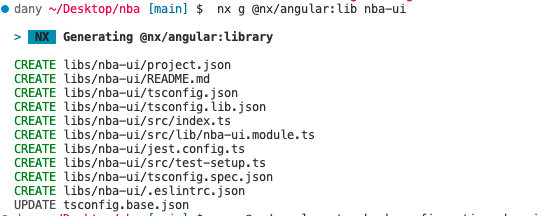
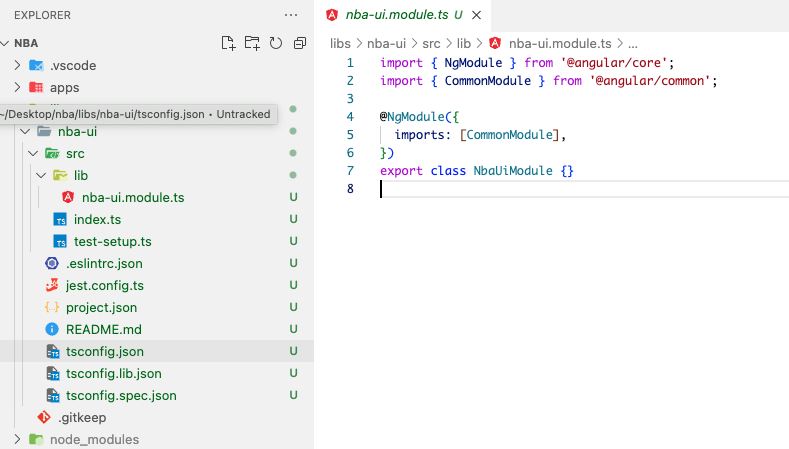
The result is a library set up with ESLint and Jest effortlessly.
What about Storybook ?
Nx provides a list of packages for our projects to configure with a single command in our projects, for example, Storybook.
We're going to easily configure Storybook without any pain by running the nx configuration command in the nba-ui library.
nx g @nx/angular:storybook-configuration nba-ui
It will ask if you want to configure Cypress to run against the Storybook instance or generate stories from our components in the library, saving a lot of time.

Ok, lets see if how nx save time and generate stories ?
First, create a navigation and button component using nx, similar to angular/cli, by using the --standalone flag and specifying the project.
nx g @nx/angular:component navigation --standalone --project nba-ui
>  NX  Generating @nx/angular:component
CREATE libs/nba-ui/src/lib/navigation/navigation.component.scss
CREATE libs/nba-ui/src/lib/navigation/navigation.component.html
CREATE libs/nba-ui/src/lib/navigation/navigation.component.spec.ts
CREATE libs/nba-ui/src/lib/navigation/navigation.component.ts
dany ~/Desktop/nba [main] $
Open the navigation.component.html file and insert the following template:
<nav>
  <a *ngFor="let navItem of navOptions">{{navItem}}</a>
</nav>
To make the desired changes, open up your `navigation.component.ts` file and add this friendly code snippet:
import { Component, Input } from '@angular/core';
import { CommonModule } from '@angular/common';

@Component({
  selector: 'nba-navigation',
  standalone: true,
  imports: [CommonModule],
  templateUrl: './navigation.component.html',
  styleUrls: ['./navigation.component.scss'],
})
export class NavigationComponent {

  @Input() navOptions = [ 'home', 'about']
}
Edit the navigation.component.scss file and add the following CSS rule:
nav {
  display: flex;
  gap: 1rem
}
Alright, we have the component ready! Now, let's ask NX to assist us in creating the stories for our component using Storybook.
Run the following command: nx generate @nx/angular:stories --name=nba-ui
nx generate @nx/angular:stories --name=nba-ui

>  NX  Generating @nx/angular:stories

✔ Do you want to generate Cypress specs as well? (y/N) · true
CREATE libs/nba-ui/src/lib/button/button.component.stories.ts
CREATE apps/nba-ui-e2e/src/e2e/button/button.component.cy.ts
dany ~/Desktop/nba [main] $ nx storybook nba-ui
Perfect! Let's run Storybook using the command `nx storybook nba-ui` and see the final results.
nx storybook nba-ui

> nx run nba-ui:storybook

info => Starting manager..
info Addon-docs: using MDX2
info => Using implicit CSS loaders
info => Using angular browser target options from "nba-ui:build-storybook"
info => Using angular project with "tsConfig:/Users/dany/Desktop/nba/libs/nba-ui/.storybook/tsconfig.json"
info => Using default Webpack5 setup
<i> [webpack-dev-middleware] wait until bundle finished
<i> [webpack-dev-middleware] wait until bundle finished: /apple-touch-icon-precomposed.png
╭────────────────────────────────────────────────╮
│                                                │
│   Storybook 7.1.0 for angular started          │
│   102 ms for manager and 8.36 s for preview    │
│                                                │
│    Local:            http://localhost:4400/    │
│    On your network:  http://localhost:4400/    │
│                                                │
╰────────────────────────────────────────────────╯
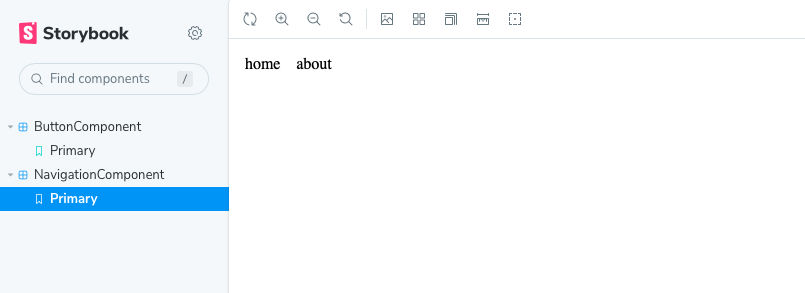
Yes, we have all our projects with ESLint, Prettier, Jest testing, Cypress, and Storybook without issues!
Nx Commands
We learn how to create applications, libraries, generate components, or configure plugins we want to use.
We have a set of commands; let's show some more:
For example, if we want to lint our nba-ui library, run the command nx run nba-ui:lint
dany ~/Desktop/backup/nba [main] $ nx run nba-ui:lint
> nx run nba-ui:lint
Linting "nba-ui"...
All files pass linting.
 ———————————————————————————————————————————————————————————————————————————————————————————————————————————————————————————————————————
 >  NX   Successfully ran target lint for project nba-ui (962ms)
dany ~/Desktop/backup/nba [main] $
But what happens if you want to lint more than one project? We need to specify the --target task, in our case 'lint', and the --projects.
dany ~/Desktop/nba [main] $ nx run-many --target=lint --projects=nba-ui,nba-web

    ✔  nx run nba-ui:lint (689ms)
    ✔  nx run nba-web:lint (715ms)

 —————————————————————————————————————————————————————————————————————————————————————————————

 >  NX   Successfully ran target lint for 2 projects (737ms)
Additionally, you can run the linter in all projects using the --all flag.
dany ~/Desktop/nba [main] $ nx run-many --target=lint --all

    ✔  nx run nba-ui:lint  [existing outputs match the cache, left as is]
    ✔  nx run nba-web:lint  [existing outputs match the cache, left as is]
    ✔  nx run nba-ui-e2e:lint (579ms)
    ✔  nx run nba-web-e2e:lint (586ms)

 —————————————————————————————————————————————————————————————————————————————————————————————

 >  NX   Successfully ran target lint for 4 projects (616ms)

   Nx read the output from the cache instead of running the command for 2 out of 4 tasks.d/my-lib
Did you notice the output of the previous command "existing output matches the cache, left as is"?
Nx uses the cache to speed up our tasks, but to bypass Nx cache, use the flag --skip-nx-cache.
   dany ~/Desktop/nba [main] $ nx run-many --target=lint --all --sky-nx-cache

    ✔  nx run nba-web-e2e:lint (611ms)
    ✔  nx run nba-ui:lint (736ms)
    ✔  nx run nba-web:lint (767ms)
    ✔  nx run nba-ui-e2e:lint (567ms)

 —————————————————————————————————————————————————————————————————————————————————————————————

 >  NX   Successfully ran target lint for 4 projects (1s)

         With additional flags:
           --sky-nx-cache=true
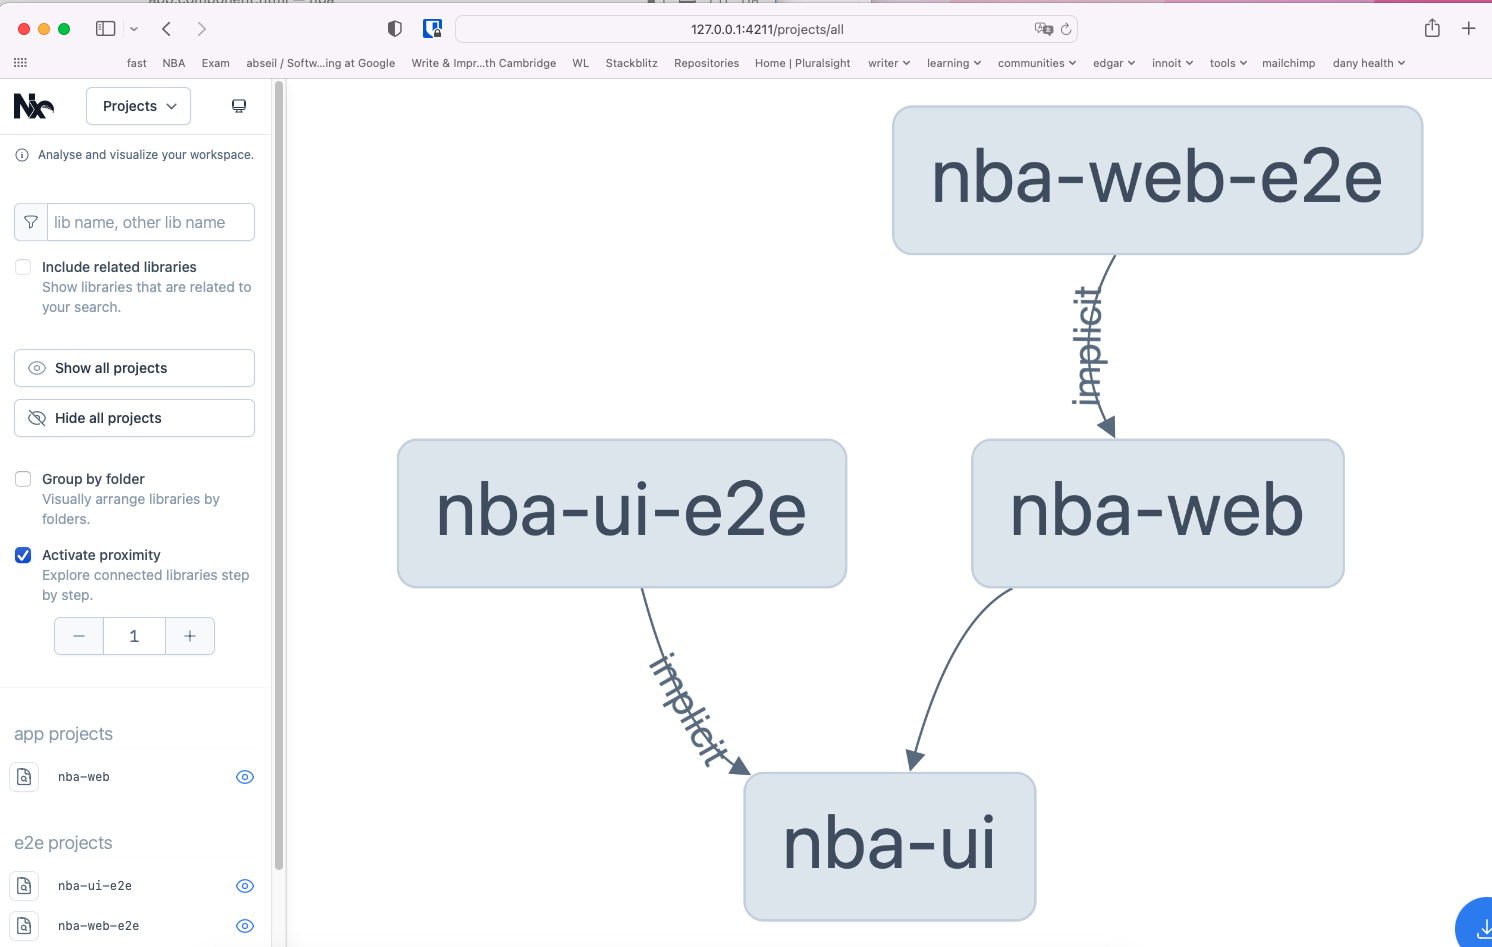
Lastly, nx offers a visual method to view project dependencies and their relationships.
For example, if we use the nba-ui library in the nba-web app, it creates a relationship. How can we visualize it?
Nx provides the nx graph command, which visually displays how the projects are related easily.
If you are interested in expanding your knowledge and skills with Nx, I highly recommend diving into the official documentation, as it offers a wealth of valuable information and insights. Additionally, consider checking out the following resources to further your understanding:
The Angular Developer's Nx Handbook by Lars Gyrup Brink Nielsen – This comprehensive handbook serves as an excellent guide for Angular developers looking to harness the full potential of Nx in their projects.
Setting up Nx Mono-repo by Santosh 🔥 by Santosh Yadav – great video provides step-by-step instructions on setting up an Nx mono-repo.
Recap
We have discovered how to effortlessly and seamlessly set up most of the commonly used libraries in our Angular project by utilizing the powerful Nx tool. Furthermore, we get into the visualization of graph dependencies, which gave us a clear understanding of the relationships between various projects.
Also we show the capabilities of Nx, such as building, linting, and executing multiple or individual projects and using caching mechanisms, which significantly accelerates the completion of our routine tasks to improve your productivity.
In conclusion, we have covered various topics related to Nx and its numerous benefits for Angular developers. By leveraging the power of Nx, you can streamline your development process, improve collaboration, and ultimately create more efficient and robust applications.
Subscribe to my newsletter
Read articles from Dany Paredes directly inside your inbox. Subscribe to the newsletter, and don't miss out.
Written by

Dany Paredes
Dany Paredes
I'm passionate about front-end development, specializing in building UI libraries and working with technologies like Angular, NgRx, Accessibility, and micro-frontends. In my free time, I enjoy writing content for the Google Dev Library, This Is Angular Community, Kendo UI, and sharing insights here.