Day-09 of 90DaysofDevops Beyond the Basics: Expanding Your Git & GitHub Knowledge as a DevOps Engineer
 Vedant Adhe
What is Git and why is it important?
What is the difference Between Main Branch and Master Branch??
Can you explain the difference between Git and GitHub?
How do you create a new repository on GitHub?
What is the difference between local & remote repositories? How to connect local to remote?
What is Git and why is it important?
Git is a distributed version control system used to track changes to software code over time. It is an essential tool for developers to collaborate effectively and manage their code base efficiently. Below, you'll learn what Git is and why it's so important:
Version Control System: Git allows developers to track changes to their codebase. Rather than just having the latest version of code, Git maintains a history of all changes so that previous versions can be easily viewed and restored.
Distributed: Git is a distributed version control system, meaning each developer working on a project has their full copy of the code repository, including its history. This allows developers to work independently and synchronize their changes with the master repository later, promoting a more decentralized and resilient development process.
What is the Difference Between the Main Branch and Master Branch?
Since my last update in September 2021, the main difference between the "Main" branch and the "Master" branch is the naming conventions and the cultural context in which these names are placed.
Master Branch: The "master" branch is a term historically used in version control systems such as Git. It is typically used as the default name for the first and primary branches of a repository. The master branch usually represents the most stable and production-ready state of the project. Developers work on their respective branches, make changes, and when they are satisfied with their work, they merge it into the master branch. However, the "master" branch designation has been criticized because it is associated with historical contexts and can promote unconscious biases.
Main branch: In recent years, there has been a push in the software development community to replace the term "master" with a more inclusive and neutral alternative. As a result, many projects and organizations have started using "Main" as the new standard branch name instead of "Master" The idea behind this change is to promote diversity and create a more inclusive environment in the tech community.
In summary, the difference between the "Main" branch and the "Master" branch is mainly in the names, and the change is driven by a desire to eliminate any language that could be seen as offensive or exclusionary.
Remember that the software development community is constantly evolving and practices and conventions may change over time. As of 2023, these changes may be even more widespread and accepted.

Can you explain the difference between Git and GitHub?
Git is like a special tool that helps you manage the versions of your project. It's like a time travel machine for your files! Every time you change a file, Git takes a snapshot of that file at that time. So you can always go back to a previous version of your project if something goes wrong or you want to see how it was before. GitHub, on the other hand, is like a fancy online hub or repository for your project. It's like a virtual collaboration platform where you can share your project and work together as a team. Not only is it a place where you can save your project, but it also facilitates multiple people to work on the same project at the same time. You can see all the changes made by different team members, discuss things and track progress.
In simpler terms, Git is the local tool you use to manage and track changes to your project, while GitHub is the online platform where you can store, share, and collaborate on your project. Git doesn't require the Internet to function, but GitHub is an online service that uses Git to create a collaborative environment. Users use Git to track changes to their projects on their computers, and when they're done, they can upload them to GitHub to share with others and facilitate collaboration.
4. How do you create a new repository on GitHub?
To create a new repository on GitHub, follow these steps:
Sign up for GitHub: If you don't already have a GitHub account, create one by going to https://github.com/ and clicking "Sign up" in the upper right corner.
Sign in to your GitHub account: Once you have an account, sign in with your username and password.
Create a new repository: After logging in, click the "+" sign in the upper right corner of the GitHub interface. From the drop-down menu, select "New Repository"
Set up repository:
Repository Name: choose a unique name for your repository. It should be descriptive so others can understand what the project is about. Description (optional): Add a short description to provide more details about your repository. Visibility: choose whether the repository should be public (visible to everyone) or private (visible only to you and collaborators you invite). Initialize this repository with a README: If you select this option, GitHub will automatically create a README file in the repository. It's usually a good idea to select this option to provide initial documentation about your project. Select a license (optional): If you want to apply a specific license to your project, you can select it from the "Add a license" dropdown menu. If you're unsure, you can skip this step and add a license later.
Add a .gitignore file (optional): If your project contains certain files or directories that you don't want to track with Git (for example, temporary files, dependencies, or sensitive information), you can select a .gitignore template that matches your project's programming language or framework.
Create the repository: after entering the required information, click the "Create Repository" button at the bottom of the page. Your new repository will be created and you'll be redirected to its main page.
Congratulations! You have successfully created a new repository on GitHub.
- What is the difference between local & remote repositories? How to connect local to remote?
Local repository: A local repository is a copy of the code and project files stored on your local computer. It resides on your hard drive and is accessible only from your computer. When you work on a project, you typically make changes to the code in your local repository. These changes can include adding, modifying, or deleting files. However, because it's a local repository, other team members cannot directly access your changes unless you manually share your code with them.
Remote repository: A remote repository, on the other hand, is hosted on a central server or cloud-based platform such as GitHub, GitLab, or Bitbucket. It serves as a shared repository where multiple developers can collaborate and access the code base. When you commit your changes to the remote repository, other team members can pull those changes into their local repositories to see and work with the latest code.
Connecting Local --> Remote Repository:
- Create a Remote Repository: First, you need to create a remote repository on a hosting service like GitHub. This is usually done through the web interface of the chosen platform.
git remote add origin <remote_repository_url>
Push to Remote Repository: After you have made changes to your local repository and committed them, you can commit the changes to the remote repository with the following command
git push origin <branch_name>
Pull from remote repository (optional): If other team members have made changes to the remote repository and you want to apply those changes to your local repository, you can use the following command:
git pull origin <branch_name>
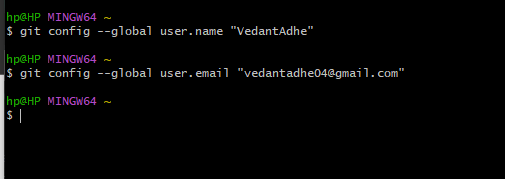
Task1 Set your user name and email address, which will be associated with your commits.
To set your user name and user email, run these commands in your terminal:
git config - global user.name "Your Name"
git config - global user.email "your.email@example.com"

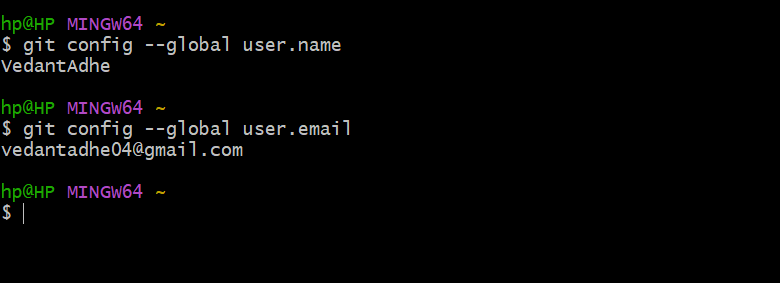
You can check your settings by running these commands:
git config --global user.name
git config --global user.email
These will show you the current values of your user name and user email.

Task 02
Create a repository named "Devops" on GitHub
- Connect your local repository to the repository on GitHub.
- Create a new file in Devops/Git/Day-02.txt & add some content to
We have already seen how to create a new repository on GitHub in the previous section, so we will skip that step here. Just make sure you name your repository DevOps and copy its URL.

Connect your local repository to the repository on GitHub
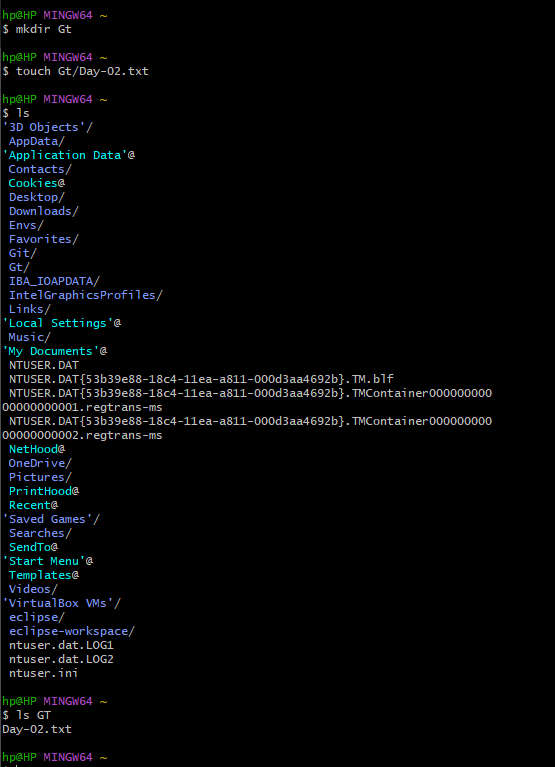
To create a new file in your local repository, you can use any text editor or IDE, or you can use the touch command in your terminal.
touch Devops/Git/Day-02.txt

For example, to add some text to the file, run this command
echo "This is Day 2 of #90DaysOfDevOps" > Devops/Git/Day-02.txt
This will overwrite the file with the text you specified.
You can also append text to the file by using >> instead of >.
For example, to append some text to the file, run this command:
echo "We learned about Git and GitHub today" >> Devops/Git/Day-02.txt
This will add the text to the end of the file.
Push your local commits to the repository on GitHub
To commit your local changes to the remote repository on GitHub, you must first deploy and commit them.
Staging is where you select which files or changes you want to include in a commit. A commit is a snapshot of your project at a specific point in time.
Run this command to deploy all the files or changes to your local repository:
git add .
This will add all the files or changes to the staging area.
To commit them with a message describing what you did, run this command:
git commit -m "Added Day-02.txt file"
This will create a new commit with the message you specified.
To push them to the remote repository on GitHub, run this command:
git push origin master
This will upload your new commit and branch to the remote repository on GitHub
You can verify that your changes are reflected on GitHub by visiting your repository page and clicking on Commits or Code.
In this blog post, we learned about some of the basics of Git and GitHub, such as branches, repositories, remotes, fetch, push, and more. We also did some tasks to practice what we learned.
Git and GitHub are powerful tools that allow you to manage your code, collaborate with other developers, and efficiently deploy your software. Mastering these tools will help you improve your DevOps skills and become a better developer.
I hope you enjoyed this blog post and learned something new. You can also follow me on LinkedIn or GitHub for more updates about my DevOps journey.
LinkedIn (linkedin.com/in/vedant-adhe-4683b0192) and
GitHub (github.com/VedantAdhe)
Connect Vedantadhe19@gmail.com
Thank you for reading!
Subscribe to my newsletter
Read articles from Vedant Adhe directly inside your inbox. Subscribe to the newsletter, and don't miss out.
Written by
