Part 3: Launching Servers with CloudWatch
 TheAwsDev
Table of contents
- Create IAM Role for CloudWatch Agent
- Launch App Server Instance in the Private Subnet of the SmallProjectA VPC
- Launch Web Server Instance in the Public Subnet of the SmallProjectA VPC
- Test Web Server
- SSH Into Web Server via Ec2 Instance Connect
- Add SSH Traffic to WebServerSPASG Security Group
- Installing & Starting CloudWatch Agent
- Create CloudWatch Alarm for Memory Usage
- Testing CloudWatch MemoryAlert alarm

Welcome back to the final installment of this series!
Today we will be launching our servers, configuring CloudWatch & adding resilience to our instances.
- Part 1: Manually Configure a VPC
Part 2: Secure the Network Environment
Part 3: Launching Servers, CloudWatch/Resilience
Create IAM Role for CloudWatch Agent
IAM roles allow you to delegate access to users or services that normally don't have access to your organization's AWS resources. IAM users or AWS services can assume a role to obtain temporary security credentials that can be used to make AWS API calls.
Before we launch our App server in the private subnet, let's create an IAM role that our Web Server instance will utilize for CloudWatch.
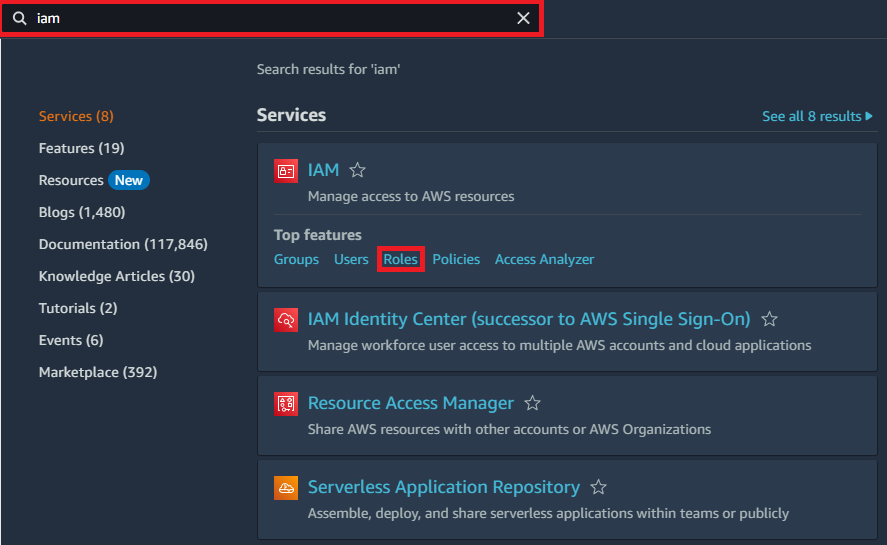
In the services search bar in the AWS Console
Enter IAM
- Hover over IAM in the results field and click Roles:
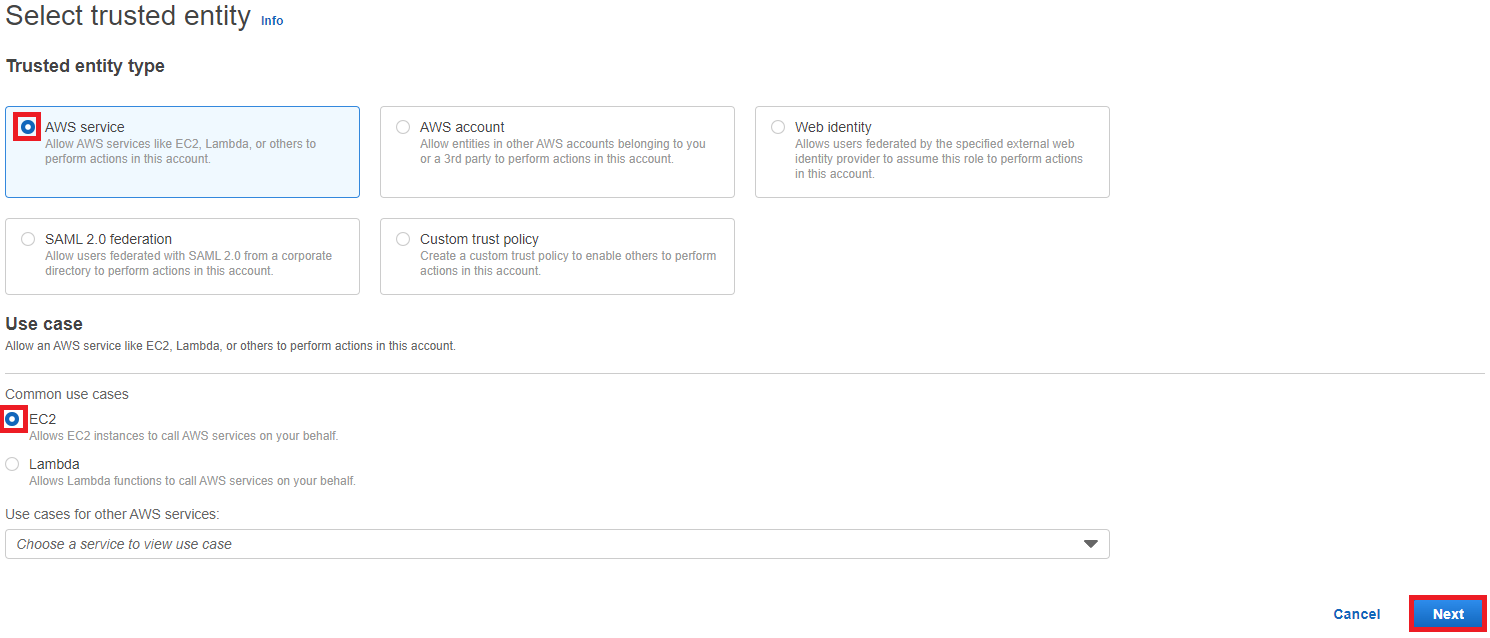
In the Create Role screen:
Select AWS service as the Trusted entity type
Select Ec2 Instance
- Click Next
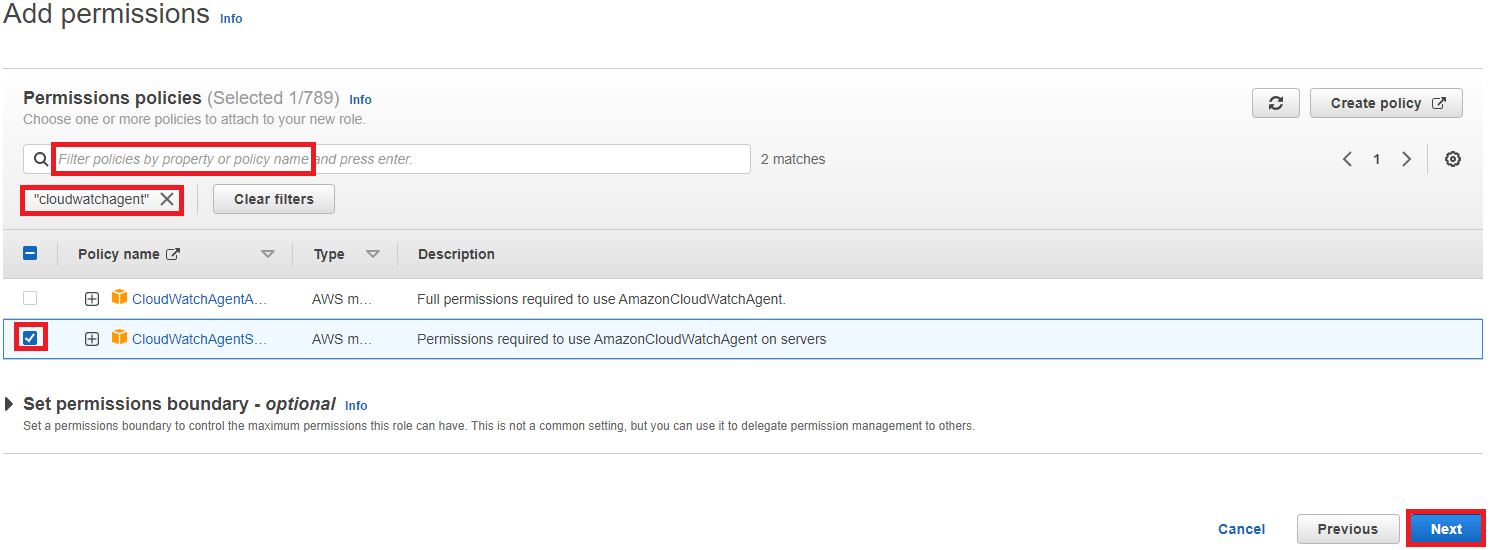
Under Add Permissions
Type "cloudwatchagent" and press enter
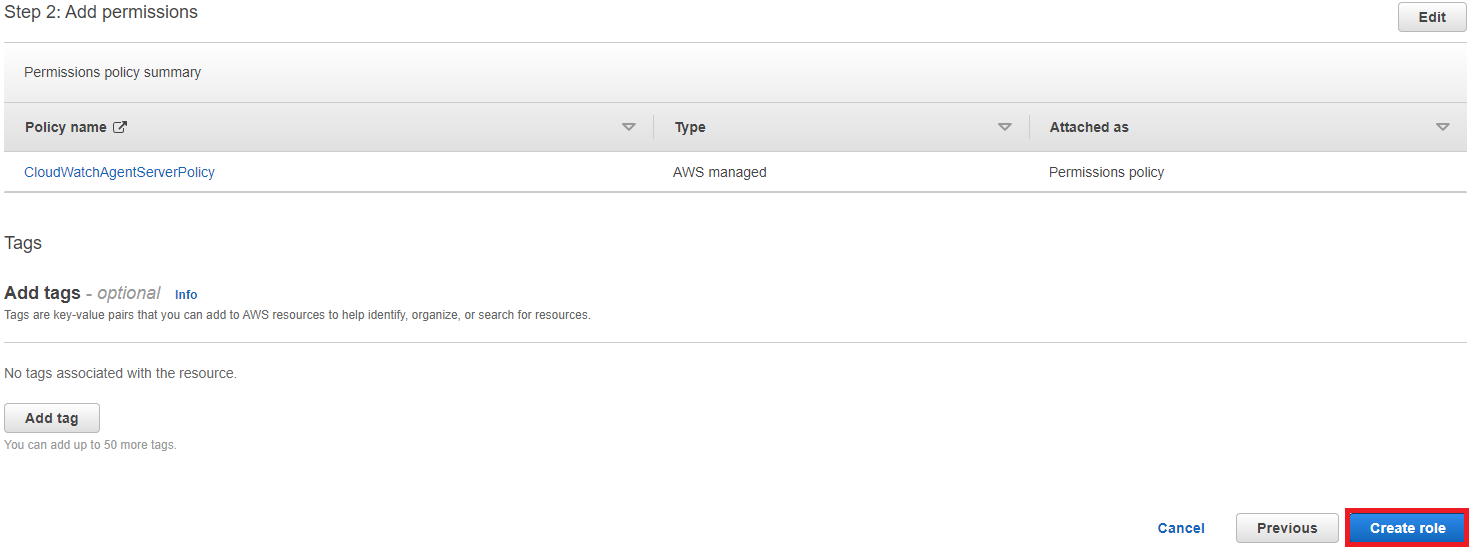
Select the second policy - CloudWatchAgentServer Policy
Click next
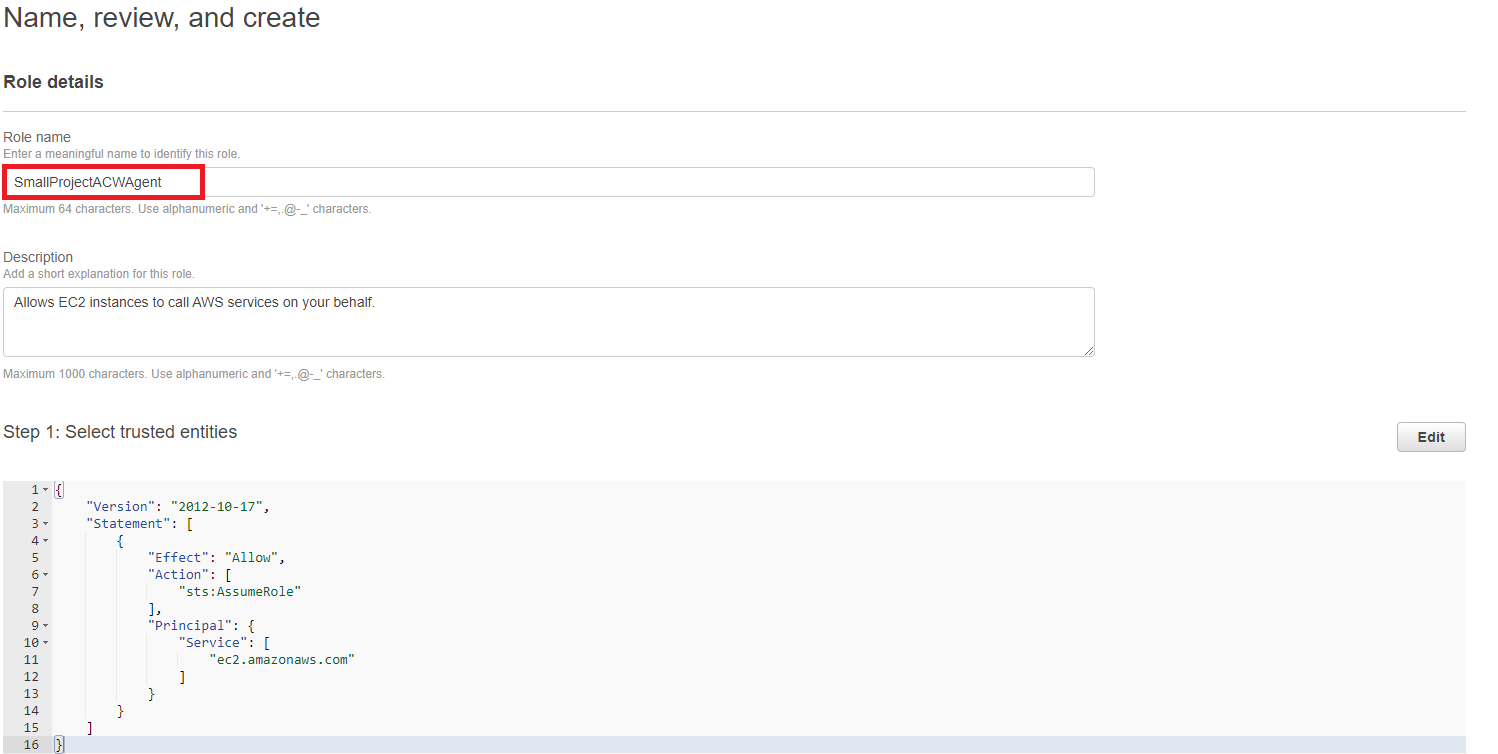
Under Name, Review, and Create:
Enter: SmallProjectACWAgent as the name
- Scroll down and click Create role

Launch App Server Instance in the Private Subnet of the SmallProjectA VPC
Amazon Elastic Compute Cloud (Amazon EC2) provides scalable computing capacity in the Amazon Web Services (AWS) Cloud. Using Amazon EC2 eliminates your need to invest in hardware upfront, so you can develop and deploy applications faster
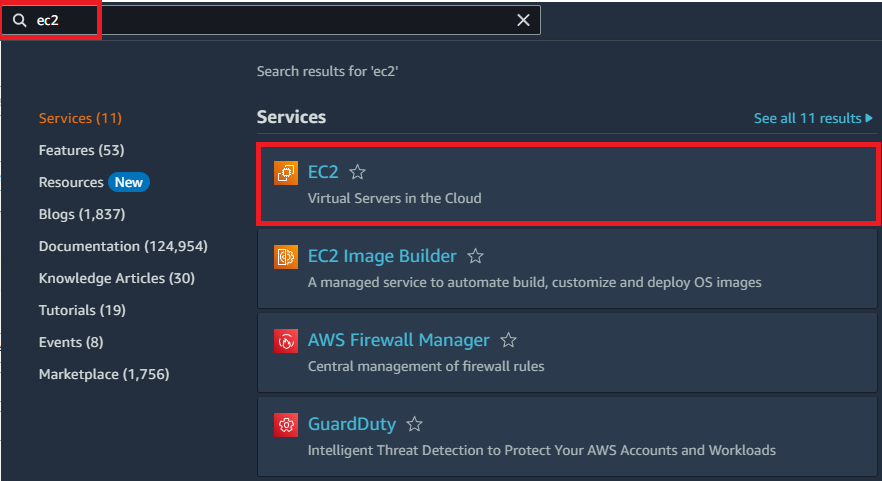
In the services search at the top left of the AWS console:
Type Ec2
- Click EC2
Click Launch Instance:

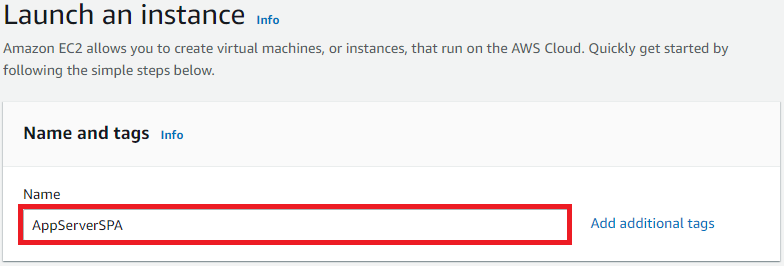
Enter the following in the Launch Instance screen:
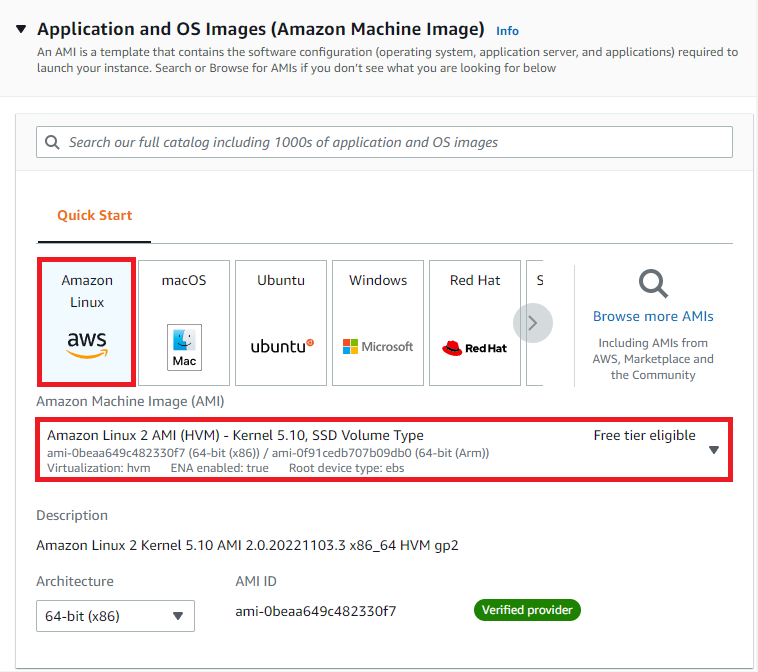
AMI: Amazon Linux 2 AMI
Instance type: t2.micro
Key Pair: Proceed without Key Pair
Network Settings
VPC: SmallProjectA
Subnet: Private Subnet 1
Auto Assign Ipv4: Disable
Security Group: Select Existing Group > AppServerSPASG
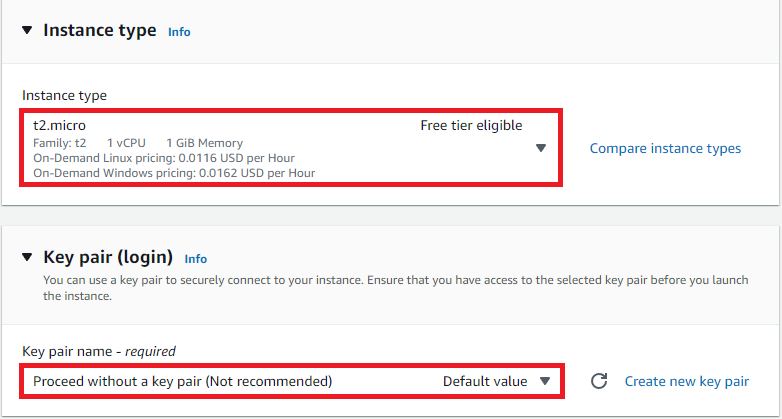
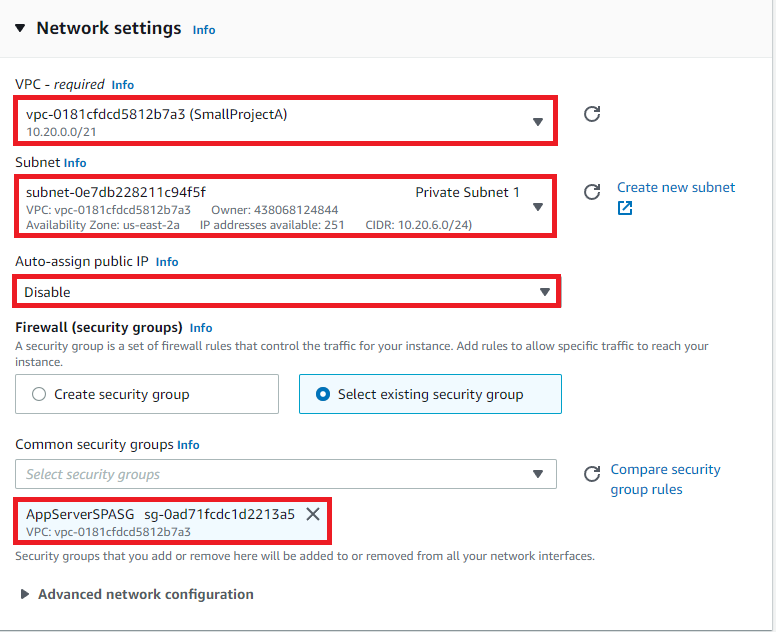
In the Advanced Details section under User Data:
Enter the following script:
  #!/bin/bash
    yum update -y
    amazon-linux-extras install epel -y
    yum install stress -y
    yum install -y httpd php
    systemctl start httpd
    systemctl enable httpd
    echo '<center><h1><?php echo $_SERVER["SERVER_ADDR"]; ?></h1></center><br><br><?php phpinfo(); ?>' > /var/www/html/index.php

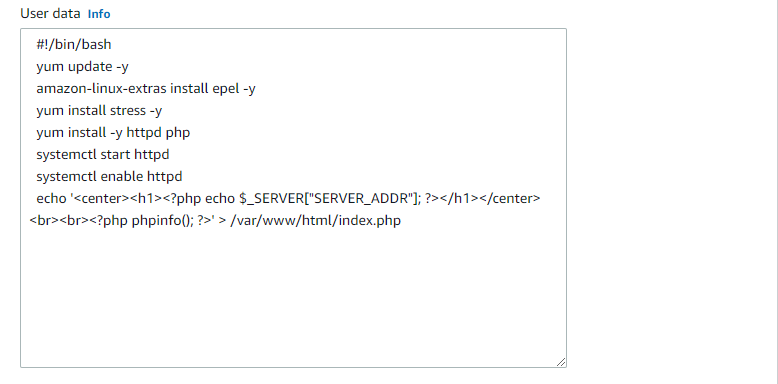
This script will perform the following upon instance launch:
Updates package manager
Install extra packages
Install Apache Web Server PHP
Starts Apache Web Server
Enables web server to start automatically on boot
Creates a home page that displays information regarding the site's PHP configuration.
Click Launch Instance

- After launching, Click the instance ID in the banner

On the Instance screen:
Select the AppServerSPA instance
- In the details tab on the bottom, copy the Private IP address for the next step:

Launch Web Server Instance in the Public Subnet of the SmallProjectA VPC
In this next task, you will create an ec2 instance for the web server that will run on the public subnet.
- The web server will communicate with the application server through the PrivateSubnetACL network ACL and the APPSG security group.
Launch Ec2 Instance in Public Subnet 1 and enter the following:
Enter the following in the Launch Instance screen:
Name: WebServerSPA
AMI: Amazon Linux 2 AMI
Instance type: t2.micro
Key Pair: Proceed without Key Pair
Network Settings
VPC: SmallProjectA
Subnet: Public Subnet 1
Auto Assign Ipv4: Enable
Security Group: Select Existing Group > WebServerSPASG
Advanced Details
IAM Instance Profile: SmallProjectACWAgent
User Data - Use script below but replace APPSERVERIP w/ AppServer Private IP.
Launch Instance - Obtain Instance Public IP via Instance Dashboard > Details
yum update -y
   amazon-linux-extras install epel -y
   yum install stress -y
   yum install -y httpd php
   systemctl start httpd
   systemctl enable httpd
   echo '<center><h1><?php echo $_SERVER["SERVER_ADDR"]; ?></h1></center><br><br><?php phpinfo(); ?>' > /var/www/html/index.php
   echo '<?php error_reporting(E_ERROR); $fp = fsockopen("APPSERVERIP", 80, $errno, $errstr, 1);    if (!$fp) {echo "<h1>Success</h1>";} else {echo "<h1>Fail</h1>"; fclose($fp);}Test Web Server
Test Web Server
Go to a new browser and enter the Web Server's Pubic Ip Address
- WebServerIP/appservertest.php
Success! We can successfully connect to our instance which indicates we have a connection to the App server.

SSH Into Web Server via Ec2 Instance Connect
Amazon EC2 Instance Connect is a simple and secure way to connect to your instances using Secure Shell (SSH).
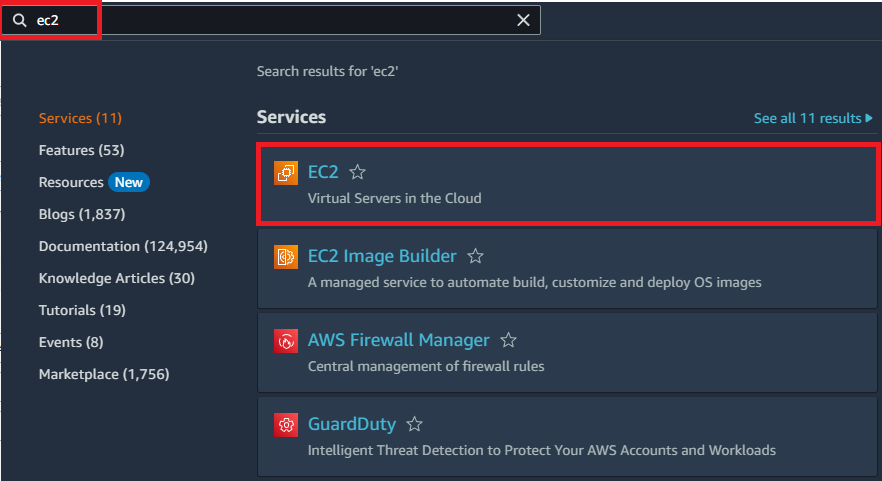
In the service search bar at the top of the AWS console
Enter Ec2
- Click Ec2
In the left-hand navigation pane of the Ec2 Dashboard
- Click Instances
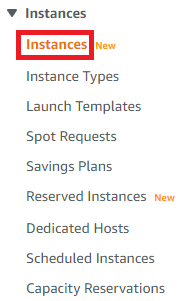
In the Instances dashboard
Select WebServerSPA
- Click Connect

In the Connect to Instance dashboard
Keep all default settings
- Click Connect

!!! We are unable to connect to our instance... lets find out why.

When using EC2 Instance Connect, an HTTPS connection is established between your computer and the EC2 Instance Connect Service inside AWS. The Ec2 Connect Service then establishes an SSH connection to the EC2 instance. We will need our security group to allow SSH traffic for IP range 18.206.107.24/29 for the EC2 Connect Service in us-east-1.
The IP ranges for the EC2 Instance Connect service can be found here: https://ip-ranges.amazonaws.com/ip-ranges.json
Add SSH Traffic to WebServerSPASG Security Group
Navigate back to the Ec2 Dashboard
Click on Security Group
Select WebServerSPASG
Add inbound rule
Source: Custom, 18.206.107.24/59
Click Save rules
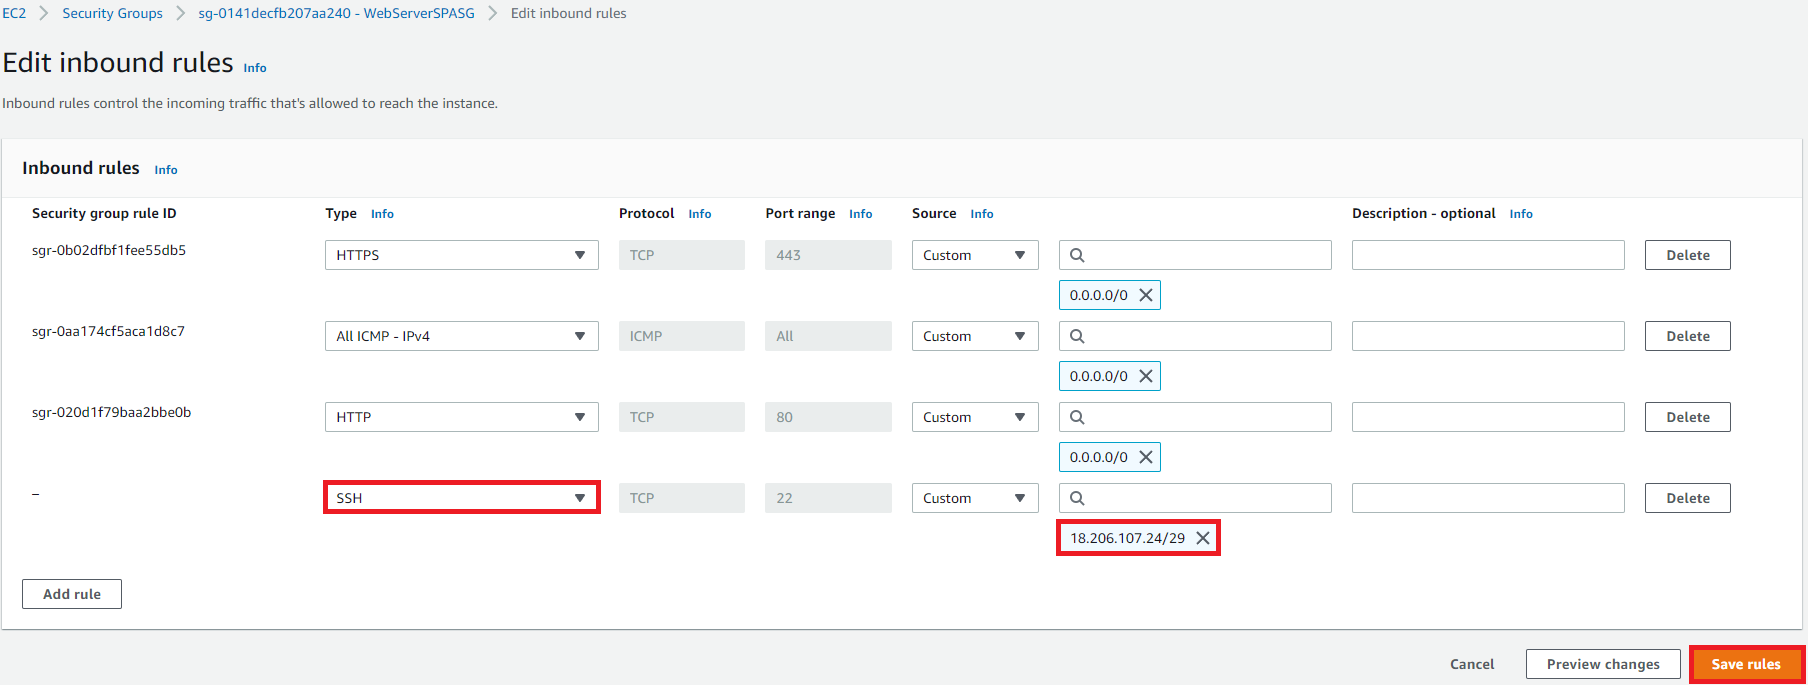
In the left-hand navigation pane of the Ec2 Dashboard
Click Instances
Select WebServerSPA
- Click Connect
Connect via Ec2 Instance Connect
You should now see the Command Line Interface (CLI) for your instance

Installing & Starting CloudWatch Agent
CloudWatch Agent is a software package that autonomously and continuously runs on your servers. Using CloudWatch Agent, we can collect metrics and logs from Amazon Elastic Compute Cloud (Amazon EC2), hybrid, and on-premises servers running both Linux and Windows
- Install and Configure CloudWatch Agent via CLI
sudo yum install amazon-cloudwatch-agent -y
- Initialize CloudWatch Config Wizard
sudo /opt/aws/amazon-cloudwatch-agent/bin/amazon-cloudwatch-agent-config-wizard
The Wizard will go through a variety of options, ensure the following config is set: For any other parameter not specified, use default value
CollectD Monitoring
- No
Do you want to monitor any host metrics? e.g CPU,memor, etc.
- Yes
Would you like to collect metrics at High Resolution?
- 10 s
Which Default Metrics do you want?
- Advanced
Do you want to Monitor Log Files?
- Yes
Log File Path?
- /var/log/httpd/access_log
Monitor Additional Log Files
- No
Store config in SSM Parameter Store?
- No
Accept above content of config
- Yes
Start the CloudWatch Agent via snippet below
sudo /opt/aws/amazon-cloudwatch-agent/bin/amazon-cloudwatch-agent-ctl -a fetch-config -m ec2 -s -c file:/opt/aws/amazon-cloudwatch-agent/bin/config.json
- Close CLI
Create CloudWatch Alarm for Memory Usage
Amazon CloudWatch is a monitoring and management service that provides data and actionable insights for AWS, hybrid, and on-premises applications and infrastructure resources.
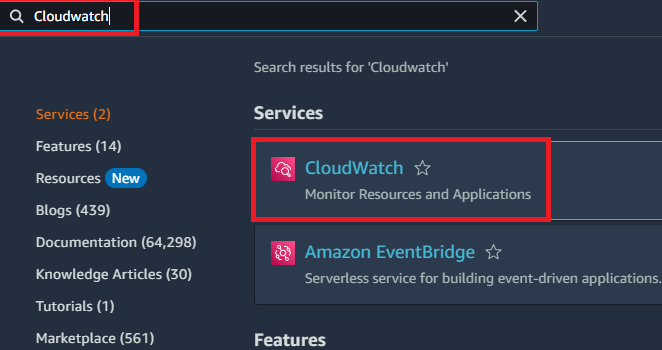
In the services search bar in the aws console:
Type CloudWatch
- Click Cloudwatch
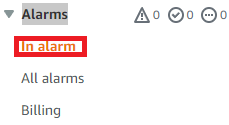
In the CloudWatch dashboard navigation pane:
Click In Alarm
- Click Create Alarm

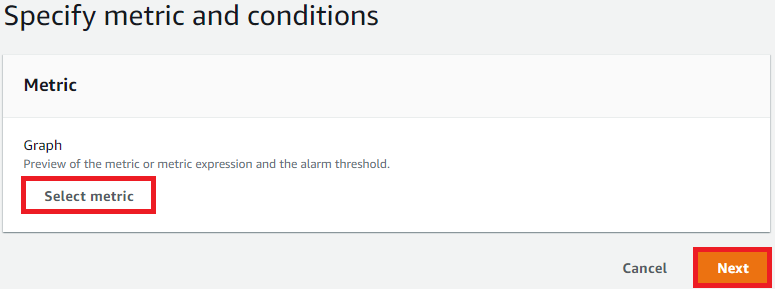
Select Metric & Conditions
Click CWAgent > InstanceId
- Select:mem_used_percent


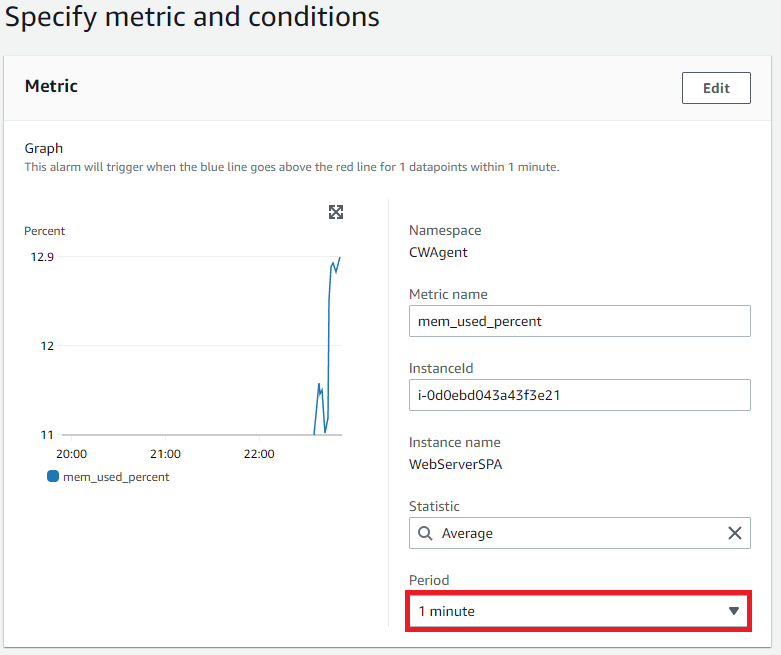
Click Period dropdown, keep all other default options
- 1 Minute
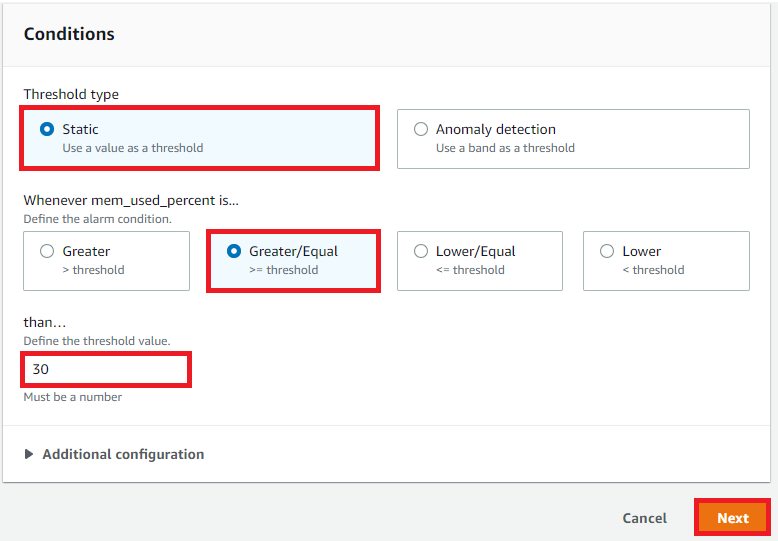
Conditions
Select Static
Select Greater/Equal >= threshold
Enter 30
Click Next
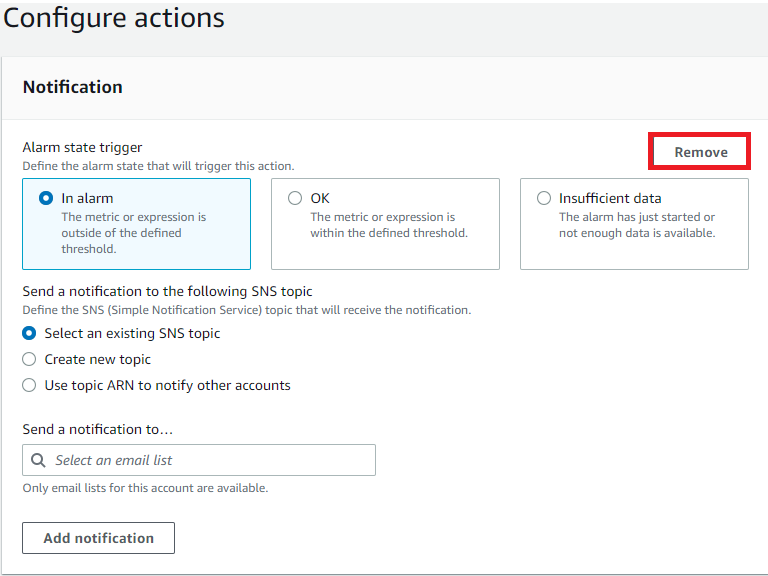
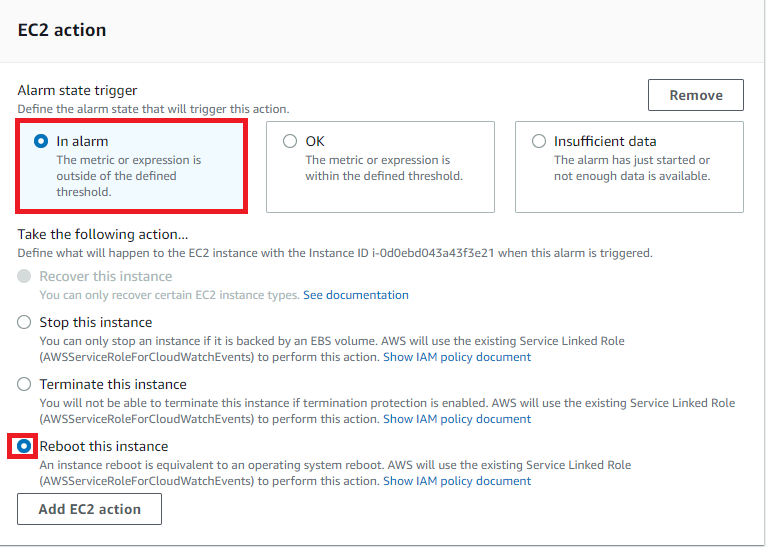
Configure Actions
Remove Notification
Add Ec2 Action
Alarm State Trigger: In Alarm
Take the following action: Reboot Instance
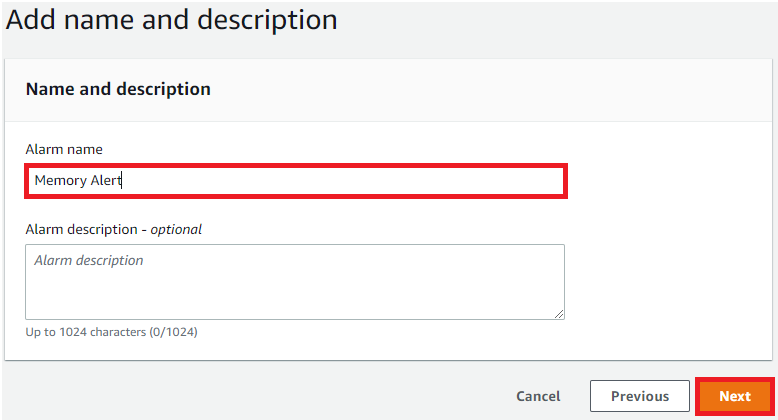
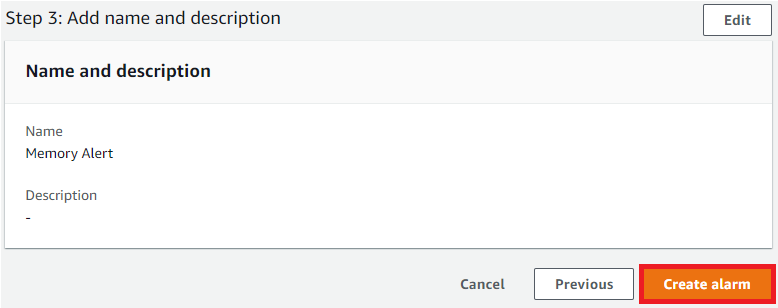
Click Next & Create Alarm
Testing CloudWatch MemoryAlert alarm
Navigate to the Ec2 Dashboard
In the Navigation Pane: Click Instances
Select WebServerSPA
Click Connect
Connect via Ec2 Instance Connect
Once connected: In the CLI, type:
stress -m 1 --vm-bytes 700M

Navigate back to your CloudWatch dashboard tab
In the Navigation Pane select All Alarms:
The MemoryAlert Alarm should now be in state: "In Alarm"
If not, allow more time and refresh.

After some time, the alarm should revert back to an OK state. Click on the Memory Alert alarm to review the alarm history.
We can see that our stress test spiked the utilization of memory in our instance and action was taken by our CloudWatch alarm to remedy over utilization.


Great Job! Kudos to you if you've stuck through and completed this mini series. Although we ran into an issue with connecting to our instance, overall we were successful in implementing our tasks without issue.
We have completed the following:
Launched App Server in Private Subnet
Launched Web Server in Public Subnet
Created IAM Role for CloudWatch
Update Security Group to allow SSH for Ec2 Instance Connect in our region/az
SSH into Web Server via EC2 Instance Connect
Install/configure/start CloudWatch Agent via the command line
Create CloudWatch MemoryAlert Alarm
- Added Resilience with CloudWatch action
Stress Test instance
Thank you for joining me on this three-part series...be sure to clean up any infrastructure that may have been provisioned so that you do not incur any charges.
Remove Infrastructure:
VPC Dashboard
Delete NAT Gateway
Release Elastic IP Address
Ec2 Dashboard
- Terminate Web Server / App Server
CloudWatch Dashboard
- Delete CloudWatch Alarm
Finally - Delete SmallProjectAVPC
* This will delete all resources associated with VPC
Till next time!
Subscribe to my newsletter
Read articles from TheAwsDev directly inside your inbox. Subscribe to the newsletter, and don't miss out.
Written by

TheAwsDev
TheAwsDev
No matter what field of study you embark on, there must be a phase in which you learn about learning, or rather, learning about how you learn. Throughout my journey into AWS, i've learned about learning (and still learning)...ideas from Richard Feynman and Tony Buzan to Aristotle, learning is ultimately how efficiently you utilize your mind-scape. Tools and techniques are to be explored, discovered or even created. As I journey through learning Cloud Developent, this blog is a tool to become immersed in the process. Hopefully, you will gain something along the way... "The capacity to learn is a gift. To learn is a skill. The willingness to learn is a choice.” - Brian Herbert