Day-10 Advanced Git & GitHub for DevOps Engineers🌟
 Shakshi Jain
👩💻Git Branching and Its Strategy?
Imagine you and your team are working on a cloud-based application, and the main version of your application is hosted on a cloud server, like Amazon Web Services (AWS). This main version is your "master" branch, representing the stable and production-ready version of your app.
Now, your team needs to work on two new features for the application: "User Authentication" and "File Sharing." Instead of making changes directly to the live application, which could cause issues for users, you decide to use Git branching to develop these features independently.
➡️Creating Branches:
You created two branches: "user-authentication" and "file-sharing."

These branches are like separate environments in the cloud where you'll develop the new features.
➡️Making Changes:
You switch to the "user-authentication" branch and start developing the user authentication feature on this isolated cloud environment.

At the same time, another team member switches to the "file-sharing" branch and starts working on the file-sharing feature in its cloud environment.

➡️Saving Changes:
As you work on the user authentication feature, you regularly commit your changes to the "user-authentication" branch. These commits are like saving checkpoints of your progress on the cloud environment.
Similarly, the other team member commits changes to the "file-sharing" branch
➡️Merging:
Once both features are fully developed and tested on their respective branches, it's time to bring them together into the main application on the AWS cloud server (master branch).
First, you switch back to the "master" branch.

Next, you merge the changes from the "user-authentication" and "file-sharing" branches into the "master" branch, ensuring that the new features are integrated smoothly

Using Git branching in a cloud-based context allows you to work on new features without impacting the main application. This cloud-based branching strategy promotes collaboration and allows developers to work on different features simultaneously without causing conflicts or disruptions to the live application.
Git Revert:
Git revert is a command in the Git version control system that allows you to undo or reverse the changes made by a specific commit. It creates a new commit that undoes the changes introduced by the target commit, effectively rolling back the code to its previous state.
Imagine you're writing an essay, and you realize you made a typo in one sentence. Instead of erasing the whole sentence and rewriting it, you use an "eraser" to remove just the mistake. That's what git revert does in code.
For example:
You have a code with three commits: A, B, and C. Each commit represents a change you made in the code.
You realize that commit B has a bug, and you want to go back to the state of code before commit B was made.
Instead of deleting commit B and losing the changes in commit C, you use git revert to create a new commit that undoes the changes in commit B.
Now, your code has four commits: A, B, C, and D. Commit D undoes the changes from commit B, and your code is back to the state it was before the bug was introduced.
Git Reset:
Git reset is like using a time machine to go back to a specific point in your project's history. It allows you to undo changes and move your project back to an earlier state.
Imagine you have a document and you've been making edits to it, adding new paragraphs and making changes to sentences. Each time you make a significant update, you save the document as a new version, like "Document_v1," "Document_v2," and so on.
Now, let's say you made some changes to the document that you don't like and want to go back to "Document_v2," which was the last version you were happy with. Instead of manually undoing each edit, you can use Git reset to go back to "Document_v2," and all changes made after that version will be removed.
In this scenario, Git reset works like a time-travelling tool for your document, allowing you to quickly revert to a specific version without redoing every change. It simplifies the process of managing your document's edits, giving you the flexibility to experiment with different ideas and easily backtrack if needed.
Git Merge and Rebase:
➡️ In Git, a merge is a command that combines the changes from two different branches into a single branch. It integrates the work done in separate branches to create a unified history and a new commit that includes the changes from both branches.
It allows multiple people to work on different parts of a project simultaneously and then brings everything together into a single, complete version. Just like merging different pieces of a puzzle, Git merge ensures a unified and comprehensive project that benefits from everyone's contributions.
➡️ In Git, rebase is a command that helps in reorganizing and streamlining the commit history of a branch. It allows you to move the commits of one branch to a new base commit, typically to incorporate the latest changes from another branch.
When you perform a rebase, Git rewinds the changes made in the branch back to the point where it diverged from the target branch. Then, it reapplies the commits on top of the latest commit in the target branch, creating a more linear and straightforward history.
The primary benefit of using rebase is to maintain a cleaner and more logical commit history, making it easier to follow the project's development timeline. However, it's essential to use rebase with caution, as it rewrites the commit history, potentially causing conflicts and complications if not done correctly.
Therefore, rebase is often best suited for individual branches or private development before merging changes into the main branch or shared repository.
👩💻Task 1: Branching, Committing, and Restoring:
In this activity, we'll delve into the process of creating a new branch 🌿, implementing changes with different messages 📝, and reverting a file to a previous version ⏪. To accomplish this, adhere to these straightforward guidelines:
1. Create a fresh branch called "dev" from the primary branch and confirm the alteration by executing the command "git checkout dev."

2. Generate a text file labelled version01.txt and populate it with the provided content.

3. Employ the "git add" command followed by the file names to stage the tracked changes. Subsequently, commit this update with the message "Added new feature.

4. Push the dev branch to the remote repository using the command:


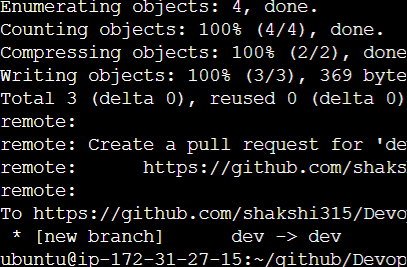
5. Proceed with additional commits to the dev branch by modifying the version01.txt file.
Commit these changes using the message "Making the following changes."
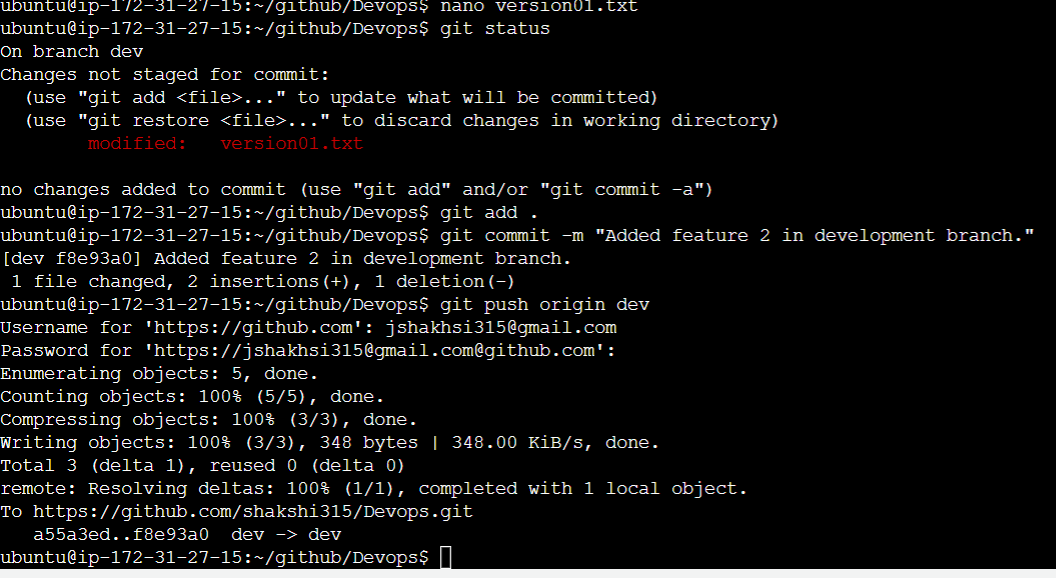
To restore the version01.txt file to a previous state with the content "This is the bug fix in the development branch," execute the appropriate Git command.
📜 Employ the "git log --oneline" command to access the <commit> information and identify the desired commit for resetting.


Task 2: Branching, Merging, and Rebasing
In this task, we'll embark on an exciting exploration of branches, merging, and rebasing. To initiate this journey, follow the outlined steps:
Let's unite the "dev" branch with the "main" branch. Start by inspecting the commits on the "dev" branch using "git checkout dev" 👩💻. Next, switch back to the "main" branch and examine its commits as well. Finally, execute the "git merge dev" command to blend the commits and observe the fascinating outcomes.
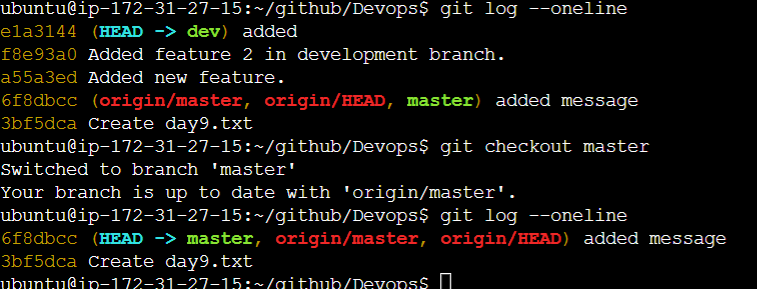
Now will run the "git merge dev" command and will see the results.


As part of your practice, try performing a git rebase operation to witness its impact. Describe the observed differences after the rebase 🔄
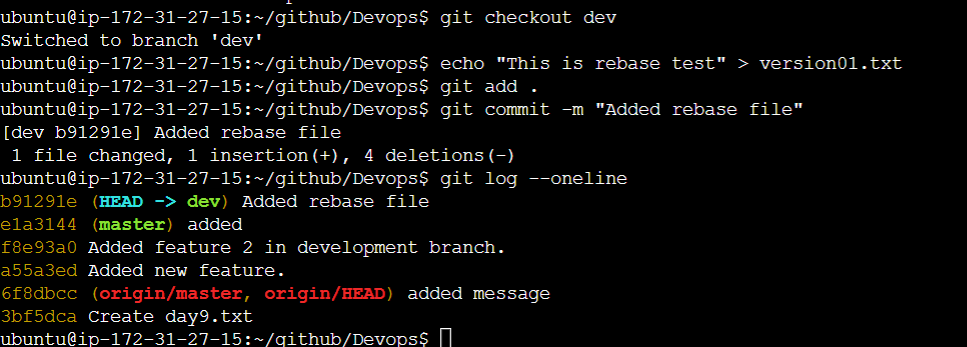
The "dev" branch is checked out, and a new text file "version01.txt" is created with specific content 📝.
Changes to the file are staged and committed with an appropriate message 💬.
The commit history on the "dev" branch is inspected.
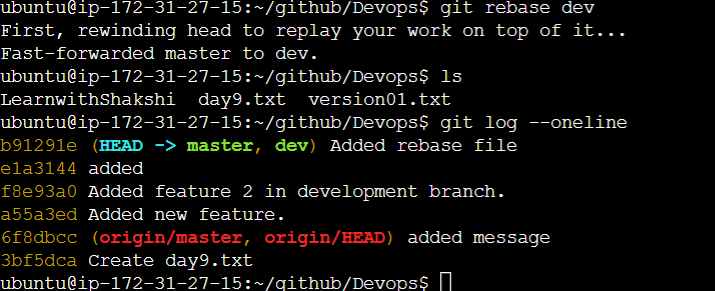
The working branch is switched to "main," and a rebase is performed.
The rebase incorporates the commits from "dev" onto "main," resulting in an updated commit history on the "main" branch.
Great job on completing Day 10 of the #90DaysOfDevOps challenge!
Today, we explored advanced Git techniques like branching, merging, and reverting—essential for seamless collaboration and version control in software projects.
Excitingly, Day 11 awaits as we continue our Git and GitHub journey for DevOps Engineers in the next segment of this topic. Stay tuned for more cosmic coding adventures! 🚀👩💻 Keep up the fantastic work!
Subscribe to my newsletter
Read articles from Shakshi Jain directly inside your inbox. Subscribe to the newsletter, and don't miss out.
Written by

Shakshi Jain
Shakshi Jain
Welcome to my tech blog! 🚀 Exploring the world of AWS and DevOps tools with passion and curiosity. Join me on this exciting journey as we uncover the wonders of cloud computing and collaborative development Let's level up our tech skills together! 👩💻🌟 #AWS #DevOps #CloudComputing #TechJourney"