Implementing Navigation Architecture in Android - Part 1
 Love Otudor
Table of contents

Before you begin, you should have:
Basic understanding of Android development with Java.
An Android IDE. I will be using Android Studio version 2.0
Migrated project to use AndroidX libraries. If you haven't done this yet, refer to this guide on how to migrate your project.
Good spirits!
What’s with the Navigation Component
Understanding the Navigation Component
Just as in the real world, where navigation is the process of moving through a specific environment, in the context of Android development, navigation refers to the interactions that let users move in and out of different parts of your app.
The Navigation component in Android helps you implement navigation consistently and predictably based on the principles of navigation. It also makes it possible to visualize your app's navigation flow in a single graph and promotes code reusability.
Creating the project and adding the necessary dependencies
Step 1: Create a new project in Android Studio with an empty activity.
Step 2: Set the minimum SDK to API 14 or higher.
Step 3: Create a new fragment with a ViewModel and Name it “HomeFragment”.
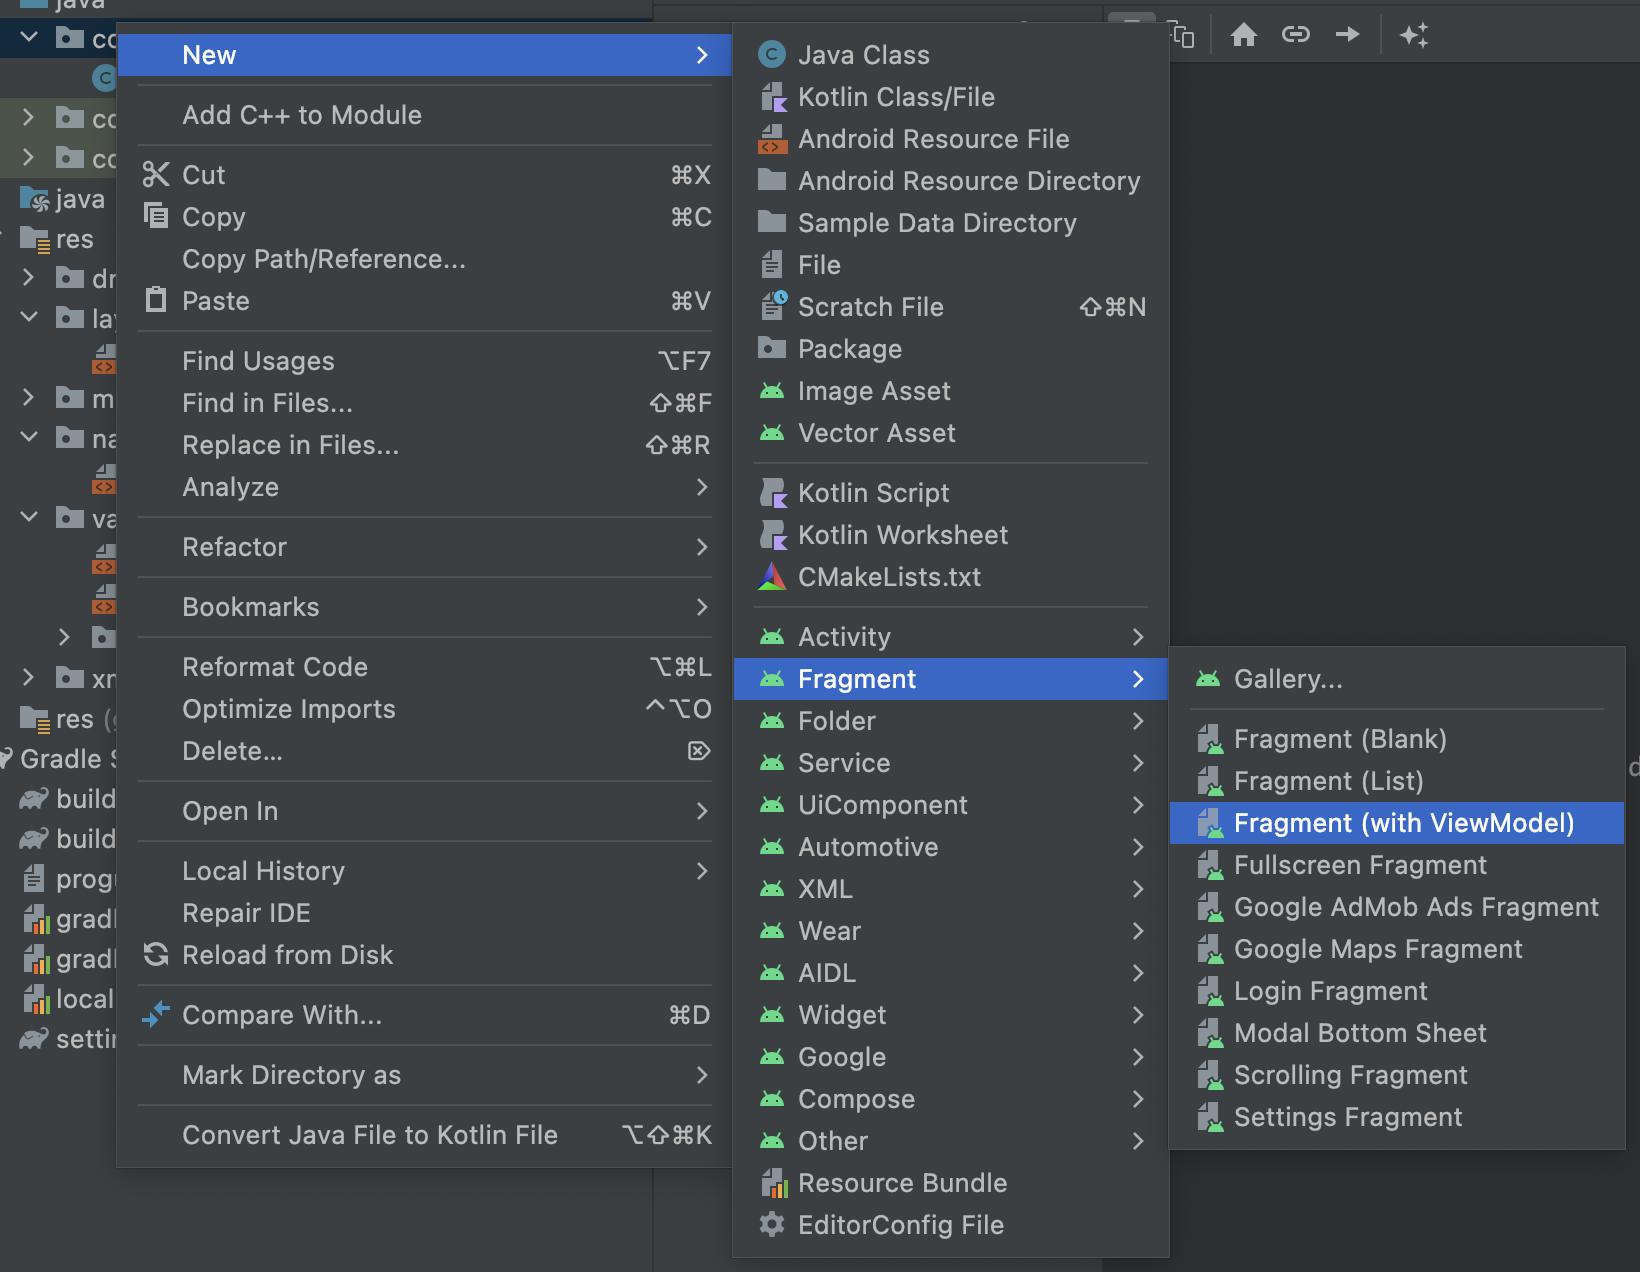
Step 4: Add the following dependencies to your app's build.gradle file to include Navigation support in your project:
def nav_version = "2.6.0"
  // Java language implementation
  implementation "androidx.navigation:navigation-fragment:$nav_version"
  implementation "androidx.navigation:navigation-ui:$nav_version"
Step 5: Add the Safe Args plugin to your project. In your top-level build.gradle file:
In Android Studio bellow bumblebee:
buildscript {
    repositories {
        google()
    }
    dependencies {
        def nav_version = "2.4.2"
        classpath "androidx.navigation:navigation-safe-args-gradle-plugin:$nav_version"
    }
}
In Android Studio bumblebee+
plugins {
    id 'androidx.navigation.safeargs' version '2.4.2' apply false
}
Apply the plugin below in your app or module's build.gradle file:
apply plugin: "androidx.navigation.safeargs"
NOTE: If you are using Kotlin, you can find the alternative dependencies here.
Step 6: Sync your project.
Creating the Navigation Graph
The navigation graph is an XML file that describes how activities and fragments relate to each other and how users can move between them. It defines the actions that move and parse data between destinations. Follow the steps below to create a navigation graph for your app:
Step 1: Right-click on the res folder.
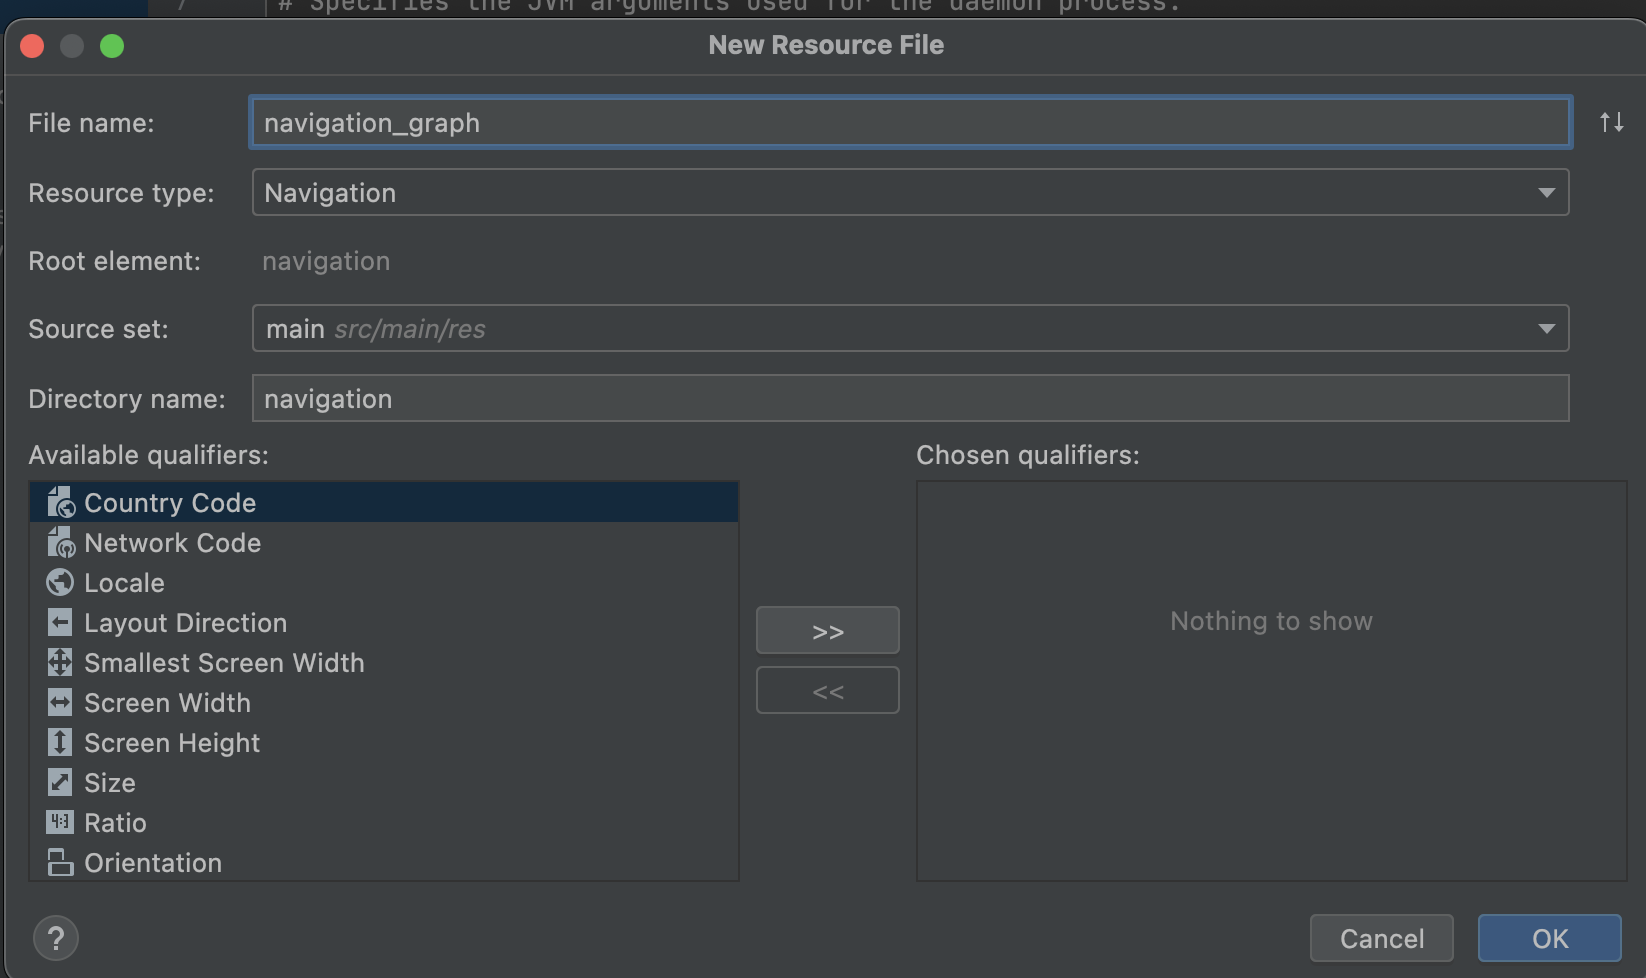
Step 2: Select "New" > "Android Resource File" from the menu option and name it "navigation_graph". Set the resource type to navigation.
Step 3: Click "OK" to create the file.
Declaring the Navigation Host Fragment
The navigation host fragment acts as a container that allows destinations to be swapped in and out as the user navigates through the app. To Create a Navigation Host Fragment:
Step 1: Open the activity_main.xml file.
Step 2: Delete the default "Hello World" TextView.
Step 3: Switch to Design View by selecting the Design tab at the top-right corner of the IDE.

Step 4: From the palette, select "Containers".
Step 5: Choose NavHostFragment, and drag and drop it onto the design tab.
Step 6: Select the navigation_graph.xml file you created earlier as the navigation graph in the pop-up window that appears.
Step 7: Click "OK", to create the navigation host fragment.
Step 8: Change the id to nav_host_fragment.
Step 9: Constraint the top, bottom, start, and end of the navigation host fragment to its parent.
Step 10: Set the layout height and width of the nav host fragment to 0dp(match constraint).
Adding destinations
A destination is a part of your app a user can go to. Every navigation graph must have its start destination. The start destination is the screen that appears when the user first launches the app. Usually, the fragment that has the home icon on it is the start destination of that navigation graph. You can either add fragments that already exist in your project or create new fragments using the navigation graph. To add destinations to the navigation graph:
Step 1: Switch to the Design View of the navigation graph.
Adding an Existing Fragment:
Step 1: Click “new destination”.
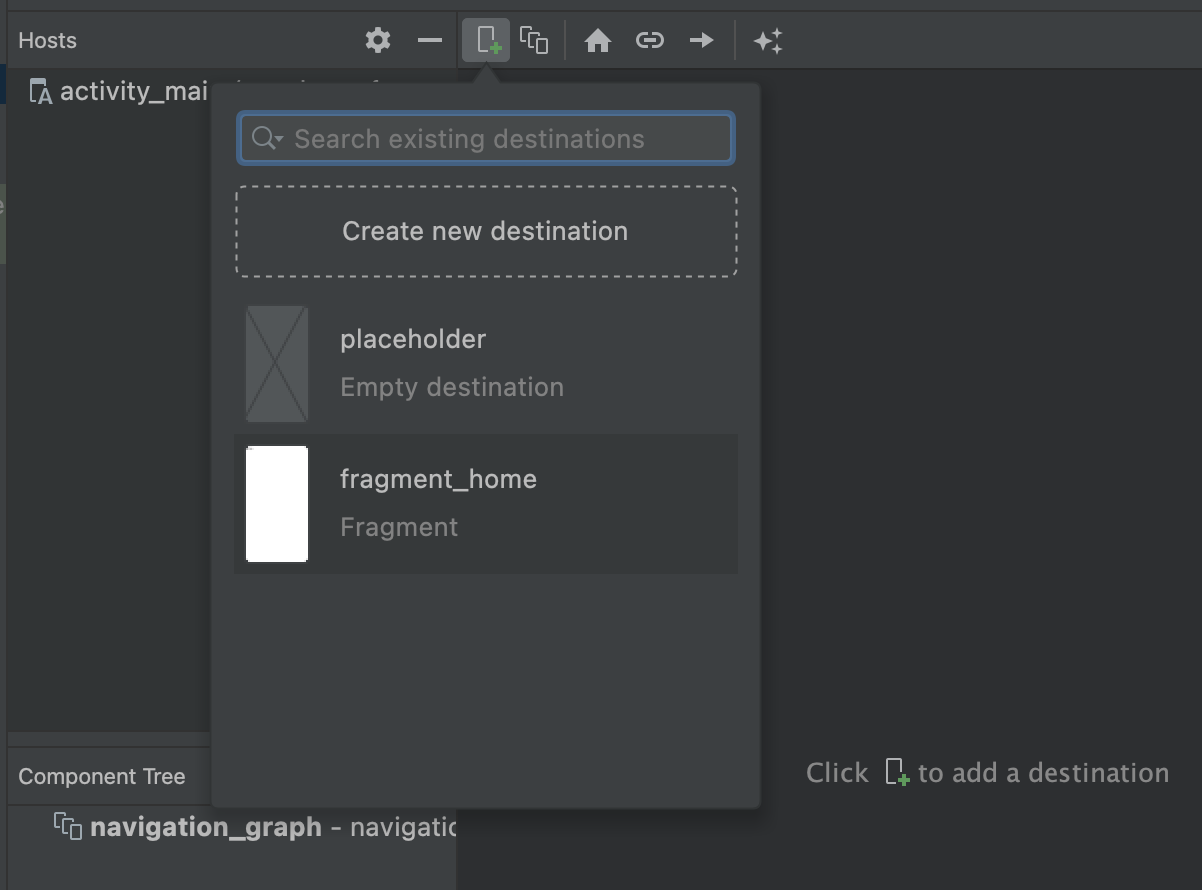
Step 2: Select the fragment. In your case, it’s the fragment_home.
Adding a New Fagment:
Step 1: Click on “new destination”.
Step 2: Select "Create new destination".
Step 3: Select a blank fragment and click next.
Step 4: Name the fragment “SecondFragment”.
Step 5: Click on "Finish".
This new fragment would appear as another destination in the navigation graph. This is what the XML file of the nav graph would look like.
<?xml version="1.0" encoding="utf-8"?>
<navigation xmlns:android="http://schemas.android.com/apk/res/android"
    xmlns:app="http://schemas.android.com/apk/res-auto"
    xmlns:tools="http://schemas.android.com/tools"
    android:id="@+id/navigation_graph"
    app:startDestination="@id/homeFragment">

    <fragment
        android:id="@+id/homeFragment"
        android:name="com.example.navigationsampleapp.HomeFragment"
        android:label="home_fragment"
        tools:layout="@layout/home_fragment"/>

    <fragment
        android:id="@+id/secondFragment"
        android:name="com.example.navigationsampleapp.SecondFragment"
        android:label="fragment_second"
        tools:layout="@layout/fragment_second" />
</navigation>
You can see that by default the first fragment(HomeFragment) has been made the start destination.
To choose a start destination:
Step 1: Select the destination by clicking on it.
Step 2: Right-click on the destination. Click on “Set as Start Destination”.
Adding actions
So far, the app doesn’t do anything, you are going to add actions to make it somewhat interactive.
An action is a logical connection between destinations in the app. It represents paths users can take in navigating through your app.
Double-clicking on a fragment(destination) in the navigation graph design tab opens up that fragments XML file into the editor.
You are going to add a button in the HomeFragment, which when clicked on would navigate to the SecondFragment.
Step 1: Open the home_fragment.xml file.
Step 2: Delete the default "Hello World" TextView.
Step 3: Drag and drop a button onto the parent, name it "Move to Next Fragment".
Step 4: Position the button and give it an ID: next_fragment_button.
Step 5: In the HomeFragment.java OnViewCreated method, implement the OnClick event of the button.
@Override
public void onViewCreated(@NonNull View view, @Nullable Bundle savedInstanceState) {
   super.onViewCreated(view, savedInstanceState);
   Button button = view.findViewById(R.id.next_fragment_button);
   button.setOnClickListener(new View.OnClickListener() {
       @Override
       public void onClick(View view) {
         }
   });

}
You would reference an Action in the navigation graph in the onClick method of this button.
Step 6: In the navigation graph, take the cursor to the right-hand edge of the homeFragment which is the startDestination. Click on the circle that appears and drag on to the secondFragment.
This is how an action is added to the navigation graph.
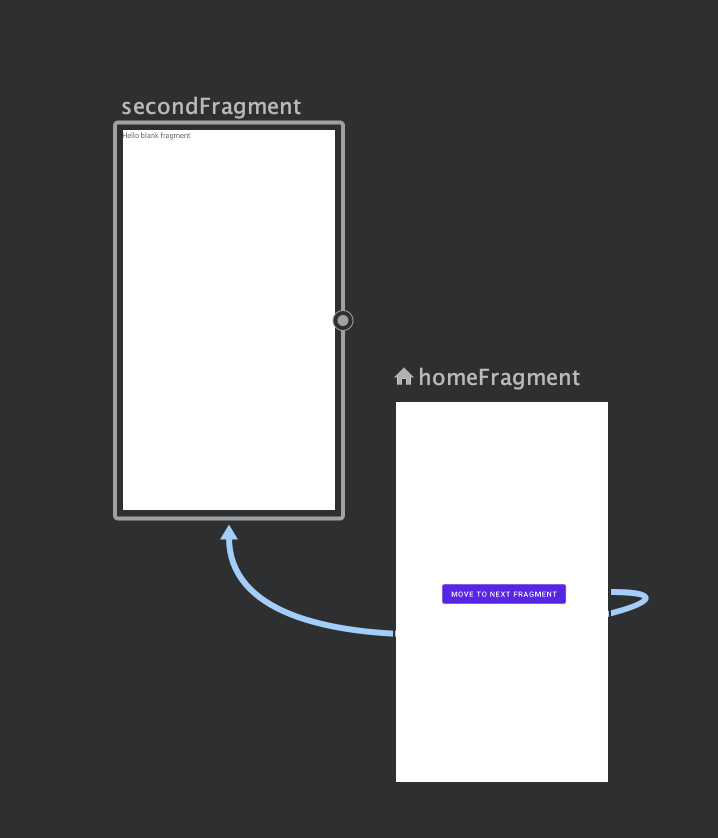
Step 7: Click on the arrowed line that connects both fragments to select the action. In the Attributes panel, rename the actions Id to “launch_second_fragment”.
You would call this action in the onClick method of the button you created earlier in HomeFragment.java.
If you switch to the Code View of the navigation graph, you would see that an action tag has been added to home_fragment.
<?xml version="1.0" encoding="utf-8"?>
<navigation xmlns:android="http://schemas.android.com/apk/res/android"
    xmlns:app="http://schemas.android.com/apk/res-auto"
    xmlns:tools="http://schemas.android.com/tools"
    android:id="@+id/navigation_graph"
    app:startDestination="@id/homeFragment">

    <fragment
        android:id="@+id/homeFragment"
        android:name="com.example.navigationsampleapp.HomeFragment"
        android:label="home_fragment"
        tools:layout="@layout/home_fragment" >
        <action
            android:id="@+id/launch_second_fragment"
            app:destination="@id/secondFragment" />
    </fragment>
    <fragment
        android:id="@+id/secondFragment"
        android:name="com.example.navigationsampleapp.SecondFragment"
        android:label="fragment_second"
        tools:layout="@layout/fragment_second" />
</navigation>
Step 8: Rebuild the project to generate the necessary calls. To do this:
On the toolbar, select "Rebuild" Project from the drop-down menu of the "Build" item.
You can find the newly generated calls in the generated Java directory. You would use this generated HomeFragmentDirectionsclass to load the second fragment by calling the method launchSecondFragment().
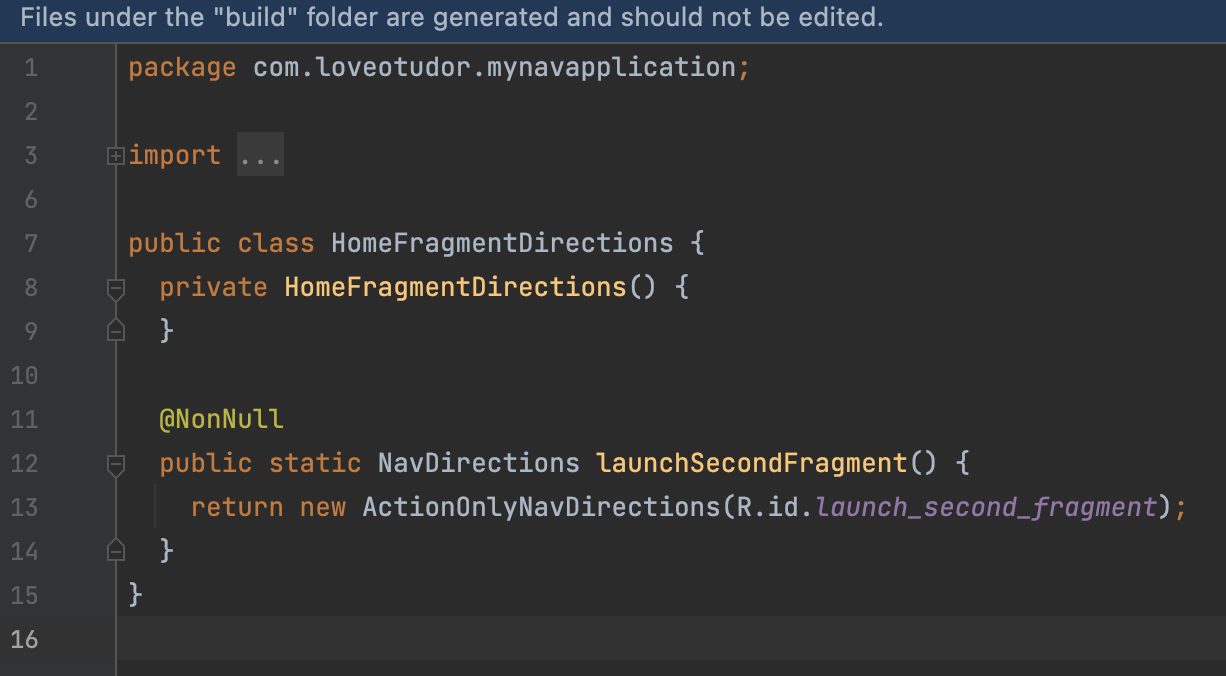
Step 9: In the buttons onClick method in HomeFragment.java, Paste the code snippet below:
Navigation.findNavController(view).navigate(HomeFragmentDirections.launchSecondFragment());
Recall that launchSecondFragment was the id you gave to the action.
Whew! That was cool.
You have successfully implemented navigation using navigation architecture. In the next article, you will see how to pass actions as arguments for enhanced functionality.
Happy Coding! ❤️
Subscribe to my newsletter
Read articles from Love Otudor directly inside your inbox. Subscribe to the newsletter, and don't miss out.
Written by

Love Otudor
Love Otudor
I am Love Otudor, an Android Developer and Technical Writer. I am passionate about contributing to open-source and simplifying complex software engineering concepts. In my free time, I enjoy indulging in my love of music 😊.