KEDA: Scaling Your Applications Made Easy
 Pushkar Kumar
Introduction
Welcome, reader! Have you ever wondered how popular applications like Instagram, Youtube, etc handle massive user traffic without crashing or slowing down? It is thanks to a concept called Scaling.
Scaling is the art of dynamically adjusting the resources your application needs to meet its demands. It’s like magically expanding or shrinking your application to accommodate the number of users or events happening at any given time. KEDA makes scaling easy for you.
KEDA stands for Kubernetes Event-driven Autoscaling. It makes it possible to easily scale your application based on any metric imaginable from almost any metric provider out there.
It can be jargon for you, so let’s break down each component from the KEDA definition and try to understand what exactly it is.
What is Kubernetes?
Kubernetes is a popular system used to manage and run applications. Think of it as a big container that holds all the different parts of an application, like a website or an online game. It helps keep everything organized and running smoothly.
What is Event-Driven?
In the digital world, an event is something that happens, like a user clicking a button, a new message coming in, or a file being uploaded. Events are important because they trigger actions or changes in the application.
What is KEDA?
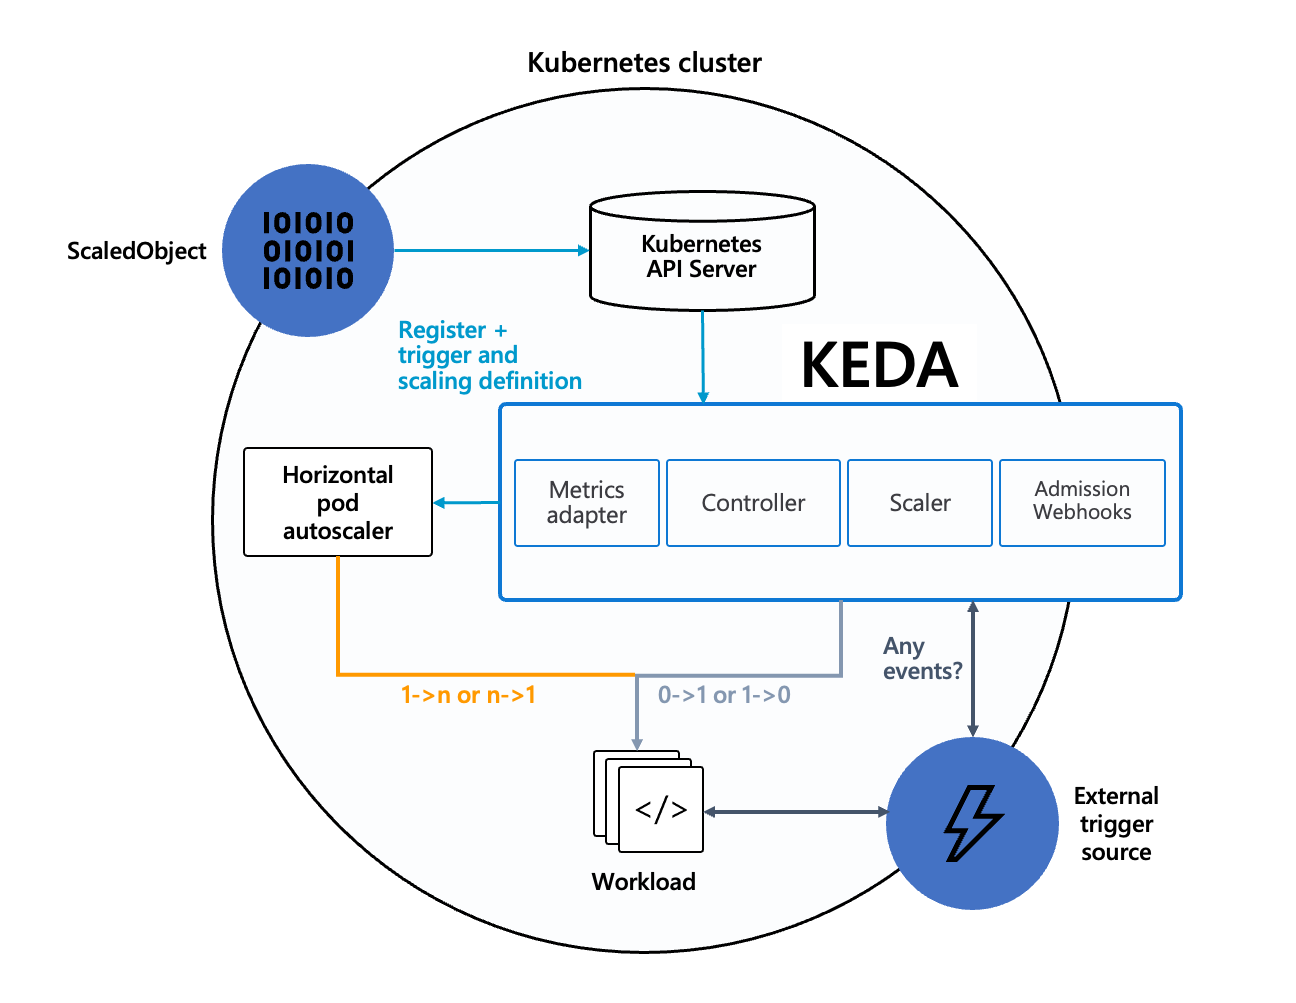
So, KEDA is a tool that helps Kubernetes handle events more efficiently. It helps applications automatically scale up or down based on the number of events happening. It works hand in hand with the built-in Kubernetes Horizontal Pod Autoscaler (HPA). KEDA complements its functionality, adding an extra layer of magic to achieve dynamic autoscaling.
It is an open-source cloud-native project backed by Microsoft. Big Corps like Alibaba Cloud, Zapier etc use it in production on a large scale.
How KEDA Makes Scaling Your App Easy?
Using KEDA you can scale your replicas from 0 to any desired number based on the metrics. There is a long list of types of metrics supported by KEDA, some standard ones are CPU and Memory based, while some advanced metrics include queue depth of a message queue, requests/second, scheduled cron jobs or even custom metrics from your application logs.
Imagine you have a website, and suddenly lots of people start visiting it at the same time. KEDA can help make sure your website can handle all those visitors without crashing or slowing down.
When many events are happening, KEDA can tell Kubernetes to add more resources, like extra servers or computing power, to handle the increased workload. This is called “autoscaling.” It’s like having more hands to get work done when things get busy.
Conversely, when there are fewer events, KEDA can tell Kubernetes to reduce the resources being used, so you don’t waste unnecessary computing power. This helps save money and makes your application more efficient.
KEDA is especially useful for applications that have unpredictable or fluctuating workloads. For example, think of a food delivery app. It might have more orders during lunchtime but fewer orders late at night. KEDA can help the app scale up during lunch hours and scale down during quieter times.
How KEDA Works?
KEDA operates as a specialized controller called an operator within Kubernetes.
It continuously monitors external metrics, such as those from Azure Monitor.
Based on the metric values, KEDA applies scaling rules to determine whether scaling is required.
When scaling is necessary, KEDA communicates directly with Kubernetes.
It instructs Kubernetes to adjust the number of pod replicas or allocate additional resources accordingly.
This tight integration ensures seamless coordination between KEDA and Kubernetes.
Applications can dynamically scale up or down based on real-time demand.
KEDA acts as a bridge, optimizing resource utilization and enabling efficient autoscaling within Kubernetes environments.

How to Setup KEDA?
Installation
You can easily install KEDA using the helm chart.
Follow the official Documentation, it covers installing KEDA using different methods.
Setup
Now that you have installed KEDA and it is running in your Kubernetes cluster, it’s time to config the scaling settings. To achieve this, you will need to write a manifest file where you can config the metrics on what values should KEDA scale and to how many pods.
All supported scaling types and sources can be found here in the documentation.
- CPU Usage-Based Scaling
You can scale your applications based on CPU utilization inside your container in the pod.
You can scale based on the following parameters:
a. Utilization: the target value is the average of the resource metric across all relevant pods, represented as a percentage of the requested value of the resource for the pods. In simpler terms, It’s like checking how much of a toy box is being used compared to how much space is available.
b. AverageValue: the target value is the target value of the average of the metric across all relevant pods (quantity). It’s like looking at the exact number of toys in each box and finding the average.
Example:
apiVersion: keda.sh/v1alpha1
kind: ScaledObject
metadata:
  name: cpu-scaledobject
  namespace: default
spec:
  scaleTargetRef:
    name: my-deployment
  triggers:
  - type: cpu
    metadata:
      type: Utilization # Allowed types are 'Utilization' or 'AverageValue'
      value: "50"
Conclusion
In this article, we covered what KEDA is and how it can help you autoscale your applications hassle-free based on the different metrics provided. We also covered an example of CPU usage-based scaling.
Feel free to add comments if you think I have missed something.
Happy Reading!
Subscribe to my newsletter
Read articles from Pushkar Kumar directly inside your inbox. Subscribe to the newsletter, and don't miss out.
Written by

Pushkar Kumar
Pushkar Kumar
I am software developer. I love to write about the technologies I liked working on.