NodeJS Authorization Made Simple: A Comprehensive Guide for Developers.
 Nancy Okeke
Table of contents
- Prerequisites
- Technologies Used in This Tutorial
- What is Authorization?
- Getting Started with Our Project
- Step 1: Create a Directory and Set It up with Npm
- Step 2: Create Files and Directories
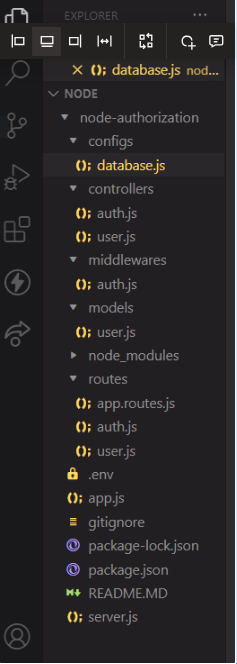
- Our project tree structure will look like the one you see below:
- Step 3: Install Required Dependencies
- Step 4: Create a Node.Js Server and Connect Your Database
- Step 5: Add Your Environment Variables and Start Your Server
- Step 6: Create the User Schema
- Step 7: Create the App and Auth Routes
- Step 8: Implement Register and Login Functionality
- Step 9: Create Middleware for Authentication and Authorization
- Step 10: Create a User Controller and Route
- Step 11: Postman Testing
- Wrapping It Up

Authorization and authentication may appear similar at first glance but hold distinct meanings. While passing through the gate is a form of authentication, understanding which doors you have the right to open represents authorization. In this article, you will learn about authorization and how to implement user authorization for nodeJS applications.
Let's consider an example within a university context, where lecturers possess specific permissions and responsibilities, such as managing lectures, setting exams, and grading papers. In contrast, students only have two rights: attending lectures and taking exams. Now, envision a scenario where these rights and permissions are not defined, and students start organizing and setting their exams. As a result, this would lead to complete disorder.
This highlights the significance of having proper authorization in place to prevent the compromise of sensitive information and maintain system order. Therefore, it becomes crucial to authorize users and assign varying access rights according to their user type.
Prerequisites
You’ll need the following to follow along with this tutorial:
A working understanding of Javascript
A good understanding of Node.js
Working knowledge of MongoDB
A good understanding of Command prompt
A basic understanding of how Postman works
Technologies Used in This Tutorial
Visual Studio Code: Visual Studio Code (VSCode) is a widely-used, free source-code editor created by Microsoft.
NodeJS: Node.js is a free and open-source JavaScript runtime environment on various platforms.
ExpressJS: Express.js is a widely-used, open-source web application framework designed for Node.js.
MongoDB: MongoDB is a popular open-source, NoSQL database management system that uses a flexible document-based format called BSON (Binary JSON) to store data.
Mongoose: Mongoose is an Object-Data Modeling (ODM) library for Node.js and MongoDB that simplifies working with MongoDB databases by providing a higher-level abstraction.
JWT (JSON Web Tokens): JSON Web Tokens (JWT) are a widely accepted mechanism specified in RFC 7519 for securely transmitting claims between two parties.
BcryptJS: Bcrypt.js is a JavaScript library used for password hashing. It allows developers to securely hash passwords before storing them in a database.
What is Authorization?
Authorization serves as a method to inquire about the user's privileges, essentially asking "What actions are you allowed to perform?", “What privileges do you have”. It involves the allocation of rights and permissions to a user, acting as a means to manage and restrict the user's activities within an application.
To understand how Authorization works, let’s build a simple nodejs Application. In this application, there will be two user roles: admin and user. Both types of users can register and log in, but only the admin can fetch all users.
Getting Started with Our Project
To get started, we need to set up our project. To do that, navigate to a directory of your choice on your machine and open it with Visual Studio Code.
Alternatively, you can open it on your terminal and type the following command:
code .
This will automatically open Visual Studio code for you.
Step 1: Create a Directory and Set It up with Npm
Create a directory and initialize npm by typing the following command in the terminal.
mkdir nodejs-authorization
cd nodejs-authorization
npm init --yes
This will automatically create a package.json file.
Step 2: Create Files and Directories
Next, we will create the models, controllers, services, routes, middleware directories and files.
To create the directories, type the following commands in the terminal:
mkdir configs models controllers routes middlewares
To create the files, type the following commands in the terminal:
touch configs/database.js models/user.js controllers/auth.js controllers/user.js routes/app.routes.js routes/auth.js routes/user.js middlewares/auth.js
We will also create the server.js and app.js in the root directory of our project:
touch app.js server.js
In addition, we will create a .env file and a .gitignore file:
touch .env .gitignore
You can optionally create a ReadMe file too:
touch README.MD
Our project tree structure will look like the one you see below:

Step 3: Install Required Dependencies
We will install several dependencies like mongoose and development dependencies like nodemon to restart the server as we make changes automatically.
To install the dependencies, type the following commands in the terminal:
npm install  express mongoose jsonwebtoken dotenv bcryptjs

npm install nodemon -D
Step 4: Create a Node.Js Server and Connect Your Database
Add the following snippet to our configs/database directory:
const mongoose = require("mongoose");

const connectDB = async () => {
  try {
    mongoose.set("strictQuery", false);
    const conn = await mongoose.connect(process.env.DATABASE_URL);
    console.log(
      `Database connection is successful. ${conn.connection.host}:${conn.connection.port}`
    );
  } catch (error) {
    console.error(error);
  }
};
module.exports = connectDB;
The snippet above utilizes Mongoose and establishes a MongoDB connection through the connectDB function. It configures query preferences, establishes the connection asynchronously, and logs the result, offering simplified database integration for the application.
Add the following snippet to the app.js file:
//app.js
const express = require("express");
const app = express();
// Body parser
app.use(express.json());
require("dotenv").config();
module.exports = app;
Add the following snippet to our server.js file:
//server.js
const dotenv = require("dotenv");
const connectDB = require("./configs/database");
const app = require("./app");
// connection
dotenv.config();
connectDB();
const PORT = process.env.PORT || 3001;
const server = app.listen(PORT, console.log(`Server running on port ${PORT}`));
The snippet above configures environment variables using dotenv, establishes a database connection with connectDBand initializes the app using app. It sets a port, starts the server, and logs a message about the server's status.
Step 5: Add Your Environment Variables and Start Your Server
Add the following environmental variables to the .env file:
PORT = 9000
DATABASE_URL="your database url"
JWT_SECRET = "YOUR_SECRET_KEY"
JWT_LIFETIME= 30d
Next, add a "start" and "dev" script to your package.json.
 "scripts": {
    "dev": "nodemon -r dotenv/config server.js",
   "start": "node server.js"
Use the following command to start our application:
npm run dev
Our server should start running immediately. I have created a repository with all the code we have written so far in this tutorial. You can clone it and use it directly as well.
Step 6: Create the User Schema
In the model/user.js, add the following snippet:
const mongoose = require("mongoose");
// This model is for user schema
const UserSchema = new mongoose.Schema(
  {
    first_name: {
      type: String,
      required: [true, "Please provide first name"],
    },
    last_name: {
      type: String,
      required: [true, "Please provide last name"],
    },
    email: {
      type: String,
      required: [true, "Please provide your email"],
      unique: true,
      match: [/.+@.+\..+/, "Please enter a valid e-mail address"],
      lowercase: true,
      trim: true,
    },
    password: {
      type: String,
      required: [true, "Please provide password"],
      minlength: 3,
      select: false,
    },
    phone_number: {
      type: String,
      required: [true, "Please provide phone number"],
      unique: true,
    },
    role: {
      type: String,
      required: [true, "Please provide role"],
      enum: ["admin", "user"],
      lowercase: true,
      default: "user",
    },
  },
  {
    timestamps: true,
  }
);
UserSchema.set("toJSON", {
  versionKey: false,
  transform(doc, ret) {
    delete ret.__v;
  },
});
UserSchema.pre("save", async function () {
  const salt = await bcrypt.genSalt(10);
  this.password = await bcrypt.hash(this.password, salt);
});
UserSchema.methods.createJWT = function () {
  return jwt.sign(
    { userId: this._id, name: this.name, role: this.role },
    process.env.JWT_SECRET,
    {
      expiresIn: process.env.JWT_LIFETIME,
    }
  );
};
UserSchema.methods.comparePassword = async function (canditatePassword) {
  const isMatch = await bcrypt.compare(canditatePassword, this.password);
  return isMatch;
};
module.exports = mongoose.model("User", UserSchema);
The snippet above defines a Mongoose schema named UserSchema which models user details encompassing elements like first name, last name, email, password, phone number, and role. The schema integrates validation regulations and functionalities such as password hashing and JWT creation. Subsequently, the schema is exported as a Mongoose model titled "User" to interact with the MongoDB database.
Step 7: Create the App and Auth Routes
In the routes/app.routes.js, add the following snippet:
const authRoute = require("./auth");
const userRoute = require("./user");
const basePath = "/api/v1";
module.exports = (app) => {
  app.use(`${basePath}/auth`, authRoute);
  app.use(`${basePath}/user`, userRoute);
};
In the routes/auth.js, add the following snippet:
const express = require("express");
const { register, login } = require("../controllers/auth");

const router = express.Router();

router.post("/register", register);
router.post("/login", login);
module.exports = router;
The snippet in the routes/app.routes.js sets up routes for authentication and user endpoints under a defined base path "/api/v1".
The snippet in the routes/auth.js configures an Express router for handling registration and login routes using functions from the auth controller module.
Step 8: Implement Register and Login Functionality
In the controllers/auth.js, add the following snippet:
const User = require("../models/user");
class AuthController {
  // Register a User
  async register(req, res) {
    try {
      const createData = {
        ...req.body,
      };
      const user = await User.create(createData);
      // generate token
      const token = await user.createJWT();
      return res.status(200).json({
        success: true,
        message: "user registered successfully",
        data: { user, token },
      });
    } catch (e) {
      console.log(e);
      return res.status(500).send("user registration failed");
    }
  }
  // Log In User
  async login(req, res) {
    try {
      const { email, password } = req.body;
      const user = await User.findOne(
        {
          email,
        },
        "+password"
      );
      console.log(user);
      if (!user) {
        return res.status(400).send("invalid email or password", {});
      }
      const passwordMatch = await user.comparePassword(password);
      if (!passwordMatch) {
        return res.status(400).send("invalid email or password");
      }
      // generate token
      const token = await user.createJWT();
      console.log(token);
      return res.status(200).json({
        success: true,
        message: "user loggedin successfully",
        data: { user, token },
      });
    } catch (e) {
      return res.status(500).send("login failed");
    }
  }
}
module.exports = new AuthController();
The snippet above defines an AuthController class with methods for user registration and login. When registering a user, it creates a new user with provided data, generates a token, and sends a successful response with user data and token. For user login, it retrieves a user by email, checks the password match, generates a token, and sends a successful response with user data and token. The class is exported as an instance of AuthController.
Step 9: Create Middleware for Authentication and Authorization
In the middlewares/auth.js, add the following snippet:
const jwt = require("jsonwebtoken");

// Authentication Here!!!!!!!!
const protect = async (req, res, next) => {
  let token;
  if (
    req.headers.authorization &&
    req.headers.authorization.startsWith("Bearer")
  ) {
    token = req.headers.authorization.split(" ")[1];
  }
  // Make sure token exists
  if (!token) {
    return next(res.status(401).send("Not authorized to access this route"));
  }
  try {
    const payload = jwt.verify(token, process.env.JWT_SECRET);
    // attach the user to the job routes
    req.user = {
      userId: payload.userId,
      name: payload.name,
      role: payload.role,
    };
    next();
  } catch (err) {
    return next(res.status(401).send("Not authorized to access this route"));
  }
};

// Authorization Here!!!!!
const authorize = (...roles) => {
  return (req, res, next) => {
    if (!roles.includes(req.user.role))
      return res.status(403).json({
        success: false,
        message: `User role:${req.user.role} is not authorized to access this route`,
      });
    next();
  };
};
module.exports = {
  protect,
  authorize,
};
The snippet above provides middleware functions for authentication and authorization. The protect middleware checks for a valid JWT token in the request headers attaches user data to the request, and proceeds if authorized. The authorize middleware takes allowed roles as arguments and grants access based on the user's role. Both middleware functions are exported for use in route protection and authorization.
Step 10: Create a User Controller and Route
In the controllers/user.js, add the following snippet:
const User = require("../models/user");
class UserController {
  async findAll(req, res) {
    const users = await User.find({});
    if (!users) {
      return res.status(404).send({
        success: false,
        message: "User not found",
      });
    }
    return res.status(200).send({
      success: true,
      message: "Users found",
      data: users,
    });
  }
}
module.exports = new UserController();
This snippet above defines a UserController class with a findAll method. When invoked, the method retrieves all users from the database using the User model. If users are found, it responds with a success message and the user data; otherwise, it returns a not-found response. An instance of UserController is exported for use in handling user-related requests.
In the routes/user.js, add the following snippet:
const express = require("express");
const userController = require("../controllers/user");
const { protect, authorize } = require("../middlewares/auth");
const userRouter = express.Router();
userRouter.get("/", protect, authorize("admin"), userController.findAll);
module.exports = userRouter;
This snippet above sets up an Express router named userRouter with a route that calls the findAll method from the userController. It employs the protect and authorize middlewares to ensure authentication and authorization, allowing only admin users to access the route. The router is then exported for use in handling user-related routes.
Then update the app.js file:
const express = require("express");
const appRoutes = require("./routes/app.routes");
const app = express();
// Body parser
app.use(express.json());
require("dotenv").config();
appRoutes(app);
module.exports = app;
Step 11: Postman Testing
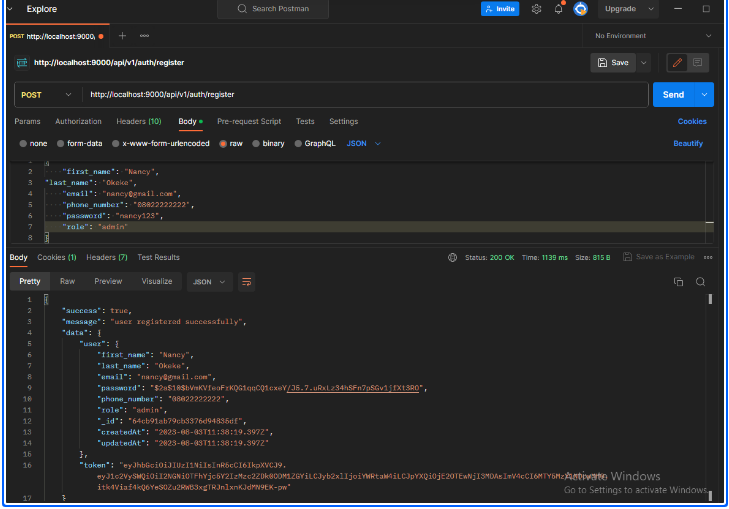
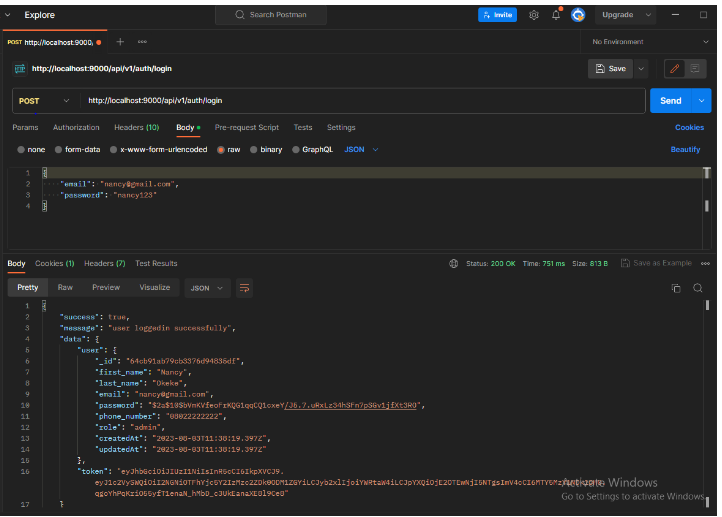
We’ll use Postman to test the endpoint. Here’s the response we get after successful registration and login.

Here’s a screenshot of a successful response showing that the user registered successfully.

Here’s a screenshot of a successful response showing that the user logged in successfully.

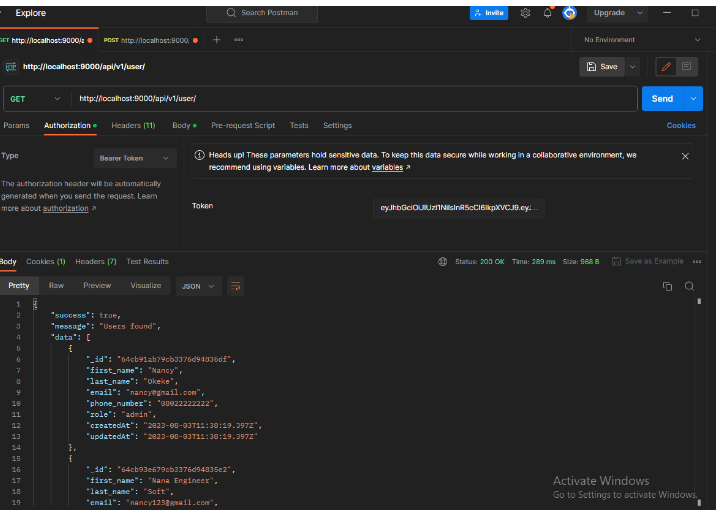
Here we added the "user" token in the authorization header. However, upon testing, we encountered an HTTP error code 403, which indicates that the request was forbidden, with the error message, "User role: the user is not authorized to access this route". This message implies that the authentication process was successful, and the "user" token was recognized. However, the user associated with this token possesses the "user" role, which lacks the necessary permissions to access the specific route or resource being requested.

Here’s a screenshot of a successful response showing Users Found.
Wrapping It Up
This is a basic Node.js application created to demonstrate the concept of authorization. The setup and implementation can become more intricate in more extensive projects, requiring more complex configurations. Nevertheless, if you have followed this tutorial, you should now have a solid foundation in the fundamentals of authorization and be prepared for any challenges that may arise while building more sophisticated Node.js applications.
In this article, input validation was not incorporated, leaving the input data from users unchecked against specific rules or requirements. However, if you want to implement robust input validation in your project, I recommend considering Joi, a popular JavaScript library renowned for data validation.
In addition, this article made use of Postman for testing, but you are free to opt for alternative tools like Insomnia, Thunder Client, etc, especially if you have great familiarity with them.
If you encountered any difficulties while following this guide, please don't hesitate to drop a comment below. Feel free to check out the source code here. If you find this information helpful, you can share it with others.
Have fun coding!🙃
Subscribe to my newsletter
Read articles from Nancy Okeke directly inside your inbox. Subscribe to the newsletter, and don't miss out.
Written by

Nancy Okeke
Nancy Okeke
I am an enthusiastic and result-driven backend developer with a strong desire to devise groundbreaking solutions through my creativity. As a technical writer, I take pride in my proficiency in explaining complex technical concepts in a simple and easy-to-understand way. My expertise lies in crafting clear and informative articles and documentation.