Integrating Passage with Grafbase and using the Grafbase Next.Js Plugin
 Shreyas Chaliha

In the article, I will explain how you can integrate Passage as an authentication provider with the Next.Js app directory and Grafbase. I will also explain the steps you can take to install the Grafbase Next.js Plugin. I would also like to thank Hashnode for providing such a great platforms to write artcles.
Before getting started, I would like to take a component to explain what Grafbase, Passage, Next.js and Grafbase Next.js Plugin is.
Grafbase: Grafbase is a cloud-based service that enables developers to build and deploy their own GraphQL APIs to the edge with complete end-to-end type safety. Grafbase allows developers to integrate any data source using resolvers and connectors, configure edge caching, set authentication and permission rules, enable serverless search and more. Grafbase also provides a web-based dashboard for managing your data and a CLI for local development.
Passage: Passage is an identity and authentication platform that provides developers with the tools to add secure user authentication and authorization to their applications. It offers a range of features, including user registration, login, password reset, and multi-factor authentication (MFA). Passage aims to simplify the implementation of authentication in web and mobile applications while maintaining high-security standards.
Passage also promotes passwordless authentication, eliminating the need for users to remember and manage passwords. Instead, it utilizes secure tokens, biometrics, and other factors to authenticate users, offering a more convenient and secure authentication experience.
By utilizing Passage, I was able to offload the complexities of user authentication and identity management, focusing more on building their application's core features and providing a secure and seamless authentication experience to the users.
They recently got certified as an OIDC-compliant identity provider.
Next.Js: Next.js is a React framework for building full-stack web applications. You use React Components to build user interfaces, and Next.js for additional features and optimizations. Under the hood, Next.js also abstracts and automatically configures tooling needed for React, like bundling, compiling, and more. This allows you to focus on building your application instead of spending time with configuration.
Grafbasee Next.js Plugin: It is a tool that automatically runs Grafbase locally using the CLI when Next.js starts the development server. Also, this plugin has 2 limitations as mentioned in the official docs. Those limitations are:
This plugin is intended to work locally. The plugin will not do anything in a production context.
If there is no environment variable or the environment variable is not localhost, the plugin will skip running the CLI.
Why did I choose this project?
There are a couple of reasons for me to choose this project where I am integrating Passage with grafbase.
I hate setting up authentication, and Passage makes it super easy.
In the Github Repo examples for Grafbase the examples I saw there were no examples with Passage.
I believe this example/starter code will help someone a lot in the initial setup when they are trying to integrate Passage with Grafbase.
What is the tech stack used?
This template has been made with the following:
Next.js 13.4.16 /app directory as the React-based framework for building the application.
Grafbase as the database.
Grafbase SDK to create and configure the GraphQl APIs.
Passage for authentication.
TypeScript for adding static typing to JavaScript.
Tailwind CSS as the utility-first CSS framework for styling the application.
Radix UI (shadcn/ui) for components.
Lucide React for adding SVG icons.
Next Themes for adding light and dark mode support
Steps to follow to integrate:
Setting up a new Next.Js project:
Create a new project with the following command
npx create-next-app@latestThe following prompt will show up and it depends on you what you choose, but I chose the default in all of them. Also, make sure you choose "Yes" for "Would you like to use App Router? (recommended)"
What is your project named? my-app
Would you like to use TypeScript? No / Yes
Would you like to use ESLint? No / Yes
Would you like to use Tailwind CSS? No / Yes
Would you like to use src/ directory? No / Yes
Would you like to use App Router? (recommended) No / Yes
Would you like to customize the default import alias? No / Yes
What import alias would you like configured? @/*
- Then
cd my-appyou should be inside the newly created project.
Setting up Grafbase:
So after creating the application, now we will need to setup Grafbase. For that, we will use the @grafbase/sdk package. The steps I took are:
In the terminal run the following command
npm i@grafbase/sdk --save-devInitializing the project with
npx grafbase init --config-format typescriptA folder will get generated called "grafbase" at the root of my project. Inside that folder, two files are generated. They are ".env" and "grafbase.config.ts".
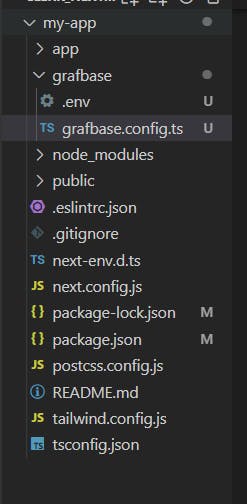
Inside the 'grafbase.config.ts' file, a general schema should be provided. Here you can change the schema based on your requirements.
The default content I got:
import { g, auth, config } from '@grafbase/sdk'

// Welcome to Grafbase!
// Define your data models, integrate auth, permission rules, custom resolvers, search, and more with Grafbase.
// Integrate Auth
// https://grafbase.com/docs/auth
//
// const authProvider = auth.OpenIDConnect({
//   issuer: process.env.ISSUER_URL ?? ''
// })
//
// Define Data Models
// https://grafbase.com/docs/database

const post = g.model('Post', {
  title: g.string(),
  slug: g.string().unique(),
  content: g.string().optional(),
  publishedAt: g.datetime().optional(),
  comments: g.relation(() => comment).optional().list().optional(),
  likes: g.int().default(0),
  tags: g.string().optional().list().length({ max: 5 }),
  author: g.relation(() => user).optional()
}).search()

const comment = g.model('Comment', {
  post: g.relation(post),
  body: g.string(),
  likes: g.int().default(0),
  author: g.relation(() => user).optional()
})

const user = g.model('User', {
  name: g.string(),
  email: g.email().optional(),
  posts: g.relation(post).optional().list(),
  comments: g.relation(comment).optional().list()

  // Extend models with resolvers
  // https://grafbase.com/docs/edge-gateway/resolvers
  // gravatar: g.url().resolver('user/gravatar')
})

export default config({
  schema: g
  // Integrate Auth
  // https://grafbase.com/docs/auth
  // auth: {
  //   providers: [authProvider],
  //   rules: (rules) => {
  //     rules.private()
  //   }
  // }
})
Setting up Grafbase API URL and API key
I went to grafbase.com and logged in. If you do not have an account, create one.
Once you are logged in click on "Create Project".
You will have the option to connect your GitHub repo to it, do also there will be an option to add Environment Variable id to the PASSAGE_ISSUER_KEY out there. Then clicked on deploy. Below, in the section "Setting up Passage", I have explained how to get this value.
Now you should see a "Connect" button, click on it. It will provide you the values for NEXT_PUBLIC_GRAFBASE_API_URL and NEXT_PUBLIC_GRAFBASE_API_KEY.
Once everything is set up, return to the terminal, one terminal will run the server for the application. In another terminal, run the following command: npx grafbase dev to start the server locally at http://localhost:4000 For more information, check the official docs for Grafbase CLI
Since I am using Grafbase Next.js Plugin it will automatically start the Grafbase server when the next.js development server starts. In my github repo I have a folder called libs and inside it, there is a file called actions.ts. I have implemented the logic to use the values for NEXT_PUBLIC_GRAFBASE_API_URL and NEXT_PUBLIC_GRAFBASE_API_KEY only for production.
To make your life easier, here is the logic mentioned in the actions.ts file:
const isProduction = process.env.NODE_ENV === "production";
const apiUrl = isProduction
  ? process.env.NEXT_PUBLIC_GRAFBASE_API_URL!
  : "http://127.0.0.1:4000/graphql";
const apiKey = isProduction
  ? process.env.NEXT_PUBLIC_GRAFBASE_API_KEY!
  : "cbsjhsbcbkscjbsckjbkjcssjcbsjcskjksjcbksjbsjcjs";
This code is checking if the current environment is production or not in order to determine which API URL and API key to use.
Specifically:
const isProduction = process.env.NODE_ENV === "production";checks if the NODE_ENV environment variable is set to "production". This will be true when the code is run in a production environment.const apiUrl = isProduction ?process.env.NEXT_PUBLIC_GRAFBASE_API_URL! : "http://127.0.0.1:4000/graphql";is a ternary that sets the apiUrl variable to either:The GRAFBASE_API_URL environment variable if in production
A local host URL if in development
Similarly,
const apiKey = isProduction ?process.env.NEXT_PUBLIC_GRAFBASE_API_KEY! : "cbsjhsbcbkscjbsckjbkjcssjcbsjcskjksjcbksjbsjcjs";sets the apiKey to either:The GRAFBASE_API_KEY environment variable in the production
A fake development key locally
This allows using real credentials in production while falling back to local/fake ones in development. The API URL also points to the real production API in prod and a local version in dev.
How Passage is being used in this application?
In the application, I have used the following package form Passage:
@passageidentity/passage-auth: It renders a UI element for users to register and log in to your website.
@passageidentity/passage-node: This Node.js SDK allows for verification of server-side authentication for applications using Passage
@passageidentity/passage-js: This package offers a set of APIs and methods that allow interaction with the Passage Identity service from their client-side code.
For my application, I have used both '@passageidentity/passage-node' and '@passageidentity/passage-js' where they see fit.
Setting up Passage
You can follow these steps to get those values.
Go to https://passage.1password.com/ and log in. If you do not have an account, create one.
Once you are logged in click on "+ Create a New App".
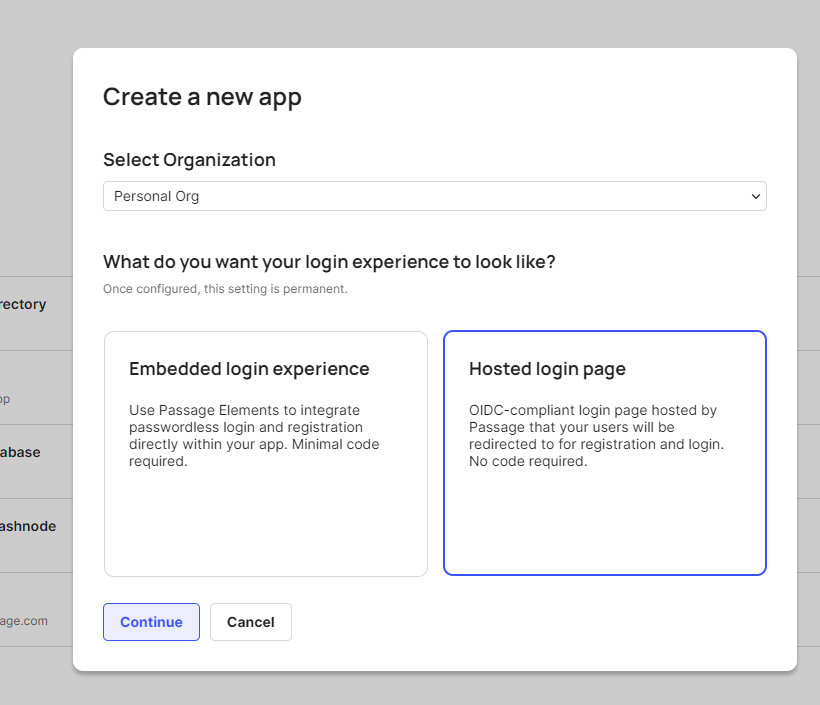
A modal should appear. For it to work properly with my repo, choose "Go Fully Passwordless" --> Continue.
Then choose "Hosted login page" which is a OIDC-complaint login. Click Continue
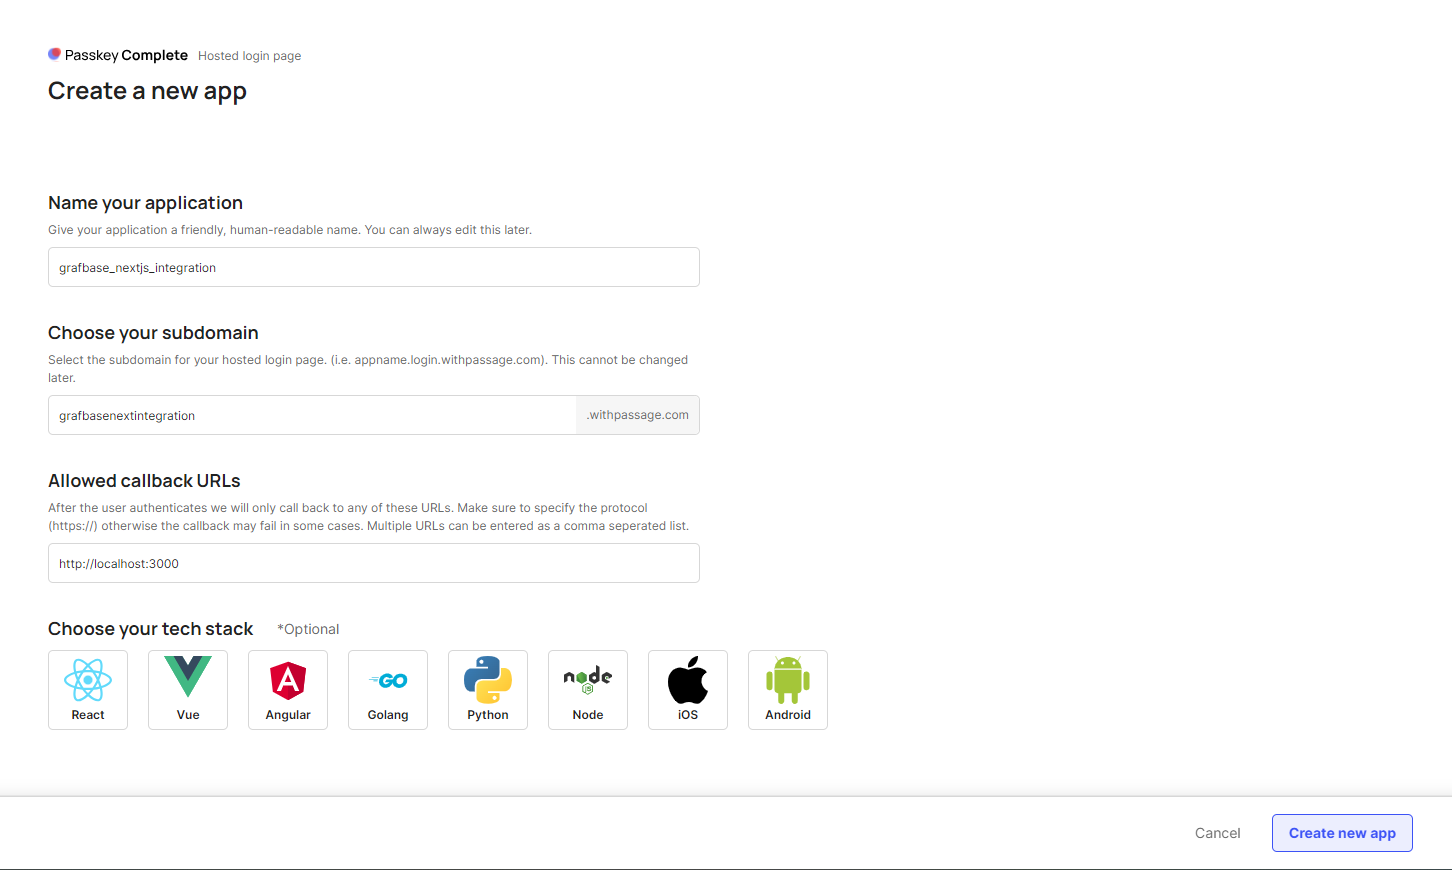
In the next step fill in the values and click on "Create new app"
Once the above step is successful you should be redirected to the dashboard. Here the application id value is the value for
NEXT_PUBLIC_PASSAGE_APP_ID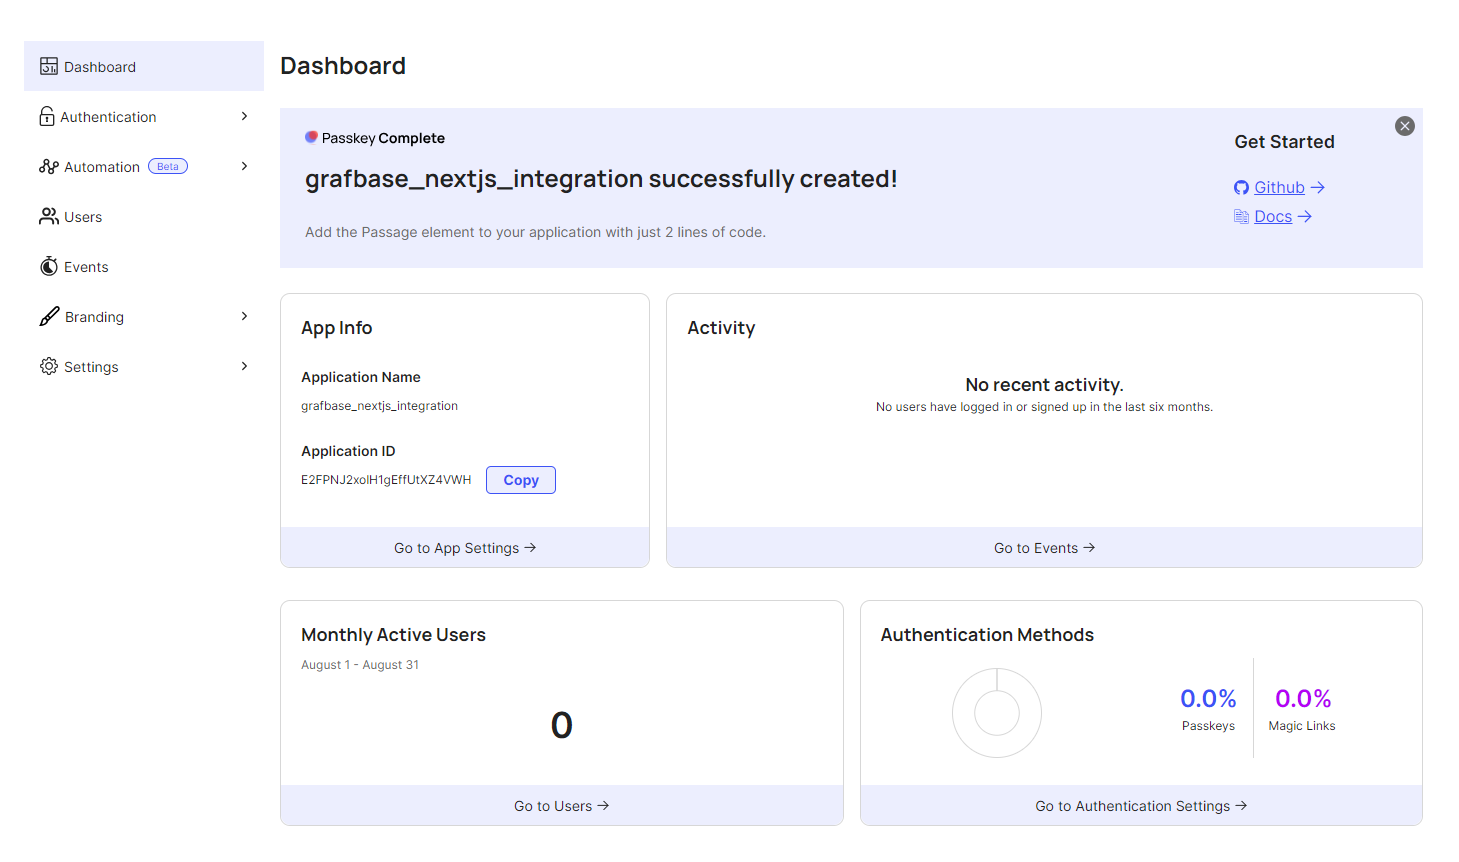
In the .env file (create one if you don't have one) at the root of your project add the application id value for NEXT_PUBLIC_PASSAGE_APP_ID=
Connecting Grafbase with Passage
Now we need to go back to grafbase.config.ts file. When the file got generated there is this part:
export default config({
  schema: g
  // Integrate Auth
  // https://grafbase.com/docs/auth
  // auth: {
  //   providers: [authProvider],
  //   rules: (rules) => {
  //     rules.private()
  //   }
  // }
})
Now our updated code with Passage integrated will look like this:
import { g, auth, config } from '@grafbase/sdk'

// Welcome to Grafbase!
// Define your data models, integrate auth, permission rules, custom resolvers, search, and more with Grafbase.
// Integrate Auth
// https://grafbase.com/docs/auth
//
// const authProvider = auth.OpenIDConnect({
//   issuer: process.env.ISSUER_URL ?? ''
// })
//
// Define Data Models
// https://grafbase.com/docs/database

const post = g.model('Post', {
  title: g.string(),
  slug: g.string().unique(),
  content: g.string().optional(),
  publishedAt: g.datetime().optional(),
  comments: g.relation(() => comment).optional().list().optional(),
  likes: g.int().default(0),
  tags: g.string().optional().list().length({ max: 5 }),
  author: g.relation(() => user).optional()
}).search()

const comment = g.model('Comment', {
  post: g.relation(post),
  body: g.string(),
  likes: g.int().default(0),
  author: g.relation(() => user).optional()
})

const user = g.model('User', {
  name: g.string(),
  email: g.email().optional(),
  posts: g.relation(post).optional().list(),
  comments: g.relation(comment).optional().list()

  // Extend models with resolvers
  // https://grafbase.com/docs/edge-gateway/resolvers
  // gravatar: g.url().resolver('user/gravatar')
})

const passage = auth.OpenIDConnect({
  issuer: g.env("PASSAGE_ISSUER_URL"),
});

export default config({
  schema: g,
  auth: {
    providers: [passage],
    rules: (rules) => rules.private(),
  },
});
Now all we need is the PASSAGE_ISSUER_URL.
- Click on Setting -> OIDC in the sidebar
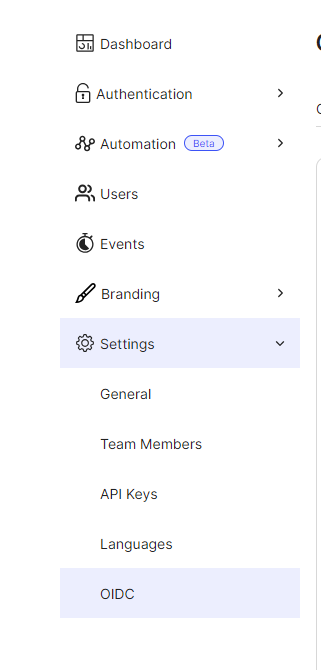

Now go to the.env file that got generated inside the grafbase folder and add this valuePASSAGE_ISSUER_URL=YOUR_ISSUER_URL
Setting up Grafbase Next.Js Plugin
Go to your terminal and run this command:
npm install -D grafbase @grafbase/nextjs-pluginGo to next.config.ts file and update it for me the final next.config.ts is as follows:
  /** @type {import('next').NextConfig} */
  const { withGrafbase } = require("@grafbase/nextjs-plugin");

  const nextConfig = {
    images: {
      domains: [
        "avatars.githubusercontent.com",
      ],
    },
    experimental: {
      serverComponentsExternalPackages: ["cloudinary", "graphql-request"],
    },

    withGrafbase: {
      reactStrictMode: true,
      swcMinify: true,
    },
  };

  module.exports = nextConfig;
You are done.
In this article, I won't go in-depth on how to set up the auth ui and stuff; for that either check the official Passage documentation or check my article called "Share your milestones and memories with "Post iT" where I have explained everything in detail.
Public Repo Link
Github Repo: https://github.com/trace2798/passage_grafbase_integration
Demo Video Link
Youtube Link: https://youtu.be/CCR1fBmR1xQ
I hope this article helped you. If you have any questions, feel free to leave a comment, and I will respond to it as soon as possible.
Happy Hacking !!!
Subscribe to my newsletter
Read articles from Shreyas Chaliha directly inside your inbox. Subscribe to the newsletter, and don't miss out.
Written by

Shreyas Chaliha
Shreyas Chaliha
I am a full-stack developer with a passion for coding and a love of cooking, I'm always discovering the perfect recipe for success. With a keen eye for detail and a knack for problem-solving, I can create beautiful, fully functional web applications and when I'm not behind the computer, you can find me in the kitchen, working on my latest culinary creation I find the kitchen to be a great creative outlet that complements my work as a developer. In my free time, I also enjoy going for long walks, reading, swimming, or playing Tennis.