Automating The Deployment Of A Resilient 2-Tier Architecture On Azure Using Terraform
 Joel Oduyemi
Table of contents
- 👨💻 Introduction
- 🤔 Why Terraform?
- 🔔 Prerequisites
- 🖼️ Architecture
- 📃 List of Azure Services Used
- 📝 Plan of Execution
- 🔐 Securing Terraform State file by storing it in an Azure Storage Account
- 📂 Setting up the Foundations: Organizing Your Terraform Project
- 👨💻 Writing Terraform Files while following best practices
- 🌩️ Terraform Deployment, Resource Confirmation, and Cleanup
- 🪴 Room for Growth
- Resources
- Connect with me on
👨💻 Introduction
Hey, there, My name is Joel Oduyemi, and I'm a passionate DevOps practitioner embarking on a continuous learning journey in the world of technology. I'm currently undergoing a #10WeeksOfCloudOps challenge organized by Piyush Sachdeva, and building cloud solutions on Microsoft Azure has been an integral part of my learning experience. It has pushed me to explore the vast possibilities of cloud operations and expand my expertise in the Azure ecosystem. 🌟
In this comprehensive guide, we'll explore how to harness the capabilities of Terraform and Azure Resource Manager to design and build a highly resilient 2-tier Architecture. Our focus will be on utilizing Azure Virtual Machine Scale Sets (VMSS), Application Gateway, Key Vaults Certificate, CDN Profiles/Endpoints, and Azure Database for MySQL. These components provide auto-scaling, intelligent traffic distribution, and managed database capabilities, respectively. By the end of this blog post, you'll have gained insights into deploying an architecture that seamlessly adapts to changing demands, while ensuring robust security measures and efficient database management.
Whether you're a cloud enthusiast, a DevOps engineer, or a developer looking to optimize your application's performance, this guide will equip you with the knowledge and hands-on experience needed to deploy and manage a scalable and resilient infrastructure on Azure using Terraform.
🤔 Why Terraform?
Terraform, developed by HashiCorp, is an open-source infrastructure as code (IaC) tool that revolutionizes the way infrastructure is provisioned, managed, and scaled. But why choose Terraform over other methods? Let's delve into the compelling reasons that make Terraform a go-to choice for building and managing your cloud infrastructure.
Declarative Infrastructure: Terraform's declarative approach allows you to specify your desired infrastructure state using code. This ensures consistency and reproducibility, reducing manual errors and configuration drift.
Multi-Cloud Flexibility: Terraform is cloud-agnostic, enabling you to manage resources across multiple cloud providers like Azure, AWS, and Google Cloud. This flexibility supports hybrid and multi-cloud strategies.
Immutable Infrastructure: With Terraform, changes are made by creating new resources rather than modifying existing ones. This "immutable" approach promotes stability and prevents unexpected changes in your infrastructure.
Version Control and Collaboration: Infrastructure code is versioned and can be stored in Git repositories. This facilitates collaboration among team members, enables code reviews, and ensures better traceability of changes.
Predictable Changes and Efficiency: Terraform's plan feature shows you what changes will occur before applying them. This helps prevent mistakes, reduces downtime, and provides a clear understanding of the impact of changes.
By leveraging Terraform modules, you elevate your infrastructure management by promoting reusability, simplifying complexity, and fostering collaboration. Modules empower you to build a foundation of consistency while efficiently scaling and adapting to evolving requirements.
🔔 Prerequisites
To follow along in this guide you would need the following:
Azure Account - If you don't have one, you can sign up for a free trial on the Azure website
Terraform Installed - download the latest version from the Terraform website and follow the installation instructions.
Visual Studio Code and The Official Terraform Extension
Azure CLI and Basic Azure Knowledge
Azure Service Principal (Optional, but Recommended) - Follow the instructions on Microsoft Learn to create a Service Principal and authenticate Terraform to use it
Git (Optional but Recommended)
🖼️ Architecture
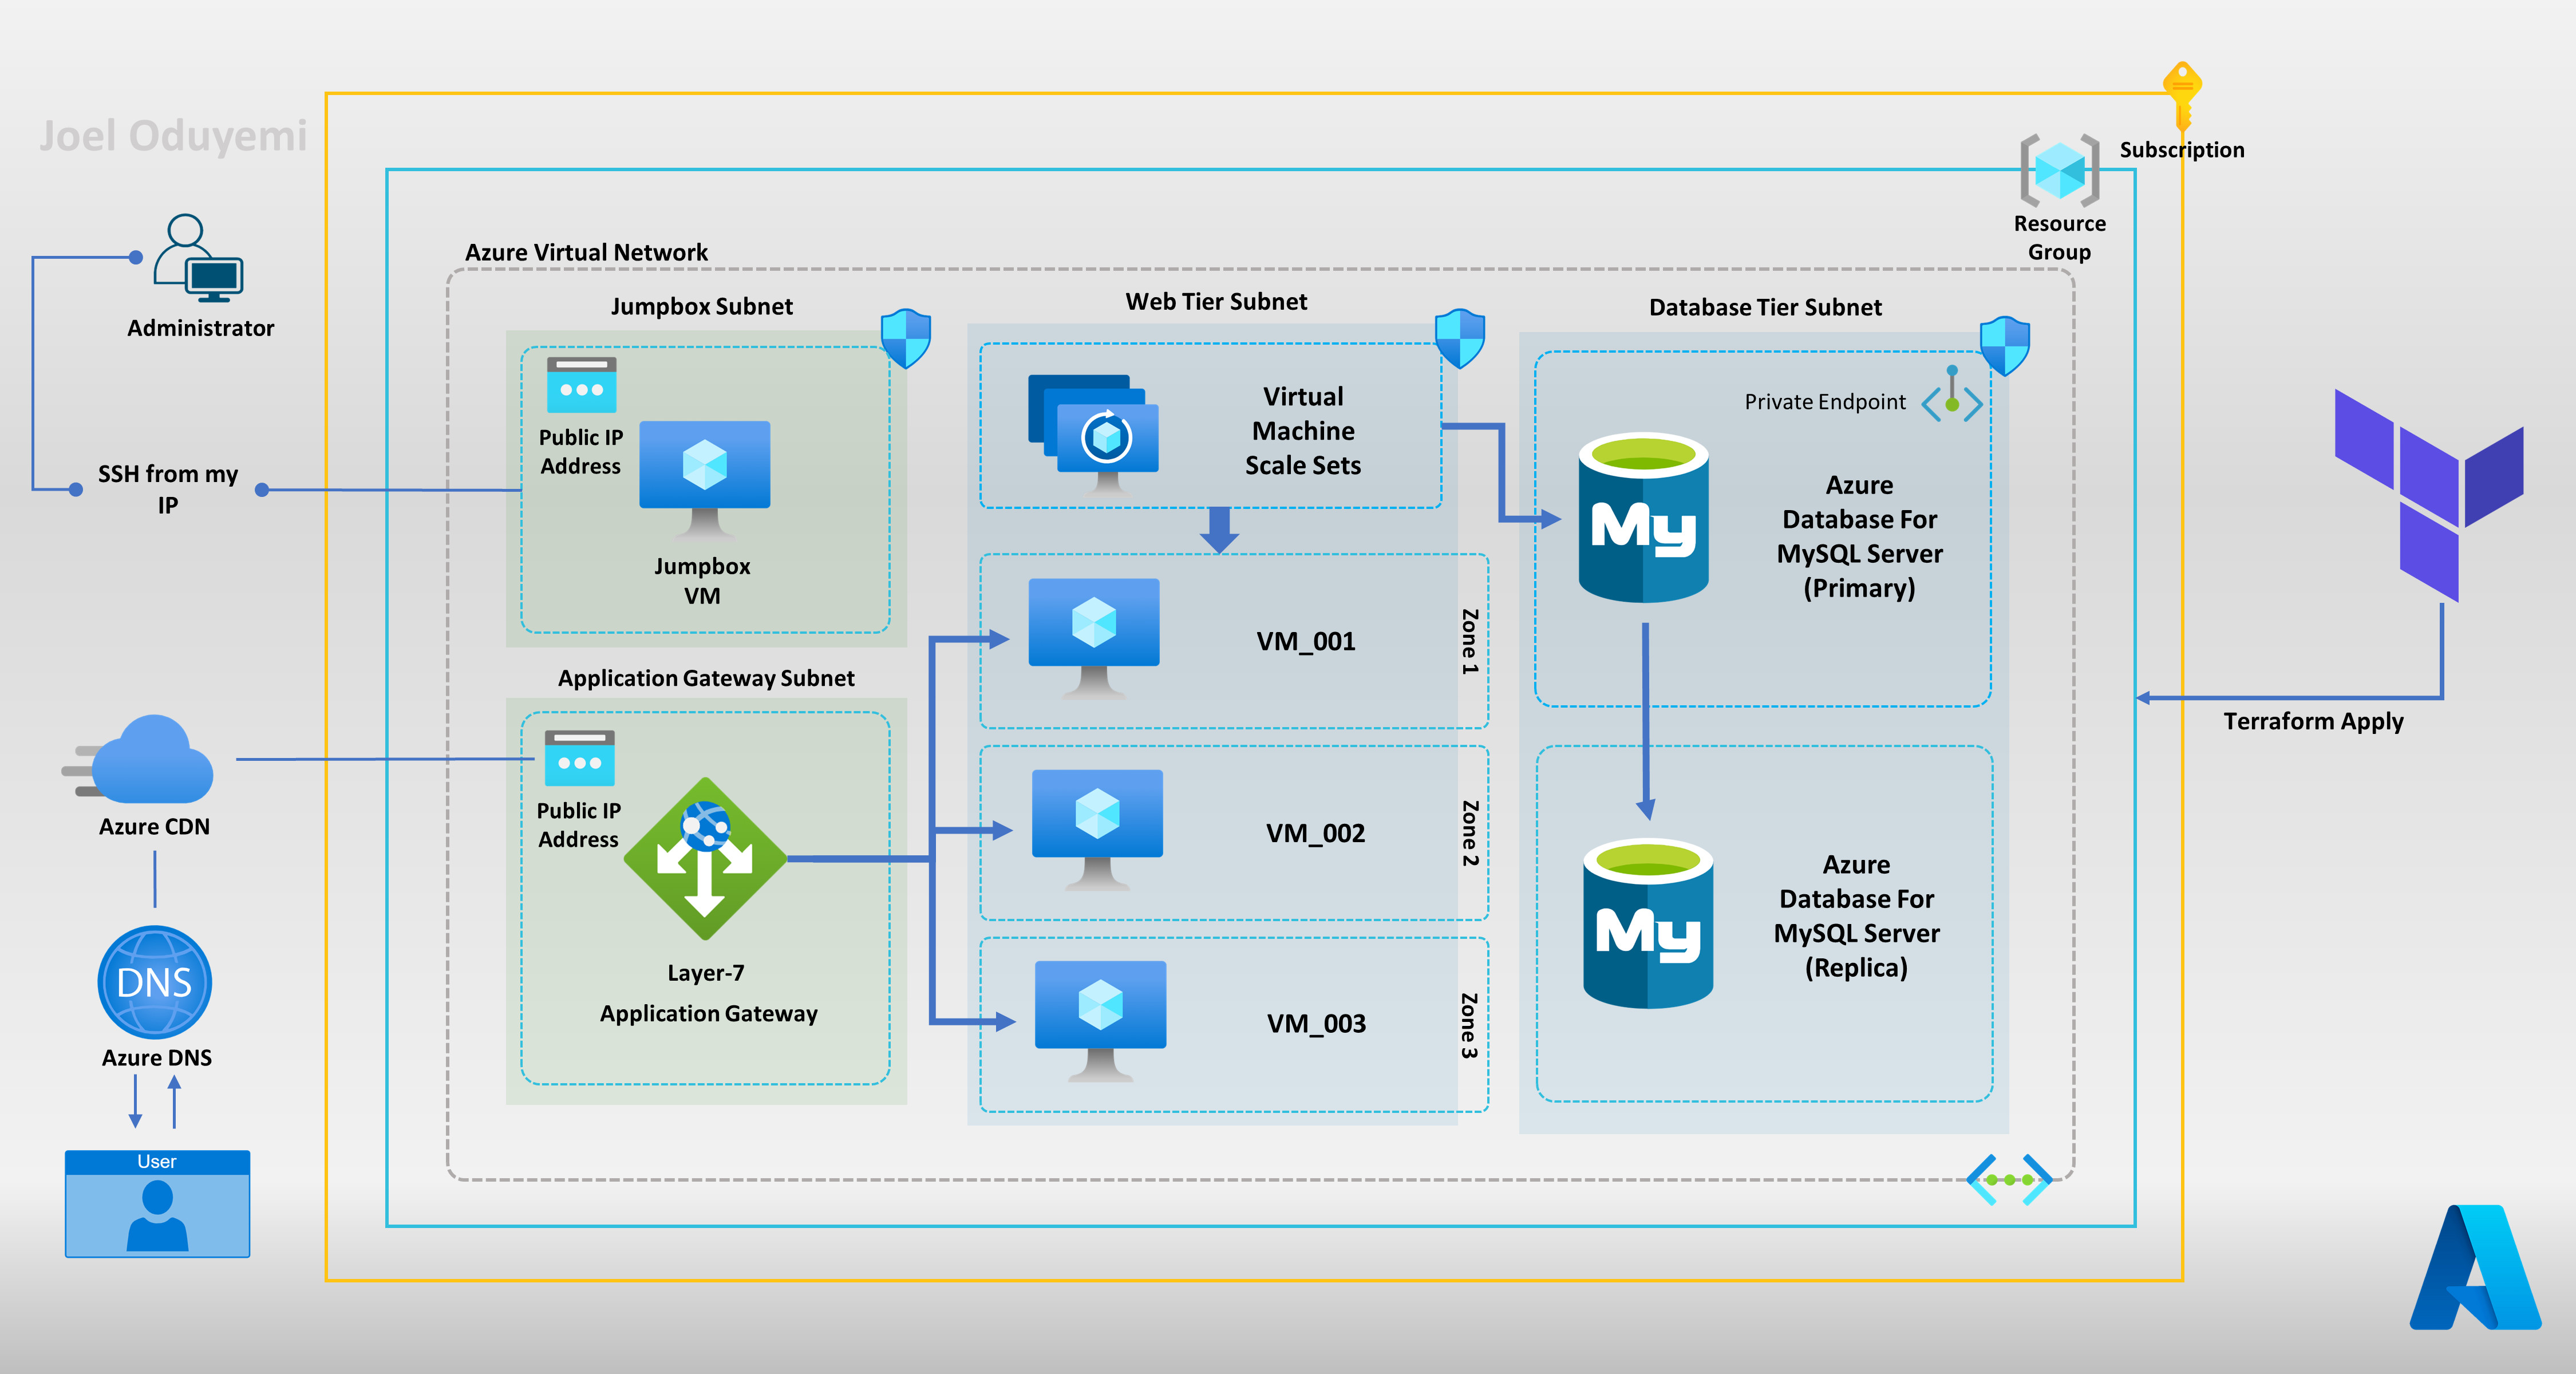
📃 List of Azure Services Used
Azure Virtual Networks
Virtual Machine
Virtual Machine Scale Sets
Application Gateway
Key Vaults Certificates
Azure Database for MySql
📝 Plan of Execution
Securing Terraform State file by storing it in an Azure Storage Account
Setting up the Foundations: Organizing Your Terraform Project
Writing Terraform Files while following best practices
Terraform Deployment, Resource Confirmation, and clean up
Room for Growth
So, without further ado, let's roll up our sleeves and embark on this journey of architecting, deploying, and maintaining a dynamic and resilient Azure environment.
🔐 Securing Terraform State file by storing it in an Azure Storage Account
The terraform state file contains sensitive information about your infrastructure, such as resource IDs, configurations, and dependencies. Storing this file locally or alongside your Terraform code can lead to challenges such as concurrency issues when working in a team, and also limitations on collaborative development across teams and projects compared to when you store it in a remote location like Azure Storage which offers a secure solution by centralizing state management, providing concurrency control, fostering collaboration, and ensuring data integrity.
Implementation Steps
The first step to configuring Terraform Backend to store the state management file in Azure Storage is to create an Azure Storage Account and a container.
The Azure Storage Account and container can easily be created using the Azure Portal. However, in the root directory of my GitHub repository dedicated to this project I have made available an Azure CLI script that automates the creation of the storage account and container for us.
Clone my GitHub repository using the command below and ensure to switch your current working directory to it
  git clone https://github.com/Joelayo/Week-3_Azure_CloudOps.git

  cd Week-3_Azure_CloudOps/
Next, configure the
remote-state.shscript with the appropriate values for the already defined variables then run the script on a bash terminal using the command below./remote-state.shOnce you've successfully created the storage account and container, the next step involves configuring the
backend.tffile. This file should include the names of the resource group, storage account, and container that you defined earlier before running the script, the file should look like the template below.terraform { backend "azurerm" { resource_group_name = "terraform-state-rg" storage_account_name = "tfpracticestorage" container_name = "tfpracticecontainer" key = "./terraform.tfstate" } }We've now concluded the first step
📂 Setting up the Foundations: Organizing Your Terraform Project
Before embarking on any Terraform project, laying a solid foundation is essential. A well-organized project structure not only tames complexity but also fosters collaboration and long-term maintainability. In this section, I'll guide you through the process of establishing the fundamental structure for your Terraform project. This structure will serve as the framework for creating a resilient and scalable 2-tier Architecture while adhering to best practices.
Creating the Project Directory
Begin by creating a dedicated directory for your Terraform project. This directory will serve as the root of your project and will house all the necessary files and subdirectories.
Week-3_Azure_CloudOps/
├── .gitignore
├── backend.tf
├── main.tf
├── providers.tf
├── terraform.tfvars
├── variables.tf
└── modules/
Here's a quick rundown of these files:
main.tf: This file aggregates the modules you've defined and sets up any additional resources that span across multiple modules, such as global networking components.variables.tf: Similar to the module-level variables, root-level variables allow you to customize the overall configuration of your project.terraform.tfvars: Store variable values in this file to make it easy to manage and share different configurations.providers.tf: Specify the providers you're using, along with any provider-specific settings..gitignore: Specifies which files and directories should be excluded from version tracking, ensuring that sensitive or temporary files aren't inadvertently committed to your repository.backend.tf: Thebackend.tffile is crucial when configuring remote state management. It establishes the backend settings, such as where and how the Terraform state should be stored remotely, often in cloud storage like Azure Storage which we already had set up previously.
Dividing Your Infrastructure into Modules
Terraform's modular approach is a game-changer when it comes to managing complex infrastructure setups. Modules allow you to simplify specific configurations and logically separate different components of your architecture.
Inside the modules/ directory, you'll create subdirectories for each module you plan to create. Each module can represent a different component or tier of your infrastructure. For instance, if you're setting up virtual machine scale sets, networking, and a database, you might structure your modules like this:
Week-3_Azure_CloudOps/
└── modules/
    ├── vmss/
    │   ├── main.tf
    │   ├── variables.tf
    │   └── outputs.tf
    ├── network/
    │   ├── main.tf
    │   ├── variables.tf
    │   └── outputs.tf
    ├── azure_database/
    │   ├── main.tf
    │   ├── variables.tf
    │   └── outputs.tf
    └── ...
Below is an image that illustrates how I organized my Terraform modules:
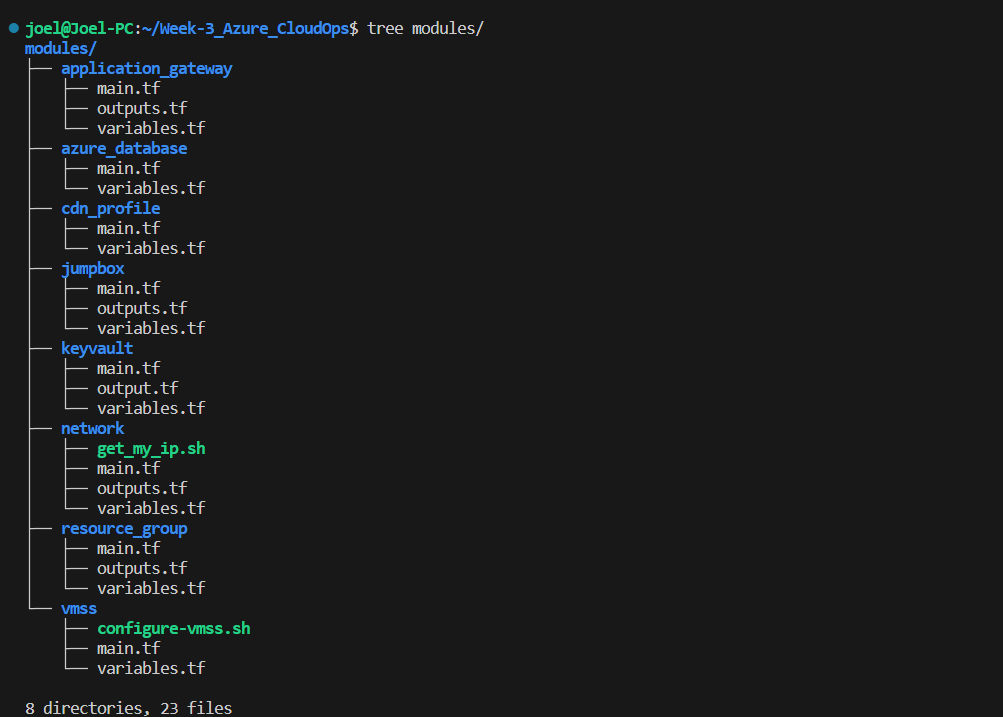
With your project directory and module structure in place, you're ready to start filling in the Terraform files to define your infrastructure which we will cover in the next section.
👨💻 Writing Terraform Files while following best practices
Writing Terraform code effectively requires adherence to best practices to ensure readability, maintainability, and robustness. For an in-depth understanding of the configurations discussed in this guide, I've taken the time to carefully document each file within the root and modules directory of the project on my GitHub repository. This documentation serves as a valuable resource to complement the explanations provided in this blog post. Here's how you can explore and benefit from this repository
Visit my GitHub repository link or Copy and paste the URL https://github.com/Joelayo/Week-3_Azure_CloudOps into a web browser.
Start by reviewing the repository's directory structure. The root and modules directories contain the Terraform configurations, each serving a specific purpose.
Inside each directory, you'll find individual files that correspond to different components or resources. Click on each file to access its detailed documentation.
The documentation for each file provides explanations of the configurations used, including variable definitions, resource setups, and any specific considerations.
Alongside the documentation, you'll also find usage instructions, showcasing how these configurations come together to build a robust and scalable 2-tier Architecture.
Feel free to contribute, open issues, or provide feedback on the repository. Your insights can help enhance the terraform configuration files and benefit the community.
By exploring the GitHub repository's detailed documentation and code, you'll gain a hands-on understanding of the Terraform configurations that drive your resilient Azure infrastructure.
🌩️ Terraform Deployment, Resource Confirmation, and Cleanup
After setting up the foundations and writing your Terraform files, it's time to take the next step: deploying your infrastructure, confirming the resources are as expected, and ensuring proper cleanup procedures. This phase is crucial to validate your configurations and avoid any surprises in a production environment.
Deployment Process:
Initializing Terraform: Before you deploy, run
terraform initfrom the root directory. This downloads required providers and set up the backend configuration you've defined in thebackend.tffile.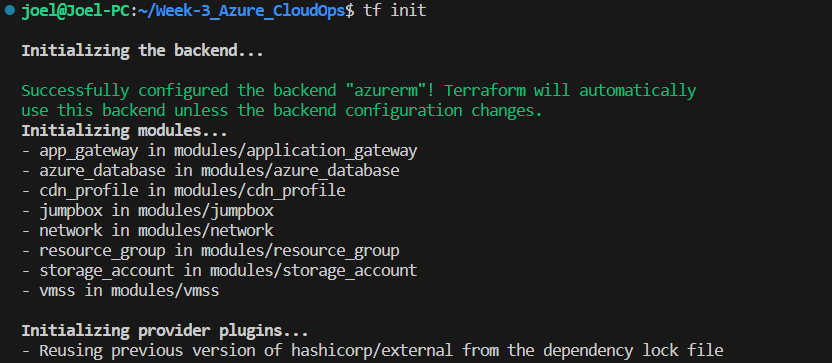
Format and Validate Terraform Configurations: Execute
terraform fmtto format your Terraform configuration files. This step ensures consistent and clean formatting across your codebase, then executeterraform validateto identify and rectify any errors or issues in your Terraform configuration files. This validation process ensures your configurations are structurally accurate and syntactically correct.
Deploying the Infrastructure: Execute
terraform applyto initiate the deployment process. Terraform will analyze your configuration, create an execution plan, and prompt you to confirm the changes before proceeding.Reviewing the Execution Plan: Terraform presents an execution plan detailing what resources will be created, modified, or destroyed. Carefully review this plan to ensure it aligns with your expectations.
Confirming Changes: When prompted, enter "yes" to confirm the changes. Terraform will proceed with provisioning the resources as defined in your configuration files.
Resource Confirmation:
Monitoring Provisioning: As Terraform deploys resources, you can monitor its progress but It's advisable to leverage Azure Portal to track the status of the created resources.
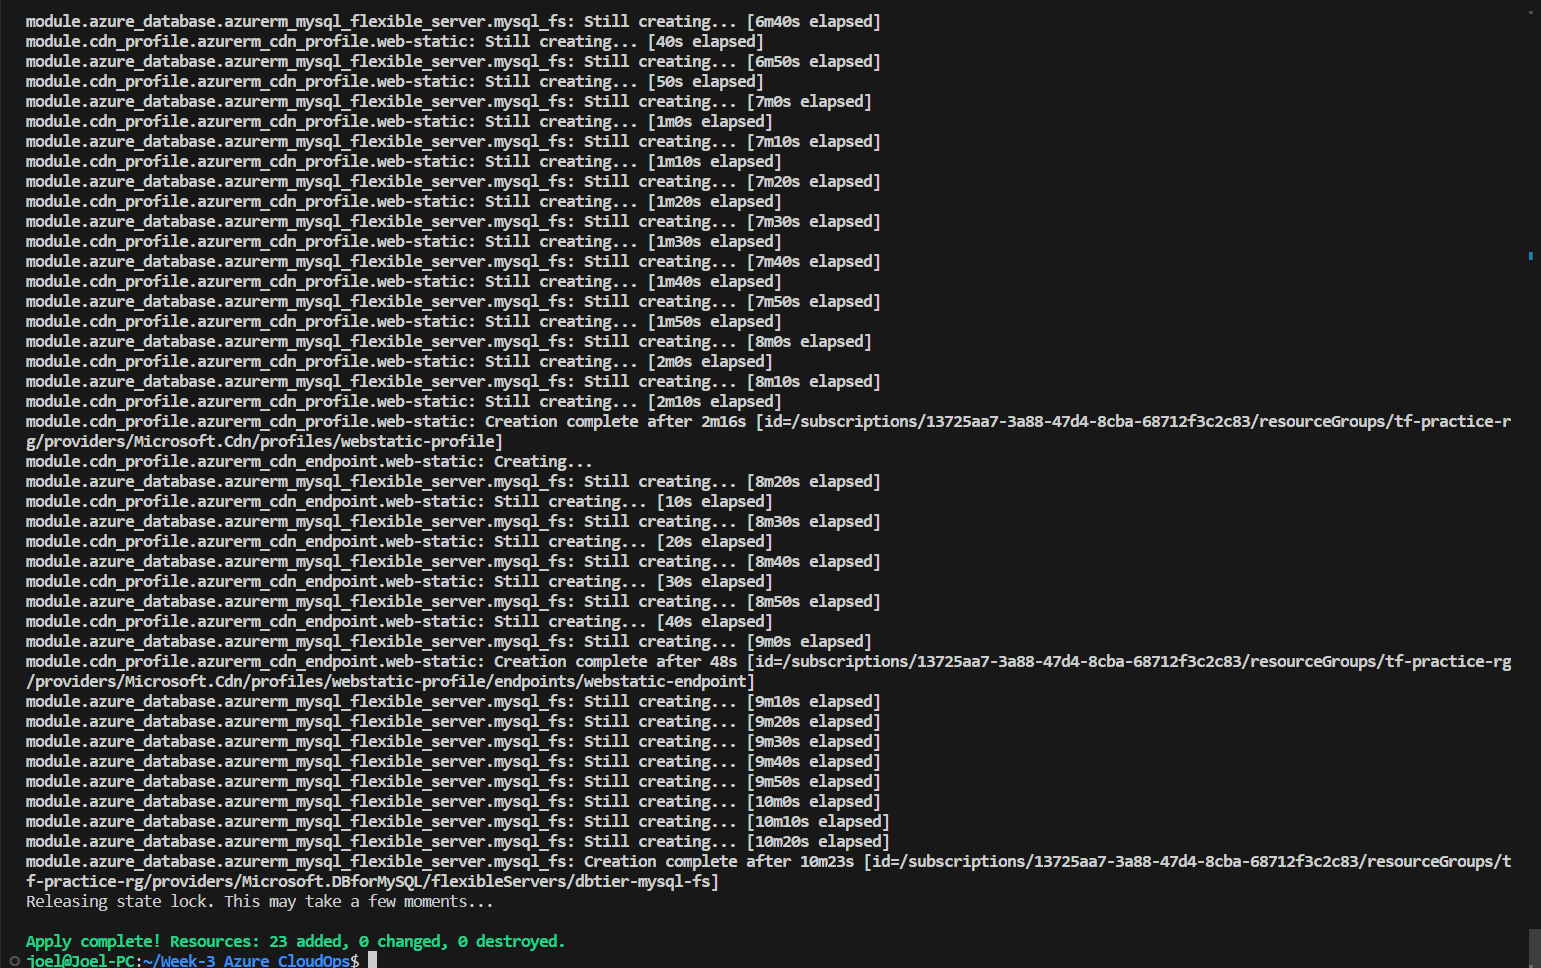
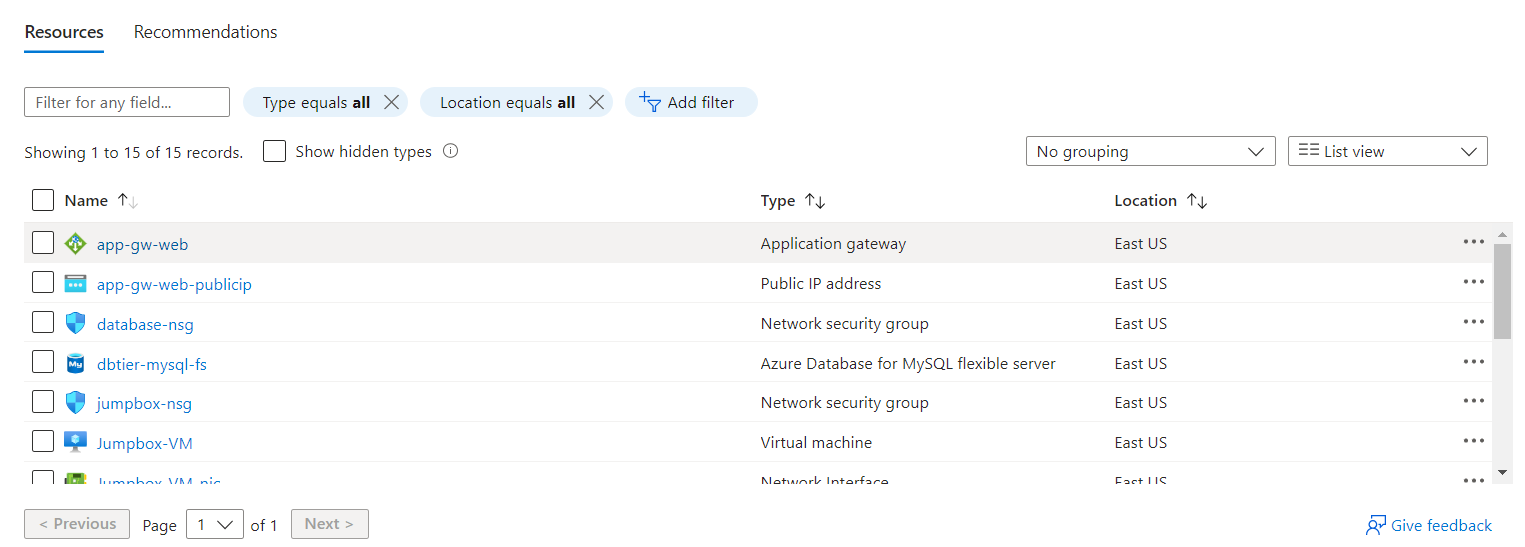
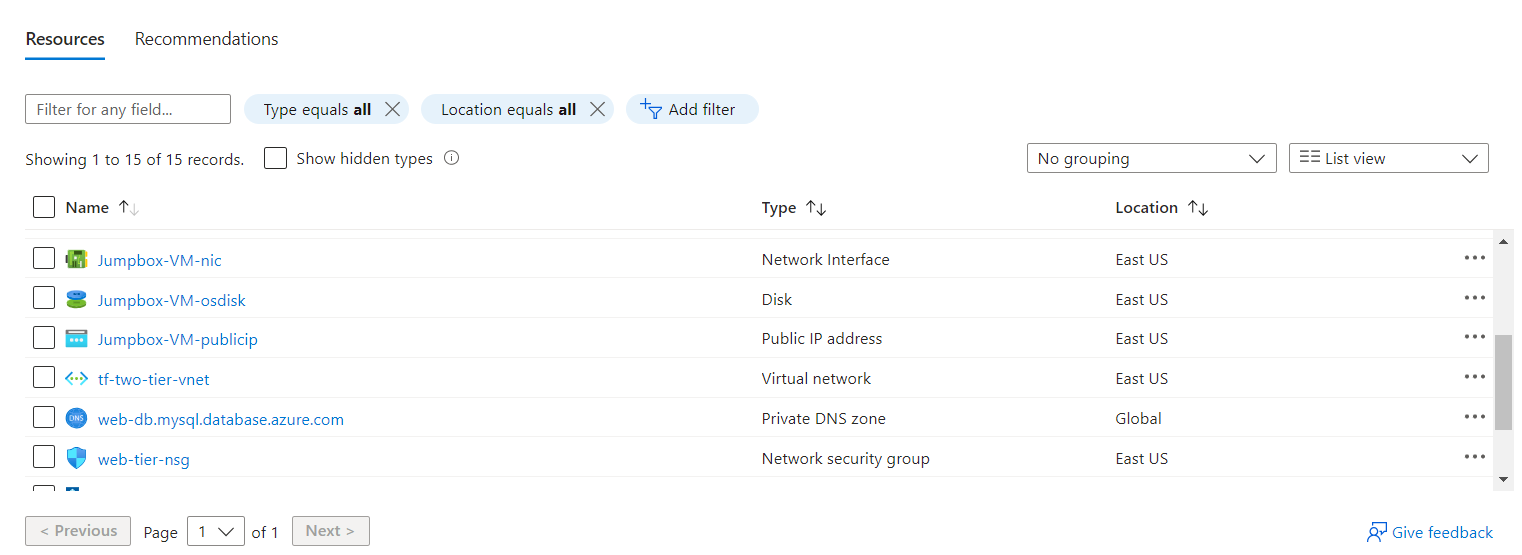
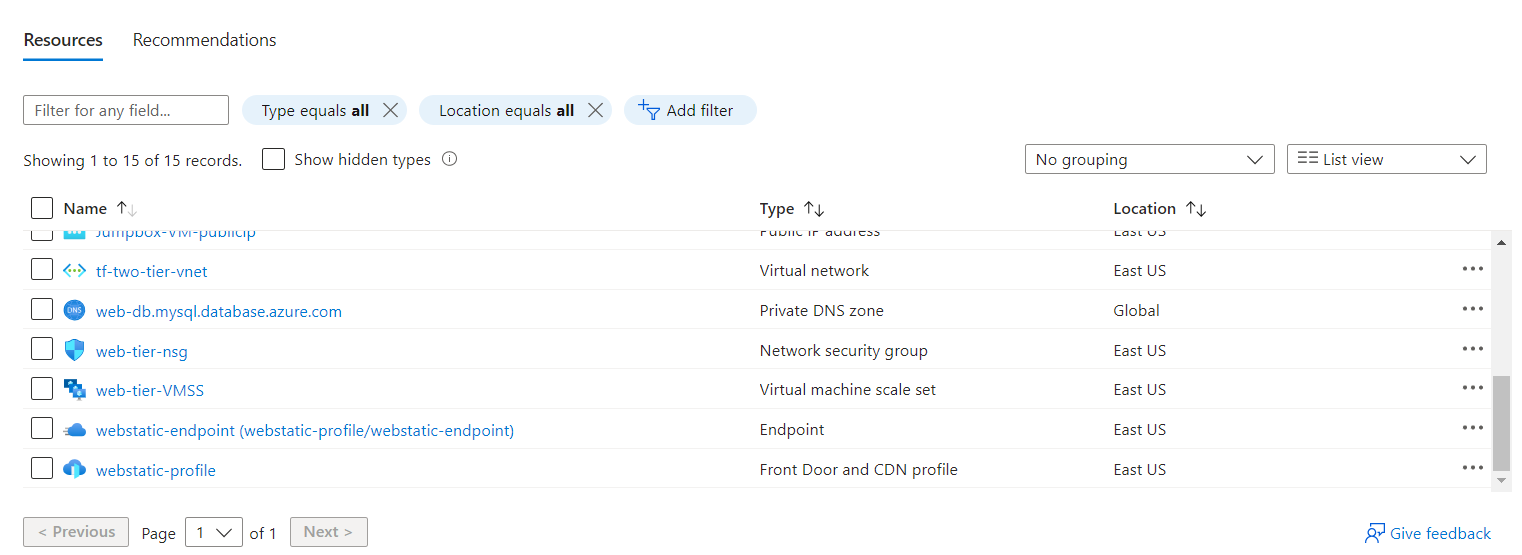
Resource Validation: Once deployed, verify that the resources have been created with the desired configurations. This step is essential to ensure consistency and correctness. The images below illustrate my resource validation after the infrastructure deployment was complete:
Clean Up:
Reviewing and Testing: Before initiating cleanup, consider testing your deployed infrastructure to confirm its functionality. This is especially crucial if you plan to replicate the setup in a production environment. The images below indicate the functionality of my CDN endpoints which depend on the successful creation of the application gateway, key vault certificate and the virtual machine scale set:

Resource Deletion: When you're ready to clean up, execute
terraform destroy. Terraform will determine the resources to be deleted based on your configuration files.Confirming Deletion: Review the destruction plan presented by Terraform, and if satisfied, enter "yes" to proceed. Terraform will then remove the resources while adhering to proper dependencies.
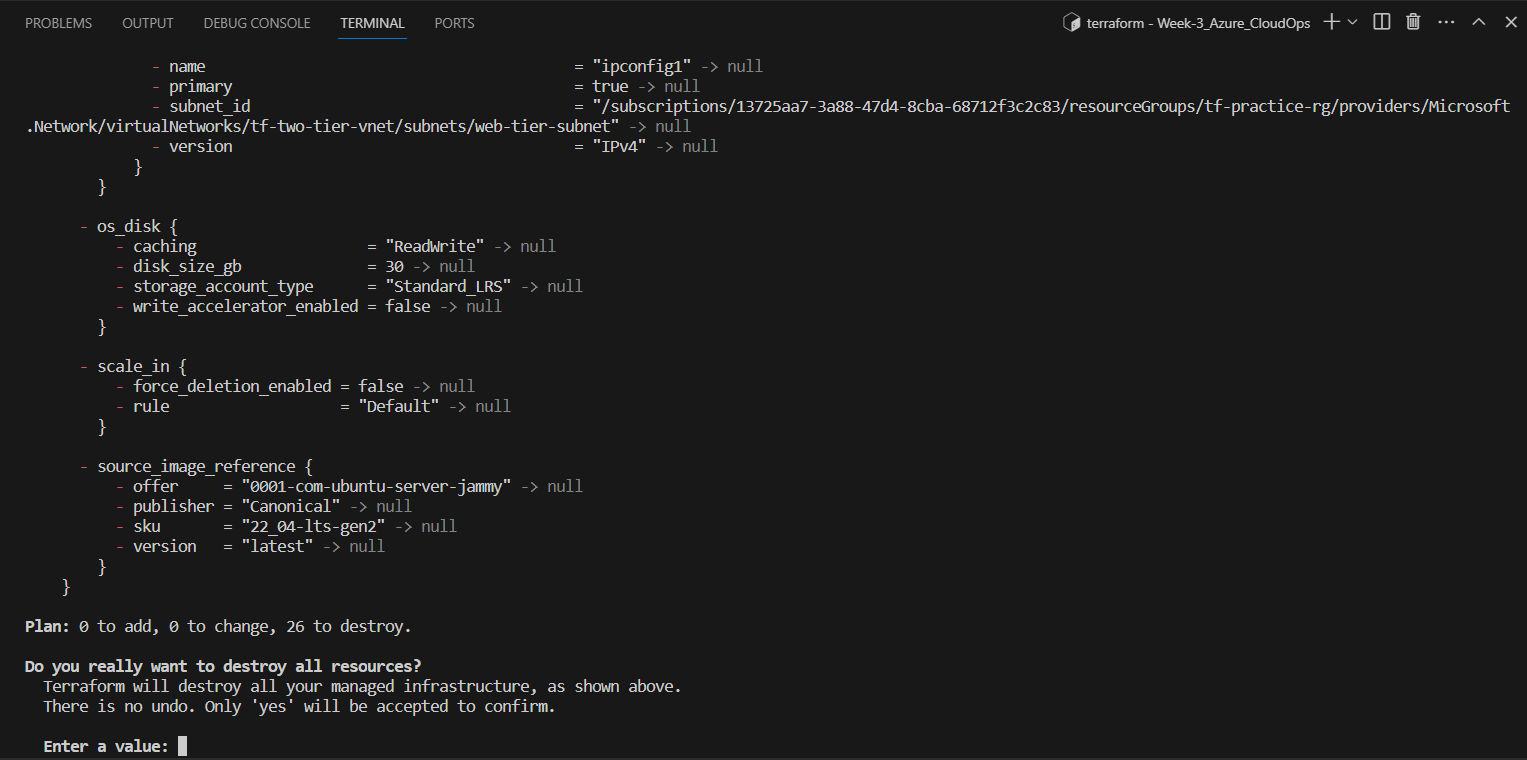
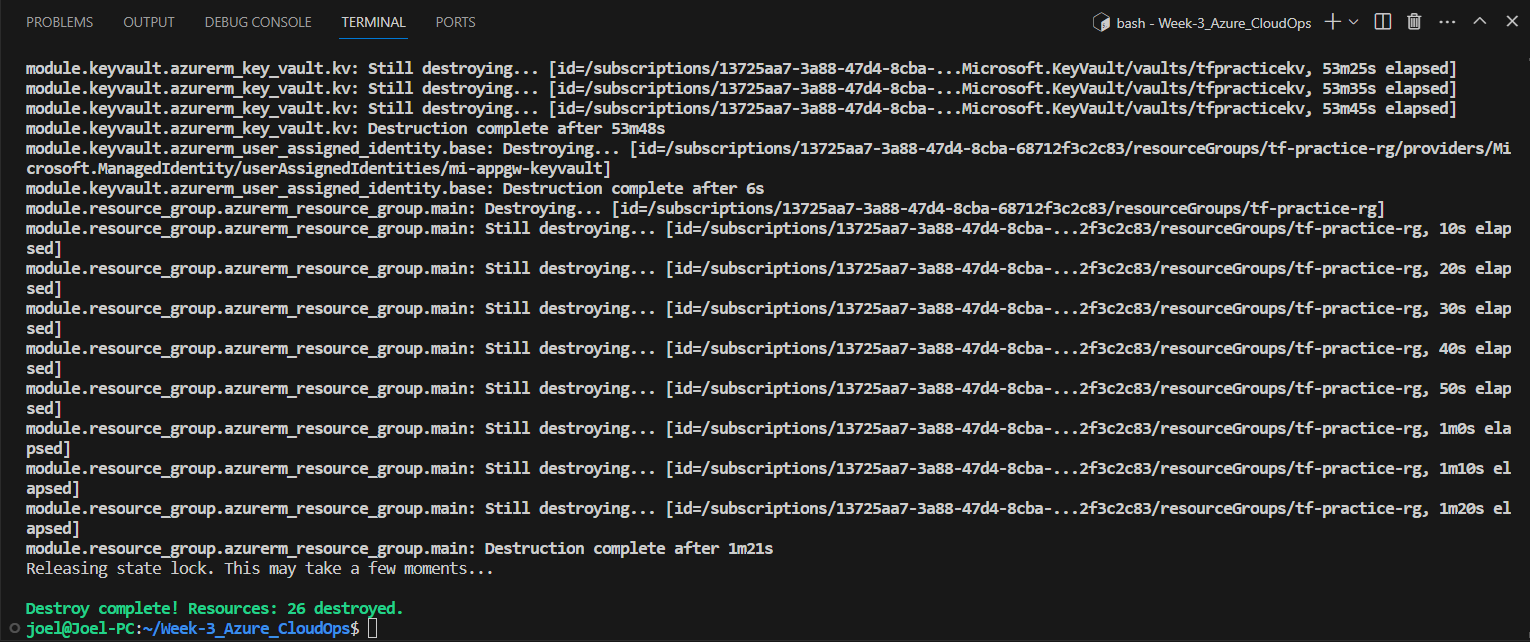
State File Management: As resources are destroyed, Terraform updates its state file. Ensure to also destroy the Storage account and Container created independently using the shell script with the AZ CLI command below:
az group delete --name "terraform-state-rg" --yes --no-wait
🪴 Room for Growth
I'm happy with how this project went. I invested nearly 50 hours to get it going, due to the number of topics I had to teach myself along the way - a hefty one but a worthwhile commitment over the past two weeks. A few things I think could/would get better with more learning and practice:
While I've got the fundamentals of networking down, I'm excited to delve into more advanced networking setups. Terraform's capability to accommodate complex network structures, including VPNs, ExpressRoute connections, and intricate routing schemes, opens up a world of possibilities for me to explore.
Security is a constant concern in today's landscape, and Terraform's integration with Azure Active Directory and Azure Policy is music to my security-conscious ears. As I continue my learning journey, I'm looking forward to implementing strict access controls, identity-based policies, and perhaps even diving into Microsoft Defender for the Cloud to keep my infrastructure rock-solid.
Containers and microservices are calling out to me, and Terraform's reach extends to provisioning Azure Kubernetes Service (AKS) clusters. The thought of managing my containerized workloads while still following the modular Terraform approach is incredibly enticing. It's like expanding my toolkit without losing the familiarity I've come to cherish.
Talking about the future wouldn't be complete without mentioning CI/CD pipelines. Integrating my Terraform configurations into tools like Azure DevOps or GitHub Actions is something I've got my sights set on. The promise of automated deployment, consistency across environments, and smoother collaboration between teams is an avenue I'm excited to explore.
In closing, this isn't the end of the road; it's more like a checkpoint in an ongoing adventure. Terraform has become more than just a tool—it's a companion that's helping me navigate the ever-changing landscape of cloud computing. I'm embracing the learning, the challenges, and the rewards that come with building my infrastructure with Terraform, and I can't wait to see where this journey takes me next.
Resources
https://learn.microsoft.com/en-us/azure/developer/terraform/get-started-windows-bash?tabs=bash
https://registry.terraform.io/providers/hashicorp/azurerm/latest/docs
https://learn.microsoft.com/en-us/azure/virtual-machines/linux/cli-ps-findimage
Connect with me on
🔗 Linkedin - linkedin.com/in/joel-oduyemi
🔗 Github - github.com/Joelayo
Subscribe to my newsletter
Read articles from Joel Oduyemi directly inside your inbox. Subscribe to the newsletter, and don't miss out.
Written by

Joel Oduyemi
Joel Oduyemi
I'm a detail-oriented and innovative Solutions Architect / DevOps engineer, a team player, and solution-driven, with a keen eye for excellence and achieving business goals. I have repeatedly demonstrated success in designing and launching new cloud infrastructure throughout Azure workloads. I'm passionate about the Cloud, DevOps, Well-Architected Infrastructure, Automation, Open-source, Collaboration, Community building, and knowledge sharing.