Building a Dynamic Shopping Cart with React: A Practical Step-by-Step Guide.
 Bimbo Adesoye
One of the main features of practically every website you visit is an online shopping cart. Every company, regardless of size, has things they wish to sell, making the shopping cart one of the most popular and important features for a web developer to be able to construct. In this article, using React, we'll delve into the intricacies of constructing this fundamental feature, implementing the "Add to Cart" functionality, and increasing and decreasing the number of items to purchase thereby equipping you to master the art of building online shopping carts that enhance user experiences across the digital landscape.
This tutorial will endeavour to make the subject matter as beginner friendly as possible because in my experience, making a functional shopping cart can be a bit more complicated than expected and a lot of resources out there don't take the time to break it down as simply as possible. So strap in and let's work through it together. This might be a lengthy read.
What Our Page Will Look Like


The images above are screenshots of what we'll be building together in this tutorial. As you might have been able to tell, I've divided the app into 2 pages. The "Home" section where we have all the products lined up and the "Cart" section where we showcase the items that have been added to the cart, their quantity and the total price of our goods. We'll be navigating through both pages seamlessly using "react-router-dom". More on that later.
Setting up the Project
To create a shopping cart component using React, you begin by creating a folder on your computer. You can name it whatever you like. And open up your preferred code editor. In this tutorial, I'll be making use of Visual Studio Code. Open up the folder you've created in your code editor. With VSCode, you can simply drag and drop the folder.
We'll be making use of a React and Vite development environment and styling with Vanilla CSS.
Installation
Open up your terminal and initialize React using the command: npm create vite@latest
You should see this :

You can put in a project name or initialise with a "." to use your current folder name.
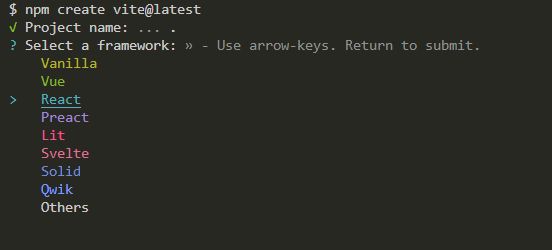
Select React as the framework of choice;
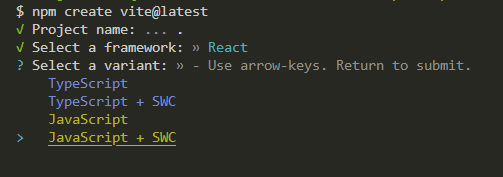
Select JavaScript as the variant;

Finally, run the command npm install to download all the boilerplate code and the packages needed to run React. Then npm run dev and click on the local link to run your project in the browser.
Your browser will look something like this :

This is just the code that comes with Vite. We'll be deleting all of it in our folder.
Project Structure
If you've spent any length of time with React, you'll be familiar with the folder structure and the emphasis on component-based building.

Our project folder will resemble the picture shown above. We have two sub-folders inside the src folder. An "assets" folder where we will keep the photos we'll be using and a "components" folder where the various components of our project will be housed. We have a "Cart" component, a "Home" component, a "Navbar" component, and a "DB" component. "DB" stands for Database in this scenario. When working with a bunch of items, like In a shopping cart, we can either get our data from a third-party API or our local system. For simplicity, the data we'll be using data from our local system for this project and you can find it in the "DB.js" file.
You can get the data, assets and styles we'll be using here: https://github.com/BimboAdesoye/shopping-cart-article
Dependencies
Dependencies are external frameworks, libraries, or modules that a software project needs to run well. These external components offer pre-built functionality, resources, or tools that the project uses to complete particular tasks without having to start from scratch. Dependencies can be code libraries, external APIs, testing or development tools, and more. We'll be installing a couple of them to aid us in our project.

You can find your dependencies in your package.json file. The packages I've installed are :
react-router-dom (For navigating through the pages on your website). You can install it with the command
npm i react-router-dom.react-toastify (For getting notifications when an item is added to the cart). You can install it with the command
npm i react-toastify.
First step
We'll begin by deleting all the boilerplate code that came with Vite. Open up your App.css and Index.css files and delete all the CSS styles there. We'll be writing our own from scratch. The main.jsx file is the entry point for our application. It typically imports and renders the root component of the app (in our case, App.jsx). Proceed to App.jsx file - the main component of our app where our structure and layout are defined - and delete everything until it looks like this :
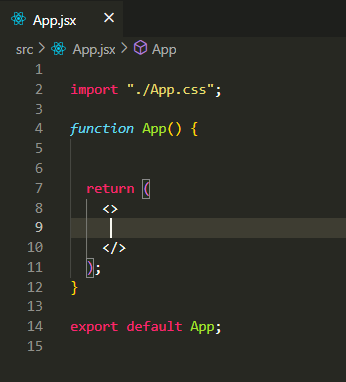
The next step is to import {BrowserRouter, Routes and Route} from 'react-router-dom'

These are for navigating through each page on the website. If you're not familiar with react routing, I suggest you watch a tutorial. This is a solid video explaining the topic
Import your components into the App.jsx file

This is where they'll be nested. To implement navigating, the components will be wrapped with the BrowserRouter, Routes and Route elements.
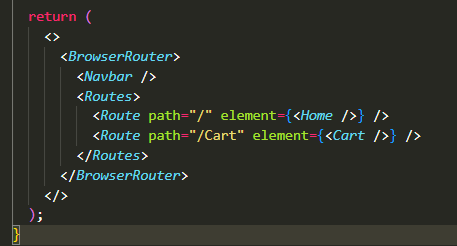
The BrowserRouter is a higher-level component that provides routing functionality to your application. Remember App.jsx is the root component of our app so we're wrapping the entire application with BrowserRouter to enable routing.
The Routes component is used to define our application's routes more flexibly and hierarchically. It allows us to nest routes and control how they match and render.
The Route component is used to define a route and its corresponding component. It specifies what component should be rendered when a certain path is matched in the URL. In our project, we define our paths and then nest the component in the Route element. This allows us to add links to whatever element we choose, specify any of the Route paths we've defined here and navigate to that component easily. It'll become clearer as we move further in the tutorial.
You can add multiple Route components within your application to define different routes.
If you have a keen eye, you might have noticed we nested the Navbar component before the Routes element. This is because we want the Navbar to be present everywhere on our website. If you're in the Cart section or the Home section, the Navbar will be visible.
Building our Components
All the styles for this project will be written in the App.css file.
Boilerplate css to start the project:

After nesting our Components, we move on to building them. Let's start with the Navbar.
Navbar Component
In the Navbar component, we can generate boilerplate code for a functional component by using rafce. The result will look something like :
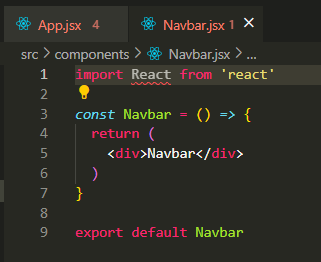
rafce is not a built-in react feature, however, so you will have to install the "ES7+ React/Redux/React-Native snippets" extension and restart your VsCode or type it out yourself.


In our Navbar component, I've imported the images for the Logo and the Cart and styled them appropriately. You might observe that the images are wrapped in a Link tag. The <Link> component is part of the React Router library and is used for handling routing in single-page applications. It's used to create links within your application without causing a full page refresh as opposed to the <a>(anchor) tag which can cause full page refreshes, leading to a slower user experience.
We wrap the logo with the Link tag and pass the attribute to with a value of {"/"} which means anytime we click on the Logo, we are directed to the Home component.
We do the same thing with the Cart component. Wrap with Link tag, pass the attribute to with a value of {"/Cart"} which directs us to the Cart component whenever we click on that image.
The styles for this component:

Home Component
To build the home component, we first need to populate the "DB.js" file with the data we'll be making use of. So go to your DB.js file and put in the following data :
const products = [
  {
    id: "1",
    name: "Armaf Club De Nuit",
    price: 19000,
    image:
      "./src/assets/armaf_club_de_nuit_3_piece_perfume_gift_set_for_men 1.svg",
  },
  {
    id: "2",
    name: "Boadicea The Victorious",
    price: 19000,
    image: "./src/assets/boadicea_the_victorious_envious_edp_100ml_1 1.svg",
  },
  {
    id: "3",
    name: "Mancera Lemon Lime",
    price: 19000,
    image: "./src/assets/mancera_lemon_lime_edp_120ml_perfume_for_men 1.svg",
  },
  {
    id: "4",
    name: "Carolina Herrera",
    price: 19000,
    image:
      "./src/assets/carolina_herrera_212_vip_black_i_love_new_york_edp_100ml_for_men 1.svg",
  },
];

export default products;
Our data is an array of objects each with a name, an image, a price and a unique id. You can get the images from the GitHub link I posted earlier. We also export the "products" array so we can make use of it in other components.
In our Home component, we'll be importing the products array from "DB.js" and looping through to display the items.

In the image above, to render our data in the Home component, we've imported the products array from the "DB.js" file, and we're mapping over the products array using the map method and for each single-product, we render a <div> with an image, a name, a price and a button to add the items to the Cart. The key attribute is set to the id of the product. The key attribute helps React optimize rendering when the list changes.
The line const { id, name, price, image } = singleProduct; is using object destructuring to extract specific properties from the singleProduct object and assign them to variables with corresponding names (id, name, price, and image).
Here's a breakdown of what's happening:
singleProductis an object representing a single product from the array of products.By using object destructuring,
{ id, name, price, image }extracts the propertiesid,name,price, andimagefrom thesingleProductobject.These extracted properties are assigned to variables with the same names. This means that after this line, you can use these variables directly instead of accessing the properties using dot notation, like
singleProduct.id.
To style the home component:
/* Home */
.products {
  display: flex;
  justify-content: space-between;
  margin: 1.5rem 0;
}

.product {
  display: flex;
  flex-direction: column;
  align-items: flex-start;
  gap: 20px;
  border-radius: 8px;
  border: 2px solid #d9d9d9;
  background: #fff;
  padding: 1rem;
}

.product img {
  mix-blend-mode: darken;
  width: 249px;
  height: 257px;
}

.name {
  color: #000;
  font-size: 20px;
  font-style: normal;
  font-weight: 500;
  line-height: normal;
}

.price {
  color: #000;
  font-size: 24px;
  font-style: normal;
  font-weight: 700;
  line-height: normal;
}

.btn {
  background: var(--primary, #db9200);
  border-radius: 20px;
  border: none;
  cursor: pointer;
  font-size: 20px;
  outline: none;
  padding: 12px 0;
  text-align: center;
  width: 100%;
}
Implementing the "Add to Cart" functionality
Before we move further, we have to broach the subject of state management.
In React, state management entails handling and updating the data that controls how components behave and look. Your application will remain responsive and be able to dynamically adapt to changes in the user interface thanks to this.
In this project, we'll be using the useState and the useEffect hooks from react to manage the state and perform side effects respectively.
In our App.jsx file, import the useState and the useEffect hooks
import { useState, useEffect } from "react";
In our App function, just before the return keyword:

const [cartItems, setCartItems] = useState([]) Initializes the cartItems state variable with an empty array. The setCartItems function is used to update this state.
The AddToCart function can be a little bit complex for beginners so I'll go through how it works carefully.
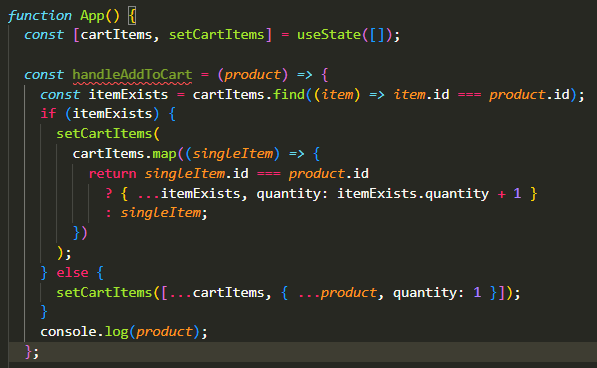
To understand this function, it's important to break it down and comprehend what each section entails. We have a function called handleAddToCart that takes in a parameter we've named product (We'll be passing in an argument later on).
The first thing the function does is to check if the item we're looking to add already exists in the cart.
const itemExists = cartItems.find((item) => item.id === product.id);
To do this, we loop through the cartItems using the find method and for every instance of item (because the item is each individual product in the cart) we check if the id is equal to the id of the product we're trying to add. Whatever result we get is then returned as a value to itemExists . Let's assume for a second we have a cart with 3 items each with their unique ids(1, 2, 3, for example). If we're trying to add another item to that cart, we would first go through the cart and check if there's any other item in it whose id matches the one we're trying to add. If our item has an id of 3, then we get true but if it has an id of 4, then we would get false. That's the logic at play here.
The second part of the function increases the quantity of the product if the item already exists in the cart.
   if (itemExists) {
    }
The line if (itemExists) is the same thing as saying if itemExists === true meaning we already have the item in the cart.
 setCartItems(
        cartItems.map((singleItem) => {
          return singleItem.id === product.id
            ? { ...itemExists, quantity: itemExists.quantity + 1 }
            : singleItem;
        })
      );
If you're familiar with the useState hook you understand that cartItems is the default value, while setCartItems updates the cart. The block of code above maps through the cart using the map method and for every item in the cart (denoted as "singleItem"), we check if the id is equal to the id of the product and return the value. What we're doing here is pinpointing the exact item after we've confirmed that it exists in the cart. Using the ternary operator, if the return value is yes, we use the spread operator to create a new object by copying the properties of (itemExists) and then increasing the quantity by 1. Essentially, if we attempt to add an item but it already exists in the cart, we simply increase its quantity by 1.
The last portion accounts for when the item is not already present in the cart
else {
      setCartItems([...cartItems, { ...product, quantity: 1 }]);
    }
We start with the else statement which means if itemExists === false meaning the item isn't already in the cart. Here, we use setCartItems to update the cart once more. Using the spread operator once again, we add (or technically, join) the item (product) to the cartItems array and set its quantity to 1.
Implementing the Increase Item Quantity functionality
Having implemented the add-to-cart functionality, increasing the quantity is quite straightforward
 const handleIncrease = (product) => {
    const itemExists = cartItems.find((item) => item.id === product.id);
    if (itemExists) {
      setCartItems(
        cartItems.map((singleItem) =>
          singleItem.id === product.id
            ? { ...itemExists, quantity: itemExists.quantity + 1 }
            : singleItem
        )
      );
    }
  };
It's the same function as the add-to-cart functionality except without the else statement because whenever we make use of this function, we would be doing so with items that already exist in the cart.
Implementing the Decrease Item Quantity functionality
 const handleDecrease = (product) => {
    const selectedItem = cartItems.find((item) => item.id === product.id);
    if (selectedItem.quantity === 1) {
      setCartItems(
        cartItems.filter((oneItem) => oneItem.id !== selectedItem.id)
      );
    } else {
      setCartItems(
        cartItems.map((singleItem) =>
          singleItem.id === product.id
            ? { ...selectedItem, quantity: selectedItem.quantity - 1 }
            : singleItem
        )
      );
    }
  };
This is the reverse of the add-to-cart functionality.
We check if the item exists in the cart :
const selectedItem = cartItems.find((item) => item.id === product.id);
If yes and the quantity of the item is exactly 1, we remove the item from the cart
   if (selectedItem.quantity === 1) {
      setCartItems(
        cartItems.filter((oneItem) => oneItem.id !== selectedItem.id)
      );
We do this by looping through the cart using the filter method. What this does is that it returns every item whose id is not equal to the id of the selected item essentially removing the selected item from the cart.
Implementing the Remove Item functionality
This function deletes the item from the cart immediately.
 const handleRemoveItem = (product) => {
    setCartItems(cartItems.filter((oneItem) => oneItem.id !== product.id));
  };
We've been through exactly how this function works.
At this point, your App.jsx component should look something like this:

Having implemented the necessary functions, it's time to make use of them. If you're wondering why we wrote the functions in the App.jsx component, this is because we'll need to make use of the functions in different parts of our application so we'll need to pass them as props (properties) to those other components and we have them nested in the App.jsx component. There are 2 ways to go about this. We could use the useContext hook or we could use the props method. It is advisable to use the useContext hook when working with a lot of components that need the functions to avoid prop drilling but for this project we'll be using the props method.
To pass the functions as props to the components, they're needed, we simply use them like would use attributes with an element.
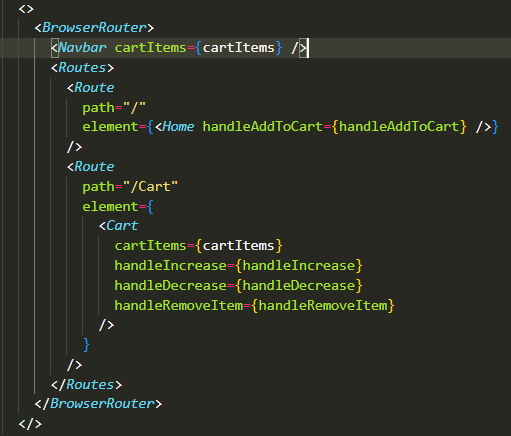
As shown in the image above, we pass the functions and cartItems as properties to the components where they're needed.
We move to our Home component. The first step is to accept all the properties that were passed to the nested Home element in our App.jsx . This is an important step to take note of. When you pass props to an element, it is essential to accept the props in the actual component before you can make use of them.
We could accept the properties by using the dot notation. For example, we would accept the handleAddToCart prop by denoting it as props.handleAddToCart but a more efficient method would be destructuring the item directly from the props keyword. So more like:

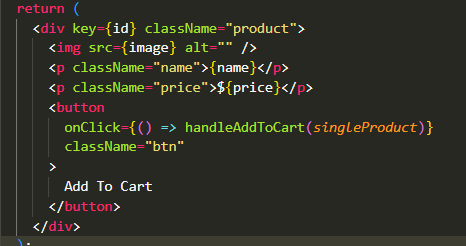
We accept the property has a parameter. To use the function, we call an onclick attribute on the add-to-cart button and pass in the function with an argument of singleProduct (singleProduct is each product that we click on).
Cart Component
We now move to our Cart.jsx component. To build the Cart component we begin by accepting all the properties that we passed to the Cart element in App.jsx .

We can now use the passed properties to construct the Cart component after accepting all of them. We start by accounting for what our cart will look like if there are no items in it.

We have a div with a class of "container" to align it in the middle and another class of "cart" for styling. We also have an h1 tag. Then we use conditional rendering with the "&&" operator to dynamically render the <div> component. Using the cartItems prop we open up curly braces because we're writing javascript code and declaring a condition cartItems.length === 0, we used the logical AND operator and then we render the <div> with the class empty-cart. How the conditional rendering works is if the condition we declared is met(if it returns true), the <div> is rendered but if the condition returns false, the <div is not rendered. The "continue shopping" button is wrapped with a Link tag and assigned a path of "/" so when you click on it, it takes you back to the home page.
We need to import the Link tag from react-router-dom.
import { Link } from "react-router-dom";
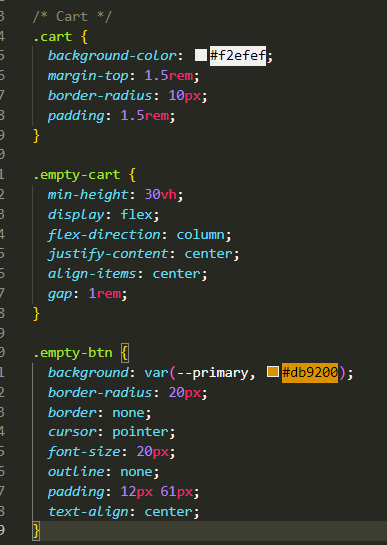
The styles:
The next thing is to populate the Cart with the items when they're added to the cart.
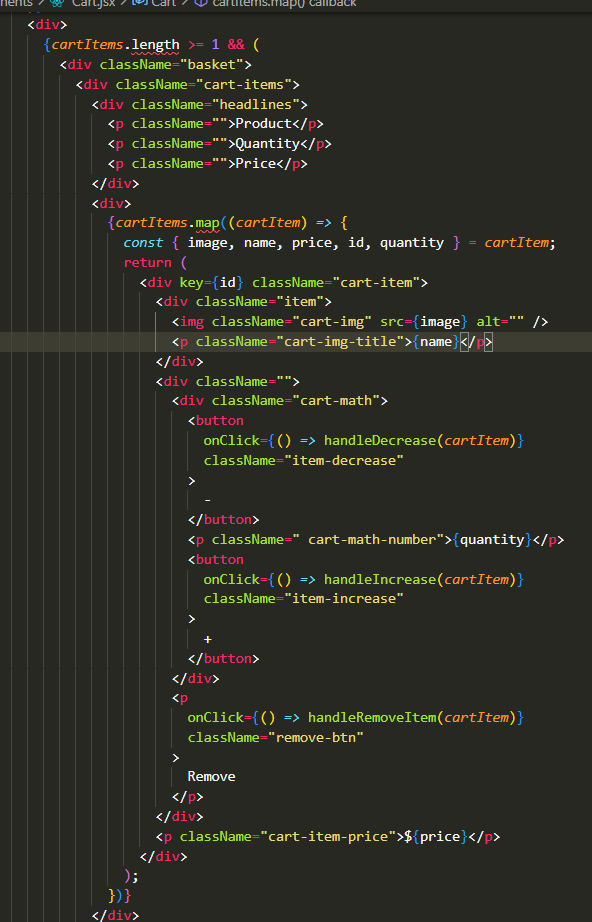
We create a <div> tag just below the curly braces and conditionally render the next component. In this instance, the condition for rendering the tag is if cartItems.length >= 1 (if we have one or more items in our cart). We use the logical AND operator (&&) to render another <div> tag with a class of "basket".
The cartItems array is mapped over, and for each item, the properties, image, name, price, and quantity are extracted using object destructuring.
The cart items are displayed in a structured manner with each item contained within a div element marked with the cart-item class. Inside this element, the product image and name are shown, followed by a section allowing users to adjust the quantity of the item. Alongside the quantity, buttons with the labels "+" and "-" allow us to increase or decrease the number of items respectively. Additionally, a "Remove" option lets users promptly remove items from the cart.
The buttons labelled "+" and "-" are given an onclick attribute with the handleDecrease and handleIncrease functions respectively that take in cartItem (cartItem is whatever product that we click on) as an argument. When we click on the buttons, their respective functions are called.
The button labelled "Remove" also has an onclick attribute with the handleRemoveItem function that takes in cartItem as a function. When we click on the button, the function is called and the item is deleted from the Cart.
The styles:
.basket {
  display: flex;
  justify-content: space-between;
}

.cart-items {
  margin-top: 1rem;
  border: 2px solid #db9200;
  border-radius: 10px;
  background-color: #fff;
  width: 65%;
}

.headlines {
  display: flex;
  justify-content: space-between;
  align-items: center;
  height: 3rem;
  border-bottom: 2px solid #db9200;
  padding: 1.5rem;
}

.headlines p {
  font-size: 20px;
  font-style: normal;
  font-weight: 700;
}

.cart-item {
  display: grid;
  grid-template-columns: repeat(3, 1fr);
  place-items: center;
  padding: 0 1.5rem;
}

.cart-item img {
  mix-blend-mode: darken;
  width: 57.226px;
  height: 98px;
}

.cart-item .item {
  display: flex;
  justify-content: center;
  align-items: center;
}

.cart-math {
  display: flex;
  justify-content: space-between;
  margin-bottom: 10px;
  gap: 10px;
}

.cart-math button {
  background: var(--primary, #db9200);
  border-radius: 10px;
  border: none;
  cursor: pointer;
  font-size: 20px;
  outline: none;
  padding: 3px 20px;
  text-align: center;
}

.remove-btn {
  text-align: center;
  font-size: 17px;
  font-style: normal;
  font-weight: 600;
  cursor: pointer;
}

.cart-item-price {
  font-size: 17px;
  font-style: normal;
  font-weight: 700;
  justify-self: end;
}
We can now go to our browser, click on any of the products, click on the cartIcon to go to the cart section and we have the products there.
However, we need a way to know that our products have been added without having to go into the Cart itself.
Back to our Navbar.jsx component, we accept the props cartItem that we passed to the Navbar element in App.jsx


In the image above, the code snippet {cartItems.length > 0 && <p>{cartItems.length}</p>} we once again use conditional rendering to display the <p> tag only when there are items in the cart, avoiding unnecessary clutter when the cart is empty.
Breaking Down the Code
cartItems.length > 0: This condition checks whether the length of thecartItemsarray is greater than zero. In other words, it verifies if there are any items in the cart.&&: The logical AND operator is used to combine the condition with the next part of the code. It ensures that the following element is rendered only when the condition is true.<p>{cartItems.length}</p>: If the condition is met (i.e., there are items in the cart), a (<p>) element is rendered with the content being the length of thecartItemsarray. This dynamically displays the count of items in the cart.
So when we add the items to the cart the number increase, like so :

The css:
.cart-icon {
  position: relative;
}

.cart-icon p {
  background-color: #db9200;
  border-radius: 50%;
  color: black;
  font-weight: bold;
  position: absolute;
  right: -3px;
  text-align: center;
  top: -5px;
  width: 20px;
}
There's another method we can employ to be notified when we add an item to the cart. We'll be making use of a dependency called react-toastify. We installed that at the beginning of the project.
To use the react-toastify dependency, we go to our Home.jsx component and import the following at the top:
import "react-toastify/dist/ReactToastify.css";
import { ToastContainer, toast } from "react-toastify";
Before our return statement, we place in the function: The function is taken straight from https://www.npmjs.com/package/react-toastify. You can learn more about how it works there.
 const notify = () => {
    toast.success("An item has been added !", {
      position: toast.POSITION.TOP_CENTER,
    });
  };
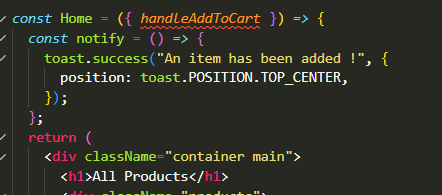
You can change "An item has been added!" to whatever you want the notification to display. You can also adjust the position to whatever suits you.
We then call the notify function in our add-to-cart button and nest the ToastContainer element that we imported just below it. Just like this:

Essentially whenever we add an item to the cart, we call the notify function and a notification pops up at the top like so:

Calculating the Total Price
To round up the Cart component, a major aspect of any cart is the total price of the goods, with other factors like tax and shipping price often taken into account.
First, we begin by calculating the combined price of all the items in the cart. In our cart component, before the return keyword :
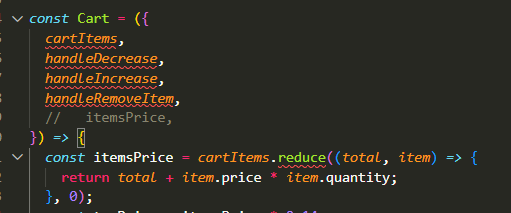
We calculate this using the reduce method.
Breaking Down the Code
As we know
cartItemsis the array that holds all the items in the cart, each with its price and quantity.We call the reduce method on
cartItems. The reduce method takes in two values. The total value of our calculation which we've declared to be zero (so our initial value starts at 0) anditem, which is each item in thecartItemsarray.For each
itemincartItems, the functionreturn total + item.price * item.quantity;is executed.The function takes the current
totaland adds to it thepriceof theitemmultiplied by itsquantity.The result becomes the new
total.
Once all items are processed, the final
totalis theitemsPrice, which gives us the total of all the items' prices in the cart.
After calculating the itemsPrice, the next step is to account for tax, and shipping and combine all three to get the Total Price.

taxPriceis calculated by multiplyingitemsPriceby 0.14. Quite straightforwardTo get the
shippingPrice, we use a ternary operator. We declare a conditionitemsPrice < 80000. If the condition is true, theshippingPriceis 0 else it's 50.totalPriceis derived by addingitemsPrice,taxPriceandshippingPricetogether.
Next, we incorporate these values into our cart thereby rendering them dynamically.
Directly, under the <div> element with the cart-items class, we place another <div> element with a class of subtotal.

Breaking down the code :
subtotalis a container for our cart total and breakdown.Inside the container, we use a couple of
divelements, each representing a specific part of the breakdown.We have a
divforitemsPrice, one fortaxPrice, and another forshippingPrice.Inside each of these
divelements, we have two moredivelements. The first one contains the description, like "Items Price," and the second one displays the corresponding price. We're using the dollar sign ($) to indicate currency.
A horizontal line (
<hr />) separates the individual prices from the total price, adding a visual distinction.Finally, we have a
divfor the "Total Price." We're using the<strong>tag to make the text bold and more prominent. The corresponding price is shown similarly.
The styles:

Storing our Items in Local Storage
You might have noticed that when our page gets refreshed, the items we've added to our cart are deleted. This is because the data representing the cart items isn't persistently stored. In React applications, the component state is temporary and is reset when the page is refreshed. To maintain the cart items across page refreshes, we need to implement a form of data persistence. In this tutorial, we'll be making use of our local storage.
LocalStorage is a feature provided by web browsers that allows web applications to store data locally on the user's device. It provides a simple key-value storage mechanism, similar to a dictionary or associative array.
A user's device can store key-value pairs for online applications using the local storage function of their web browser. It offers a method for persistently storing data on the client side, which ensures that the information is kept even if the user shuts the browser or leaves the page. The Web Storage API, which also includes Session Storage, supports Local Storage as one of its storage options.
We'll store the cart items in the browser's local storage before the page is refreshed and retrieve them after the page loads.
In our App.jsx component:

The line const cartItemsFromLocalStorage = JSON.parse(localStorage.getItem("cartItems")) || [] is used to retrieve cart items from the browser's local storage and store them in the cartItemsFromLocalStorage variable.
Breaking down the code :
localStorage.getItem("cartItems")uses thegetItemmethod of thelocalStorageobject to retrieve the value associated with the key"cartItems"from the browser's local storage.The value acquired from local storage is usually kept as a string when using JSON.parse(). To transform the string back into a JavaScript object, we use JSON.parse(). In this instance, it involves converting the data about cart items —which is presumed to be in JSON format—back into a JavaScript array.
|| []: The||operator is used for a default value. If the value retrieved from local storage isnull(meaning there are no cart items stored), the right-hand side ([]) will be used as a default value. This ensures that if there are no stored cart items, an empty array is assigned tocartItemsFromLocalStorage.
This piece of code essentially creates a mechanism for retrieving items from a stored cart and converting them into a useful array.
Earlier, we set the default value of cartItems to an empty array using the useState hook. However, we can now modify our code into const [cartItems, setCartItems] = useState(cartItemsFromLocalStorage)
This is because we're now getting our items from our local storage.
Finally, we utilize the useEffect hook to save the cartItems to our local storage whenever it changes. If you're not familiar with the useEffect hook, it's essentially used to perform side effects in a component. Some examples are fetching data from an API, directly updating the DOM, etc.
Breaking down :
  useEffect(() => {
    localStorage.setItem("cartItems", JSON.stringify(cartItems));
  }, [cartItems]);
We set up an effect that runs whenever the
cartItemsstate changes. The array[cartItems]as the second argument ensures that the effect only triggers when thecartItemsvalue changes.localStorage.setItem("cartItems", JSON.stringify(cartItems)): uses thesetItemmethod of thelocalStorageobject to store thecartItemsarray in the browser's local storage. TheJSON.stringify(cartItems)converts the array into a JSON string before storing it.
In essence, this code "listens" for changes to the cartItems state. The effect activates and stores the updated cart items back into local storage each time the cart items are updated. In this manner, the user's cart information is retained even if they reload the page or navigate away from the website and back again.
By using useEffect in combination with local storage, you're ensuring that the user's shopping cart data remains consistent and available across different sessions and interactions with your web application.
When we store our items in the local storage, we can view them in our browser

Finally, we have a fully functional Shopping Cart application.
Conclusion
In conclusion, the article provides a comprehensive and practical walkthrough for constructing a dynamic shopping cart using React. By breaking down the process into clear step-by-step instructions, you are equipped with the core concepts of state management, component interaction, and user interface design. The tutorial's hands-on approach ensures that you can enhance your skills in building interactive web applications. By mastering the techniques outlined in the article, you can create seamless and engaging shopping cart experiences that match user expectations.
In this article, you've learned
Why knowing how to build a shopping cart is an invaluable skill to have
How to build a fully functional shopping cart component
How to save Items using Local Storage
I hope this tutorial was easy to follow along and you were able to build this project completely. I implore you to tweak the project to your satisfaction becuase the best way to internalize what you've learned is by continuous practice and experimentation.
Thanks for reading. Happy coding🙂.
Subscribe to my newsletter
Read articles from Bimbo Adesoye directly inside your inbox. Subscribe to the newsletter, and don't miss out.
Written by

Bimbo Adesoye
Bimbo Adesoye
A Front-end Web developer driven by creating captivating and dynamic user experiences. I'm also a technical writer skilled at simplifying intricate subjects into easily understandable fragments, accessible to everyone.