Use Crossplane and ArgoCD to deliver Cloud Infrastructure the GitOps Way
 Platformwale
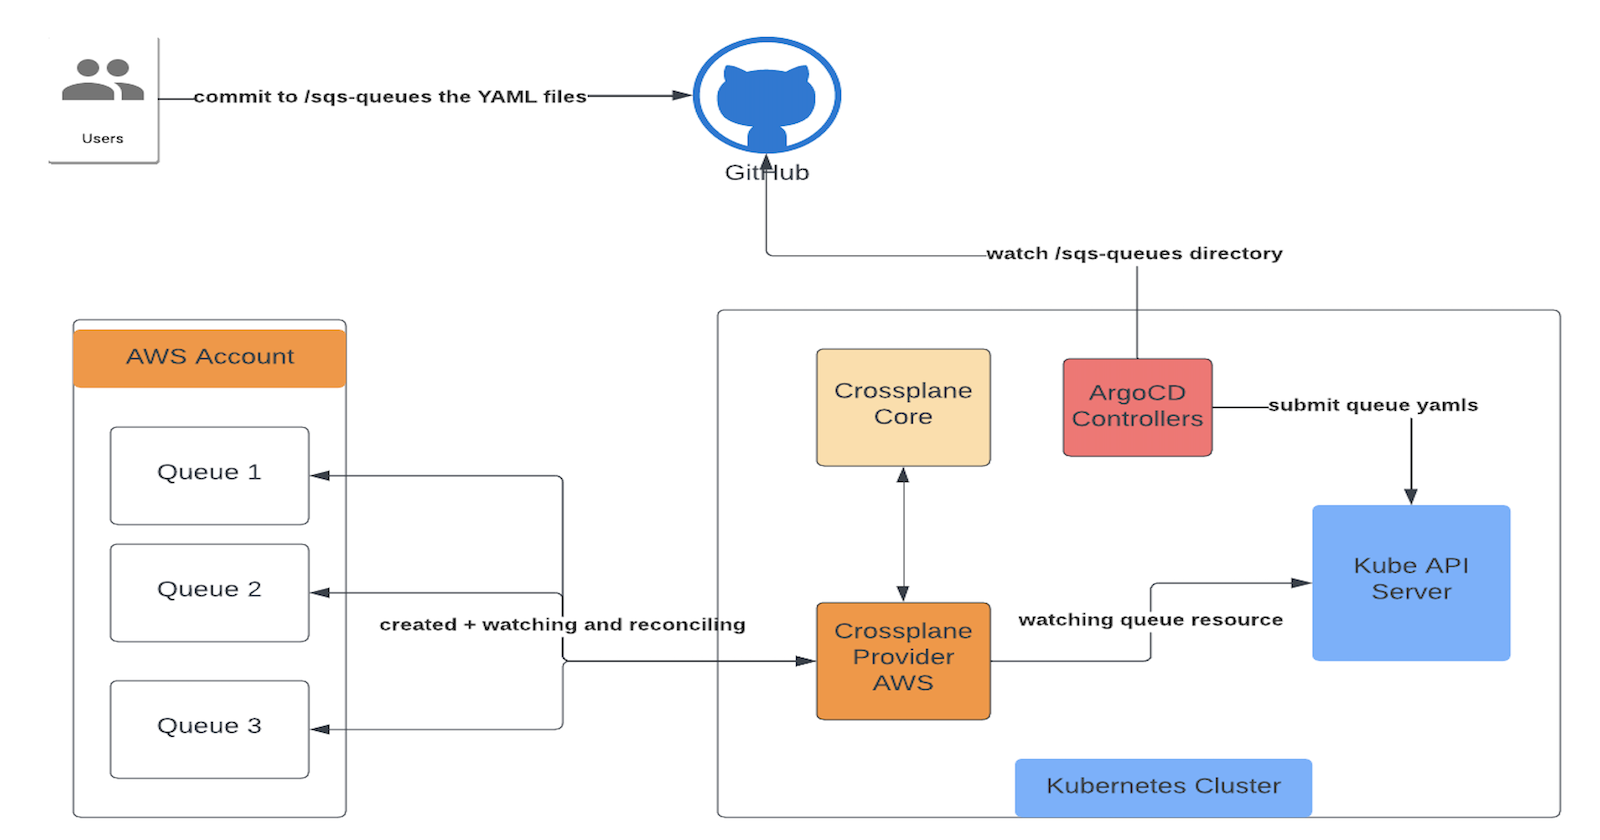
In this blog we delve into the exciting world of modern infrastructure management using Crossplane and ArgoCD. GitOps, a methodology that brings the principles of version control and collaboration to infrastructure as code (IaC). In this blog, we'll guide you through the steps of leveraging Crossplane and ArgoCD to deliver infrastructure the GitOps way.
Please be aware that this blog marks the beginning of the Crossplane + ArgoCD series. In this installment, we'll delve into the fundamental configuration required to deploy infrastructure using the GitOps approach. Subsequent blog posts will provide more comprehensive insights into various concepts.
Prerequisites
- Docker
- kind, there are many ways to install kind, please refer the link to install as you see fit.
- kubectl, we will use this to interact with the cluster.
- Github account
- Helm to install crossplane charts
- AWS Account as in this blog we will create an SQS resource in AWS
What are we going to create/observe?
At a high level we will do the following -
- Private Github Repository setup with ArgoCD
- Kubernetes cluster with Crossplane and ArgoCD
- Create a AWS SQS queue the gitops way
- Import an existing AWS SQS queue the gitops way
- Delete the resource from kubernetes cluster and observe that ArgoCD brings it back
- Delete the resource from AWS Console and observe that Crossplane brings it back
Create a private github repository
Assuming you already have the github account. The following steps will create the github repository and generate a personal access token. ArgoCD will watch this repository to sync the resources in the kubernetes cluster.
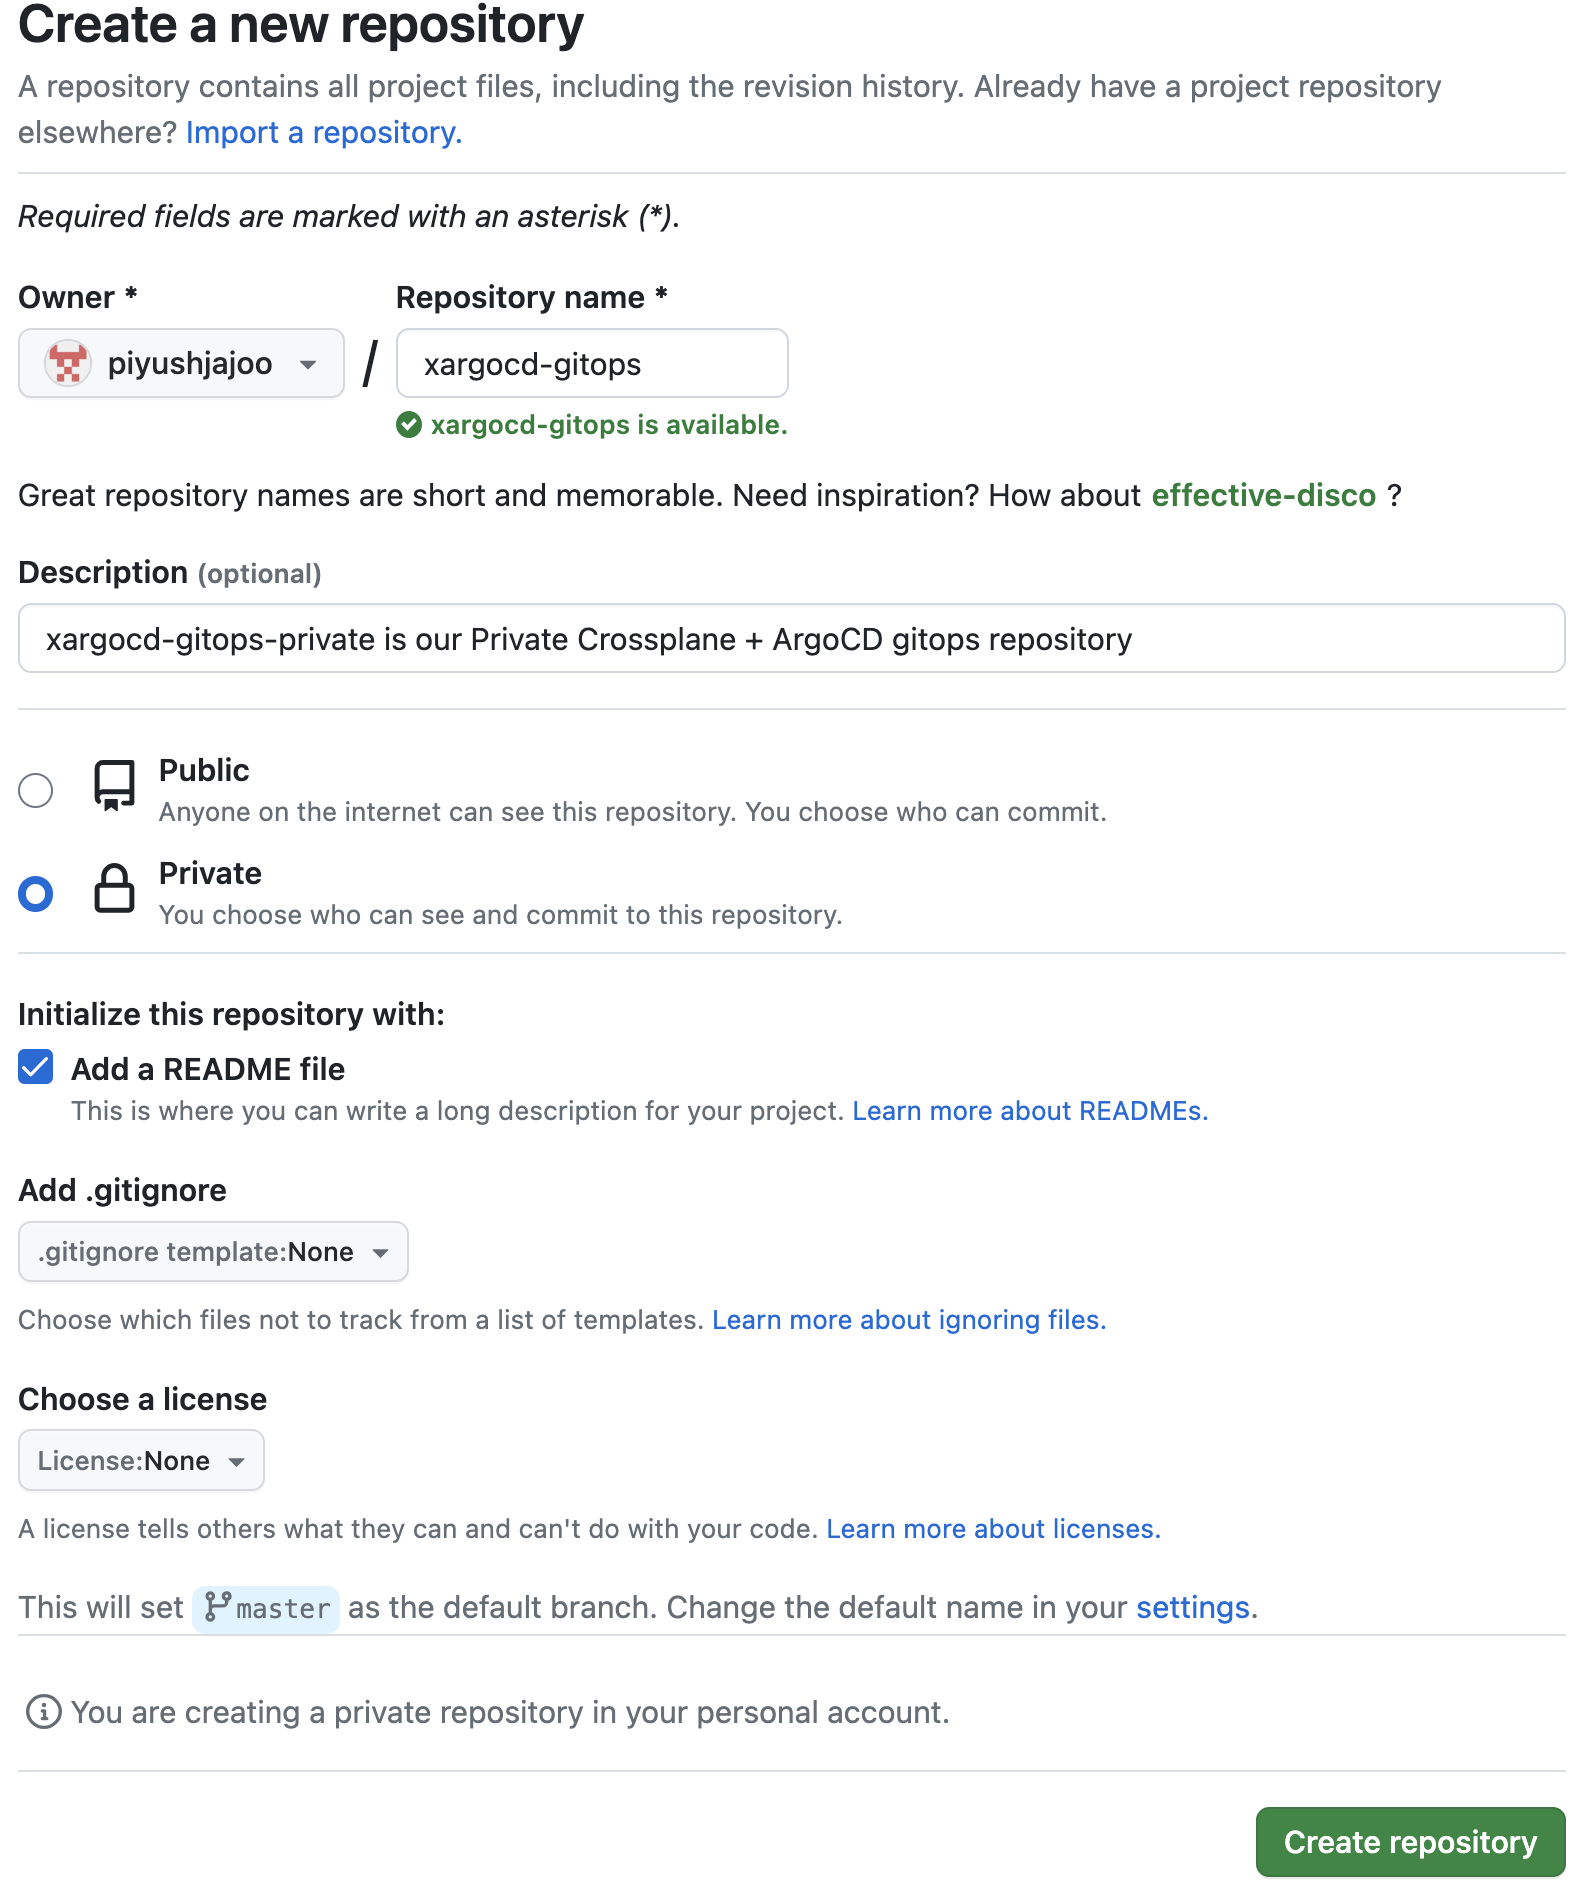
Create a new private github repository as shown in the screenshot below, we will name it as xargocd-gitops, if it's not available you can use any name -
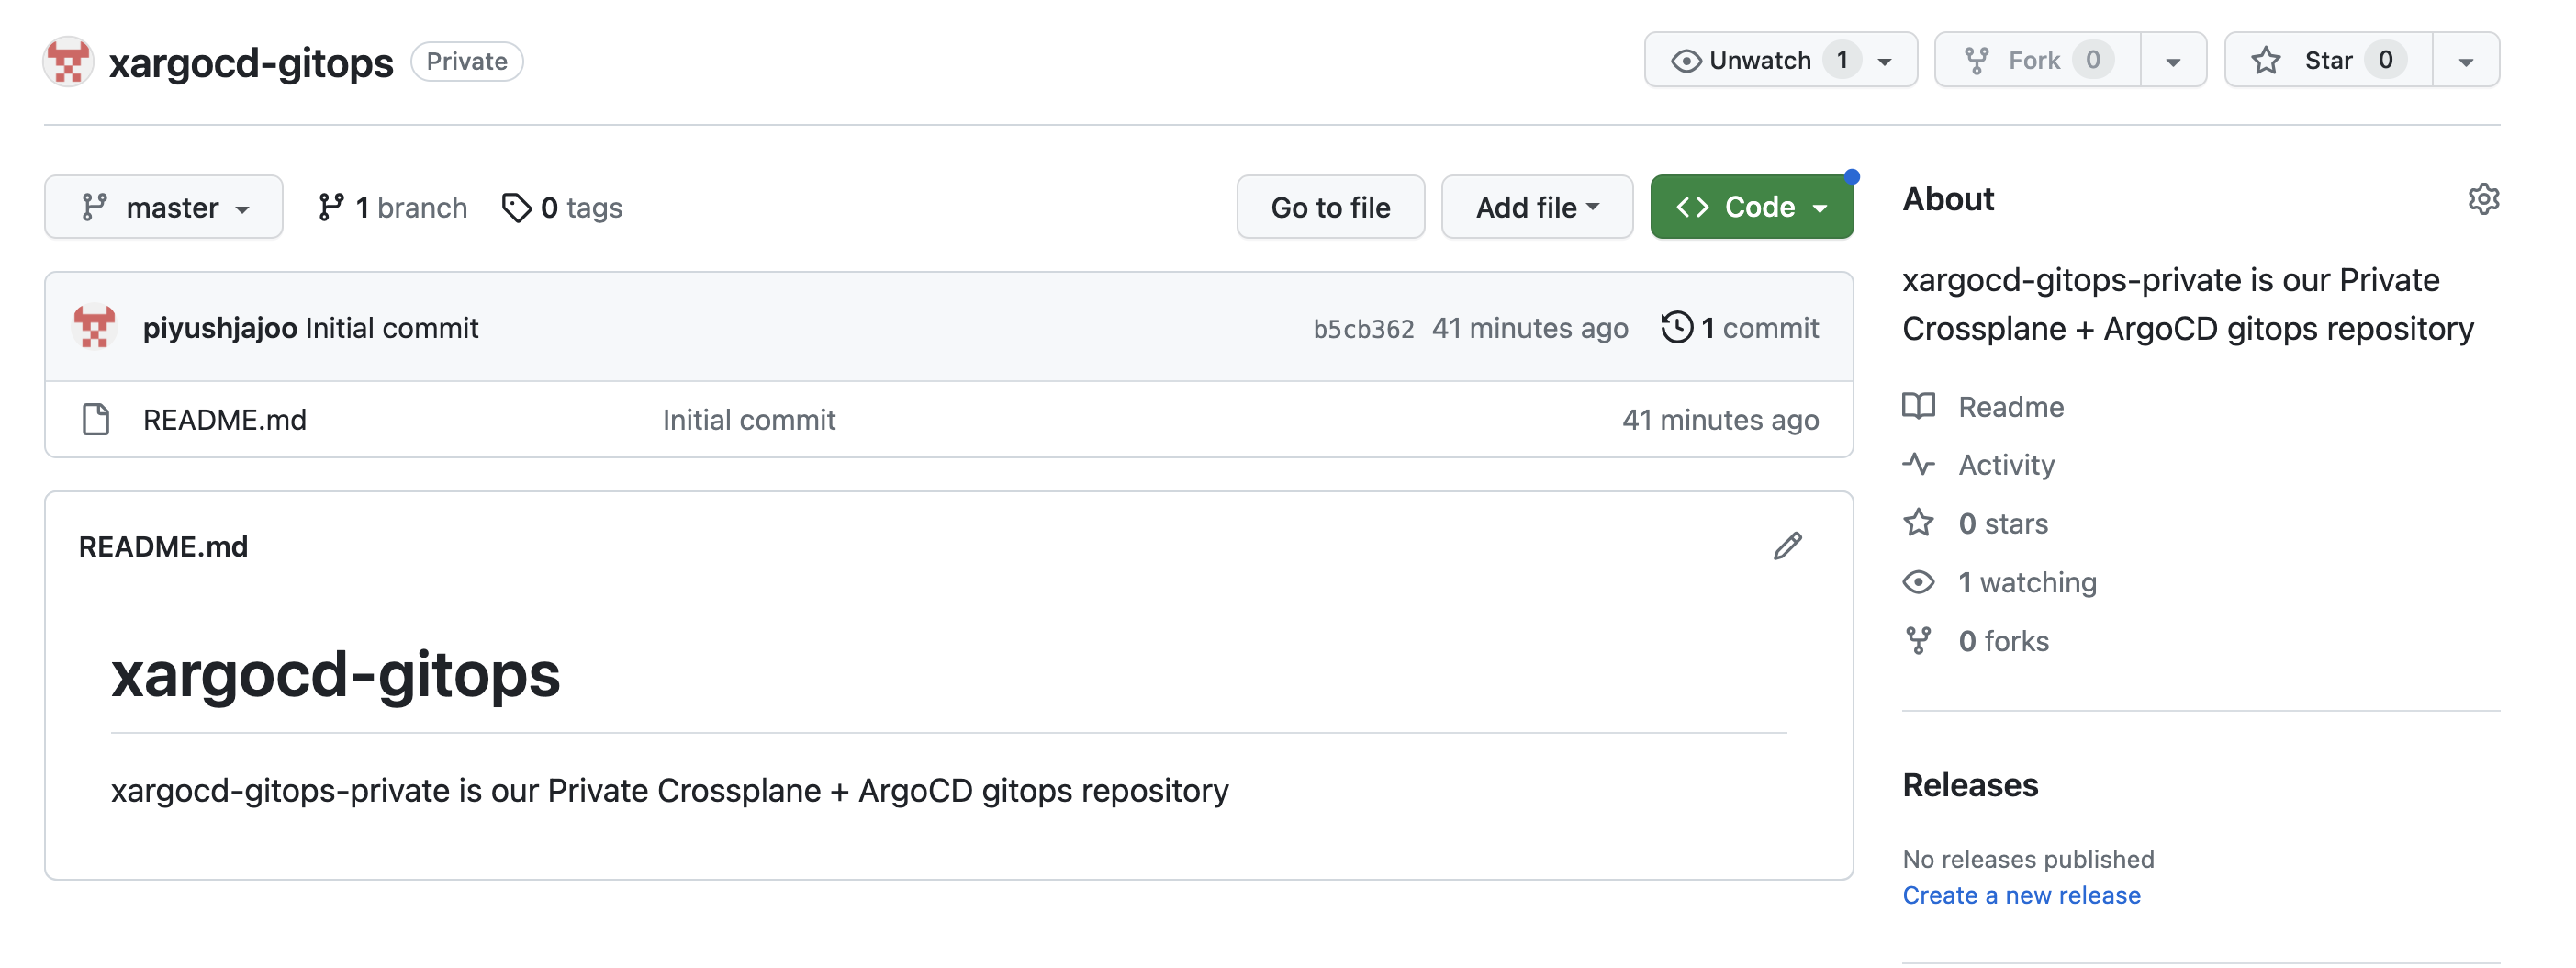
After successful creation of the repository it will look as below -
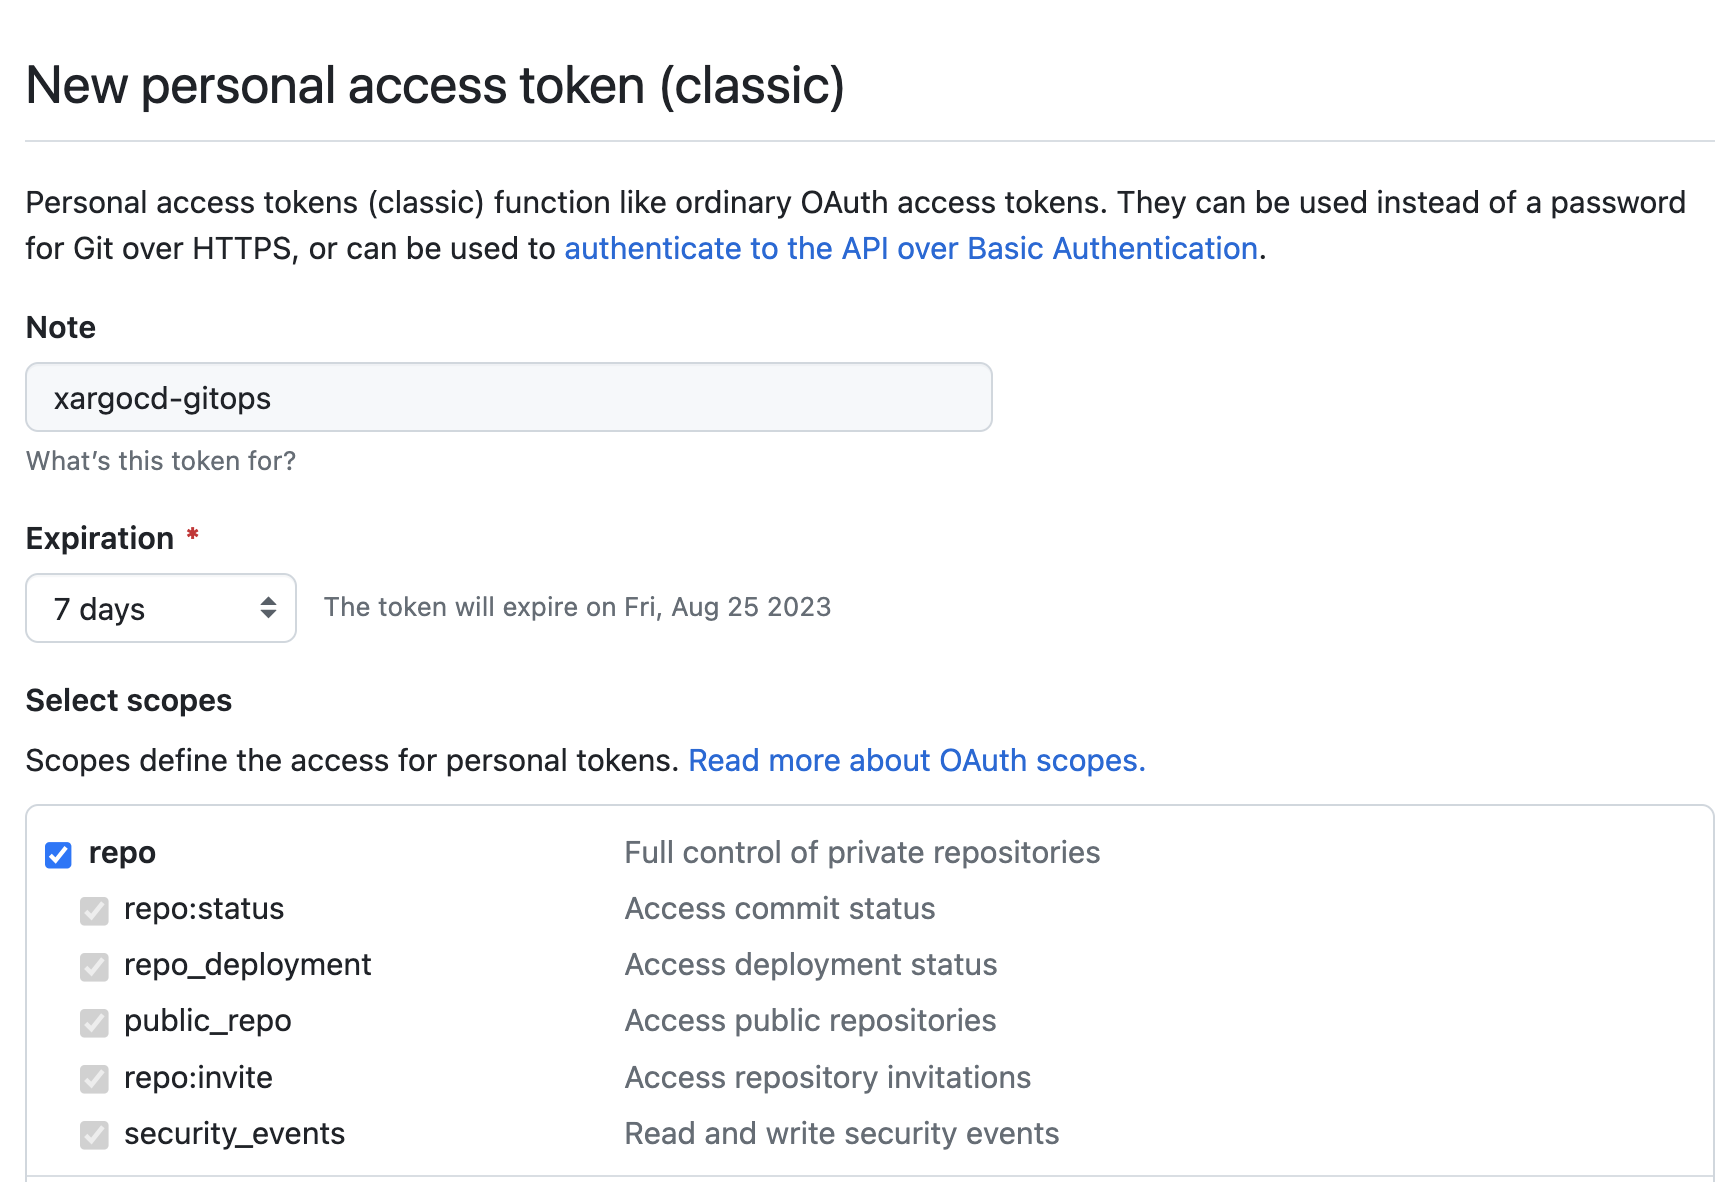
Create Personal access tokens (classic) with repo scope as below and click on Generate Token button, make a note of the token, we will need this while configuring ArgoCD to watch our private git repo -
Create kubernetes cluster using KIND
We have explained in detail in our earlier blog on how to setup a functional kubernetes cluster using KIND, hence we will not go in detail again. Please read the blog for details on KIND.
Create a KIND cluster as below -
kind create cluster --config - <<EOF
kind: Cluster
apiVersion: kind.x-k8s.io/v1alpha4
name: "platformwale"
# configure cluster with containerd registry config dir enabled
containerdConfigPatches:
- |-
  [plugins."io.containerd.grpc.v1.cri".registry]
    config_path = "/etc/containerd/certs.d"
nodes:
- role: control-plane
  image: "kindest/node:v1.27.3"
EOF
Make sure the kubectl context is pointing to the kind cluster created above -
# set the context as below
kubectl config use-context kind-platformwale

# validate as below
kubectl config current-context
Install and Configure ArgoCD
Let's install the stable release of the ArgoCD in the KIND cluster we created above. At the time of writing this blog, the ArgoCD stable release was on version v2.8.0.
kubectl create namespace argocd
kubectl apply -n argocd -f https://raw.githubusercontent.com/argoproj/argo-cd/stable/manifests/install.yaml
Make sure all the argocd pods are running as below -
$ kubectl get po -n argocd
NAME                                                READY   STATUS    RESTARTS   AGE
argocd-application-controller-0                     1/1     Running   0          49s
argocd-applicationset-controller-74bd4b8497-5bfcd   1/1     Running   0          49s
argocd-dex-server-6c6dfb6597-twwnw                  1/1     Running   0          49s
argocd-notifications-controller-6786586cb-87nxc     1/1     Running   0          49s
argocd-redis-b5d6bf5f5-xbqc5                        1/1     Running   0          49s
argocd-repo-server-6658f8b96d-6jmwt                 1/1     Running   0          49s
argocd-server-5fff657769-nnqwm                      1/1     Running   0          49s
Install ArgoCD CLI as suggested in the link, in my case I was working on Mac and I installed CLI as below -
brew install argocd
Port forward argocd service so that you can access the argocd UI at http://localhost:8080 as below -
kubectl port-forward svc/argocd-server -n argocd 8080:443
Modify the initial secret for argocd UI by running following commands in another terminal -
# open another terminal

# make sure your kubecontext is pointing to the cluster you created above
kubectl config use-context kind-platformwale

# this will stdout the initial password, copy that, you will need it for the command below
argocd admin initial-password -n argocd

# login using the password from above command, the Username will be `admin` and Password will be the one you copied above
argocd login localhost:8080

# update password; it will ask for current password, which is the one from command above and provide a new password
argocd account update-password

# delete the secret holding initial argocd password
kubectl delete secret -n argocd argocd-initial-admin-secret
Make sure you are able to use the new password and login to argocd UI http://localhost:8080 using Username: admin. On successful login you will see something as below -

Configure ArgoCD to watch the private Github repository
Now we will configure ArgoCD to watch the Private Github Repository we created in the section above. Assuming you have copied the private access token, you will need to substitute below and apply the manifest -
GITHUB_PRIVATE_ACCESS_TOKEN=<your token>
YOUR_PRIVATE_GITHUB_REPO_URL=<e.g. https://github.com/piyushjajoo/xargocd-gitops>
YOUR_GITHUB_USERNAME=<e.g. piyushjajoo>

kubectl apply -f - <<EOF
---
# setup argocd secret for private gitops repository
apiVersion: v1
kind: Secret
metadata:
  name: xargocd-gitops-credentials
  namespace: argocd
  labels:
    argocd.argoproj.io/secret-type: repository
type: Opaque
stringData:
  name: xargocd-gitops
  url: ${YOUR_PRIVATE_GITHUB_REPO_URL}
  username: ${YOUR_GITHUB_USERNAME}
  password: ${GITHUB_PRIVATE_ACCESS_TOKEN}
EOF
Make sure the secret is created successfully -
$ kubectl get secrets -n argocd xargocd-gitops-credentials
NAME                         TYPE     DATA   AGE
xargocd-gitops-credentials   Opaque   4      4m1s
Configure ArgoCD AppProject CRs
The following AppProject CR allows to deploy ArgoCD Application CRs to only argocd namespace within the KIND cluster -
SOURCE_REPO=<e.g. https://github.com/piyushjajoo/xargocd-gitops>

kubectl apply -f - <<EOF
# The 'applications-project' AppProject allows a non-admin user to deploy
# only Application resources in the 'argocd' namespace.
---
apiVersion: argoproj.io/v1alpha1
kind: AppProject
metadata:
  name: applications-project
  namespace: argocd
  finalizers:
    - resources-finalizer.argocd.argoproj.io
spec:
  description: Project for argocd applicatons
  sourceRepos:
  - ${SOURCE_REPO}

  #
  # Allow this project to deploy only to 'argocd' namespace
  #
  destinations:
  - namespace: argocd
    server: https://kubernetes.default.svc
  #
  # Deny all namespace-scoped resources from being created, except for Application
  #
  namespaceResourceWhitelist:
  - group: 'argoproj.io'
    kind: Application
EOF
The following AppProject CR allows to deploy any SQS AWS resources from sqs.aws.upbound.io API to any namespace within the KIND cluster -
SOURCE_REPO=<e.g. https://github.com/piyushjajoo/xargocd-gitops>

kubectl apply -f - <<EOF
# 'sqs-project' is used for actual SQS crossplane resources
apiVersion: argoproj.io/v1alpha1
kind: AppProject
metadata:
  name: sqs-project
  namespace: argocd
  finalizers:
    - resources-finalizer.argocd.argoproj.io
spec:
  description: Project for deploying crossplane resources to the cluster
  sourceRepos:
  - ${SOURCE_REPO}

  # can deploy to any namespace but within the kind cluster only
  destinations:
  - namespace: '*'
    server: https://kubernetes.default.svc

  # can deploy any SQS resources
  clusterResourceWhitelist:
  - group: 'sqs.aws.upbound.io'
    kind: '*'
EOF
Make sure the AppProject CRs are installed successfully as below -
$ kubectl get appprojects.argoproj.io -A
NAMESPACE   NAME                   AGE
argocd      applications-project   24s
argocd      default                60m
argocd      sqs-project            12s
Setup ArgoCD Application
Let's configure an argocd Application CR to install any SQS resources under sqs-queues directory under xargocd-gitops private repository, we will create the directory after the Crossplane is installed.
REPO_URL=<e.g. https://github.com/piyushjajoo/xargocd-gitops>

kubectl apply -f - <<EOF
---
apiVersion: argoproj.io/v1alpha1
kind: Application
metadata:
  name: sqs-queues
  namespace: argocd
  finalizers:
    - resources-finalizer.argocd.argoproj.io
spec:
  project: sqs-project
  source:
    repoURL: ${REPO_URL}
    targetRevision: HEAD
    path: ./sqs-queues
  destination:
    server: https://kubernetes.default.svc
    namespace: crossplane-system
  syncPolicy:
    automated:
      prune: true
      selfHeal: true
    syncOptions:
    - SyncWaveOrder=true
    retry:
      limit: 1
      backoff:
        duration: 5s
        factor: 2
        maxDuration: 1m
EOF
Make sure the argocd application is created successfully as below -
$ kubectl get applications -A
NAMESPACE   NAME         SYNC STATUS   HEALTH STATUS
argocd      sqs-queues   Unknown       Healthy

$ argocd app list
NAME               CLUSTER                         NAMESPACE          PROJECT      STATUS   HEALTH   SYNCPOLICY  CONDITIONS       REPO                                           PATH          TARGET
argocd/sqs-queues  https://kubernetes.default.svc  crossplane-system  sqs-project  Unknown  Healthy  Auto-Prune  ComparisonError  https://github.com/piyushjajoo/xargocd-gitops  ./sqs-queues  HEAD
Let's fix the ComparisonError for now, this is because sqs-queues directory is not present in the repository just yet, the error will disappear once we setup the directory in next section.
Create a directory named sqs-queues and add any dummy text file for e.g. dummy to the directory and commit to git repo. This will fix the argocd app.
$ argocd app list
NAME               CLUSTER                         NAMESPACE          PROJECT      STATUS  HEALTH   SYNCPOLICY  CONDITIONS  REPO                                           PATH          TARGET
argocd/sqs-queues  https://kubernetes.default.svc  crossplane-system  sqs-project  Synced  Healthy  Auto-Prune  <none>      https://github.com/piyushjajoo/xargocd-gitops  ./sqs-queues  HEAD
Install Crossplane and Configure Provider AWS
In this section, we will install the Crossplane core and Crossplane AWS Provider controller for SQS resources.
Install Crossplane Core, at the time of writing this blog, we Crossplane version v1.13.2 -
# add crossplane helm repo
helm repo add \
crossplane-stable https://charts.crossplane.io/stable

# update the added helm repo
helm repo update

# to check the current version of the crossplane core
helm search repo crossplane-stable

# install crossplane core helm chart
helm install crossplane \
crossplane-stable/crossplane \
--namespace crossplane-system \
--create-namespace
Make sure all the crossplane pods are installed successfully -
$ kubectl get po -n crossplane-system
NAME                                       READY   STATUS    RESTARTS   AGE
crossplane-8697f8cff4-mw5j6                1/1     Running   0          35s
crossplane-rbac-manager-6f8dbd9ffd-tkcb9   1/1     Running   0          35s
Install Crossplane AWS Provider as below, at time of writing this blog, provider-aws-sqs was at version v0.38.0 -
cat <<EOF | kubectl apply -f -
apiVersion: pkg.crossplane.io/v1
kind: Provider
metadata:
  name: provider-aws-sqs
spec:
  package: xpkg.upbound.io/upbound/provider-aws-sqs:v0.38.0
EOF
Make sure the AWS Provider is installed successfully as below -
$ kubectl get providers
NAME                          INSTALLED   HEALTHY   PACKAGE                                               AGE
provider-aws-sqs              True        True      xpkg.upbound.io/upbound/provider-aws-sqs:v0.38.0      29s
upbound-provider-family-aws   True        True      xpkg.upbound.io/upbound/provider-family-aws:v0.38.0   25s
Also make sure the api-resources for SQS are available -
$ kubectl api-resources | grep sqs.aws.upbound.io
queuepolicies                                        sqs.aws.upbound.io/v1beta1             false        QueuePolicy
queueredriveallowpolicies                            sqs.aws.upbound.io/v1beta1             false        QueueRedriveAllowPolicy
queueredrivepolicies                                 sqs.aws.upbound.io/v1beta1             false        QueueRedrivePolicy
queues                                               sqs.aws.upbound.io/v1beta1             false        Queue
Create IAM User with SQS permissions
Crossplane will need AWS IAM Permissions to be able to create SQS queues, in our use case we will simply create an IAM Role with SQSFullAccess permissions as below from AWS Console.
- Go to IAM > Users console in AWS UI
- Create an IAM User, you can choose any name you want, on next screen select
Attach policies directlyand search forAmazonSQSFullAccessand create the IAM User. - Once the user is created, click on
View Userand go toSecurity Credentialstab and scroll down to sectionAccess Keys. - Click on
Create access keyand make sure to copy the values before you hitDoneor at least download the.csvfile, as we will need these credentials to setup theProviderConfigfor Provider AWS as shown below.
NOTE: there are different ways you can configure credentials for AWS Provider, but for this blog we will use IAM User credentials, in upcoming blogs we will go over other ways, for e.g. InjectedIdentity. The various ways of authentication for Provider AWS are mentioned in this document.
Setup ProviderConfig
In this section we will setup a ProviderConfig for Provider AWS, this is a way to make provider AWS controller create resources in your desired AWS Account.
Create the aws-credentials.txt file with the IAM User credentials you copied in the section above, make sure to substitute the values -
[default]
aws_access_key_id = REPLACE_ME_AWS_ACCESS_KEY_ID
aws_secret_access_key = REPLACE_ME_AWS_SECRET_ACCESS_KEY
Create the kubernetes secret as below -
kubectl create secret \
generic aws-secret \
-n crossplane-system \
--from-file=creds=./aws-credentials.txt
Create ProviderConfig as below -
cat <<EOF | kubectl apply -f -
apiVersion: aws.upbound.io/v1beta1
kind: ProviderConfig
metadata:
  name: default
spec:
  credentials:
    source: Secret
    secretRef:
      namespace: crossplane-system
      name: aws-secret
      key: creds
EOF
This is a way to configure default ProviderConfig for provider-aws, i.e. if providerConfigRef is not mentioned in the crossplane resource being created, it will by default pick the default ProviderConfig.
Validate the crossplane and provider aws setup
That's it, we are now ready to make a commit to git and see the resource getting created. Or maybe one last validation before we deliver infrastructure through GitOps.
Submit the following Queue resource using kubectl and validate if the queue is created in your desired AWS Account in the desired region, notice in the example below we are explicitly specifying providerConfigRef -> default, but this will work even if we don't mention the default ProviderConfig -
kubectl apply -f - <<EOF
apiVersion: sqs.aws.upbound.io/v1beta1
kind: Queue
metadata:
  name: demo-queue
spec:
  forProvider:
    name: demo-queue
    region: us-west-2
  providerConfigRef:
    name: default
EOF
Give it a few seconds the sqs-queue resource will be created, you can also validate in the AWS Console -
$ kubectl get queues.sqs.aws.upbound.io
NAME         READY   SYNCED   EXTERNAL-NAME                                                 AGE
demo-queue   True    True     https://sqs.us-west-2.amazonaws.com/xxxxxxxxx/demo-queue   37s
Delete the queue as follows and make sure that the queue is deleted -
$ kubectl delete queues.sqs.aws.upbound.io demo-queue
queue.sqs.aws.upbound.io "demo-queue" deleted

$ kubectl get queues.sqs.aws.upbound.io
No resources found
See the GitOps + Crossplane + ArgoCD magic
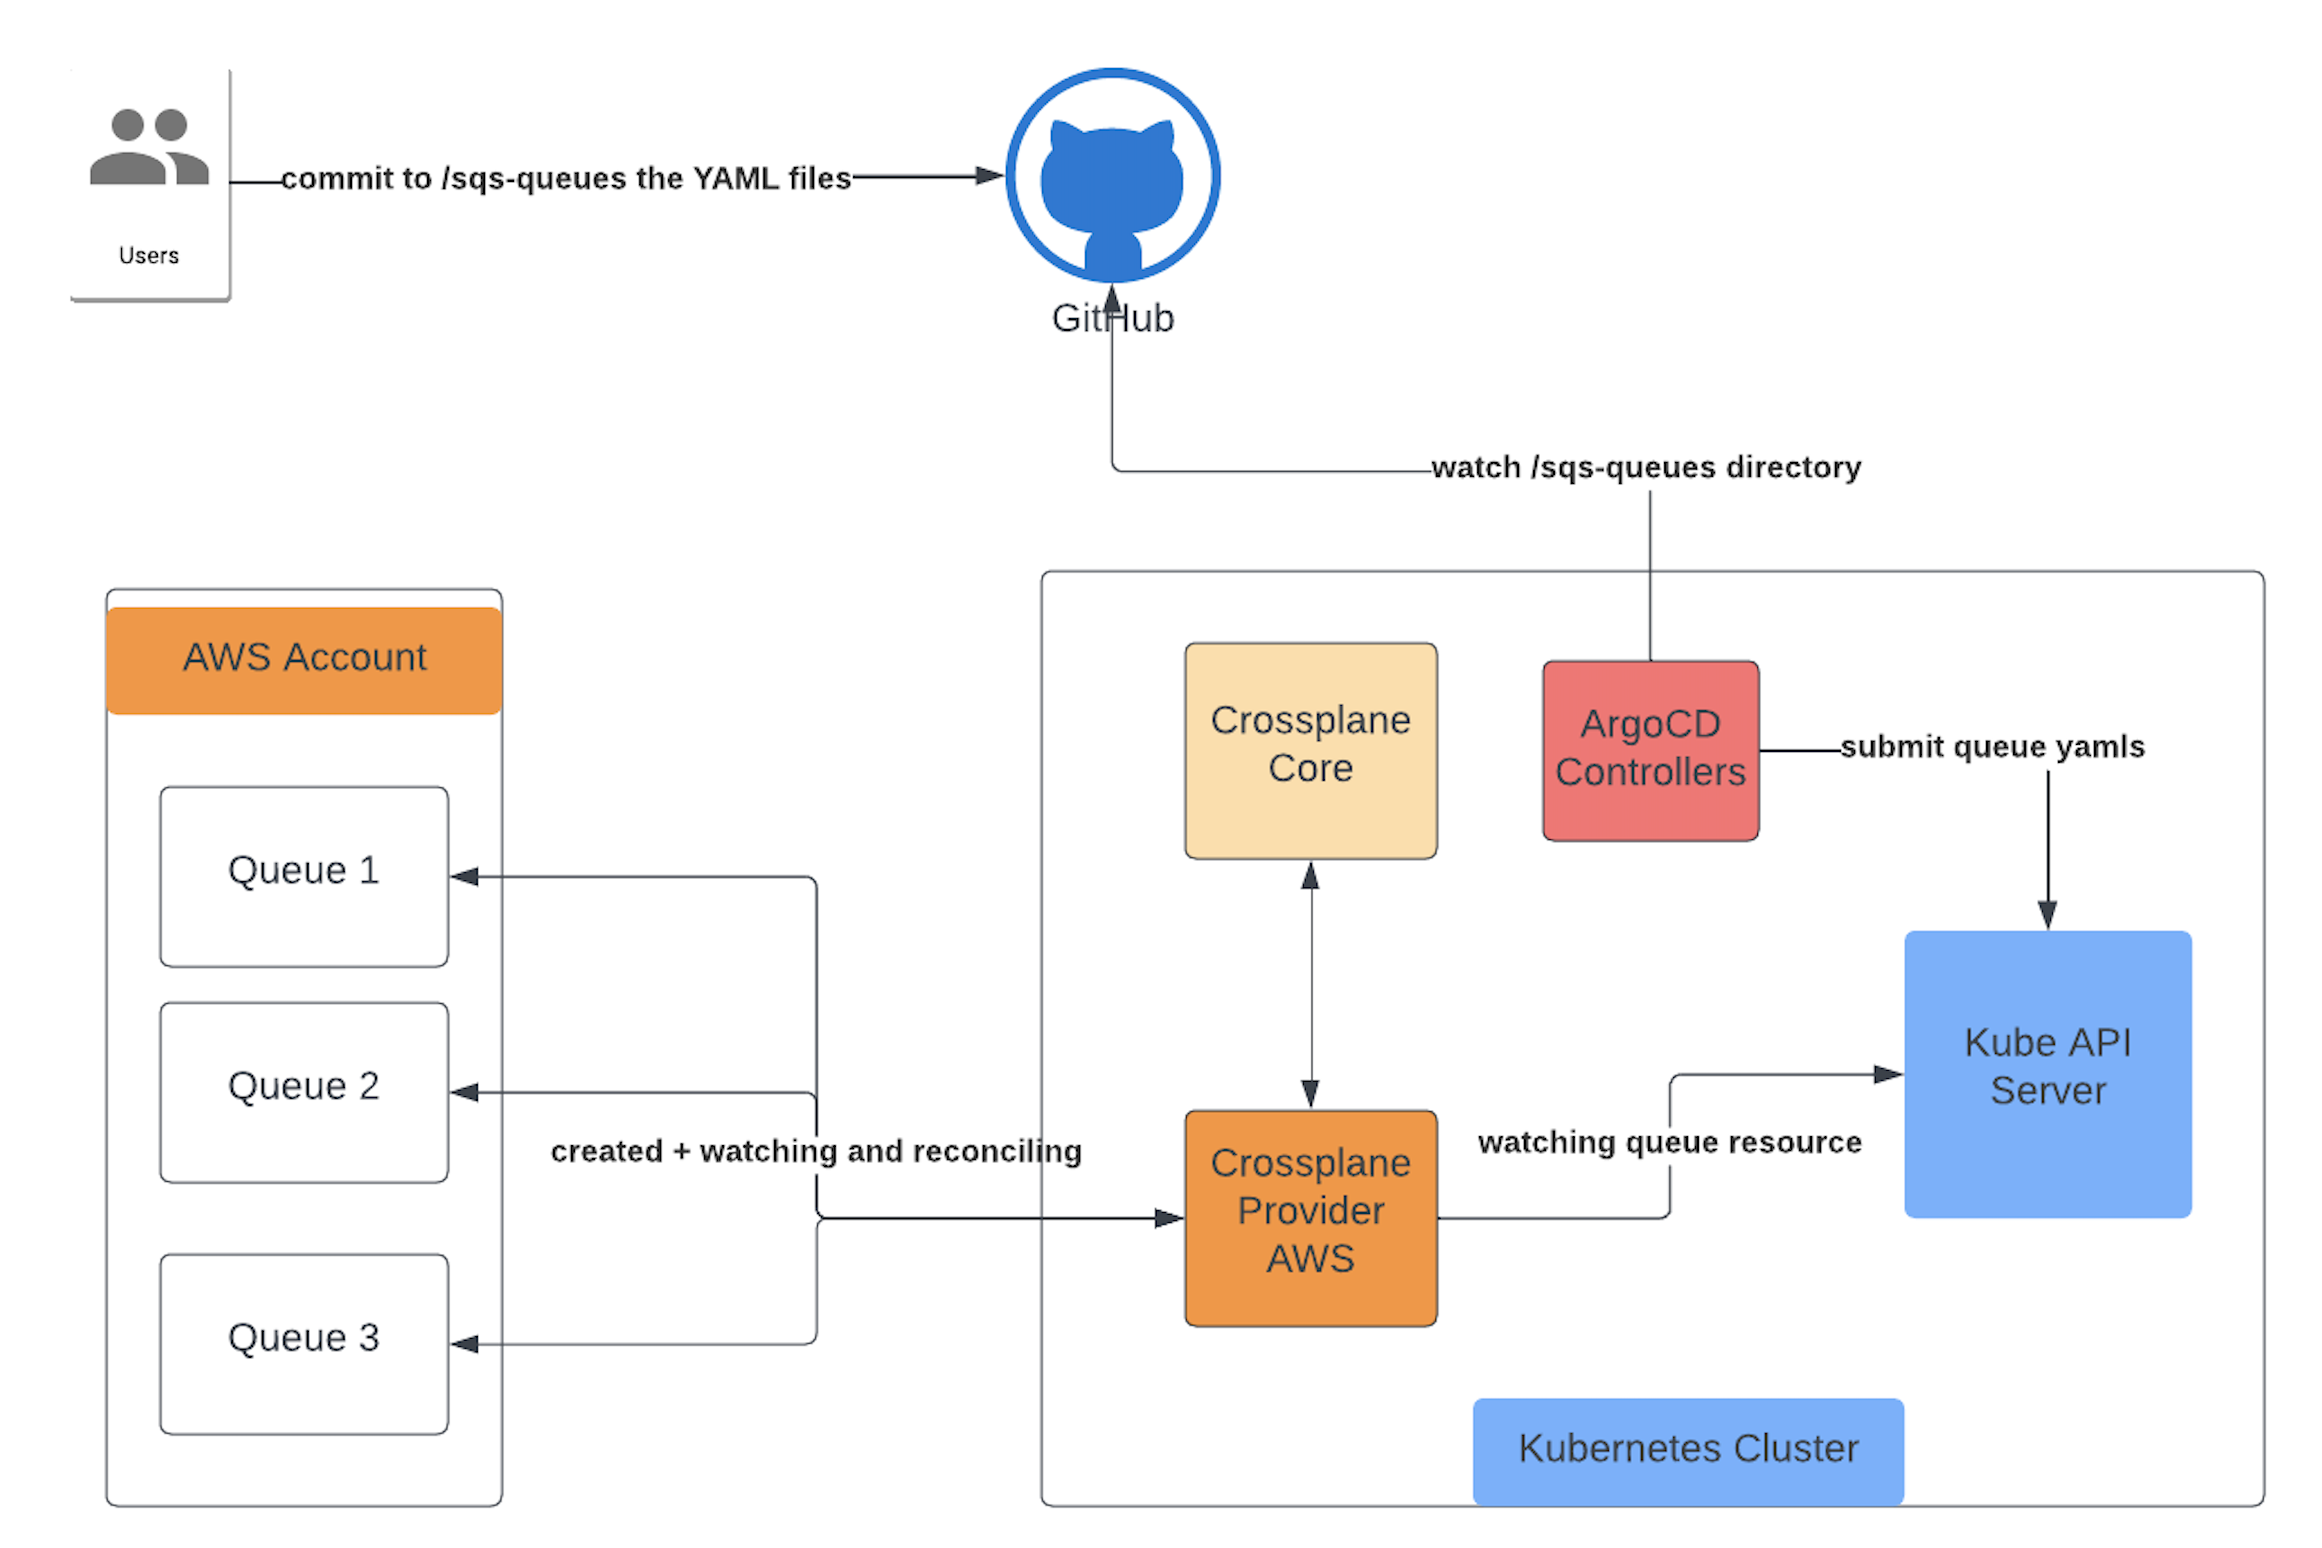
We are ready to see Crossplane and ArgoCD in action. Here is the architecture -
Create a new SQS Queue
Create a commit with following YAML manifest in sqs-queues directory in the github repository you created earlier, this is the directory you had configured earlier with ArgoCD. In this scenario we are creating a new resource via GitOps.
apiVersion: sqs.aws.upbound.io/v1beta1
kind: Queue
metadata:
  name: platformwale-queue
spec:
  forProvider:
    name: platformwale-queue
    region: us-west-2
Your github repo will look as below -

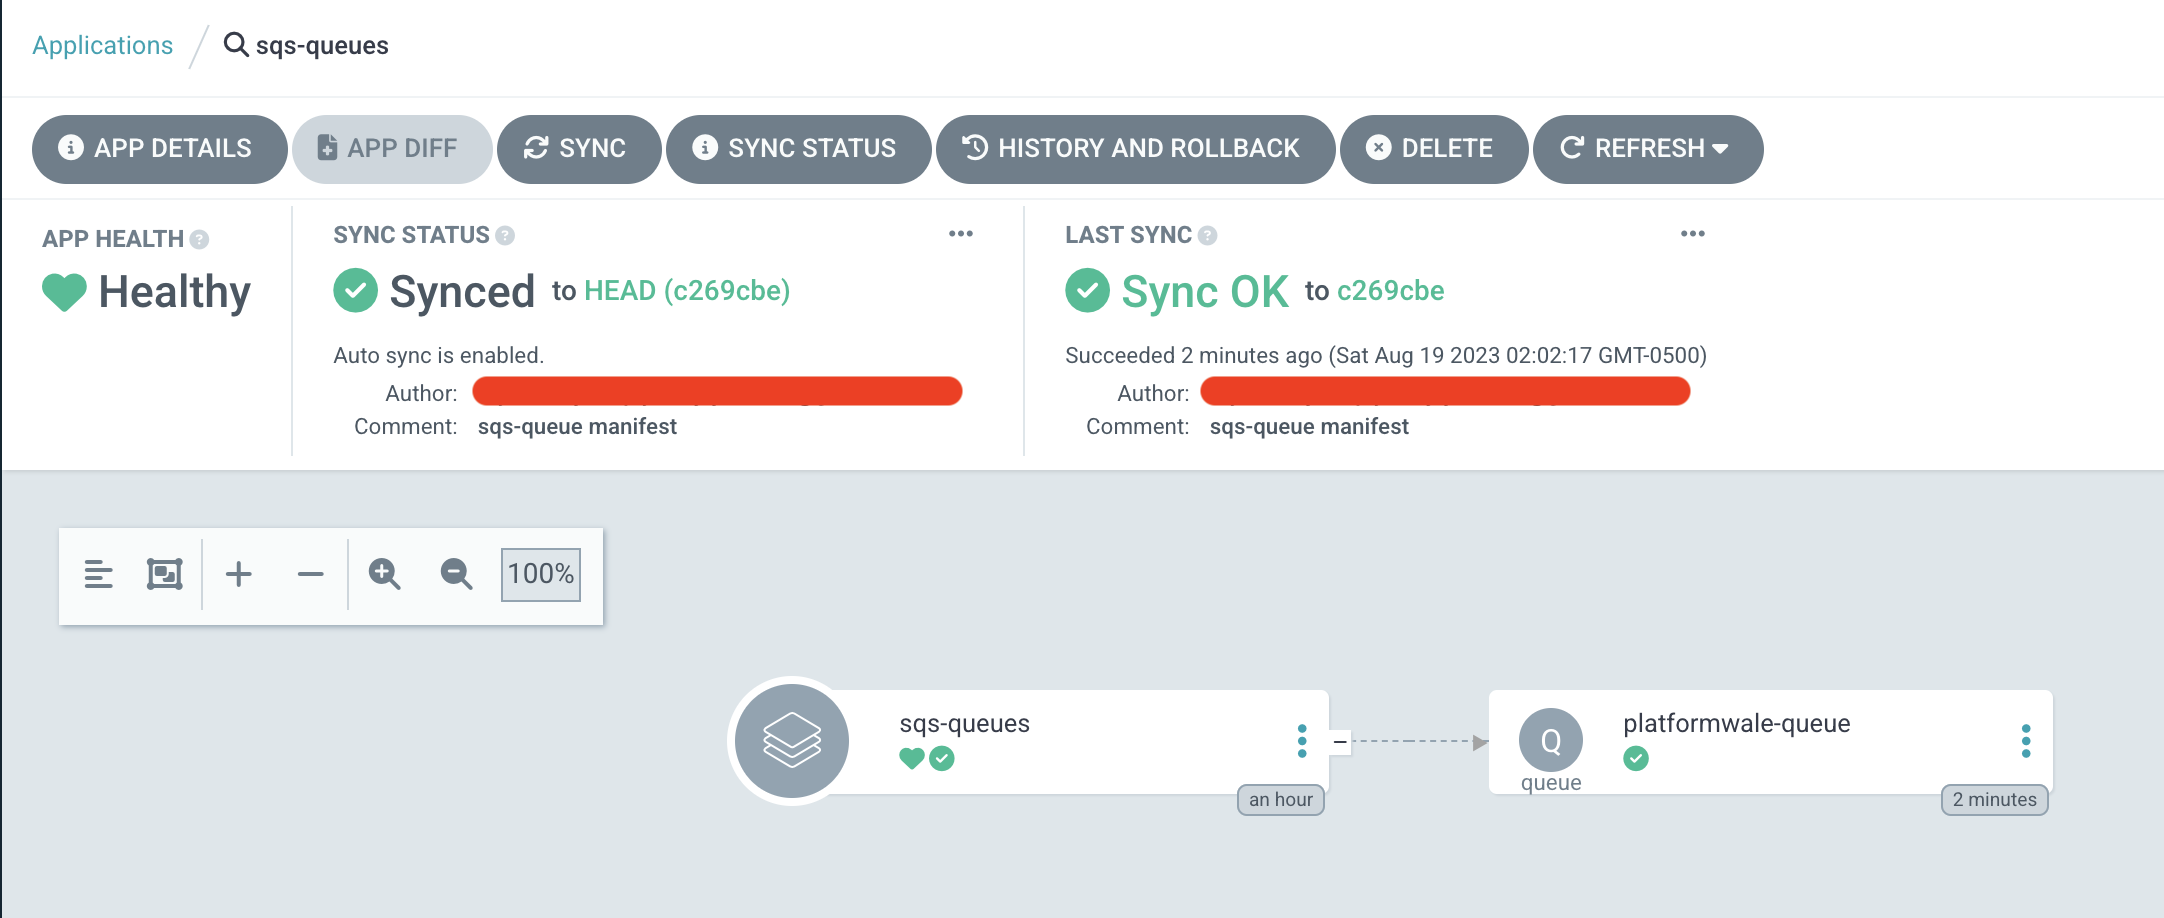
Go to argocd UI to your sqs-queues application and hit Refresh button if argocd has not yet auto synced the repo, wait for a few seconds and you will see that repo is synced as below, also validate that the platformwale-queue is created in the specified AWS Region in configured AWS Account.
$ kubectl get queues.sqs.aws.upbound.io
NAME                 READY   SYNCED   EXTERNAL-NAME                                                         AGE
platformwale-queue   True    True     https://sqs.us-west-2.amazonaws.com/xxxxxxx/platformwale-queue   6m48s
Import an existing SQS Queue
Let's do the other way around, let's create a Queue from AWS Console, let's call it platformwale-queue2 in us-west-2 region and let's try to import it.
Create the queue platformwale-queue2 in us-west-2 with all the default values and copy the value of field URL. For example - https://sqs.us-west-2.amazonaws.com/xxxxx/platformwale-queue2
Submit the manifest below to git repo under sqs-queues directory as earlier, this time you will notice that, it will successfully import the existing resource and will not try to recreate the resource.
apiVersion: sqs.aws.upbound.io/v1beta1
kind: Queue
metadata:
  name: platformwale-queue2
  annotations:
    crossplane.io/external-name: https://sqs.us-west-2.amazonaws.com/xxxxx/platformwale-queue2
spec:
  forProvider:
    name: platformwale-queue2
    region: us-west-2
The magic happens through crossplane.io/external-name annotation we specified in our manifest. This is the annotation modified by crossplane after the resource is created and crossplane validates if the resource exists with the value specified in the annotation, if yes, it simply tries to import the resource.
$ kubectl get queues.sqs.aws.upbound.io
NAME                  READY   SYNCED   EXTERNAL-NAME                                                          AGE
platformwale-queue    True    True     https://sqs.us-west-2.amazonaws.com/xxxxx/platformwale-queue    16m
platformwale-queue2   True    True     https://sqs.us-west-2.amazonaws.com/xxxxx/platformwale-queue2   15s
We will cover importing resource in detail in our upcoming blogs. That's it!! There you have a functional GitOps way of delivering infrastructure using Crossplane + ArgoCD.
Automatic Drift Detection
Let's be ambitious and delete the resource from the cluster, you will see that in sometime argocd will resync and the resource will be back -
# delete the queue
$ kubectl delete queues platformwale-queue
queue.sqs.aws.upbound.io "platformwale-queue" deleted

# queue is gone and you see it being recreated, you can also valdiate in AWS Console
$ kubectl get queues
NAME                 READY   SYNCED   EXTERNAL-NAME   AGE
platformwale-queue   False   True                     2s
Let's be super ambitious and delete the resource from AWS UI Console, you will see that in sometime (for me it was ~10 mins, I am sure this is configurable) the resource will be back -
$ kubectl describe queues platformwale-queue
....
....
....
    Normal   CreatedExternalResource          16s (x3 over 22m)  managed/sqs.aws.upbound.io/v1beta1, kind=queue  Successfully requested creation of external resource
Cleanup
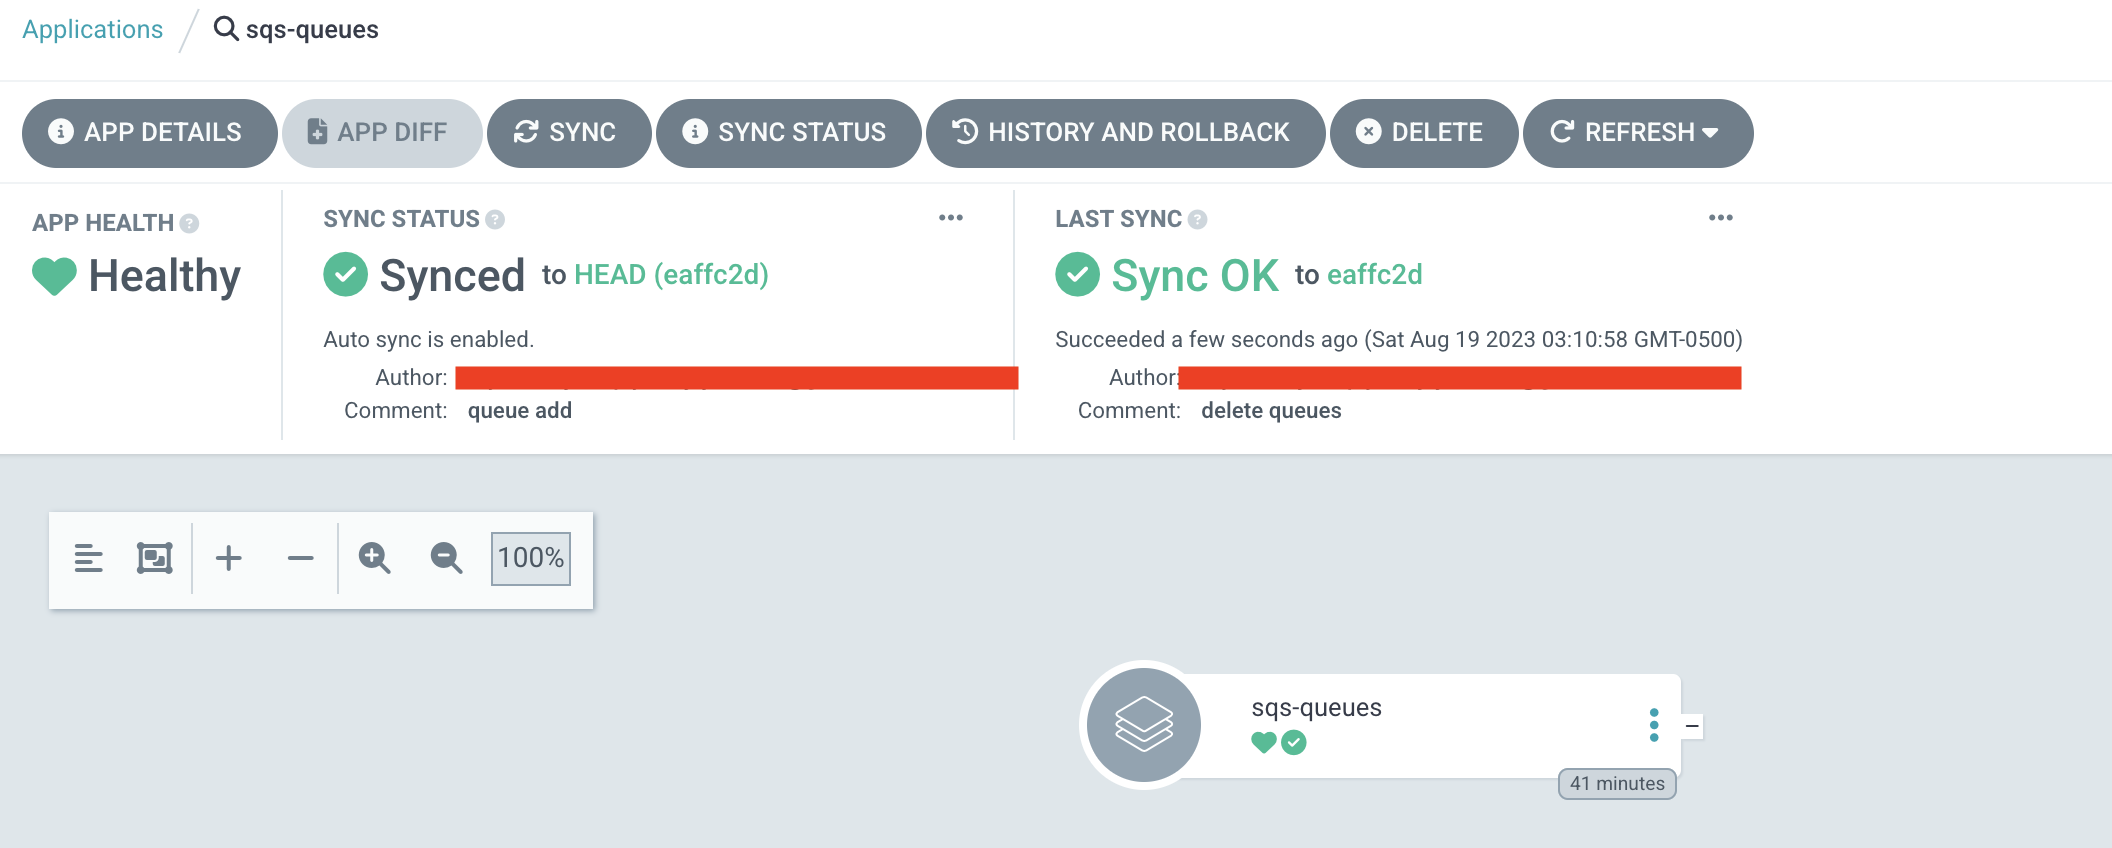
This is extremely important, you don't want to see unexpected costs in your AWS bill. GitOps makes it even smooth to cleanup. Simply delete the YAML files created under sqs-queues directory and then run argocd app sync sqs-qeueues --prune, this will delete the resources whose manifests you just deleted.
$ kubectl get queues
No resources found
Make sure to delete the IAM User you created earlier from AWS Console.
Also if you no longer need private github repository, you can delete the repository. Also make sure to delete the personal access token you generated if you don't want to continue using it. Please leverage GitHub UI to clean them up.
Finally, if you are done using kind cluster, delete it as below, please don't delete the cluster before deleting the cloud resources, otherwise you will need to clean the cloud resources manually -
kind delete cluster --name platformwale

## validation
$ kind delete cluster --name platformwale
Deleting cluster "platformwale" ...
Deleted nodes: ["platformwale-control-plane"]
Conclusion
Therefore, we've observed how Crossplane and ArgoCD can be harnessed to implement the GitOps methodology for delivering infrastructure. This capability holds immense potential for both internal developer teams and platform teams. The built-in abilities for detecting drift and conducting reconciliations offer remarkable advantages that any platform engineer would be enthusiastic about offering to their internal developer groups.
Resources
- Crossplane documentation
- ArgoCD Documentation
- Setting Up a Kubernetes Cluster with a Local Registry and Ingress in Docker using KIND
- Crossplane Providers
Author Notes
Feel free to reach out with any concerns or questions you have. I will make every effort to address your inquiries and provide resolutions. Stay tuned for the upcoming blog in this series dedicated to Platformwale (Engineers who work on Infrastructure Platform teams).
Originally published at https://platformwale.blog on Aug 19, 2023.
Subscribe to my newsletter
Read articles from Platformwale directly inside your inbox. Subscribe to the newsletter, and don't miss out.
Written by

Platformwale
Platformwale
Cloud Platform Tech Lead at DataStax. Experienced in building Internal Developer Platforms for K8S in multi-cloud.