Linux Vitual Machine Set Up On Azure.
 Ezekiel Adesanya
You are welcome to today's edition of the Tech Merchant blog. In one of our previous learning, we looked at the step-by-step guide on the deployment of a window operating system Virtual Machine (VM) in an Azure environment.
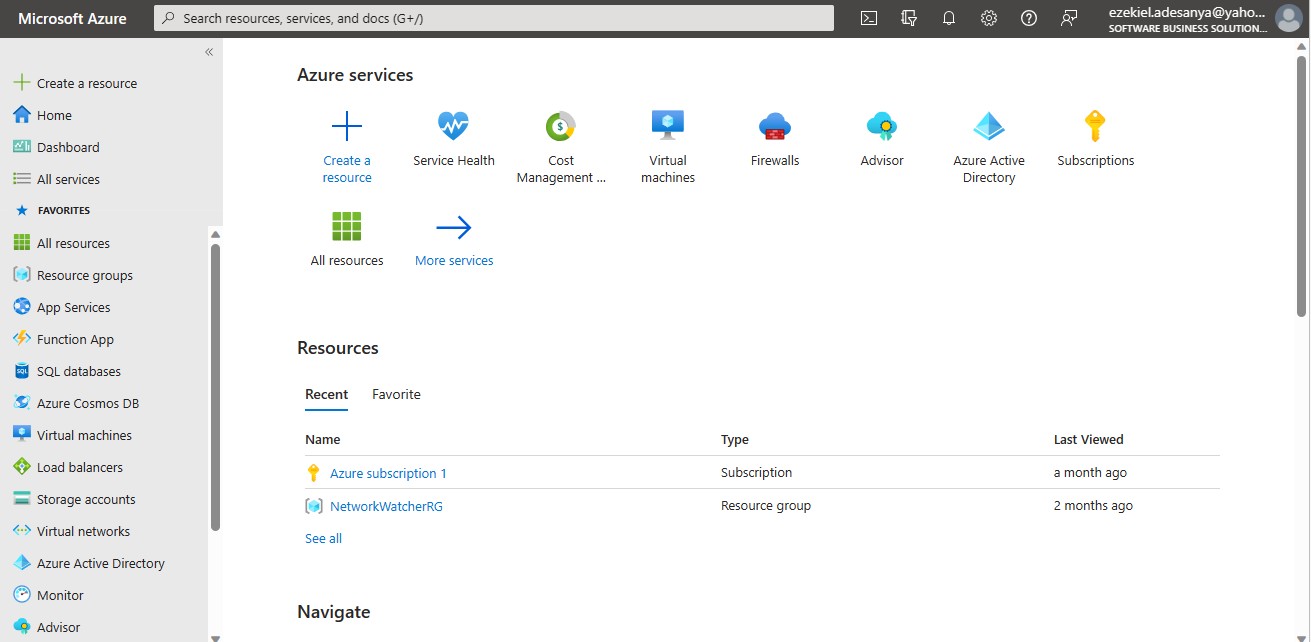
Today, we will be looking at the deployment of a Linux operating system VM in the Azure environment. This will necessitate a login into the Azure portal.
Step 1
Step 2:
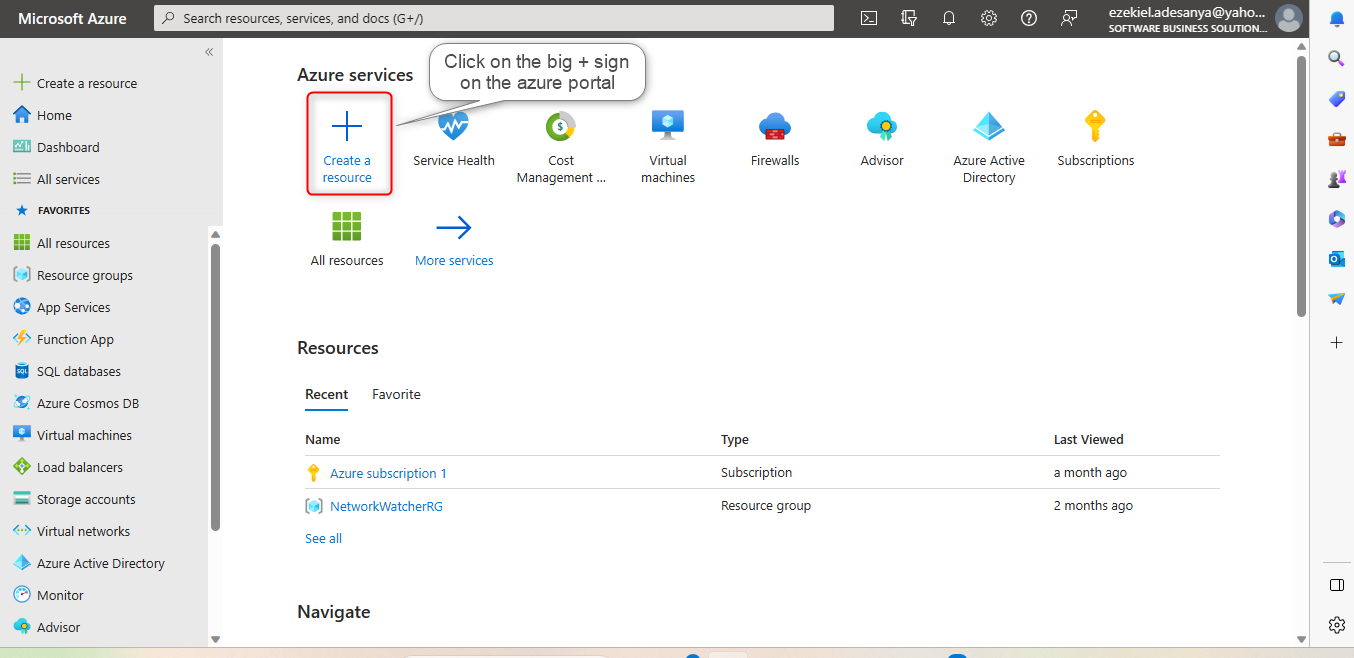
Upon login, look out for the Big + Sign and click.
Step 3:
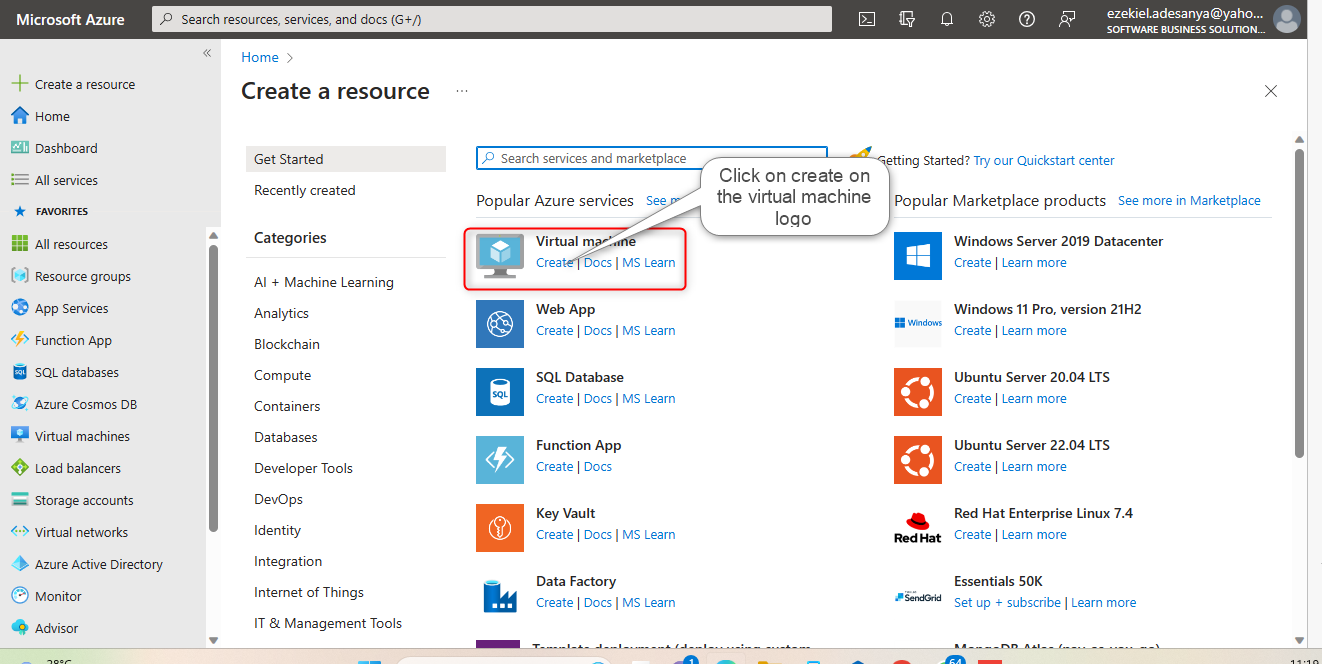
On the next interface, look out for the virtual machine logo and click on Create.
Step 4:
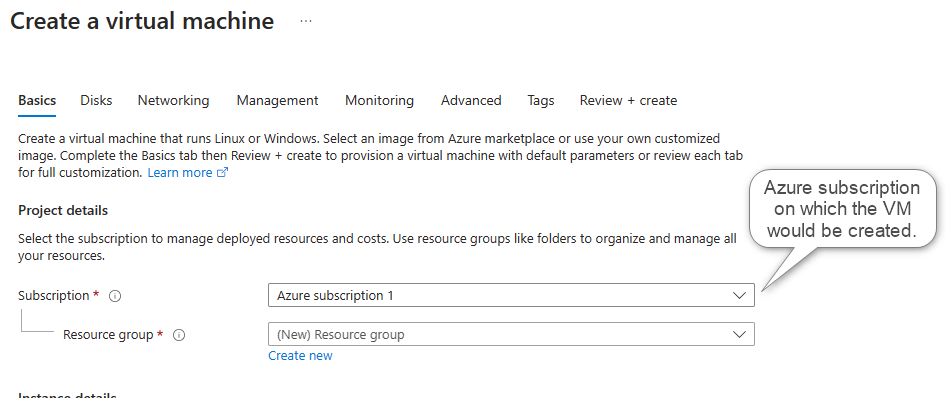
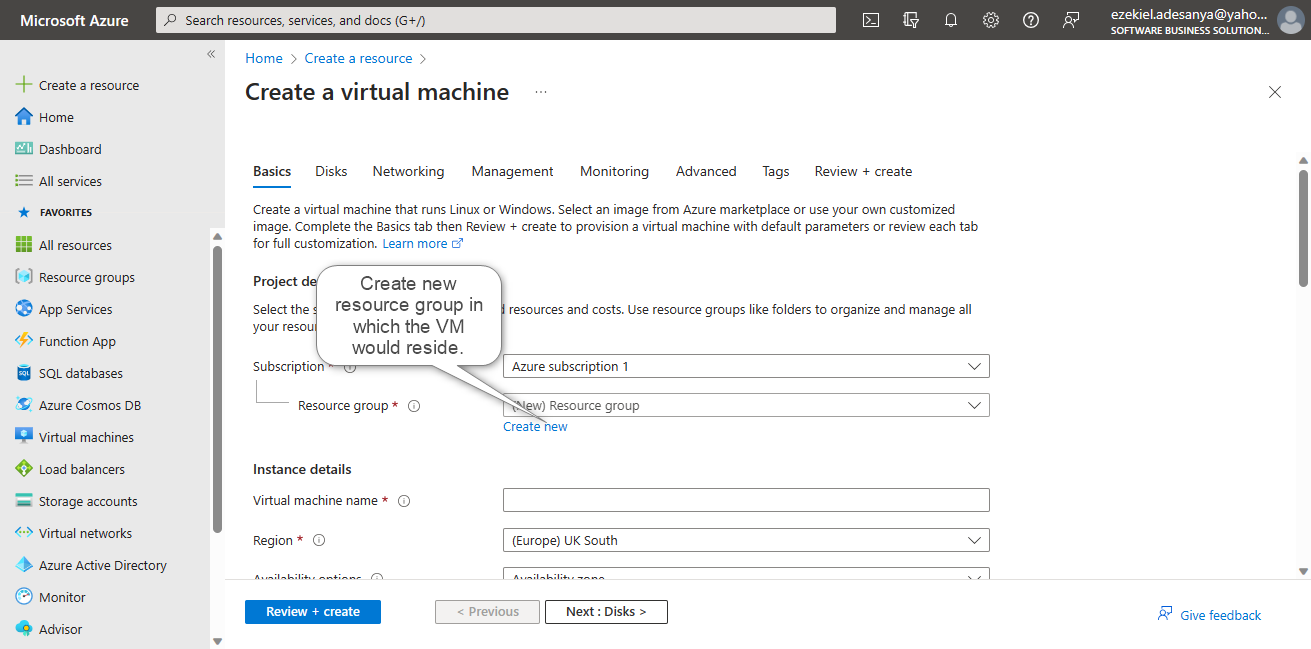
You will land on the "Create a virtual Machine page" where you have "Project detail" under which you would choose the Azure subscription you are creating the VM on and also create a new resource group where the VM would reside.
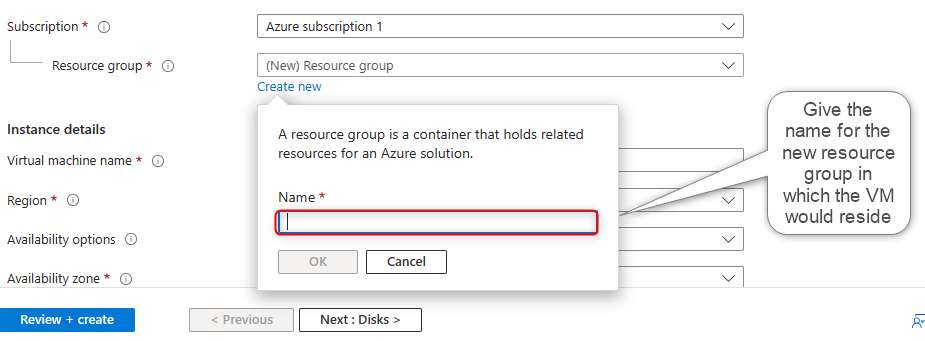
Check out for a name box that would pop out and give a name to the new resource group. For this learning, the name of the new resource group created is "ManifoldGRP".
Step 5:
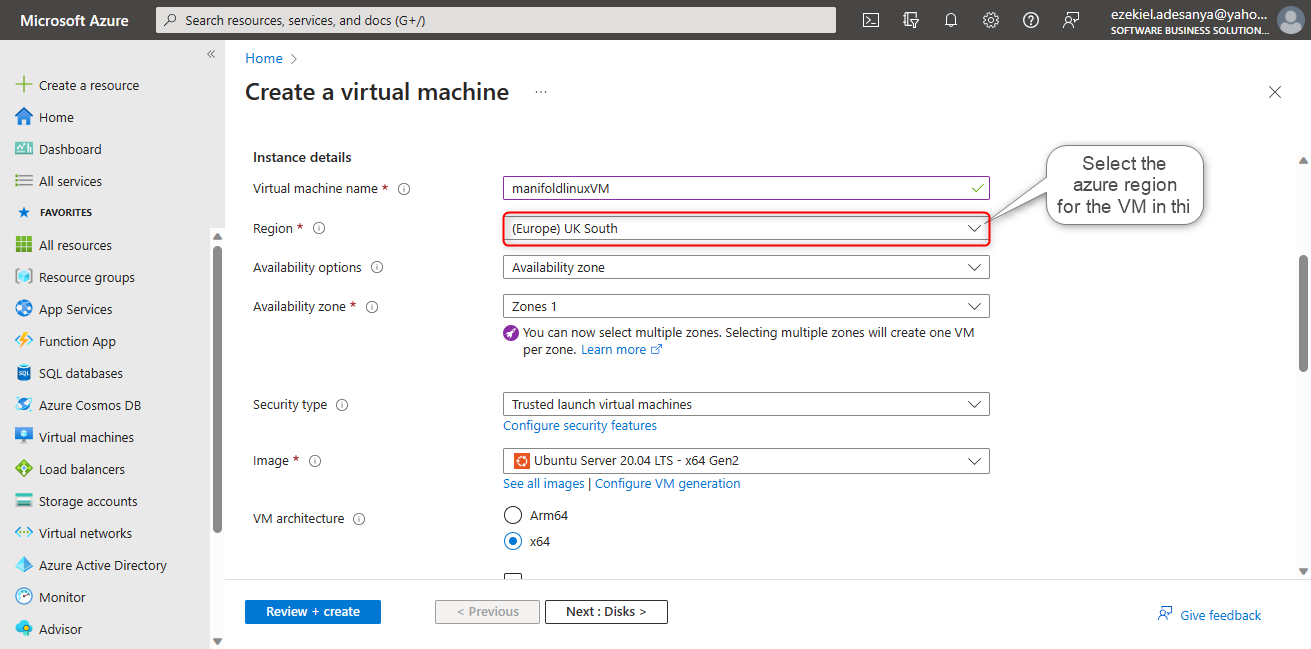
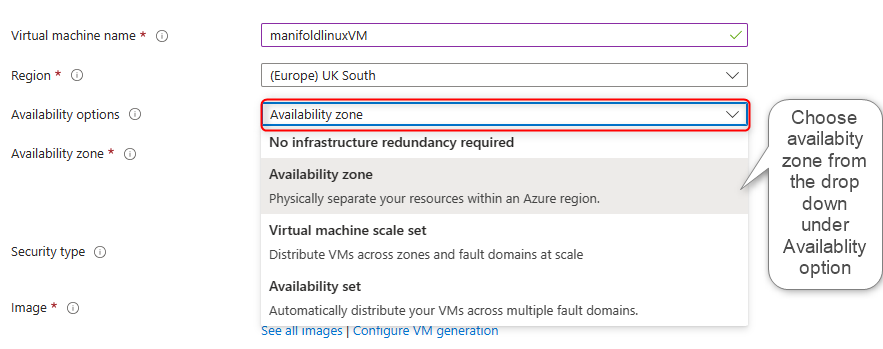
Scroll down and check out the "Instance detail" section on the page where you can give a name to the VM, Select a region where the VM would reside; select the availability option depending on the level of service availability and resilience desired for the VM and choose the number of zones (s) to determine how you want the VM to be replicated based on the level of desired application redundancy on business need. For the sake of this learning, we would be adopting "ManifoldlinuxVM" as our VM name, "(Europe) UK South" as the region for the VM, the Availabilty option will be "Availabilty Zone" and the VM will be in Zone 1.


Step 6:
Scroll down to the next section to select the type of security you desired for the VM. For the sake of this learning, we will choose the lowest level of security which is "Standard".

Step 7:
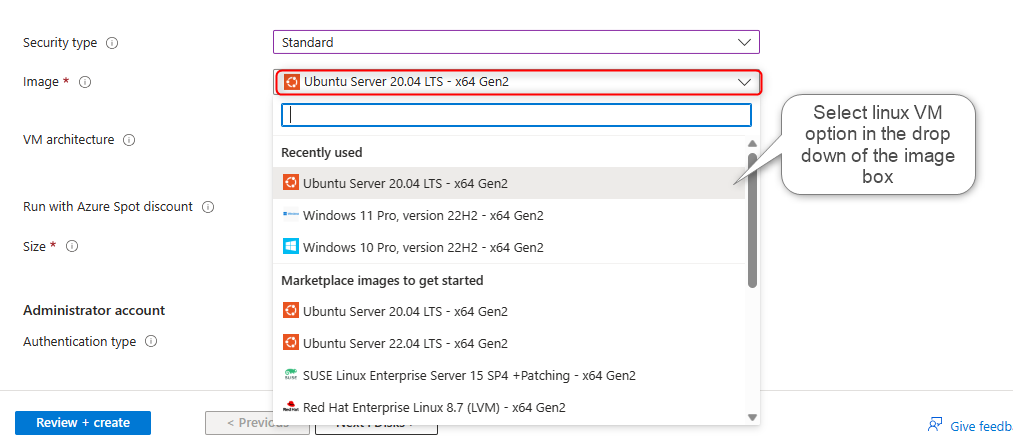
Click on the image box to select the type of operating system you desired to work in the VM. In this case, we are deploying Linux VM. The reason why Ubuntu server 20.04 LTS-x64 Gen2 is selected. Leave the VM architecture and the size to default and scroll down to "Administrative Account".
Step 8:
Under the "Administrative account" part, there are two types of Authentication type or methods to access the VM which are SSH public key and Password. This learning part will focus on how to access a VM with SSH public key. The second part will focus on using "a password as a means of access into the VM.

Step 9:
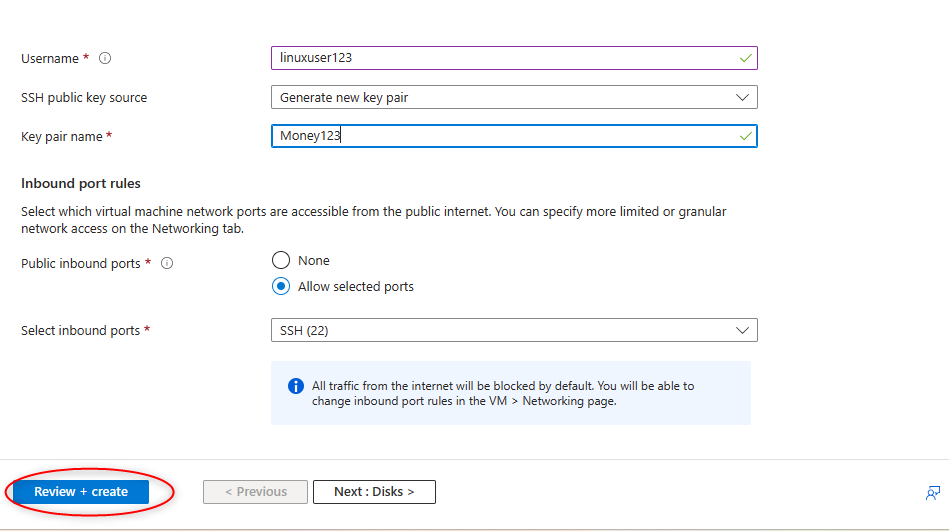
Scroll down to Username and create a unique username for the VM that you could always remember. Ensure that the SSH Public key source is "Generate new key". Give a unique key pair name you could always remember. For this learning, the VM username is "Linuxuser123" and the key pair name is "money123"


Step 10:
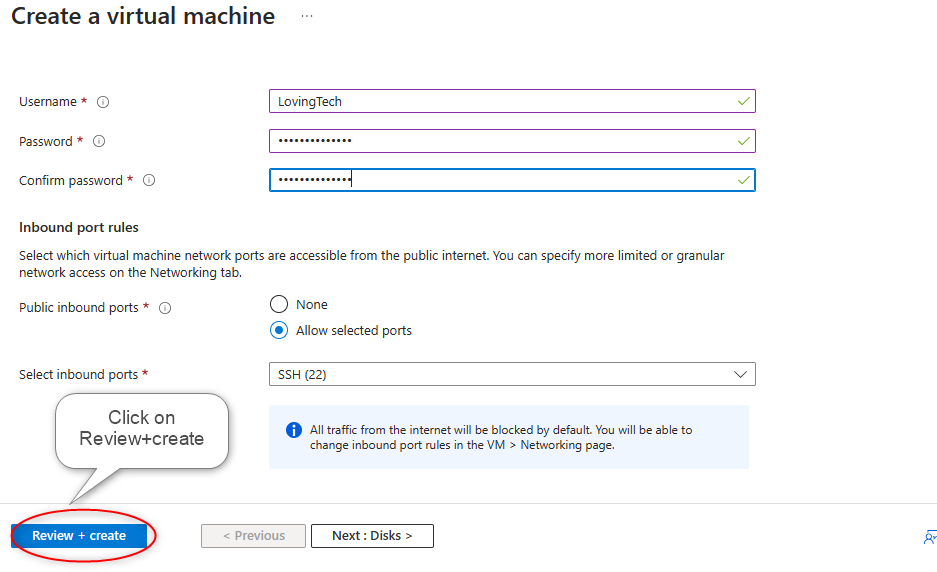
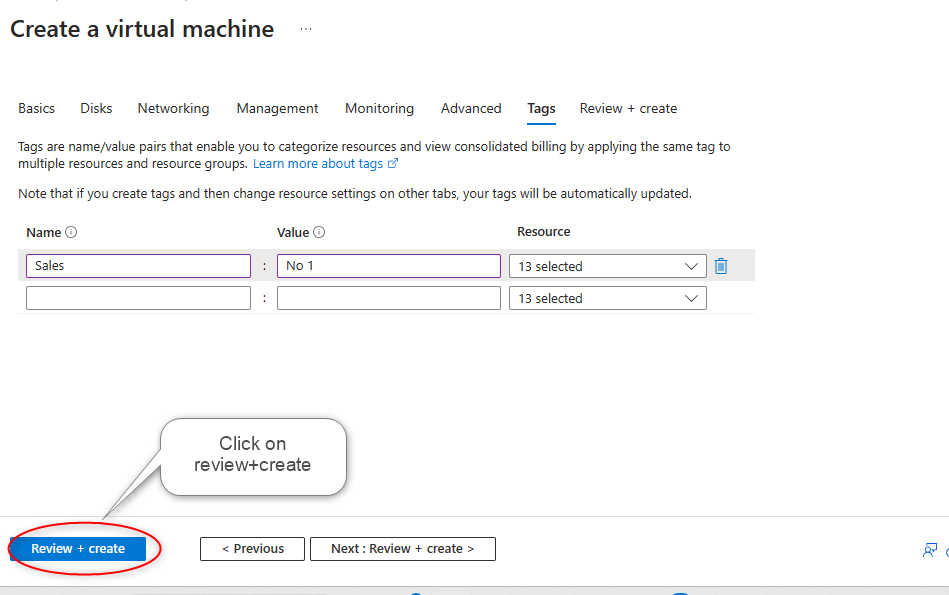
At this stage of learning, we should have every other thing to default. Click on "Review and Create"
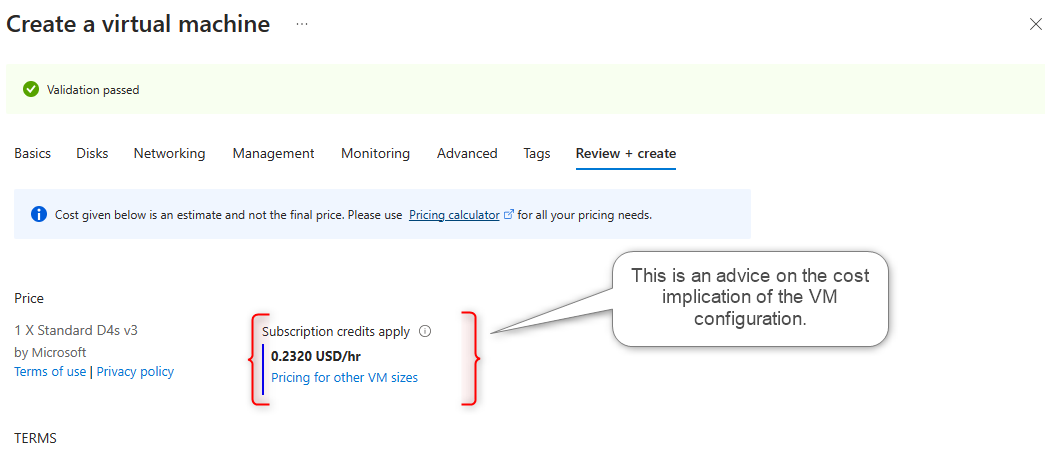
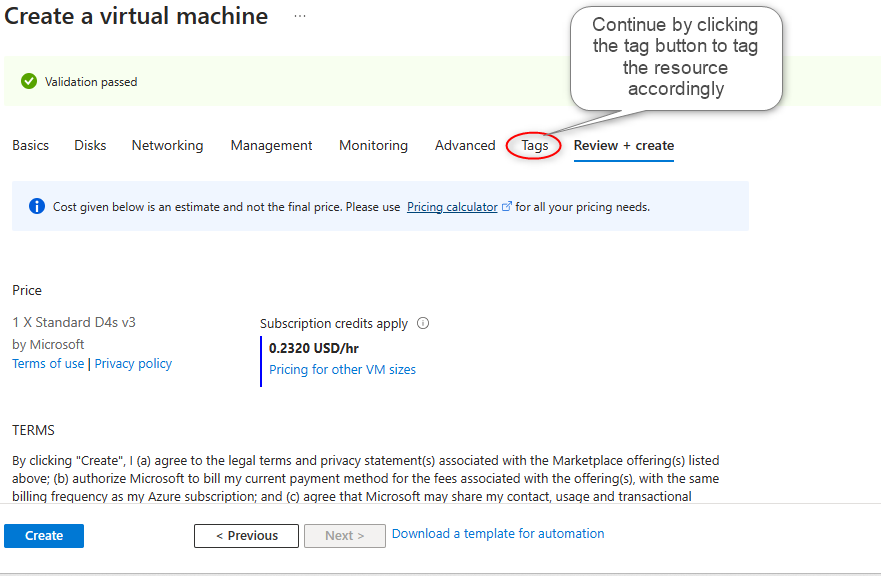
After clicking on "Review + Create", you will wait for a few seconds till you see the caption "Validation passed" on the page. this shows that the configuration all along is valid and you can go ahead and create.
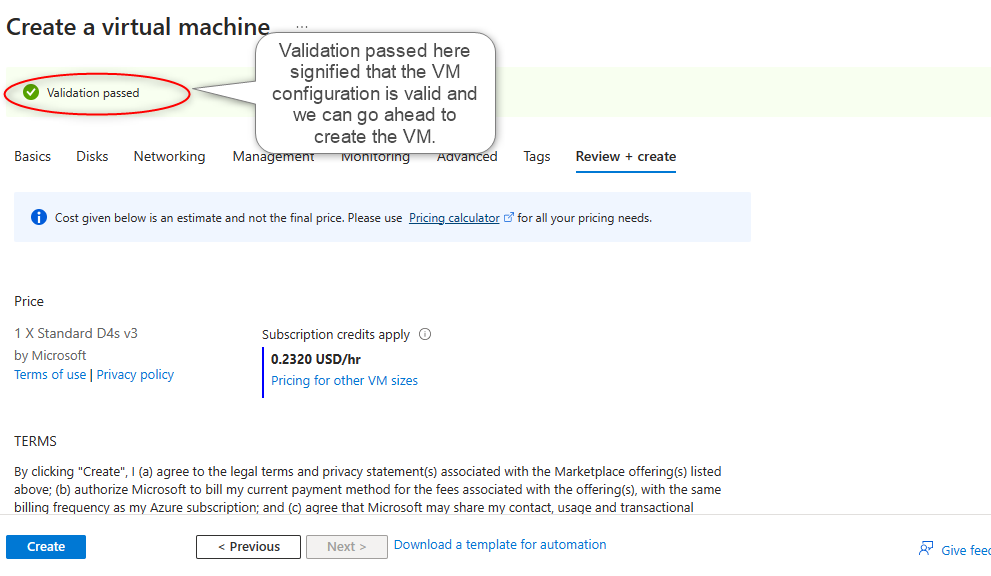
Also, take note of the configuration cost advice on this page to know how much you are being charged for the VM resource on Azure.
Step 11:
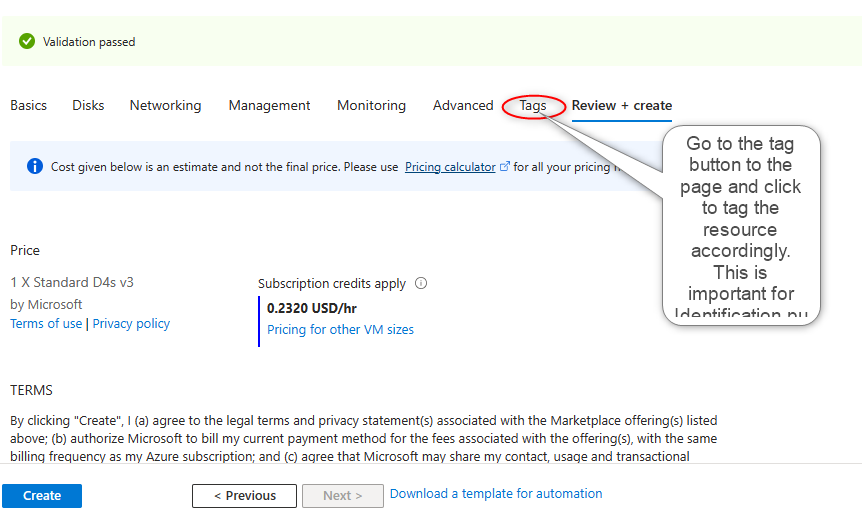
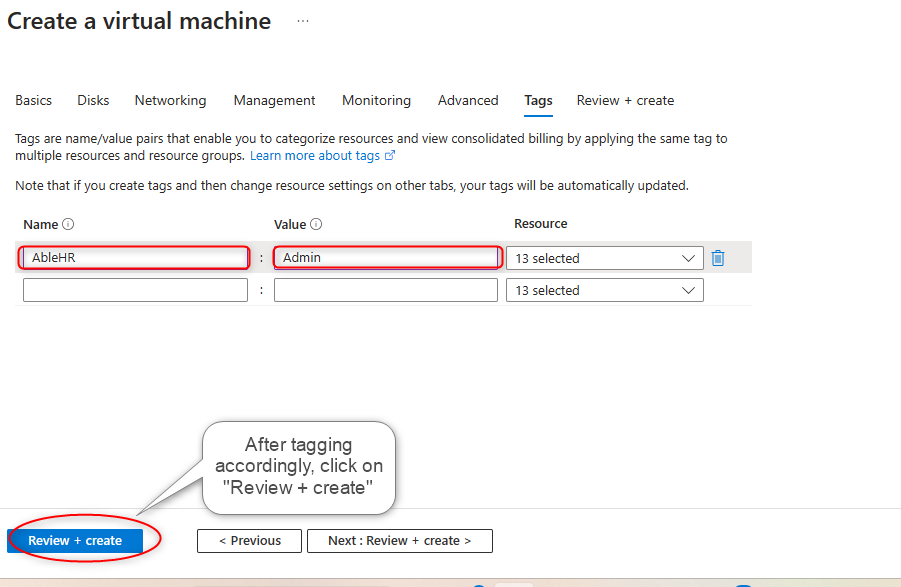
Continue by clicking on the tag button. It is important to always tag accordingly for resource identification purposes.
Step 12:
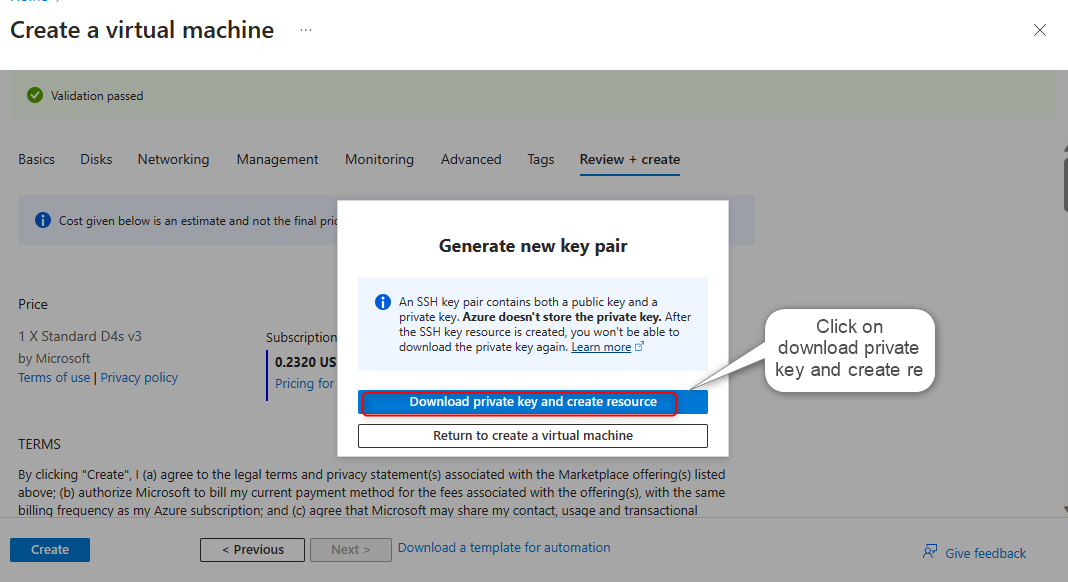
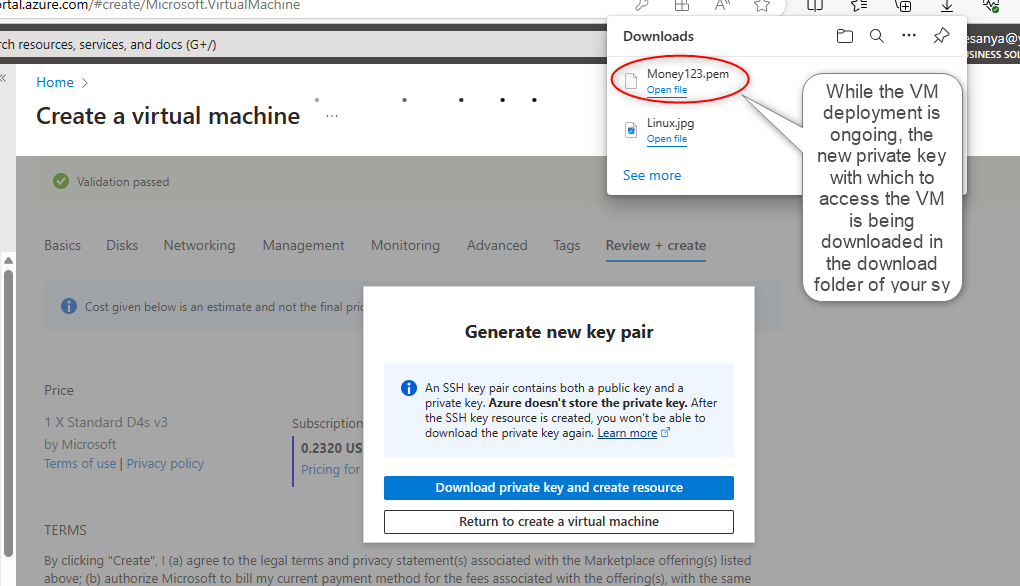
Upon clicking on "Review+create", the deployment of the virtual machine will start. while the deployment is ongoing, a "generate new key pair" box would pop up. This is a result of the option taken in step 9 where who choose "Generate new pair" for SSH public key source.

Click on "download private key and create resource"
After clicking the download from the first pop-up, the VM deployment is still ongoing. you will notice another pop-up by the top right. This pop-up is to notify you that the private key with which to access your VM is being downloaded in the download folder of your computer.
Step 13:
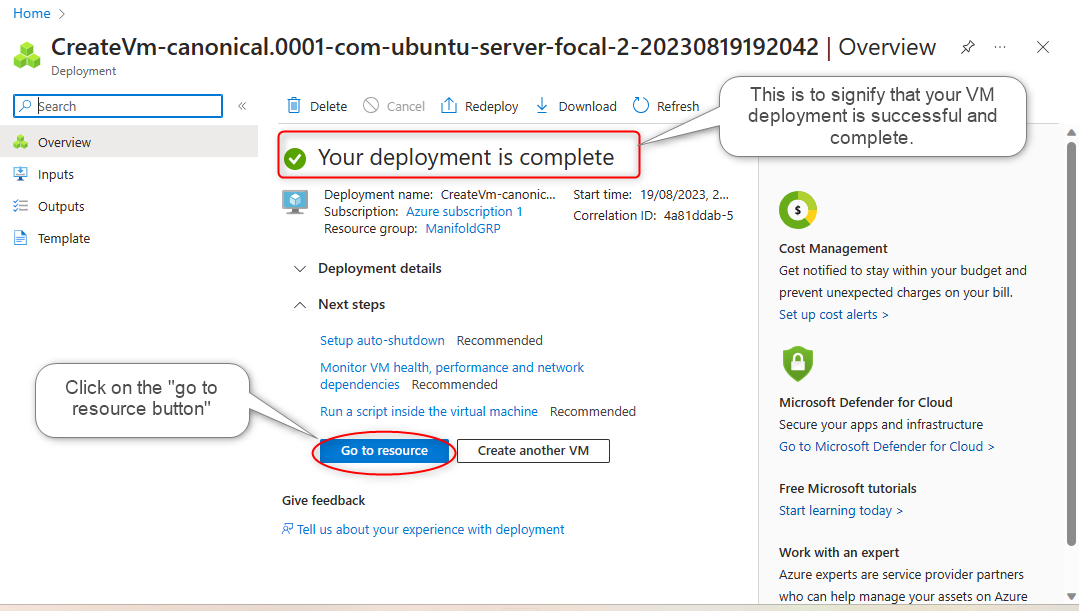
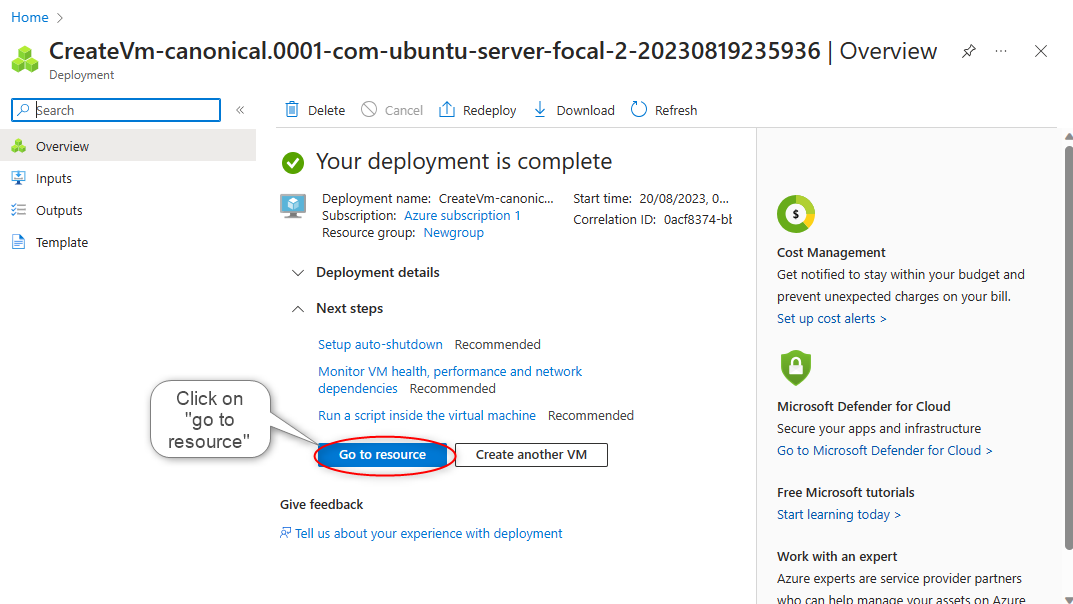
Upon clicking on the blue download box, you wait for some seconds until you receive a notification that your deployment is complete. Then click on "go to resource"
Step 14:
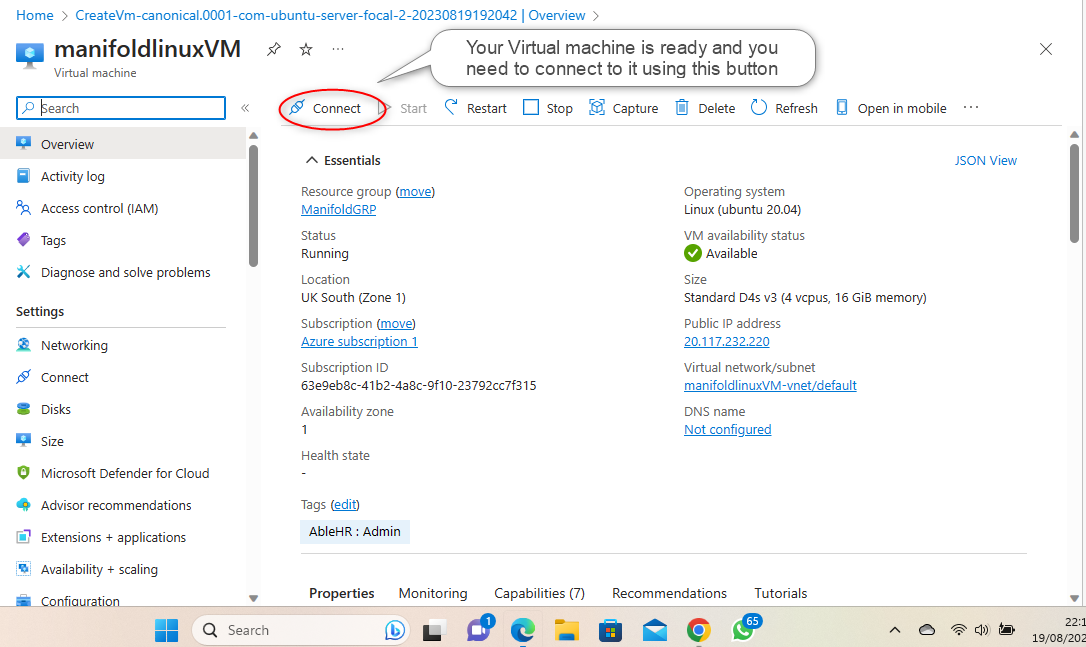
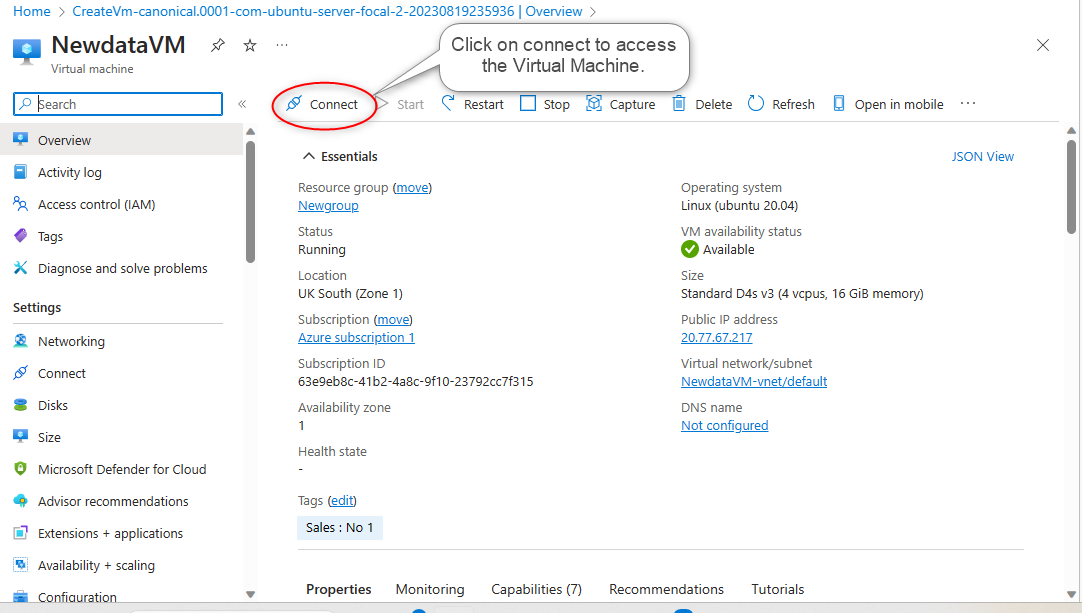
When you get to this page, it means your virtual machine is ready and you need to connect to it.
Step 15:
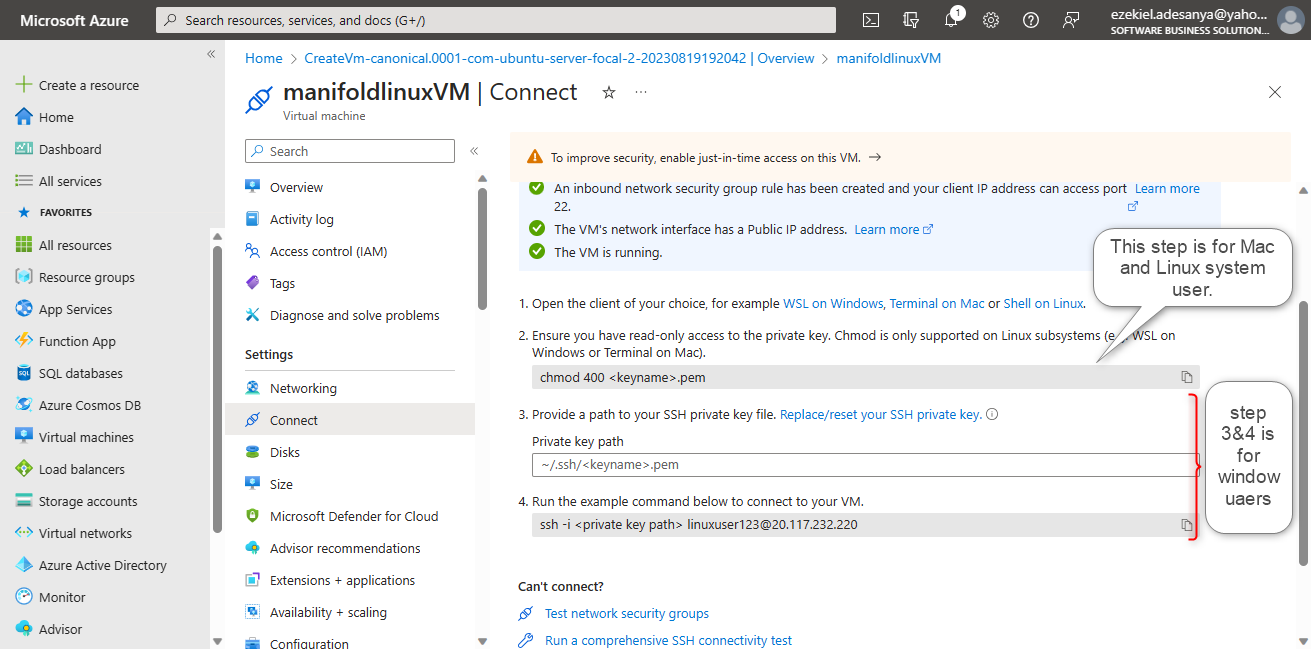
At this point, you have connected with your Linux Virtual Machine and it is already running. Now you need to "SSH" into the Virtual Machine and at this point, we need a whole lot of attention on the next few steps we will be taking.
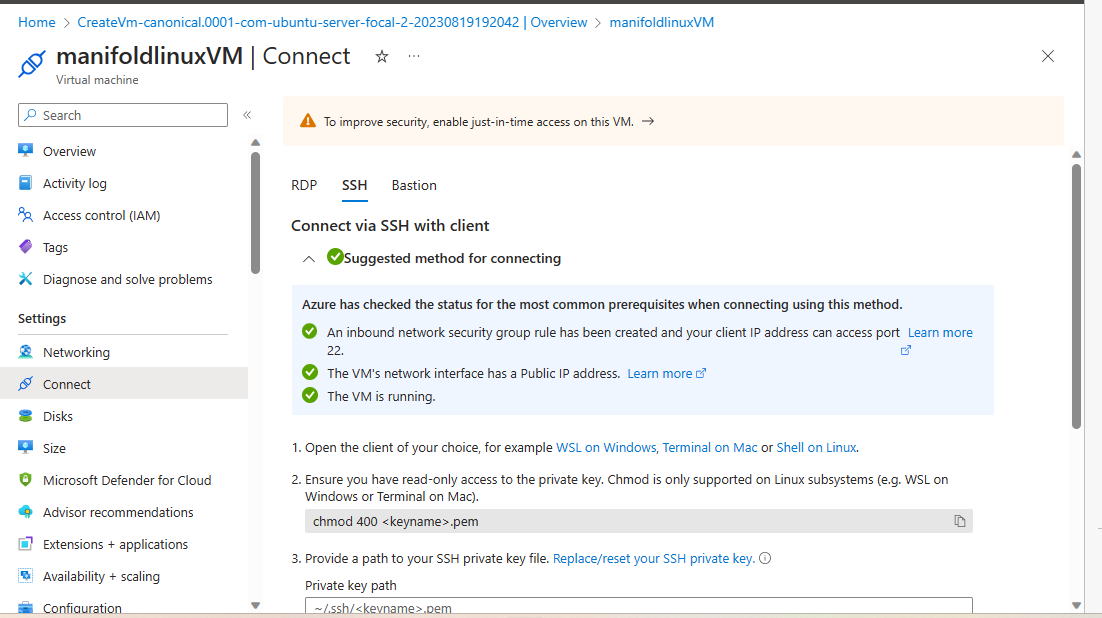
Scroll down a bit to steps 1,2,3 and 4. For Mac and Linux system users, the second step is to be followed. If you are a window system user, steps 3 and 4 are to be followed
Step 16:
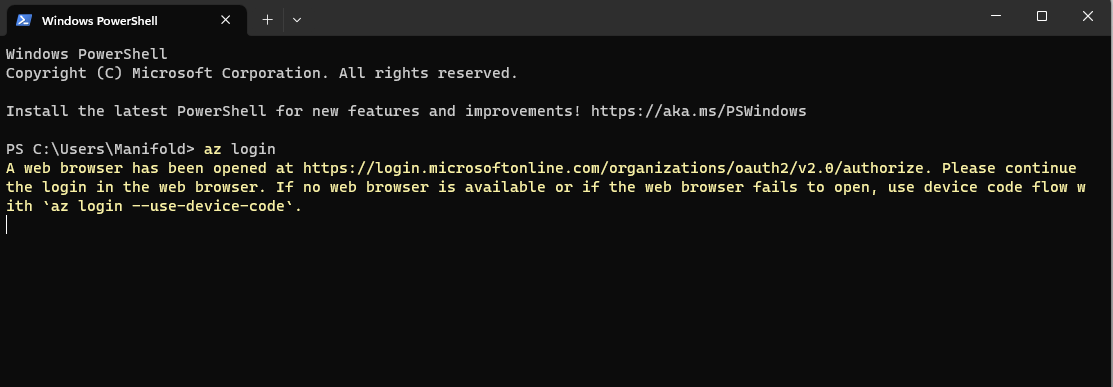
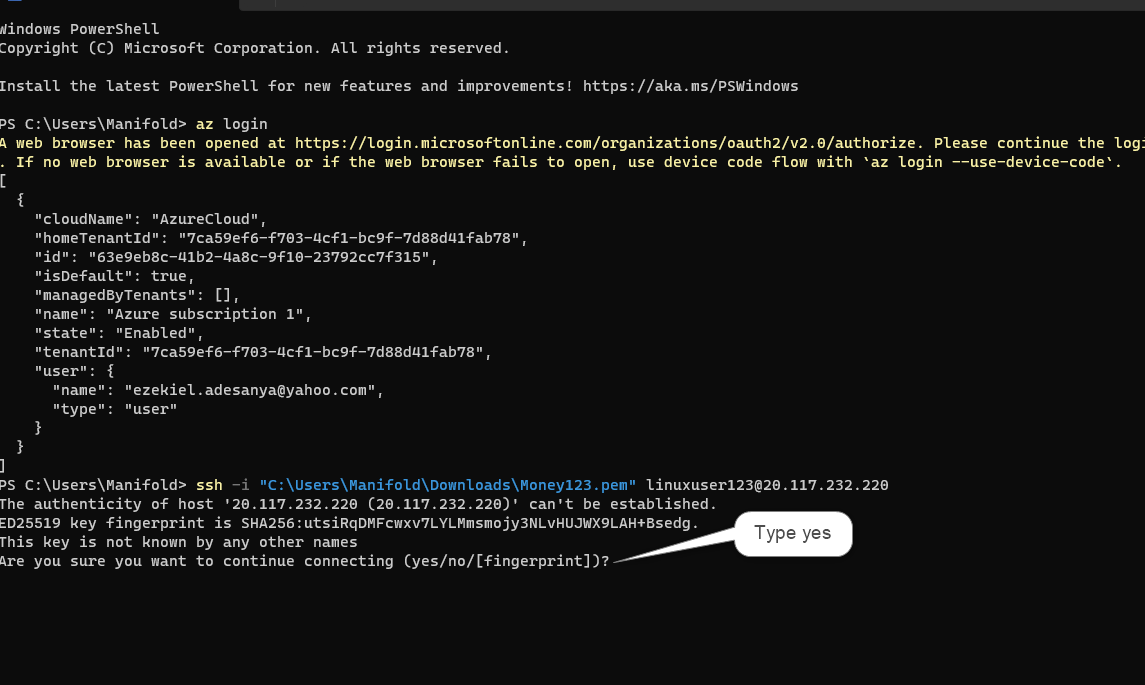
Now open the window power shell on your window system and perform az login for you to get into the CLI environment on Azure.
Step 17:
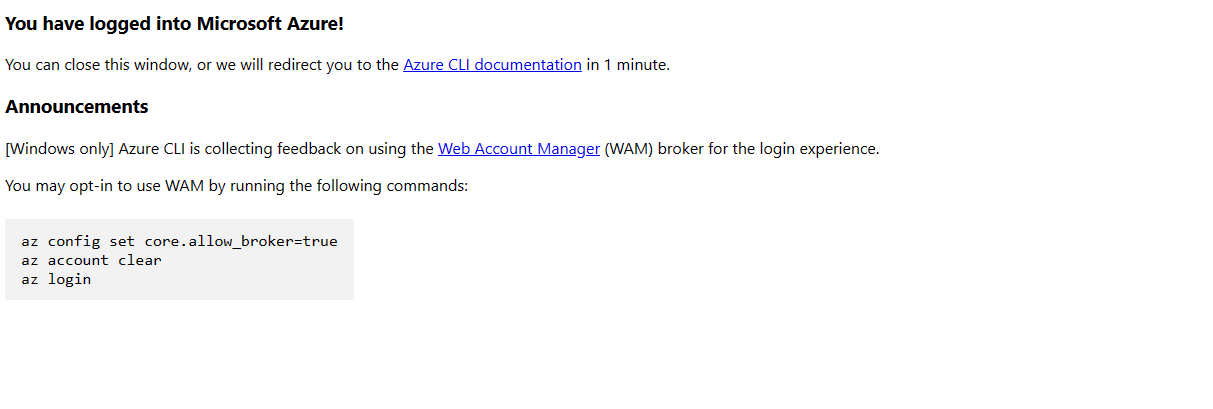
Select the appropriate email address for your Azure portal on the new tab on your browser.
Step 18:
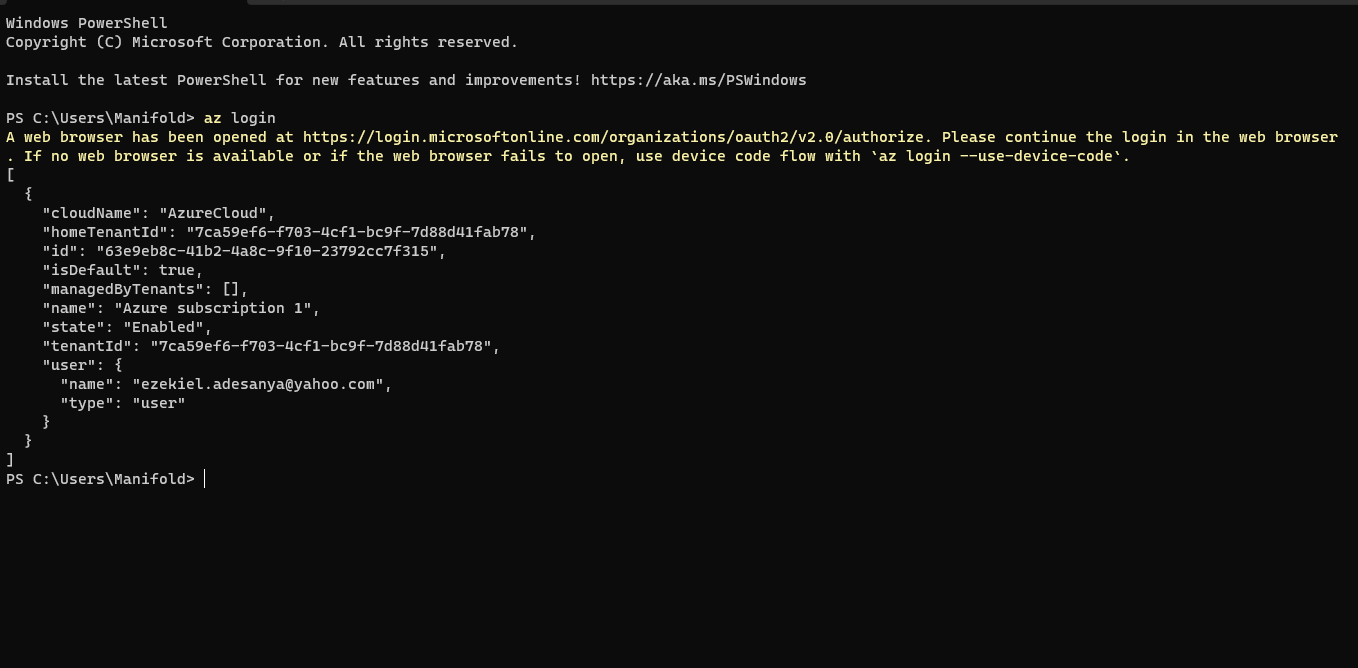
After getting to this page in step 17, close the tab and go back to your window PowerShell. The screenshot below is what you will see. Signifying that you have successfully accessed the CLI environment on your system.
Step 19
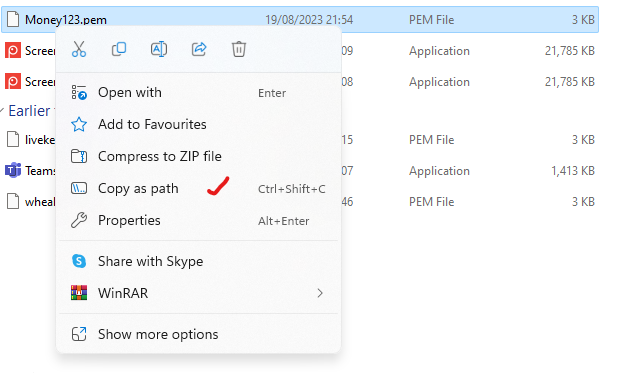
The next step is to go to the download folder on your system and check out the downloaded private key that ends in ".pem"

Step 20:
Right-click on the private key file and copy it as a path.
Step 21:
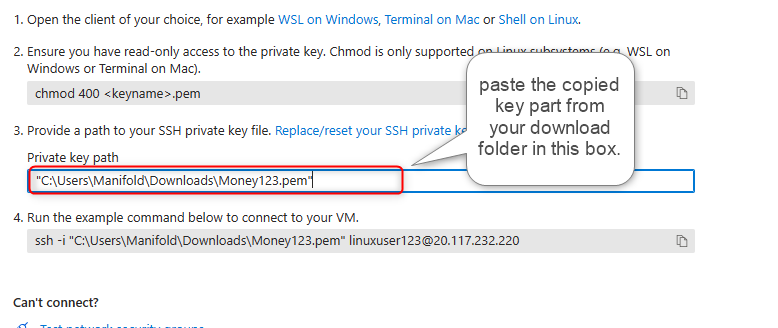
Paste the copied private key path into the box in the 3rd step
Step 22:
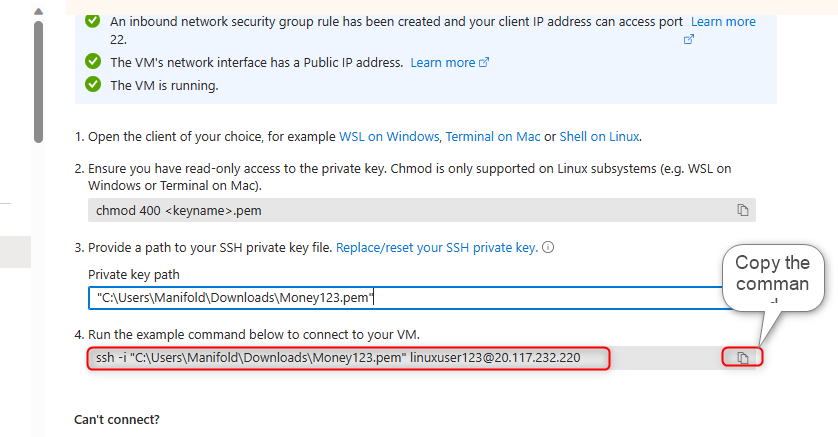
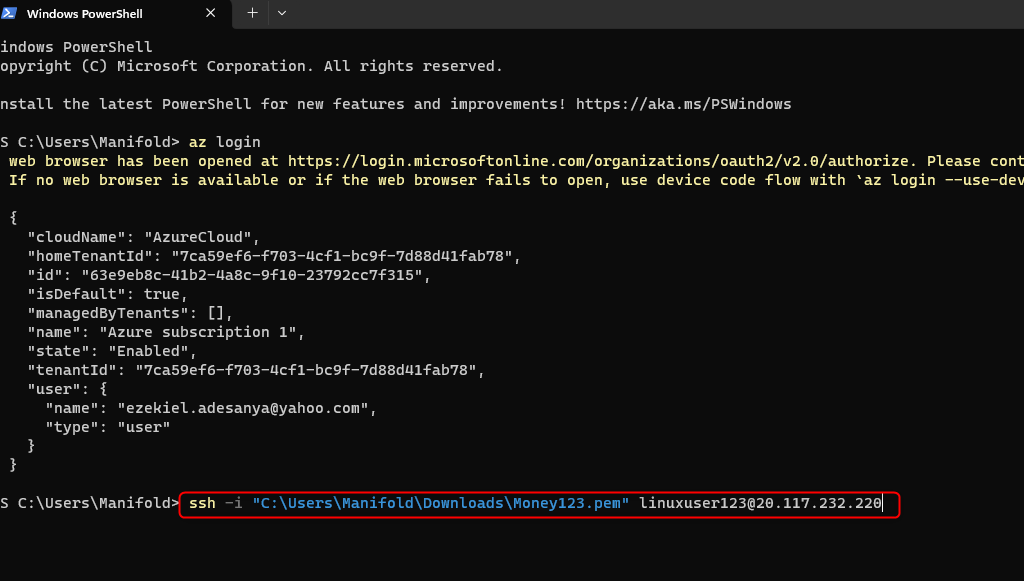
After pasting the copied key part in the private key path box, Check the box in the 4th step and confirm that the command path has been adjusted accordingly. Copy the command path and run it on your Azure power shell
Step 23:
Click on "enter" and answer yes to continue.
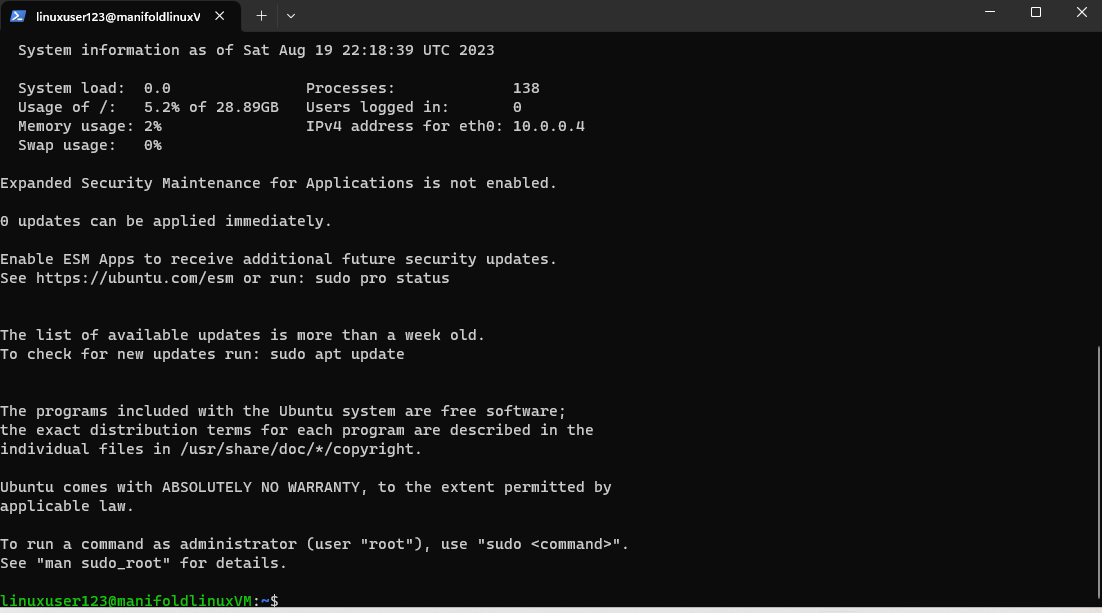
You have successfully SSH into the Linux Virtual Machine.
HOW TO SSH INTO LINUX VIRTUAL MACHINE BY PASSWORD.
In the first part of learning we just concluded, we learnt how to ssh into a VM using the SSH Public Key.

We are going to learn the second part which has to do with how to ssh into a Linux VM using a password.
To be able to do this, repeat the whole process of creating a Linux VM from Step 1 to Step 8.
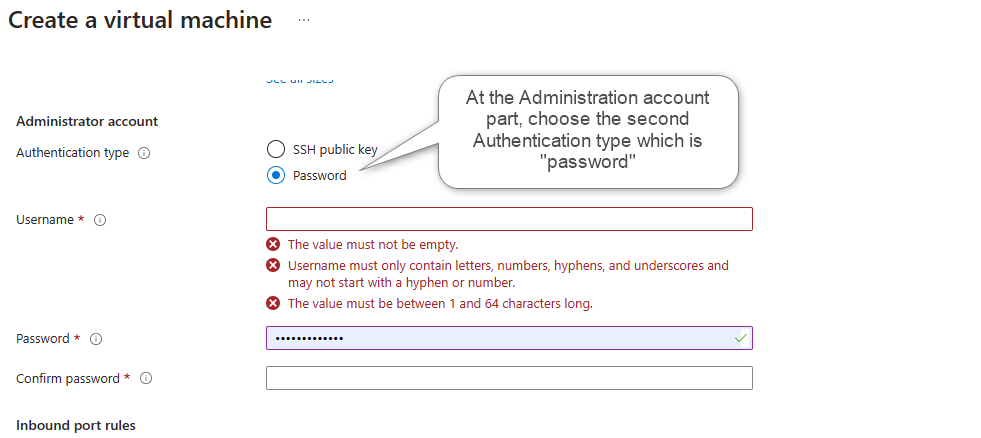


Leave everything to default and click on "review+create".
Click on the tag button to tag the resource accordingly.
Click on Review+Create
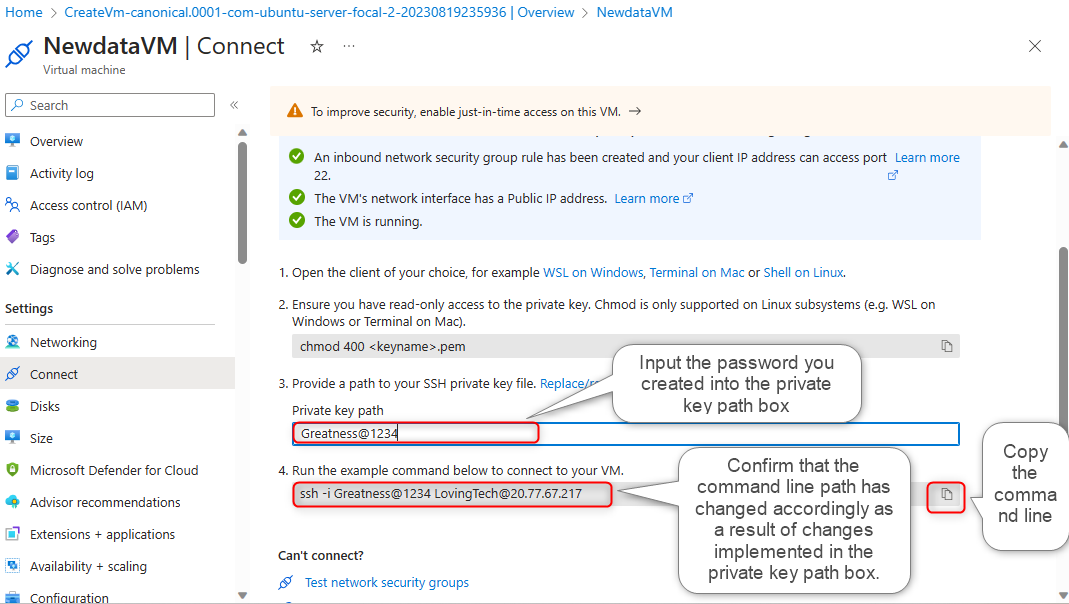
At this point, The password you created when you created your user name will be imputed into the private key path box.
Confirm that the command part in step 4 has been adjusted as a result of the changes implemented on the private key path.
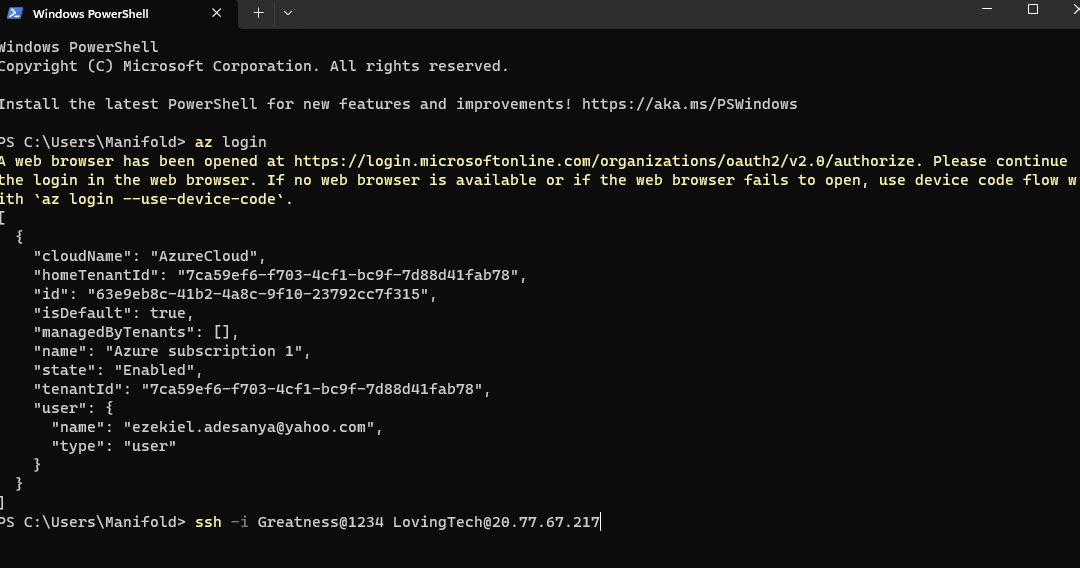
Open Powershell and perform az login accordingly. Run the copied command line part on the CLI environment in your power shell.
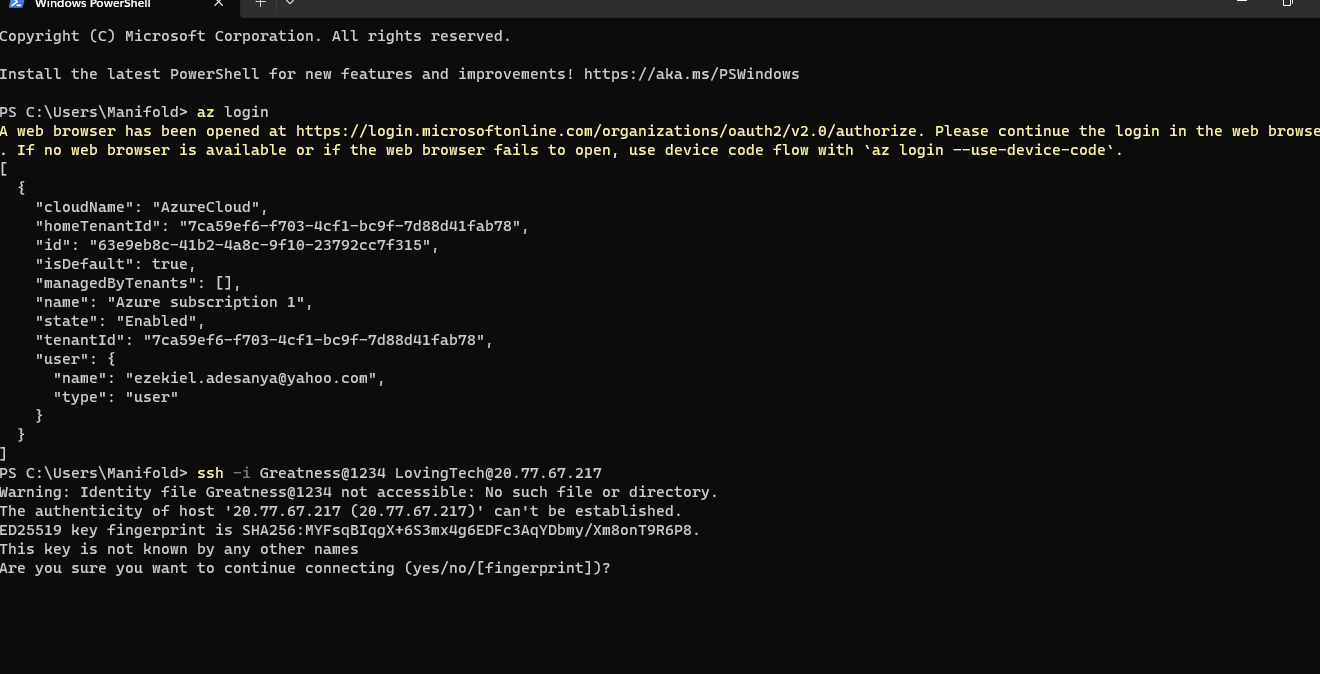
Type "yes" accordingly.
Now the Command line is asking for the password again. carefully type it in and click enter.
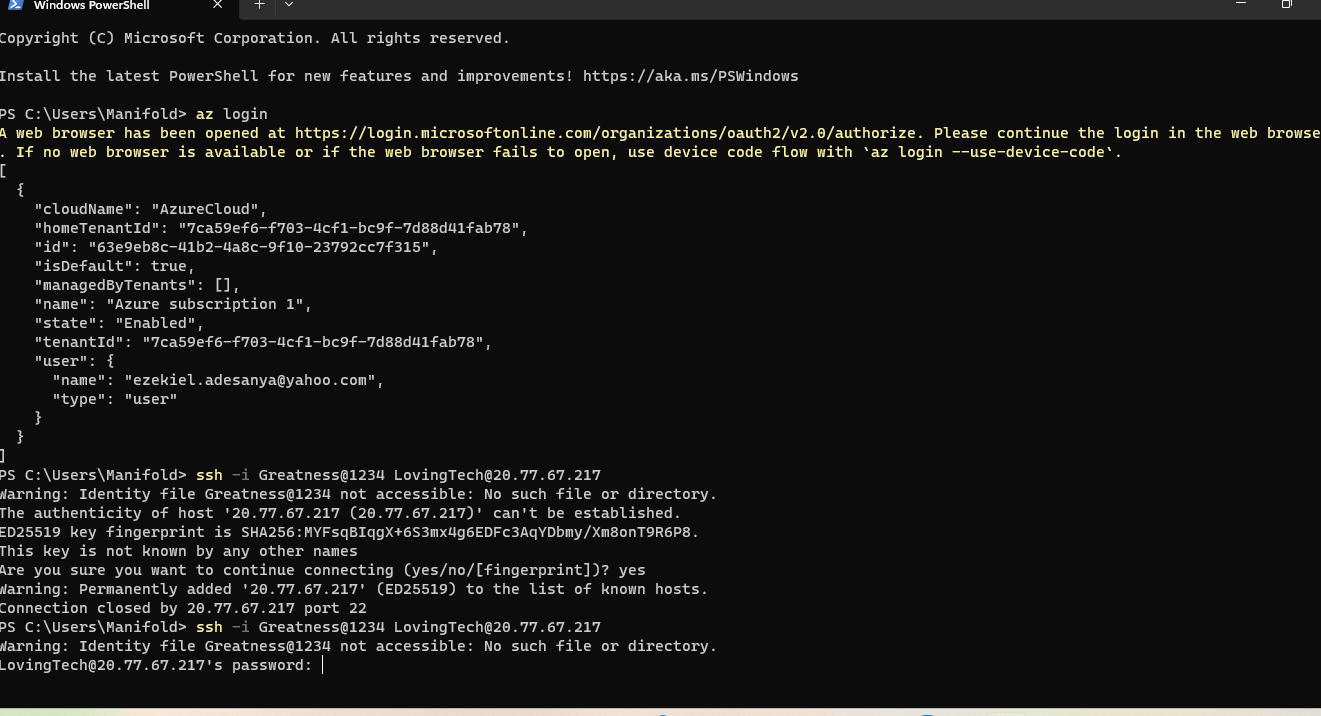
You have successfully ssh into your Linux VM through the password you created.
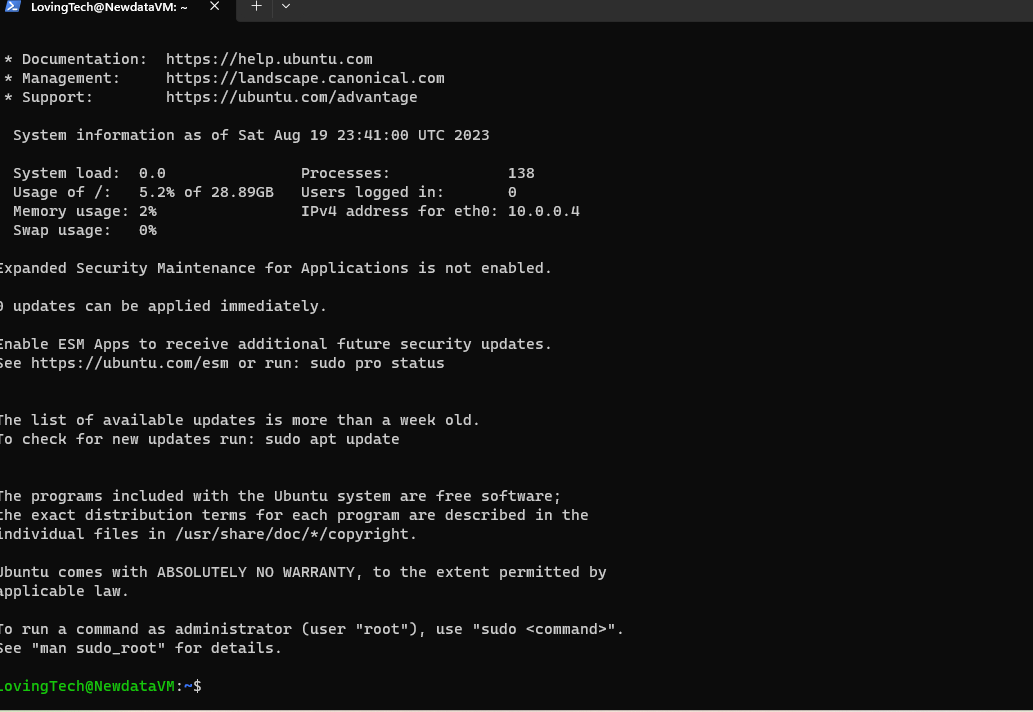
I hope this learning has added to you a great deal. I look forward to learning with you in the next edition of The Tech Merchant Blog.
Subscribe to my newsletter
Read articles from Ezekiel Adesanya directly inside your inbox. Subscribe to the newsletter, and don't miss out.
Written by

Ezekiel Adesanya
Ezekiel Adesanya
A strategic senior product and solution manager with proven accomplishments in driving growth and increasing business revenue with a proven history of driving product development and awareness which is illustrated in over 10 years of success within the product development and sales landscape in the Financial and Information Technology (IT) space in Nigeria.