Data Migration SQL to No-SQL in AWS
 ASHOK SANA
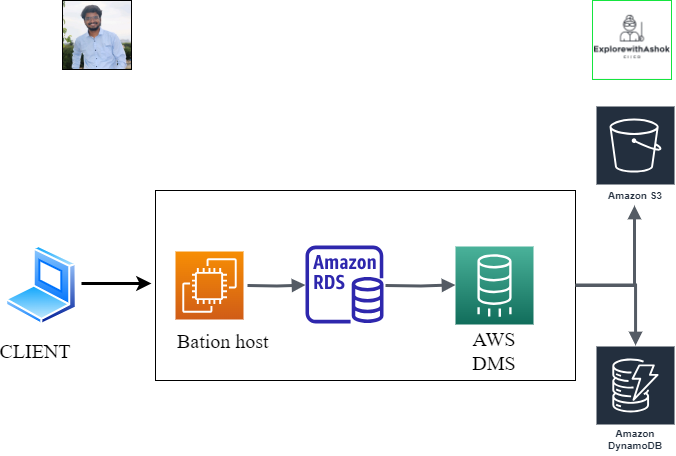
Learn how to use AWS DMS service to migrate data
1. Create DMS data sources & targets (Aurora myQSL RDS, S3 & DynamoDB) 3. Perform data migration including CDC (change data capture)
2. Create DMS replication instance, endpoints & tasks
3. Perform data migration including CDC(change data capture)
Prerequisites: Basic understanding of AWS DMS service
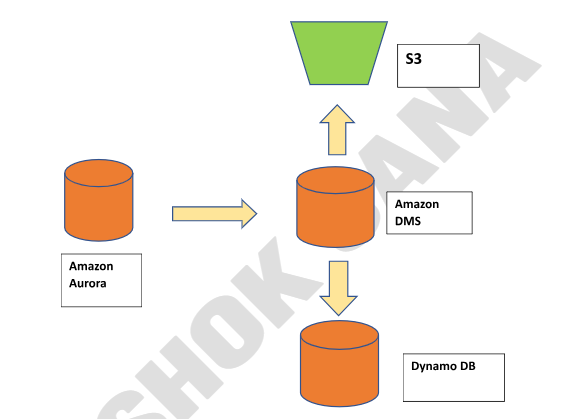
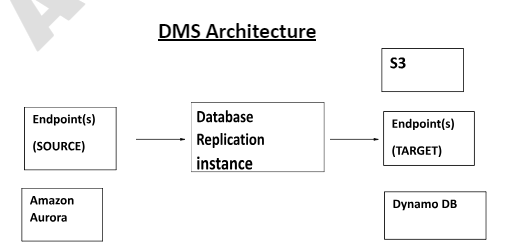
DMS Architecture
Create replication instance in AWS console
First create AWS management console.
Go to the AWS_DMS service and open the AWS DMS service.
- And create Replication instance in AWS_DMS console.
Create Replication:
Name: “Give a name”
Instance class: dms.t3.micro (you can use any class according to your requirement) but here I choose this for practice.
Engine version: latest
Allocated storage: default
Vpc: default
Multi Az: According to your requirement (single/multi Az)
Public facing ( if you want to disable this public or otherwise leave it ).
Advance security & network configuration > replication subnet: default, > vpc security : default.
Everything leave as default and click create replication.
Create AWS RDS in aws console
- Here you select Amazon Aurora Database
Follow below steps.
Select standard
Select Amazon Aurora
Edition: you will select what you select mysql/postgesql.
Select Amazon Aurora version - default
Select dev/test.
Db instance identifier > “give name”
Master username > admin
Password > 12345678
Db class > db.t3.small
Storage > gp2, Allocated Storage >20, Storage autoscaling > enable, max storage > 10000
Connectivity > Don’t connect to ec2 , Network type > Ipv4
Vpc - default
Db subnet group > default
Public acces > no
Vpc security group > default
And click on create db, wait for 5mins for availability of db.
- See here we created DB cluster and DB instance.

Create & Configure s3 DMS target
Create s3 bucket.
Create IAM Role & Policy for DMS to access s3.
Create DMS s3 Target endpoint & Test.
Here I created bucket name as a “ashok-8000”. You should copy and paste it in note it is used for while creating IAM role.
- Now go to IAM management console.
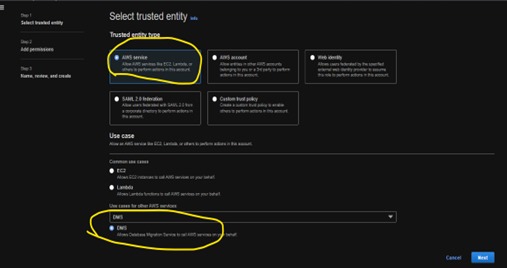
Here you have created one role for s3 to access DMS service.
And you click on create policy.
  {
      "Version": "2012-10-17",
      "Statement": [
         {
              "Effect": "Allow",
              "Action": [
                  "s3:PutObject",

                  "s3:DeleteObject",

                  "s3:PutObjectTagging"
              ],
              "Resource": [
                  "arn:aws:s3:::ashok-8000/*"
              ]
          },
          {
              "Effect": "Allow",
              "Action": [
                  "s3:ListBucket"
              ],
              "Resource": [
                  "arn:aws:s3:::ashok-8000"
              ]
          }
      ]
  }
Use above DMS_s3_acess policy and paste in json box. Create the policy in the name DMS_S3_ACCESS.
With help of this policy create one role i.e. DMS_S3_ROLE.
Now IAM role and policy created. After click on role you should copy the role arn: arn:aws:iam::170161646353:role/DMS_S3_ACEESS_ROLE
Now you create DMS replication Endpoint for s3 target.
Open endpoint console in DMS replication for crating target endpoint s3
ENDPOINTS: Target
Endpoint configuration:
“give a endpoint name”
Target engine: awss3
Service arn role: arn:aws:iam::170161646353:role/DMS_S3_ACEESS_ROLE
Bucket name: ashok-8000
Bucket folder: give new folder name
And click on run button you will wait upto status will be successfully.
See now we are created the two endpoints in DMS>Endpoint of both s3(target) and mysql(source).
Now we have to Amazon DynamoDB. Before that we have to create IAM role for DynamoDB access like s3.
- Create a role as DMS_DynomoDB_Acess and give new policies as;
{
    "Version": "2012-10-17",
    "Statement": [
    {
        "Effect": "Allow",
        "Action": [
        "dynamodb:PutItem",
        "dynamodb:CreateTable",
        "dynamodb:DescribeTable",
        "dynamodb:DeleteTable",
        "dynamodb:DeleteItem",
        "dynamodb:UpdateItem"
    ],
    "Resource": [
    "arn:aws:dynamodb:us-east-2:170161646353:table/Employee",
    "arn:aws:dynamodb:us-east-2:170161646353:table/awsdms_apply_exceptions",
    "arn:aws:dynamodb:us-east-2:170161646353:table/awsdms_full_load_exceptions"
    ]
    },
    {
        "Effect": "Allow",
        "Action": [
        "dynamodb:ListTables"
        ],
        "Resource": "*"
    }
    ]
}
https://docs.aws.amazon.com/dms/latest/userguide/CHAP_Target.DynamoDB.html
- Refer this above link for DynamoDB iam role as target access.
See above I created DynamoDB new custom role for access DynamoDB as target endpoint from mysql.
Now again go back to the DMS endpoint section and create the one target endpoint for DynamoDB.
Copy the ARN of IAM role and paste at DynamoDB target point. arn:aws:iam::170161646353:role/DMS_DynomoDB_Acess_role
See in above the screenshot I created three endpoint like 2 target endpoint( DynamoDB & S3) and 1 source enpoint(mysql).
Now main task will perform like DMS Migration from source to end.
Before that I must give connection MySQL(source) to server like EC2 of Bastion-host and give security group of my ip address. for creating databases, tables, and content. With the help of this content, I have migrated data from source to target .
Open Ec2 and launch instance ( give sg of my ip address and after launching instances create one more sg as BASTION HOST SG and give port number 3306 and give the destination ip as private ec2 instance). connect the MySQL server in instance.
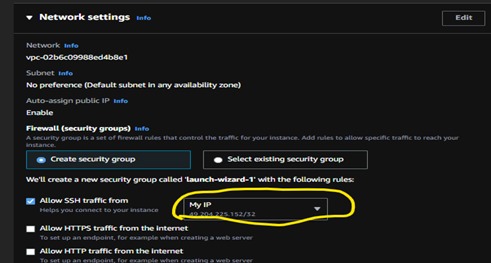
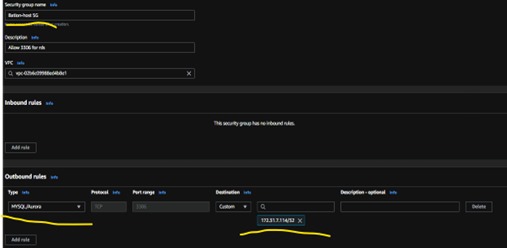
- Now newly created the SG attached to the RDS of source MySQL.
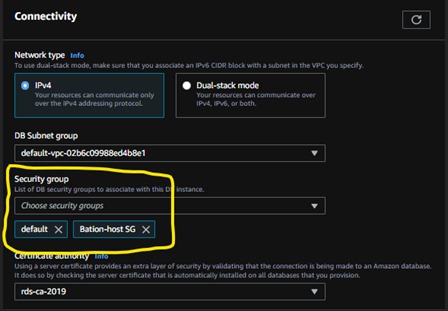
- After modified , now you have to create the parameter groups in RDS for Enable binlogs
- After created this myrds-cluster-parameter-binlogs, Open the parameter of what I was created and click on edit parameters and now you have edit the binlog-checksum(none) & binlog-format(row).
- Now this myrds-cluster-parameter-binlogs attached to RDS of mysql.
- Now download the one sql client in your windows laptop. This is the download link https://github.com/sqlectron/sqlectron-gui/releases/tag/v1.38.0 .
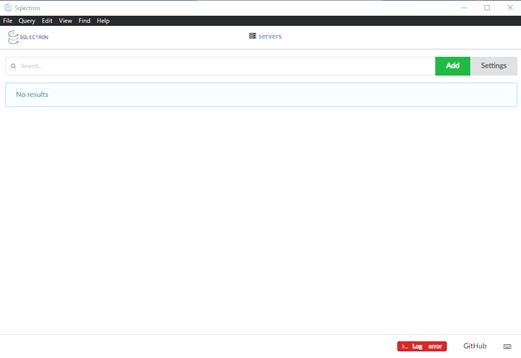
This is the interface you have downloaded sql eletron client application. And after downloaded you have to give the connection rds to this sql client by click add.
After click add you have give following details:
Give name of client, RDS endpoint in HOST, Port number 3306, user & passwd what your given while creating rds. Enable ssh and give ec2 user name and upload key pair pem file of Bastion host of ec2.
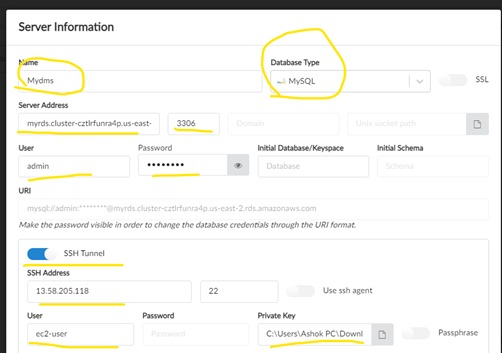
- Now click on save and then click connect the rds.
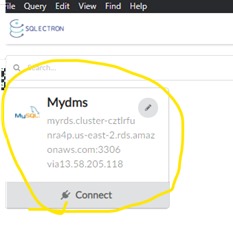
- After click on connect you will get one interface like this
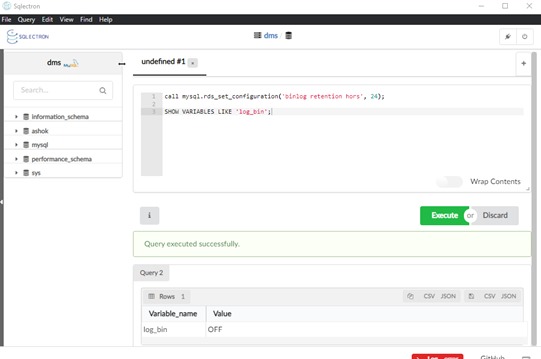
You want to know how many databases are type command SHOW SCHEMAS OR SHOW DATABASES;
And you should give the retention period of your Rds by using following commands.
call mysql.rds_set_configuration('binlog retention hours', 24);
SHOW VARIABLES LIKE 'log_bin';
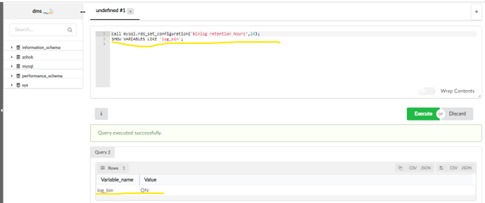
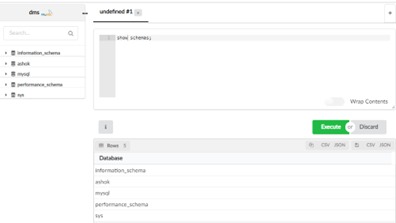
Now our retention we were set up to 24 hrs by using above command.
Now create a database or schema ( create database <name> or create schema <name>).
Then use that db or scheme bye using command USE <db name>
Now create a table in that “mydb” use mydb and then create table following command:
create table if not exists employee (
    empId int auto_increment primary key,
    empName varchar(100)
);
insert into employee value(1, 'emp-1');
insert into employee value(2, 'emp-2');
insert into employee value(3, 'emp-3');
insert into employee value(4, 'emp-4');
select * from employee;
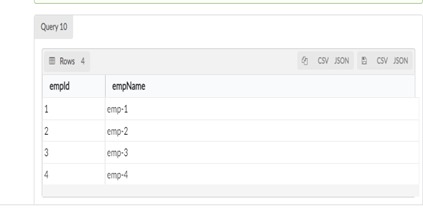
Now table is created in ‘mydb’ database.
Now we have to create database 2 tasks**(s3 and Dynamodb)** in DMS console
- Now we have create task ‘mysql-s3-task’ and mysql-Dynamodb-task’
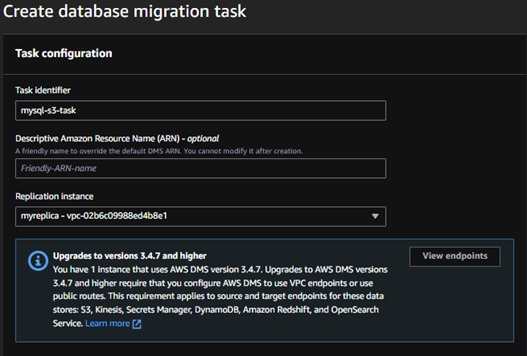
Now give the source and target resource. And give schema name and table name by clicking add new and remaining leave it as default.
In migration type you should select only Migrate existing data and replicate ongoing changes.
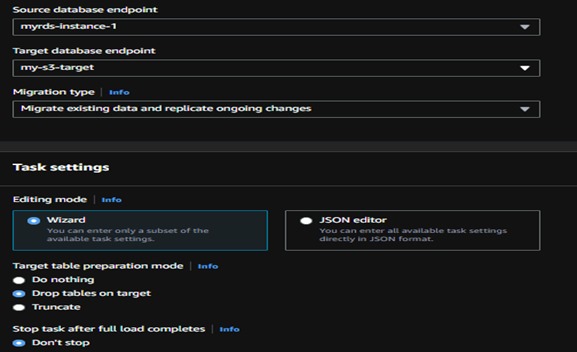
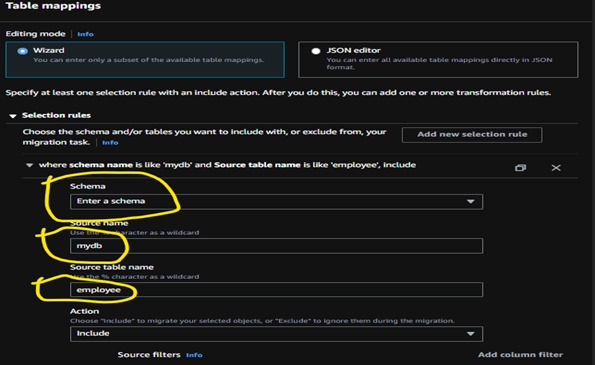
- Click on create task
Like you have to create 2 tasks
Now you check the s3 bucket that we give access to DMS
Now check DynamoDB also
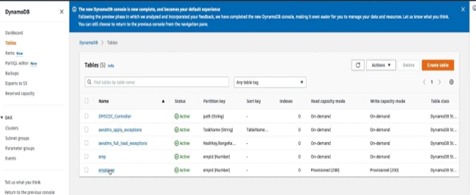
Finally we did this task as moving content from amazon aurora to s3 & Dynamodb with the help of bastion host.
Hope you like my blog...!

If you like the content follow me on LinkedIn: https://www.linkedin.com/in/ashok-sana
Follow my Whatsapp & telegram community: https://chat.whatsapp.com/BzX1aruZIH645l29LxvgO3
Happy learning......!
Subscribe to my newsletter
Read articles from ASHOK SANA directly inside your inbox. Subscribe to the newsletter, and don't miss out.
Written by

ASHOK SANA
ASHOK SANA
Transitioning from agriculture to technology has been a transformative journey. With a strong agricultural background and two years of field experience, I now thrive as an AWS trainer and DevOps Engineer. My agricultural roots instilled efficiency, resource management, and continuous improvement values - all vital in DevOps. As an AWS trainer, I've honed my communication skills and deepened my cloud expertise. I'm committed to staying at the forefront of DevOps, focusing on automation, containerization, and CI/CD pipelines. I bring a unique blend of agricultural insights and tech expertise to drive innovation in organizations' DevOps processes.