Creating a Self-Sufficient Contact Form: Sending Emails with SMTP.JS on the Frontend
 Afolabi Abdullahi
Introduction
A long-lasting relationship is built on communication, which is why contact forms are used on websites. Emails cannot be sent using HTML contact forms alone. Despite JavaScript's immense capabilities, it doesn't support server-side languages that interact with SMTP servers. Using a JavaScript library called SmtpJS, we can take advantage of JavaScript's extensive support for libraries and frameworks.
Infinite Loop Ltd created a free JavaScript library called SmtpJS. It was designed to act as a conduit for JavaScript to connect directly to the SMTP server-side needed to send emails without using a back-end server. As a result, we can now send emails using JavaScript and HTML forms.
Getting Started
You require prior knowledge of HTML and CSS to create and style your form as well as a fundamental understanding of JavaScript to set up SmtpJS.
Creating the HTML structure
Writing code for your contact form's HTML structure.
<!DOCTYPE html>
<html lang="en">
<head>
    <title>Contact us with smtpJS</title>
</head>
<body>
    <form>
        <input type="name" placeholder="name">
        <input type="email" placeholder="email">
        <textarea placeholder="Please type your message here..."></textarea>
        <button type="submit">Send Message</button>
    </form>

</body>
</html>
Setting up SmtpJS
To obtain the details you require to include smtpJS into your already-created HTML form, visit the smtpJS website.
Include the script in your HTML document
 <script src="https://smtpjs.com/v3/smtp.js">
 </script>
Get the email-sending script template you need to launch emailing from your contact form.
 Email.send({
     Host : "smtp.elasticemail.com",
     Username : "username",
     Password : "password",
     To : 'them@website.com',
     From : "you@isp.com",
     Subject : "This is the subject",
     Body : "And this is the body"
 }).then(
   message => alert(message)
 );
ElasticEmail will provide the username and password that are required above.
ElasticEmail
Go to the ElasticEmail website, select the Email API section, and then click on "try for free."
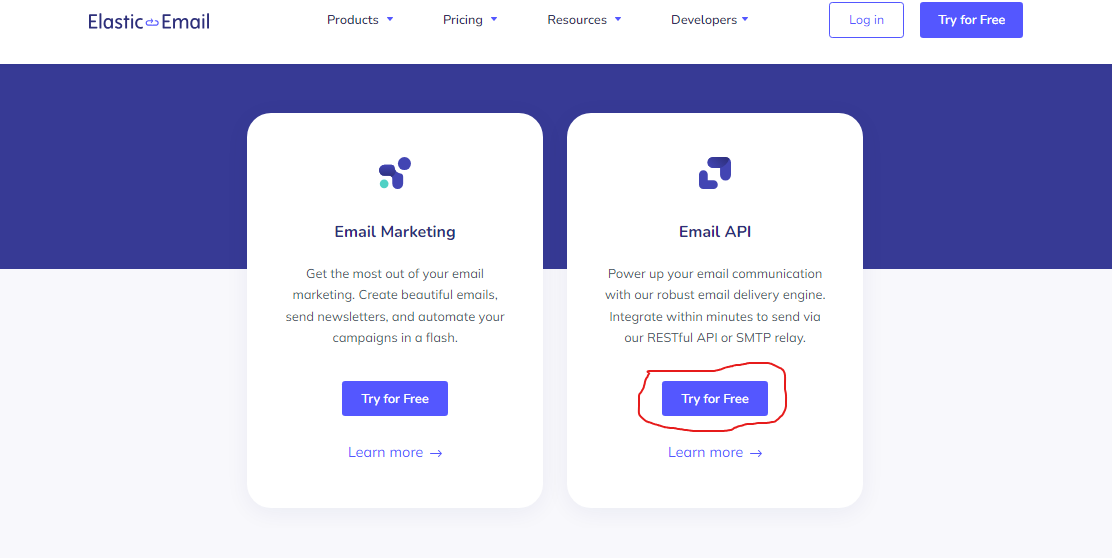
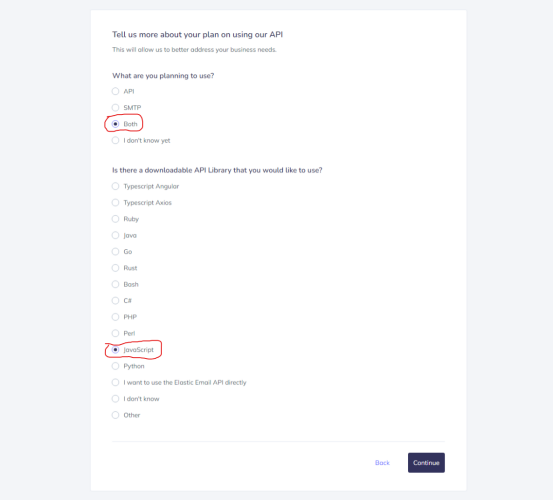
You will be required to respond to a few questions when signing up. When you reach the section on implementation, respond as shown in the image below:
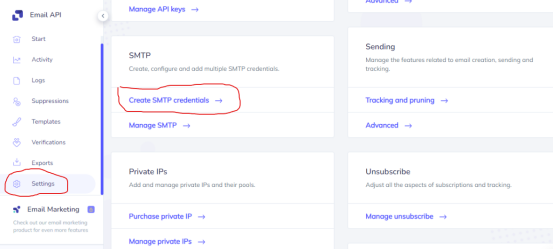
Click "Create SMTP credentials" under the settings tab on your dashboard.
Your email address should be your username. Click "Create" after that.
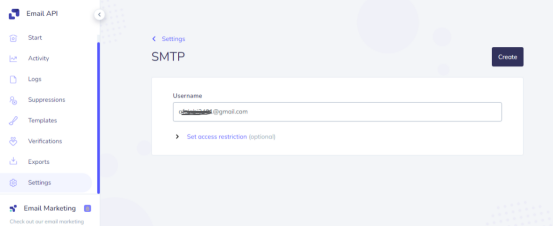
Your SMTP information will appear as follows:
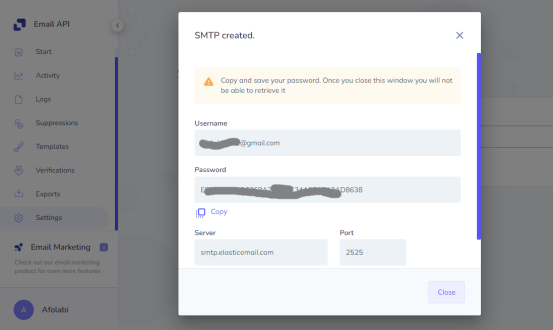
You will need your password to set up smtpJS, so keep it secure.
Note: The email address you used to sign up for ElasticEmail needs to have 2FA enabled.
SmtpJS and ElasticEmail Integration
Keep in mind the SmtpJS email-sending script that we downloaded. The information we obtained from ElasticEmail will be inserted into it, followed by the completion of the remaining fields.
Below are the details.
Username: ElasticEmail will give you this username, which is also your email address.
Password: You were given this by ElasticEmail.
To: Your desired email address for message delivery from the contact form.
From: This is the email sender, and it must be the email address you used to set up ElasticEmail.
Body: The contact form's body is presented here. Hold on, we will move forward.
The updated script is provided below
Email.send({
    Host : "smtp.elasticemail.com",
    Username : "********@gmail.com",
    Password : "************A28CC4C34A9B18A2AD8638",
    To : '********@gmail.com',
    From : "********@gmail.com",
    Subject : "This is the subject",
    Body : "And this is the body"
}).then(
  message => alert(message)
);
JavaScript and HTML Connection
The HTML form needs to be properly integrated with JavaScript using the following procedure to enable seamless email sending.
The script will be contained within a function. The function will be called
onSubmitin the form opening tag, which requires us to add the function with the other attributes required for email status notifications.<form onsubmit="sendEmail(); reset; return false;">For all of your input tags, add an
ID.<input type="name" id="name" placeholder="name"> <input type="email" id="email" placeholder="email"> <textarea id="message" placeholder="Please type your message here..."></textarea>HTML source for the SmtpJS script should be added.
 <script src="https://smtpjs.com/v3/smtp.js">
 </script>
To create an entire HTML document, combine everything.
 <!DOCTYPE html>
 <html lang="en">
 <head>
     <title>Contact us with smtpJS</title>
 </head>
 <body>
     <form onsubmit="sendEmail(); reset; return false;">
         <input type="name" id="name" placeholder="name">
         <input type="email" id="email" placeholder="email">
         <textarea id="message" placeholder="Please type your message here..."></textarea>
         <button type="submit">Send Message</button>
     </form>

 </body>
     <script src="https://smtpjs.com/v3/smtp.js">
     </script>
 </html>
Put our Javascript inside a
sendEmailfunction.function sendEmail() { Email.send({ Host : "smtp.elasticemail.com", Username : "********@gmail.com", Password : "************A9B18A2AD8638", To : '********@gmail.com', From : "********@gmail.com", Subject : "This is the subject", Body : "And this is the body" }).then( message => alert(message) ); }Set up the JavaScript
bodyso that it can use the value from the HTML form. To accomplish this, we will use the value of each input field's assigned ID to call the input field, use the value, and then add the result to the main JavaScript.Body: "Name: " + document.getElementById("name").value + "<br> Email: " + document.getElementById("email").value + "<br> Message: " + document.getElementById("message").valuefunction sendEmail() { Email.send({ Host : "smtp.elasticemail.com", Username : "********@gmail.com", Password : "************A9B18A2AD8638", To : '********@gmail.com', From : "********@gmail.com", Subject : "This is the subject", Body: "Name: " + document.getElementById("name").value + "<br> Email: " + document.getElementById("email").value + "<br> Message: " + document.getElementById("message").value }).then( message => alert(message) ); }Your contact form is operational and capable of sending emails when both HTML and JavaScript are linked, either internally or externally.
  <!DOCTYPE html>
 <html lang="en">
 <head>
     <title>Contact us with smtpJS</title>
 </head>
 <body>
     <form onsubmit="sendEmail(); reset; return false;">
         <input type="name" id="name" placeholder="name">
         <input type="email" id="email" placeholder="email">
         <textarea id="message" placeholder="Please type your message here..."></textarea>
         <button type="submit">Send Message</button>
     </form>

 </body>
     <script src="https://smtpjs.com/v3/smtp.js">
     </script>

     <script>
          function sendEmail() {
               Email.send({
                 Host : "smtp.elasticemail.com",
                 Username : "********@gmail.com",
                 Password : "************A9B18A2AD8638",
                 To : '********@gmail.com',
                 From : "********@gmail.com",
                 Subject : "This is the subject",
                 Body:
                 "Name: " +
                 document.getElementById("name").value +
                 "<br> Email: " +
                 document.getElementById("email").value +
                 "<br> Message: " +
                 document.getElementById("message").value
             }).then(
               message => alert(message)
             );
             }
     </script>
 </html>
Keeping your credentials secure
Your JavaScript currently displays the username and password for the SMTP credentials that ElasticEmail provided to you. We'll use a secure method offered by smtpJS to safeguard it, so your information won't be stolen.
Let's complete that using the following procedure:
Get the security code that is displayed by going to the security section of the smtpJS website.
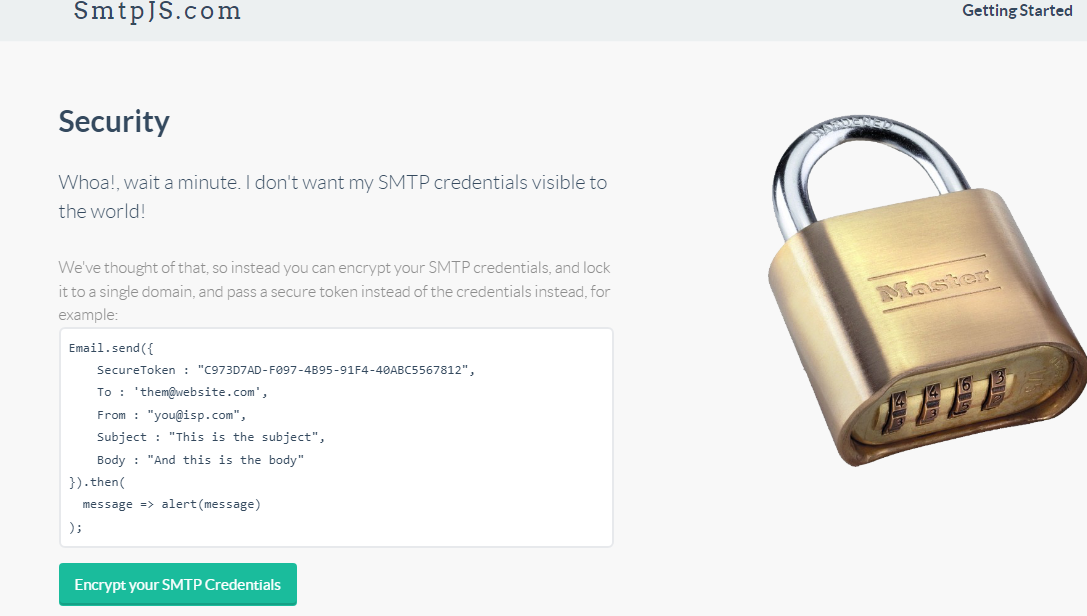
 Email.send({
     SecureToken : "C973D7AD-F097-4B95-91F4-40ABC5567812",
     To : 'them@website.com',
     From : "you@isp.com",
     Subject : "This is the subject",
     Body : "And this is the body"
 }).then(
   message => alert(message)
 );
Click "Encrypt your SMTP Credentials" to obtain a secure token. Then, enter your username and password to generate a secure token.
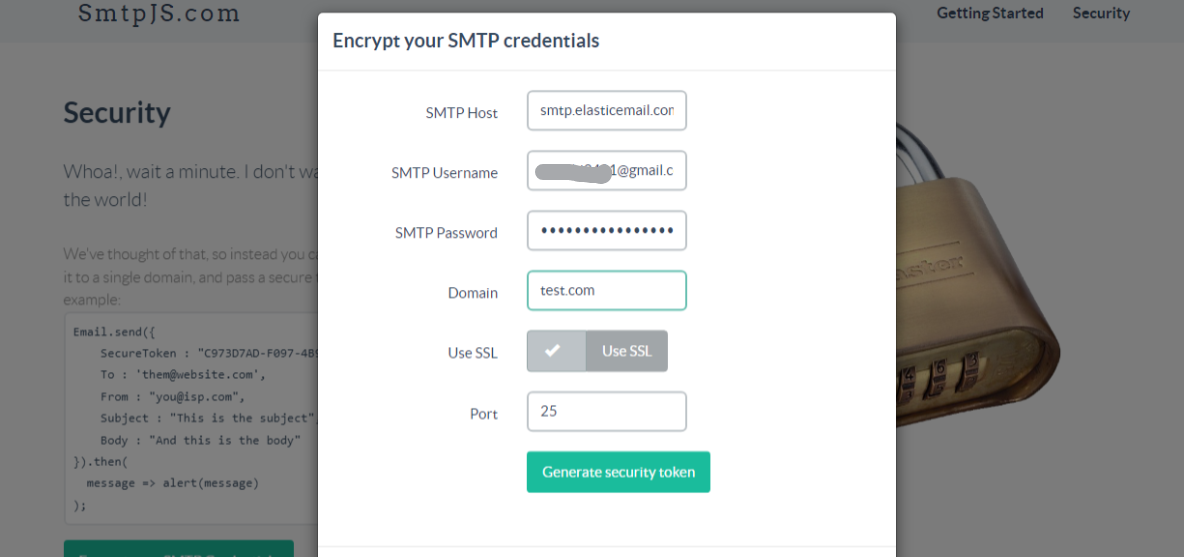
NB: The domain is the address where your website will be stored. This is significant because it limits email sending to the provided domain.
Substitute your information and the secure token that you were given with the dummy contents and secure token, respectively.
  Email.send({
     SecureToken : "c6c2707b-617d-4c51-9bbf-50755b179feb",
     To : '********@gmail.com',
     From : "********@gmail.com",
     Subject : "This is the subject",
     Body:
          "Name: " +
          document.getElementById("name").value +
          "<br> Email: " +
          document.getElementById("email").value +
          "<br> Message: " +
          document.getElementById("message").value
     }).then(
       message => alert(message)
 );
Put your updated script inside a
functioncalledsendMail()and then re-incorporate it into your HTML to create a finished document.<!DOCTYPE html> <html lang="en"> <head> <title>Contact us with smtpJS</title> </head> <body> <form onsubmit="sendEmail(); reset; return false;"> <input type="name" id="name" placeholder="name"> <input type="email" id="email" placeholder="email"> <textarea id="message" placeholder="Please type your message here..."></textarea> <button type="submit">Send Message</button> </form> </body> <script src="https://smtpjs.com/v3/smtp.js"> </script> <script> function sendEmail() { Email.send({ SecureToken : "c6c2707b-617d-4c51-9bbf-50755b179feb", To : '********@gmail.com', From : "********@gmail.com", Subject : "This is the subject", Body: "Name: " + document.getElementById("name").value + "<br> Email: " + document.getElementById("email").value + "<br> Message: " + document.getElementById("message").value }).then( message => alert(message) ); } </script> </html>
Your contact form will now begin sending emails directly from your website to the email address you specified now that we have finished integrating smtpJS.
Conclusion
Although sending emails is undoubtedly a server-side operation, you can prevent server-side operations. To replace the back-end service and streamline your front end so that it can send emails, you need SmtpJS and ElasticEmail. You must select ElasticEmail because it is currently the only SMTP service that SmtpJS recognizes.
Subscribe to my newsletter
Read articles from Afolabi Abdullahi directly inside your inbox. Subscribe to the newsletter, and don't miss out.
Written by

Afolabi Abdullahi
Afolabi Abdullahi
I am a Frontend Developer who's more than just code. I bring technical prowess, clear communication through technical writing, and marketing finesse to every project. Fluent in HTML, CSS, and JavaScript, I turn design into seamless user experiences. I craft user-friendly documentation, compelling content, and persuasive marketing strategies. I thrive in collaborative, fast-paced environments and stay ahead of tech trends. Passionate about creating impactful digital experiences, I'm your go-to for innovation in front-end development.