How To Create An Azure Compute Gallery And Capture Windows Virtual Machine Image.
 OBUMNEME ANTHONY IKECHEBELU
WHAT IS VIRTUAL MACHINE IMAGE CAPTURING?
Capturing a virtual machine (VM) image involves creating a snapshot or template of a virtual machine's current state, including its operating system, applications, configurations, and data. This captured image can then be used to quickly deploy identical or similar VM instances. This process is commonly used for scalability, backup, disaster recovery, and creating standardized environments.
In the context of Azure, capturing a VM image involves the following steps:
1. Generalize the VM: Before capturing the image, you need to generalize the VM. Generalization removes specific system information, making the image suitable for use as a template. You can generalize a Windows VM using the "Sysprep" command or a Linux VM using various commands to remove unique identifiers.
2. Capture the Image: After generalizing the VM, you capture the image. This process creates a copy of the VM's disk and configuration settings. In Azure, you can use tools like Azure PowerShell, Azure CLI, or the Azure portal to initiate the capture process.
3. Create a Managed Image: Once the image is captured, you can create a managed image in Azure. This managed image serves as a template for creating new VM instances. It's a convenient way to package your VM configuration and applications.
4. Deploy VMs from Image: With the managed image in place, you can deploy new VM instances using that image. This is much faster than starting from scratch, as the image contains the pre-configured environment.
By capturing VM images, you can ensure consistent deployments, reduce setup time, and maintain backup copies of important configurations. This process is valuable for scenarios where you need to replicate VM instances across various environments or quickly recover in case of failures.
A more detailed practical approach on how to create an Azure Compute Gallery and capture Azure Windows Virtual Machine Image is well explained below as we cover these key vital steps. [Let’s navigate].
1). Create Azure Compute Gallery.
2). Capture Windows Virtual Machine Image.
Let’s dwell on the basic prerequisite needed first before going through the steps listed above Azure Compute Gallery and capture Azure Windows Virtual Machine Image
PREREQUISITE:
1). Your PC with online access.
2). Microsoft Azure account - If you don't have an Azure paid subscription, create a Free Account before you begin.
Follow the below steps to create a Windows 11 Virtual machine.
STEP 1: CREATE AZURE WINDOW 11 VIRTUAL MACHINE.
Login to https://portal.azure.com/ from your PC.
On the Windows dashboard, search "Virtual machine", and select "Virtual machine". Then select “+Crate” This will launch you on the sequential pages starting from "Basics", “Disk”, “Networking”, “Management”, “Monitoring”, “Advanced”, “Tags”, and “Review+Create” pages. Successful validation after a review triggers the Create command for application deployment. A successful deployment message will direct you to go to resource for further actions.
Do follow the link below for a guide to creating an Azure Windows 11 virtual machine.
https://hashnode.com/post/clldxo98f000008l804fof7eh
The last action on VM creation is as follows:
1). Click “+create” after a successful / passed validation for Azure window 11 virtual machine deployment. A successful deployment message will redirect you to “Go to Resource” for other operation activities [Step 2: Connect to VM].
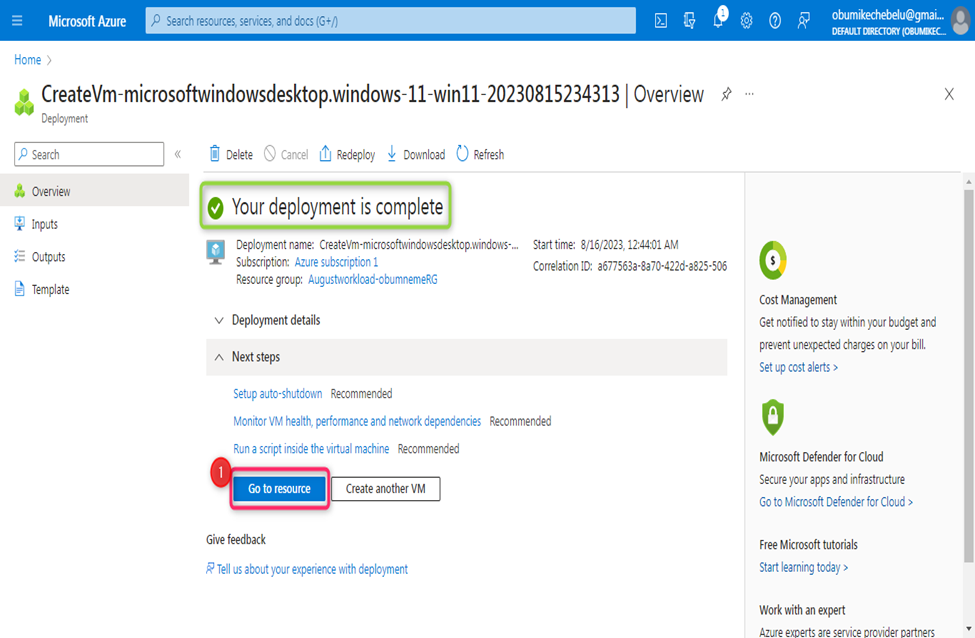
STEP 2: CREATE AZURE COMPUTE GALLERY.
On your Azure portal, after creating a Windows Virtual Machine, navigate to create an Azure compute gallery as follows;
1). Input Azure Compute Gallery on the search bar). Select Azure Compute Galleries.
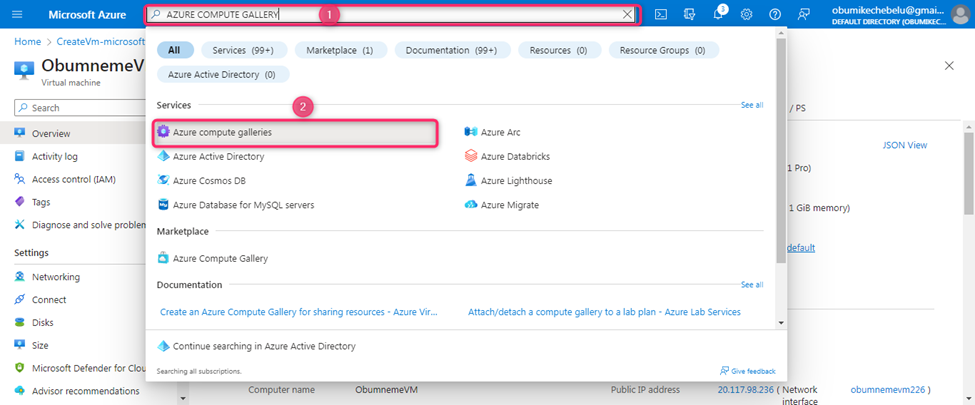
2). Select “+Create”
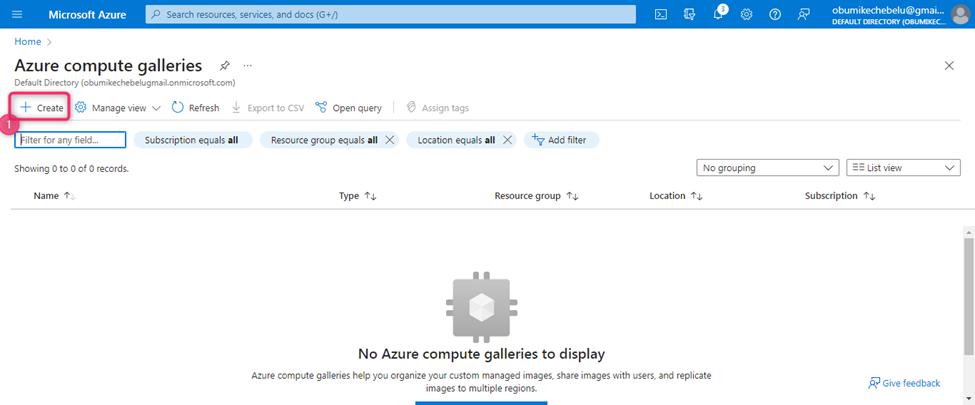
Then selected “+Crate” will launch you on the sequential pages starting from "Basics", “Sharing”, “Tags”, and “Review+Create” pages. Successful validation after a review triggers the Create command for application deployment. A successful deployment message will direct you to go to resource for further actions.
3). On the Basic page, Input the project and instance details [Subscription, Resource group, instance name, Region and Description] and “Next: Sharing methods”.
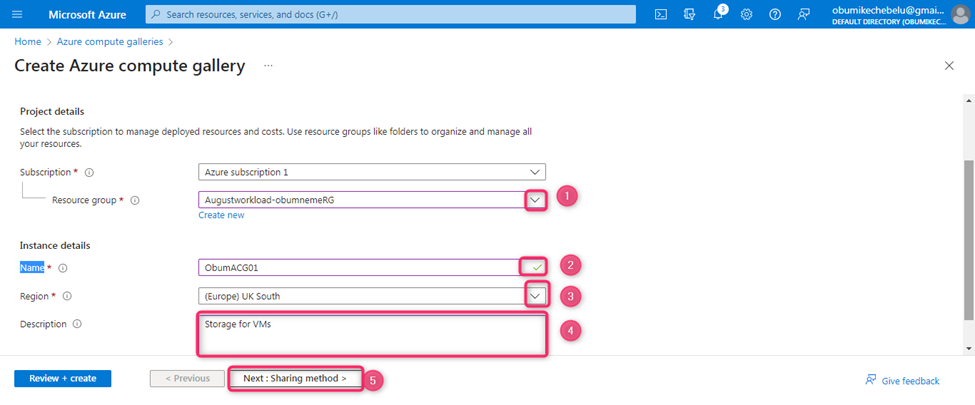
RBAC stands for Role-Based Access Control. It's a method of managing access to resources within a system, application, or platform based on the roles and responsibilities of users. In RBAC, access permissions are assigned to roles rather than directly to individual users. This approach helps simplify access management and enhance security by allowing administrators to control permissions in a more structured and scalable manner.
Here's how RBAC works:
1). Roles: Roles represent specific job functions or responsibilities within an organization. For example, roles could be "Administrator," "Developer," "Read-only User," etc. Each role is associated with a set of predefined permissions that define what actions users in that role are allowed to perform.
2). Permissions: Permissions define the actions or operations that can be performed on specific resources. These can include actions like read, write, delete, and more.
3). Users: Users are assigned to one or more roles based on their job responsibilities. When a user is assigned to a role, they inherit the permissions associated with that role.
4). Access Control: Access control is then managed by assigning roles to users rather than assigning individual permissions. This approach ensures that users have access to the appropriate resources based on their roles.
Benefits of RBAC include:
1). Simplicity: Instead of managing permissions for each user individually, you manage permissions at the role level, making access control more streamlined.
2). Scalability: As an organization grows, managing permissions becomes more manageable because new users can be assigned existing roles.
3). Security: RBAC reduces the risk of granting excessive permissions to users, as permissions are assigned based on predefined roles.
4). Auditability: RBAC makes it easier to track who has access to what resources, aiding in compliance and security audits.
In Azure cloud platforms, RBAC is a fundamental aspect of access management, allowing administrators to control who can perform actions on resources such as virtual machines, storage, databases, and more.
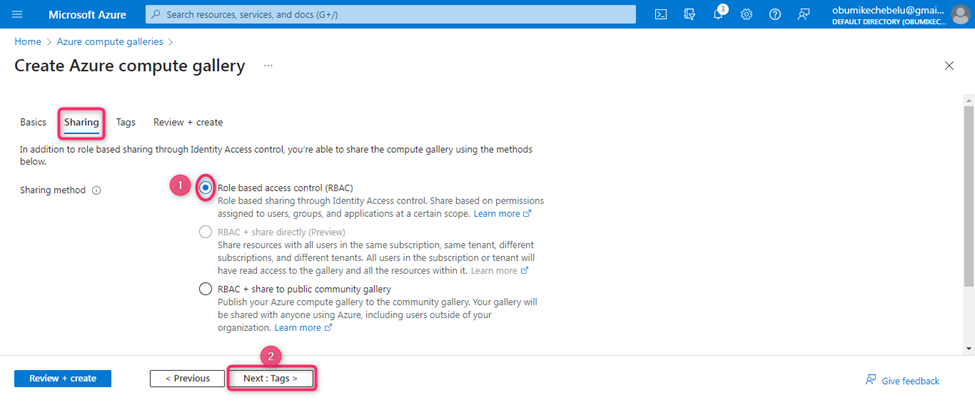
4). On the sharing method, Select RBAC [Role Based Access Control].
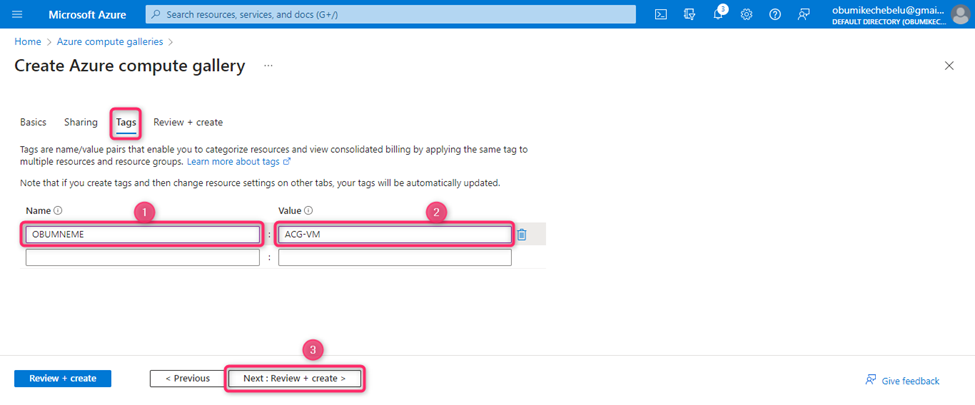
5). On Tags, Input the specific Name and values.
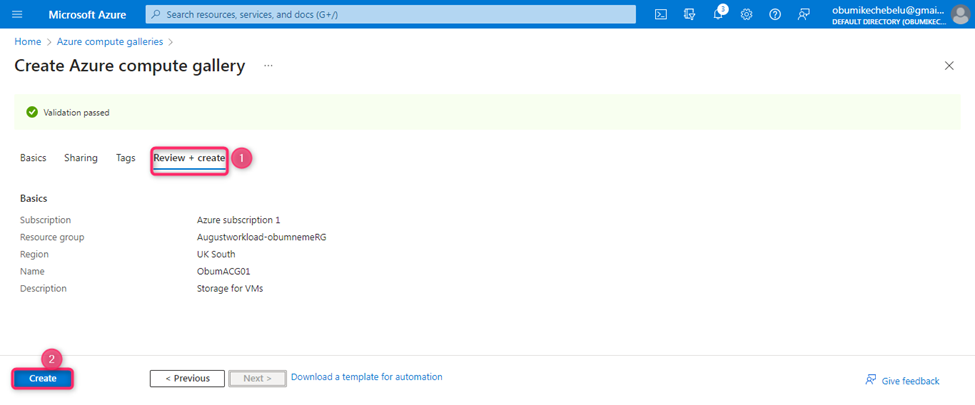
6). “Review+Create”, the system runs a check of all data inputted and an endpoint successful message “Validation passed” will trigger a Create process for deployment.
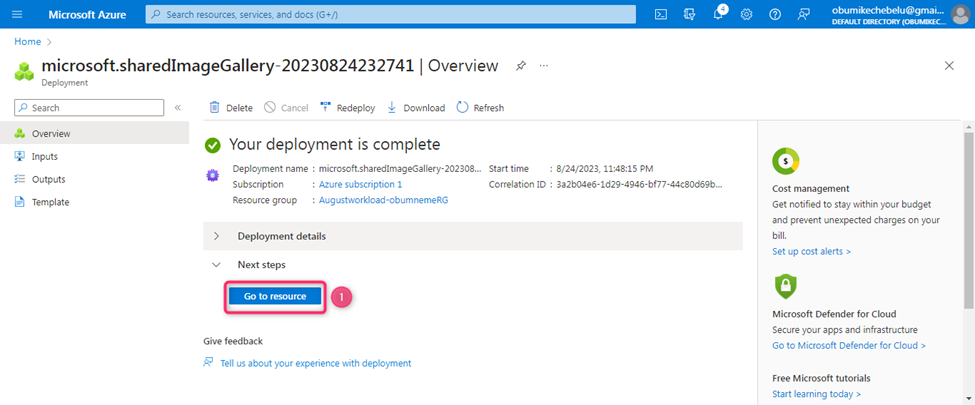
8). Azure Compute Gallery successfully deployed. Go to Resource for further action.
STEP 3: HOW TO CAPTURE A WINDOWS VIRTUAL MACHINE IMAGE.
Go to a resource through your Azure portal and follow the guide below.
1). Go to Resource [Windows 11 Virtual machine] through your Azure portal. Then, Overview and Select “Capture”.
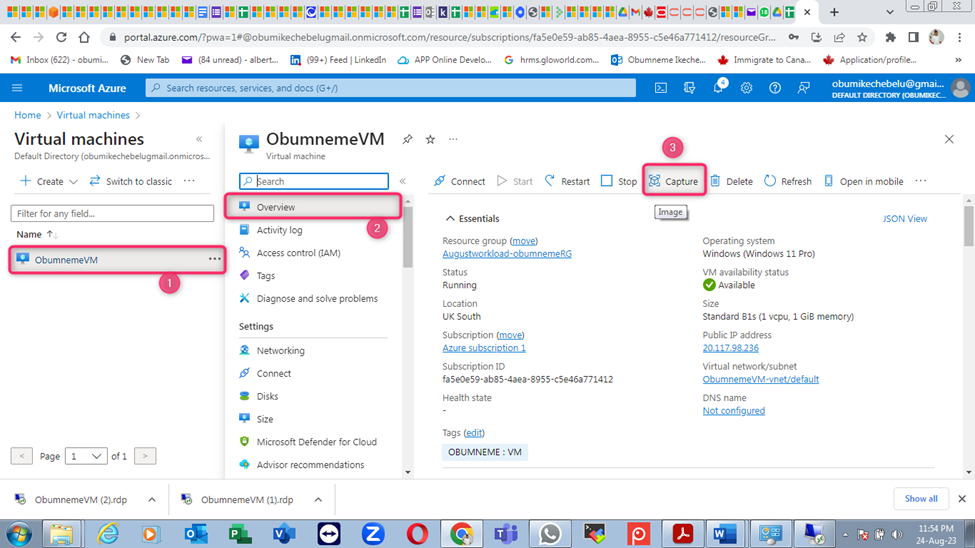
Then selected “Capture” will launch you on the sequential pages starting from "Basics", “Tags”, and “Review+Create” pages. Successful validation after a review triggers the Create command for application deployment. A successful deployment message will direct you to go to resource for further actions.
2). On the Basic page, Input the project, instance and gallery details that are not greyed [Resource group, instance name – select “Yes” to share the image to Azure computer gallery].
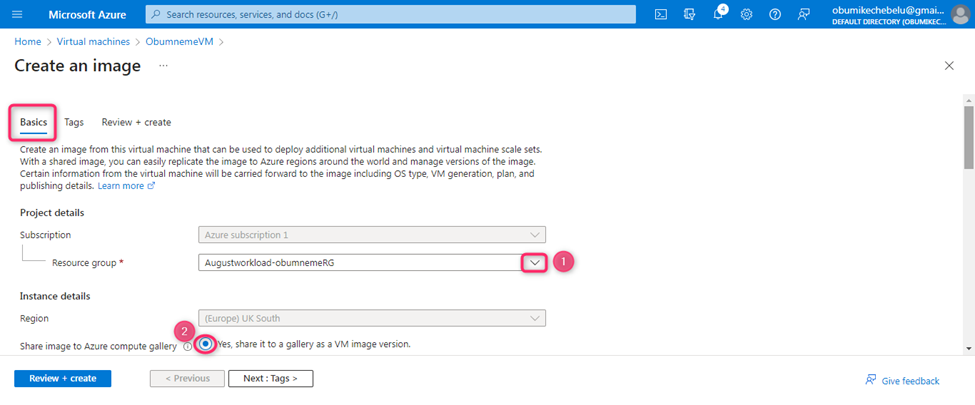
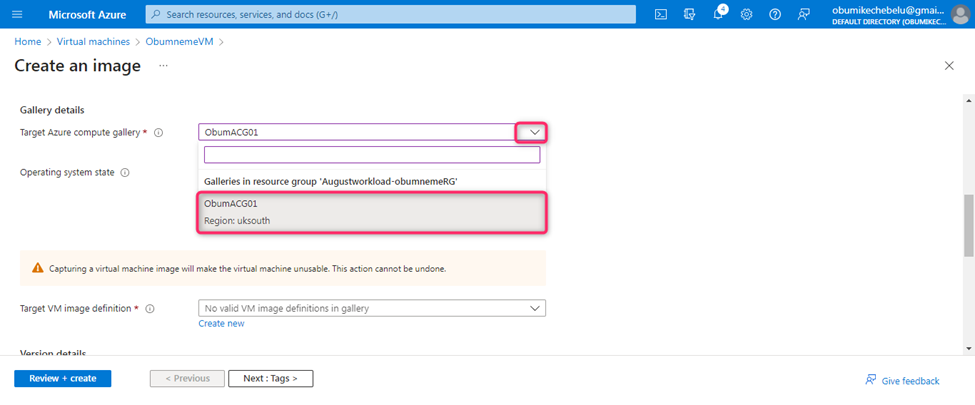
3). On Gallery details: Select the target AzureCompute Gallery which will be the name of the created Azure compute gallery.
What’s a virtual machine (VM) image definition?
Is a blueprint or template that defines the configuration, settings, and components of a virtual machine. It serves as a basis for creating new VM instances with consistent configurations. When you create a VM image definition, you're specifying the characteristics that the virtual machine will have when it's deployed from that image.
In cloud computing environments like Azure, a VM image definition typically includes:
1). Operating System: The base operating system (Windows, Linux) and its version that will be installed on the virtual machine.
2). Configuration Settings: Various configuration settings such as hostname, domain, networking configuration, and user accounts that should be present on the VM.
3). Software and Applications: Any additional software, applications, or packages that need to be pre-installed on the VM when it's deployed.
4). Security Settings: Security configurations, such as firewall rules, access controls, and encryption settings, should be applied to the VM.
5). Customizations: Any specific customizations or scripts that need to be executed during or after the VM provisioning process.
6). Disk and Storage Configurations: Information about the size and type of disks, storage accounts, and storage configurations associated with the VM.
7). Metadata: Any metadata or tags associated with the VM image for organizational purposes.
Creating a VM image definition has several benefits:
1). Consistency: VMs created from the same image definition will have identical configurations, reducing inconsistencies and potential issues.
2). Efficiency: Deploying VMs from image definitions saves time as you don't need to manually configure each VM.
3). Reproducibility: You can reliably recreate environments by deploying VMs from standardized image definitions.
4). Scalability: Deploying multiple VMs with the same configuration is simplified.
5). Disaster Recovery: VM images can be used as a backup and recovery strategy.
In Azure cloud platforms, you can create and manage VM image definitions to ensure streamlined and consistent deployments of virtual machines.
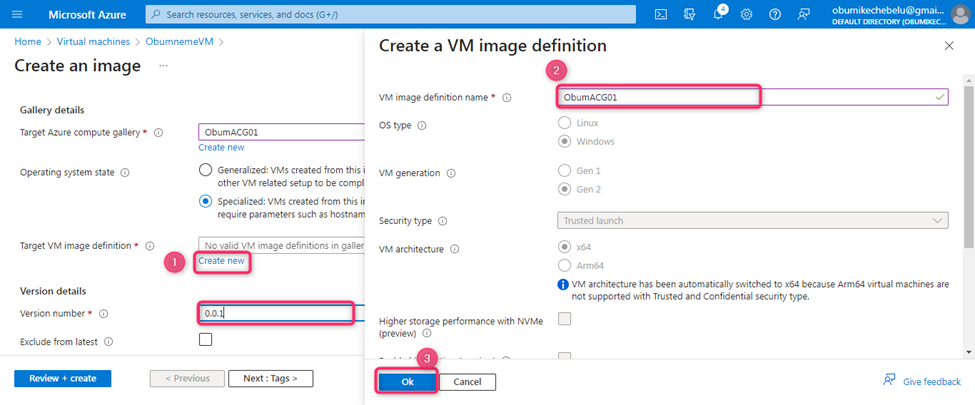
4). On Gallery details: Select the operating system state [ Specialized], Create a new target VM image definition and Version details.
Storage account types typically refer to different performance and cost tiers offered by Azure cloud storage providers. The storage account types include:
1). Standard Performance:
A). Standard Storage: Provides low-cost storage with HDDs for frequently accessed data.
B). Premium Storage (Disks): Offers high-performance SSD storage for I/O-intensive workloads.
2). Premium Performance:
A). Premium Block Blob Storage: High-performance, low-latency storage optimized for massive scale and big data analytics.
B). Premium Page Blob Storage: Optimized for low-latency random I/O operations required by VM disks.
3. Hot and Cool Tiers:
A) Hot Access Tier: Designed for frequently accessed data with slightly higher storage costs but lower access costs.
B). Cool Access Tier: Ideal for less frequently accessed data with lower storage costs but slightly higher access costs.
4. Archive Tier:
A). Archive Access Tier: For data that is rarely accessed and can tolerate longer retrieval times, offering the lowest storage costs but higher retrieval costs.
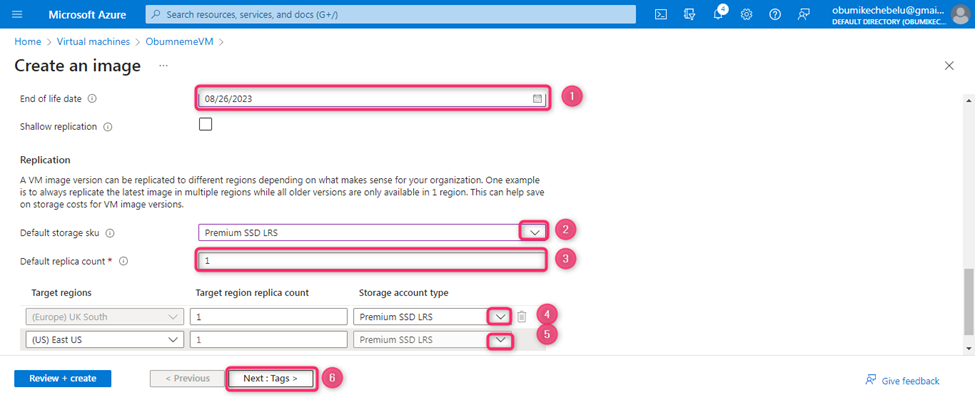
5). Input, End of Life [duration], select Storage account type and Replication of captured VM Image.
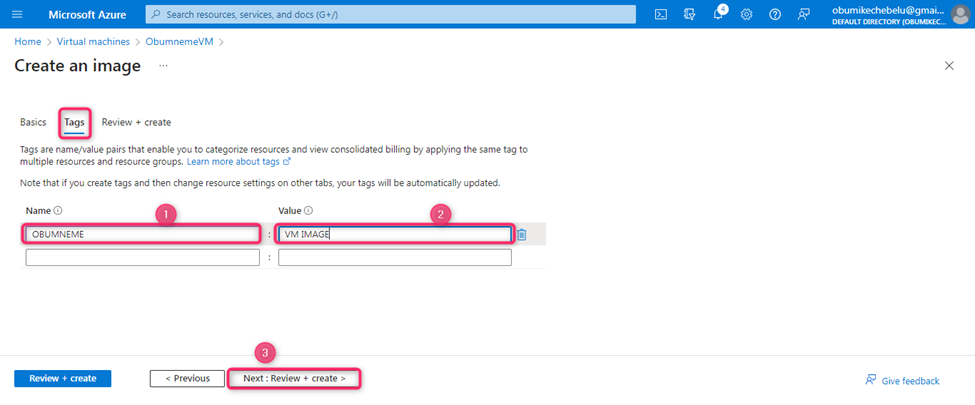
6). On Tags, Input the specific Name and values.
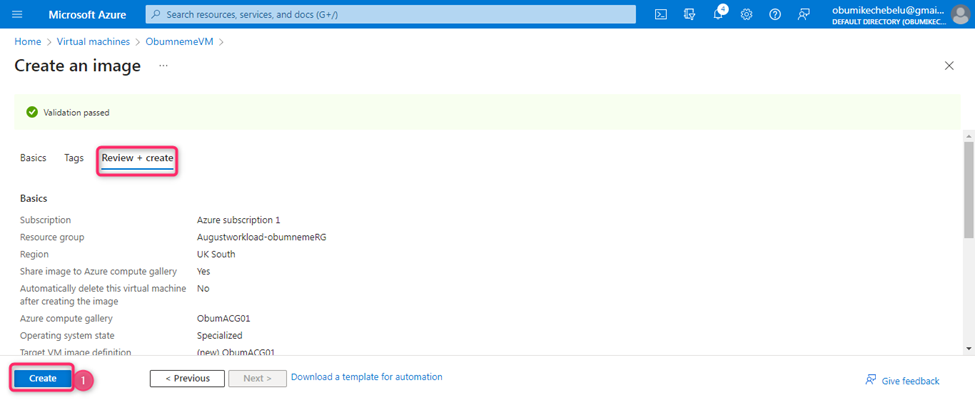
7). “Review+Create”, the system runs a check of all data inputted and an endpoint successful message “Validation passed” will trigger a Create process for deployment.
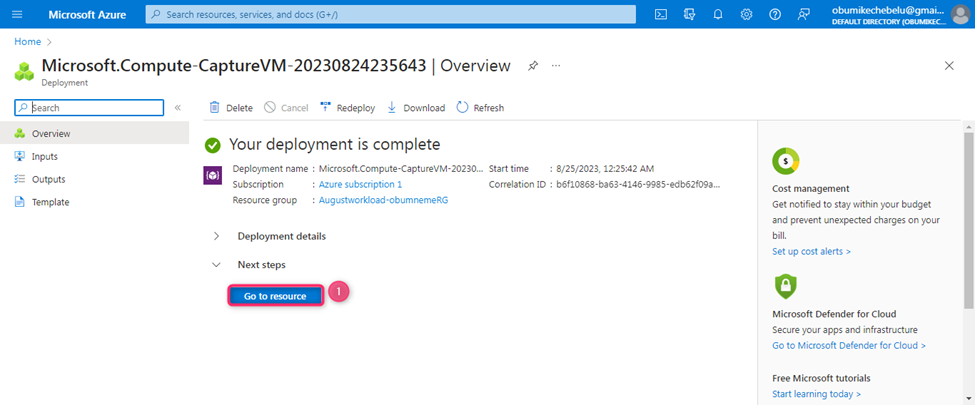
8). Azure Windows Virtual Machine Image successfully captured/deployed. Go to Resource for further action.
SUMMARY:
We were able to successfully explore the following Azure Cloud journey and I am confident that you can navigate on your own through the above guide made easy in the areas below;
1). Create Azure Compute Gallery.
2). Capture Windows Virtual Machine Image.
Thank You!...
Subscribe to my newsletter
Read articles from OBUMNEME ANTHONY IKECHEBELU directly inside your inbox. Subscribe to the newsletter, and don't miss out.
Written by
