How To Create Virtual Machine In The Cloud Using Microsoft Azure.
 Oluwatobi Adeoye Atobatele
Table of contents

Introduction
Virtual Machine is a replica of your Laptop or Desktop computer running virtually in the cloud.
This is the concept of cloud computing which describes the process of operating your laptop or desktop virtually.
Now, just like any hardware (computer) is usually driven by software programs, our virtual machine too needs an operating system (software) to function.
Hence, in this article, we are going to describe the step-by-step process of creating a Virtual Machine, installing the operating system of our choice in the machine, connecting to your virtual machine using your local computer etc.
- SIGN IN TO THE AZURE PORTAL
Before you can access the Microsoft portal, you must have created an account as a pre-requisite, click here to create your free account and subscription log in here before we get started.
Once that is done, accept my congratulations on becoming a Microsoft Azure subscriber, now you need to be sure you are signed in using your registered email and password Azure portal
- CREATE YOUR VIRTUAL MACHINE
The next thing to do is to create your personal computer called a "Virtual Machine or VM" on the cloud platform of Microsoft Azure.
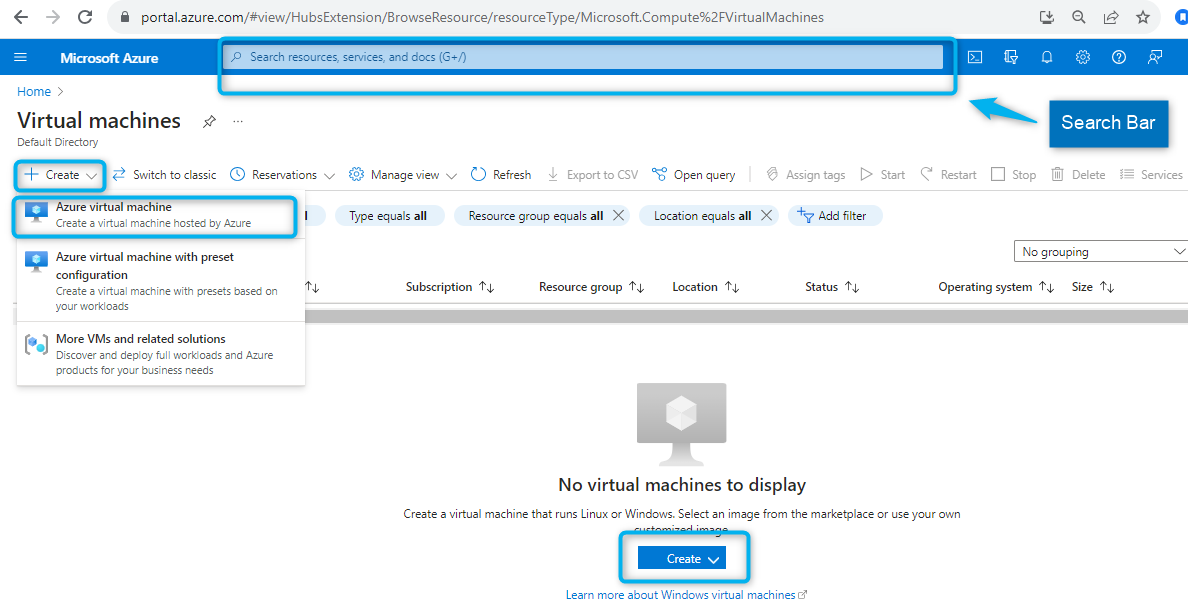
Please follow the steps and annotation guide below to create a VM:
a. In the search bar, type "Virtual Machine"
b. From the search results, select "Virtual Machine" from the list of resources shown
c. Click on the 'Create' button
d.) Select the "Azure virtual machine" as annotated
If you have done all the above successfully. Thumbs up!
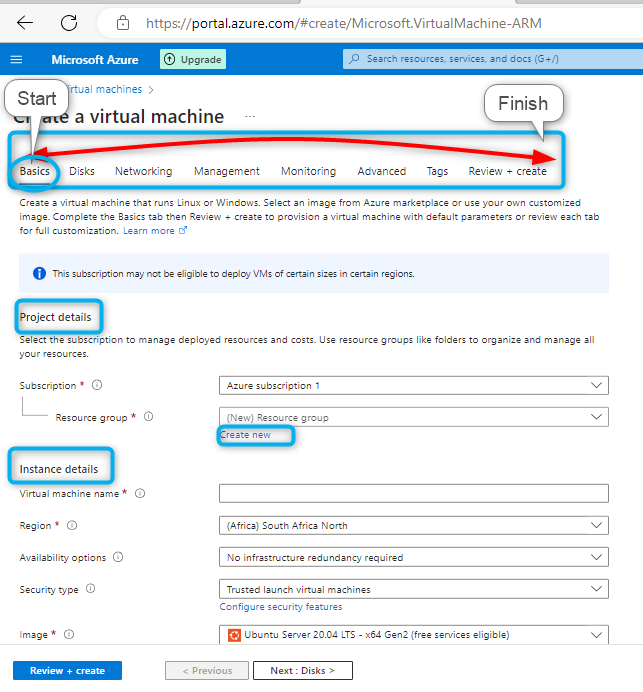
You will be directed to the interface where you can now deploy a new virtual machine. You will need to provide certain information based on your preference, starting with basic information till you are directed to "review and create".
The interface looks like below highlight:
Well, let's get to the business.
Project Details
Under the "project details, you will identify your subscription and you will create a resource group. Let us explain this further.

Microsoft Azure Subscription
You will need to identify yourself to Microsoft Azure either as a free member profile or a paid member profile by identifying your subscription. Your subscription is the gateway to accessing the platform.
In Microsoft Azure, a subscription is a billing and management profile that provides access to Azure services and resources. It's the basic account for the billing process, access control, and resource management within the Azure cloud platform.
When you sign up for an Azure account, you have essentially created a subscription.
Remember that you signed up for a free subscription with Microsoft Azure, which gives you $100 free credit to explore the platform for 30 days after which you will upgrade to a "Pay As You Go" subscription if you wish to continue using the service.
By identifying your subscription, you have authorized Microsoft Azure to deduct the cost of running your resources from that account.
The next thing to do under the "project details" is to create a "resource group".
Creating Resource Group
Under this particular project details, we put ourselves in the position of a contractor who though has many portfolios he is handling, he needs to organize himself in such a way that the documents of each and respective project are labeled properly and placed where they can be easily referenced.
In Microsoft Azure, a resource group is a logical filing system (also referred to as a container) that hosts related Azure resources for easy management, organization, and deployment.
It's a way to group resources (or documents) that belong to the same application, project, or purpose together, allowing you to manage them better.
You will need to give your resource group a name to separate one project from the other and then you can start adding resources to it.
The organization that resource groups provide makes it easier to manage complex Azure deployment and keep track of your resources in the cloud environment.
Instance Details
Let us use the analogy of the contractor whose project would require the acquisition of a new laptop. Every laptop has configuration and specifications such as the size of the hard drive, speed of the processor, the capacity of the memory, the generation of the laptop model etc.
In much the same way, "instance details" in Microsoft Azure refer to the specific information and configuration settings associated with an instance of a particular service or resource.
The particular resource we want to deploy in this instance is a laptop and we need to specify the sophistication we want to feature.
An "instance" in this context refers to a single unit of a service or resource that you want deployed in your Azure subscription.
The term "instance details" varies depending on the type of service or resource you are trying to describe. Other examples of instances that can be deployed in Microsoft Azure such as storage account instance details, database instance details, virtual network instance details, container instance details etc. are beyond the scope of this article.
Virtual Machine Instance Details
The instance details of the virtual machine (VM) we would be deploying would include information such as the VM's size (CPU, memory, disk), the operating system installed (Windows 10, 11 etc.), the network configuration, the IP address and any custom configurations you will like to make.
To complete this process, you will need to:
a) Give your virtual machine a name
b) Select the location (region) you want your virtual machine to be located.
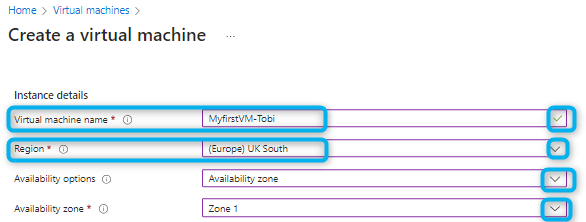
Virtual Machine Name: Giving a virtual machine (VM) a name in Microsoft Azure is important for several reasons. It helps you to identify and organize your VMs easily in the azure environment. It is important to have a clear and meaningful name that you can relate to the project to help you navigate through your resources.
Region in Microsoft Azure: As you are aware our VM runs in the cloud somewhere around the world.
In Microsoft Azure, a region refers to a specific geographic location where Azure data centers are located.
Each region is a separate geographical area with one or more data centers that have dedicated physical infrastructure such as servers, networking equipment, storage and other hardware required to run Azure services.
Azure regions are distributed around the world, and each region is composed of multiple data center facilities.
To set up a VM in your preferred region, click the dropdown button and pick anyone that appeals to you, though each region has peculiar requirements and cost implications.
The smart thing to do is to choose a region that is closest to you to minimize your cost and in our case, I will be choosing a UK region.
Availability Zone
Next, click on the dropdown to select your availability Zone. To explain the availability zone, imagine that within a particular state, like Lagos, Chicago, New York, London etc. each state has three or more data centers that communicate with each other through fiber optic cables and back up each other in case any one fails, the other one picks up immediately.
In Azure, a region can consist of three availability zones, known as Zone 1, Zone 2 and Zone 3. Each zone has one or more data centers that are kilometers apart from each other.
Data Center
In Microsoft Azure, a data center refers to a physical facility that houses the hardware and infrastructure required to operate Azure's cloud computing services.
We had severally mentioned that virtual machine runs in the cloud. The data center in Microsoft Azure is a physical location where infrastructures that support the cloud services are located and made to sync with the other pairs.
Data centers are essential for providing the computational power (e.g. generator, solar power etc.), storage capacity (e.g. hard drive), and networking capabilities that underlie Azure's cloud platform.
These data centers are equipped with independent power, networking, and cooling infrastructure to minimize the impact of failures and disruptions.
What physically Links these data centers together is Fibre Optic Cable. Fiber optic technology allows for high-speed data transmission over long distances while maintaining low latency and high bandwidth capabilities.
Security type
The security types and features in Microsoft Azure help you build a robust and secure cloud environment.
Security in Azure is a shared responsibility, with Microsoft responsible for the security of the cloud infrastructure while customers are responsible for securing their applications and data within Azure.
There are various security types and features that enhance the protection of VMs and the data they contain.
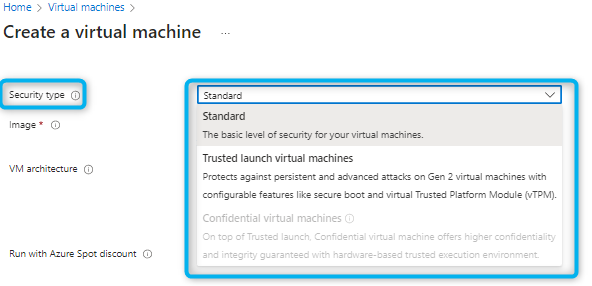
For this article, we select "standard type" as annotated below as the specific security features are beyond our scope.
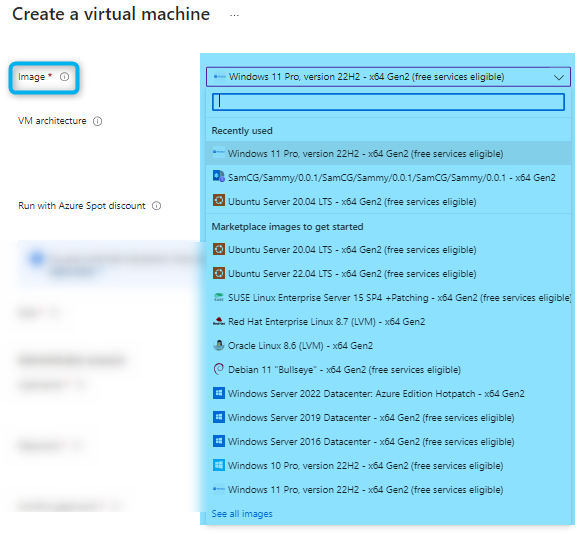
Image
Image in the context of Microsft VM does not refer to a picture or a graphic, it is the basic configuration needed to create/deploy the virtual machine.
The image defines the operating system (OS) and basic software setup of the VM after which you can customize the VM further based on your preferences. You typically select any one of the existing pre-configured images to begin enjoying the VM cloud services.
Azure provides a variety of template images that you can use as a starting point to deploy VMs quickly and efficiently including various versions of Windows Server etc. that have been optimised for specific tasks.
We shall be deploying Windows 11 for our article
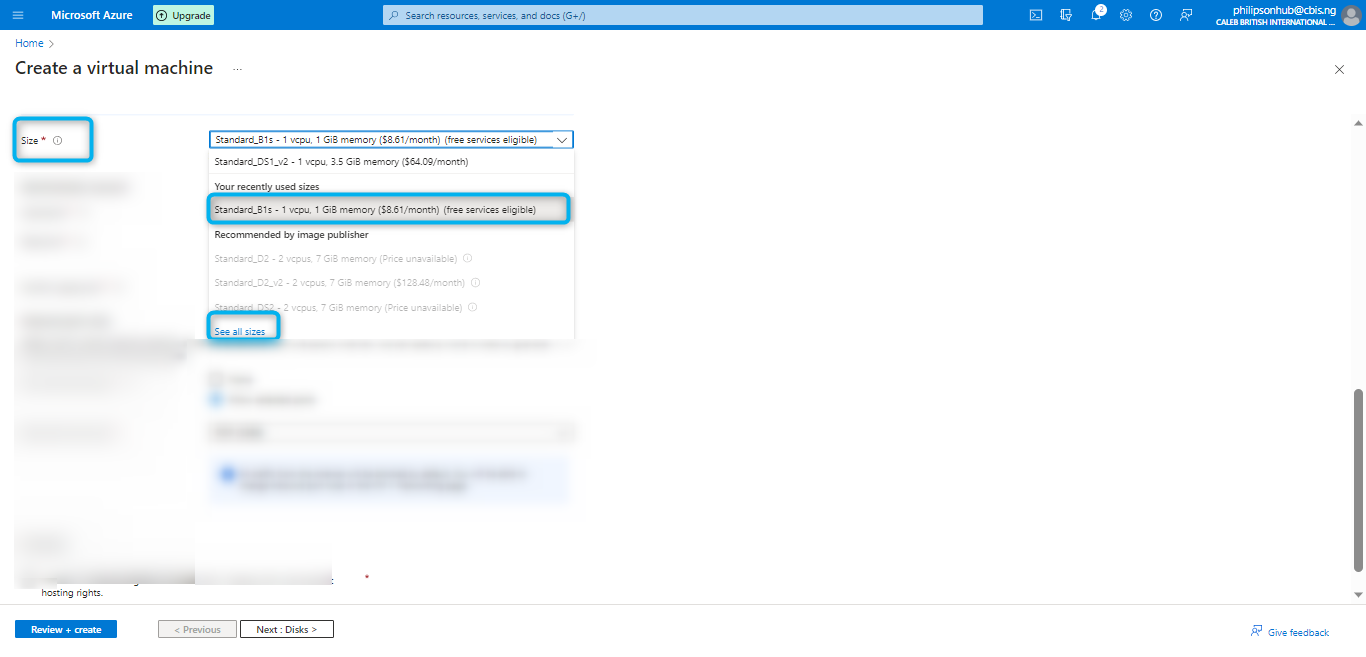
Size
Administrator Account

You will be required to create a username and password to gain access to your virtual machine and to grant you administrative rights in the Azure environment. Username: The username you provide will be used to log in to the VM.
Password or SSH Key: The password or SSH public key associated with the administrative account would complement the administrative account to authenticate access to your VM.
If you're using a Windows-based VM, as in our case, you'll provide a password but with a Linux-based VM, you'll use an SSH key pair for authentication.
Inbound Port Rule

At this juncture, you are allowed to set the networking parameters.
In Microsoft Azure, inbound port rules are used to control incoming network traffic to your virtual machines (VMs).
These rules specify which ports are open and accessible from the internet or other networks.
You can configure inbound port rules during the creation of a virtual machine, you can also modify the Network Security Group (NSG) after the VM has been created.
For this article, the "public inbound ports" would be set to allow selected ports.
Select inbound ports

The process of logging into your VM (remember that it is virtual and in the cloud) is called RDP (Remote Desktop Protocol).
Port 3389 is used for remote desktop connections for Windows-based virtual machines in Microsoft Azure.
When you create a Windows VM in Azure, you can use RDP (or log into it from your local computer) to establish a remote desktop connection to the VM's cloud environment. This allows you to interact with the VM as if you were sitting in front of it.
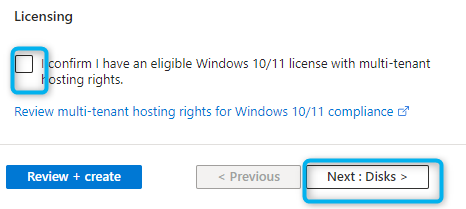
Licensing
The box needs to be ticked to confirm your eligibility to use Windows 11 which of course you have been authorized to use by your Microsoft Azure subscription.
Disk
Can you still remember where we started from?

Clicking next leads us to the second phase which is to create a disk page.
Disk Encryption
We would not be checking the disk encryption box for this exercise, however, the Azure Virtual Machine Disk Encryption feature allows you to encrypt the virtual machine's operating system (OS) and data disk content as another level of security.

Disk encryption protects your sensitive data just in case an unauthorized person gains access to the data storage, the data would be unreadable without the appropriate encryption keys.
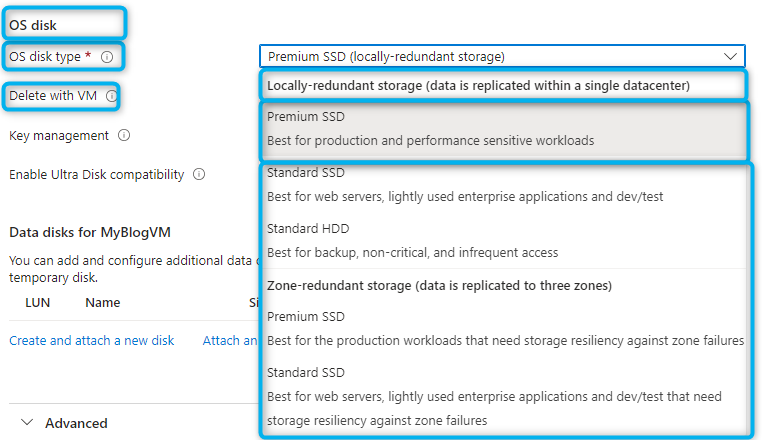
OS DISK
As we already mentioned, the disk is the storage device in your VM and you have the opportunity here to choose the type and effect some other settings to your preference.
OS DISK TYPE
The option you have here is to choose your disk type while considering the anticipated workload. Some options have been optimized to suit your workload requirements. The "Locally-redundant storage" if selected is automatically restricted to just one data center and never going to be backed. The best option for an individual subscriber who is mindful of cost efficiency. We would however be selecting the Premium standard for our experiment which is the best option for medium businesses. Other options scale higher for higher workloads, benefits and cost implications.
Delete With VM
This check box gives you the option to configure your VM in such a way that if you choose to delete your VM in the future, the disk alongside stored information such as work files, management reports, employee files etc. can be used when deploying another VM.
Key management

Platform-managed keys: Key management gives the option of allowing Microsoft to protect your disk and data by automatically generating the encryption code. These are referred to as platform-managed keys for the encryption of your managed disk. Platform-managed keys are managed by Microsoft.
Customer-managed key: Microsoft also gives you the option of managing encryption using your keys. You can specify a customer-managed key to use for encrypting and decrypting all data in managed disks if your business has the required expertise to manage this sophistication.
Review and Create
We have supplied all we need to deploy our VM and can maintain all the other default settings as suggested by the platform but you can tweak to your preferences. Hence, we would flip to the Review and Create tab to finish our setup.
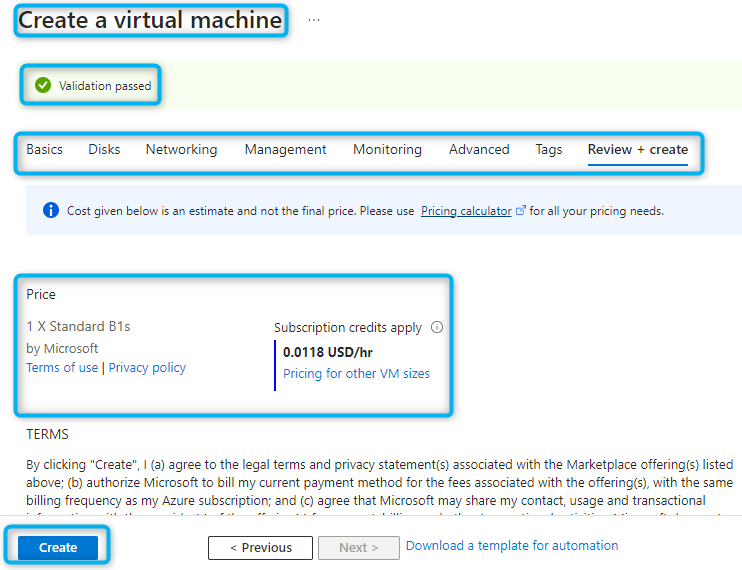
Click on 'Create' and the real-time deployment will begin. After a few moments, depending on the size and latitude of the services you have selected, the deployment will be complete and you will see a window like below:
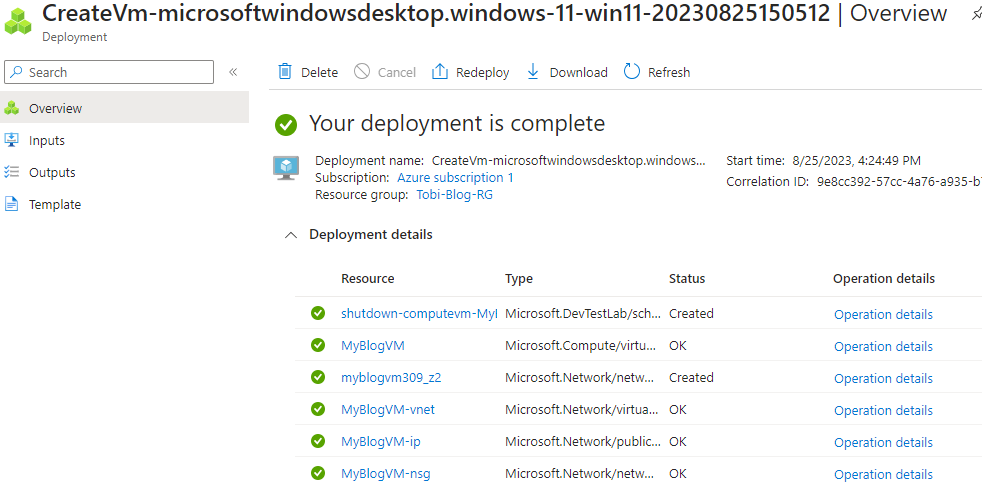
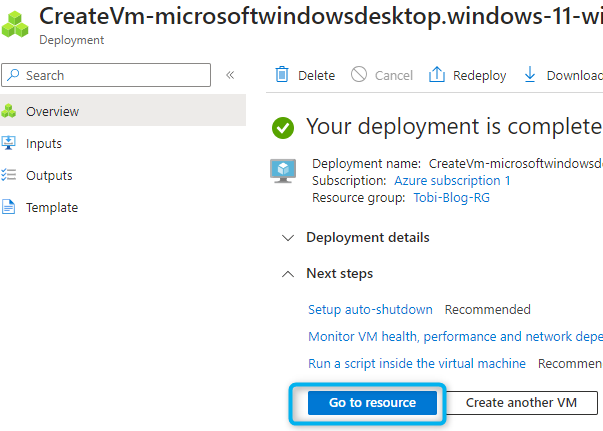
The next thing to do is to "Go to resource". This means that your VM is now available for you to access, and open your computer.
RDP your Virtual Machine
RDP means Remote Desktop Protocol and runs on the premise that since you now have your VM (Virtual Computer/Laptop) situated somewhere around the world, with your username and password, you can connect remotely from your local laptop.
After you have selected "Go to resource, you will see the interface displayed below:
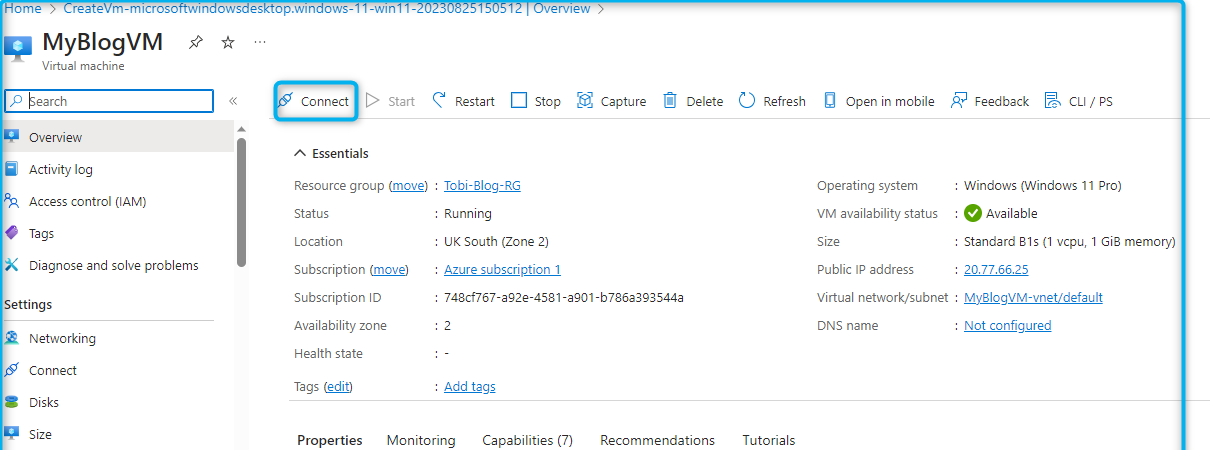
Follow the below steps:
After you have clicked on 'Connect, you will have an interface similar to the one below
Locate Native RDP and click on Select to download the file
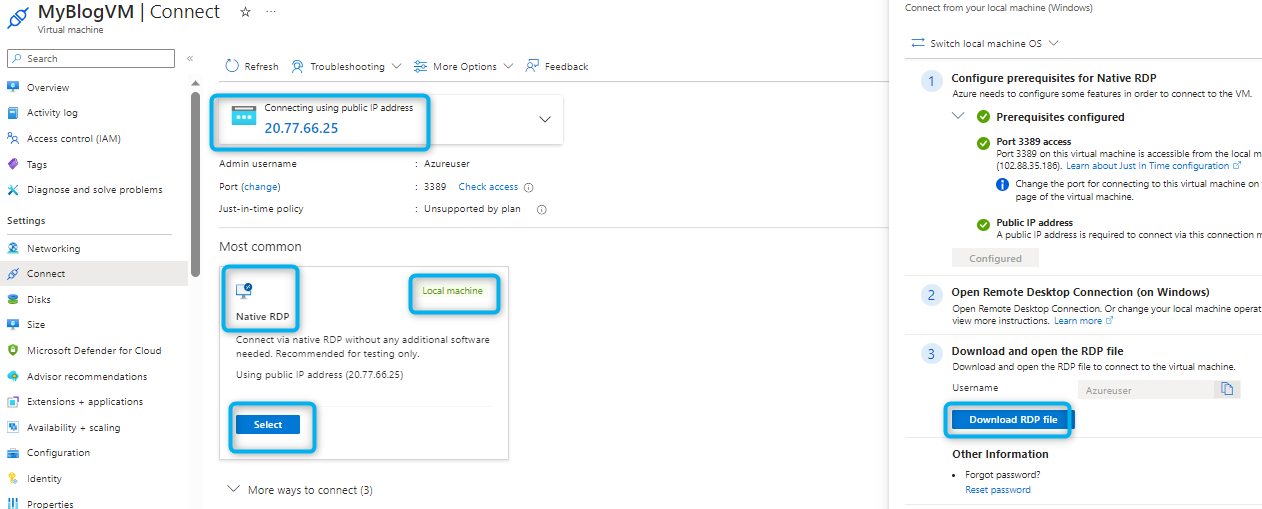
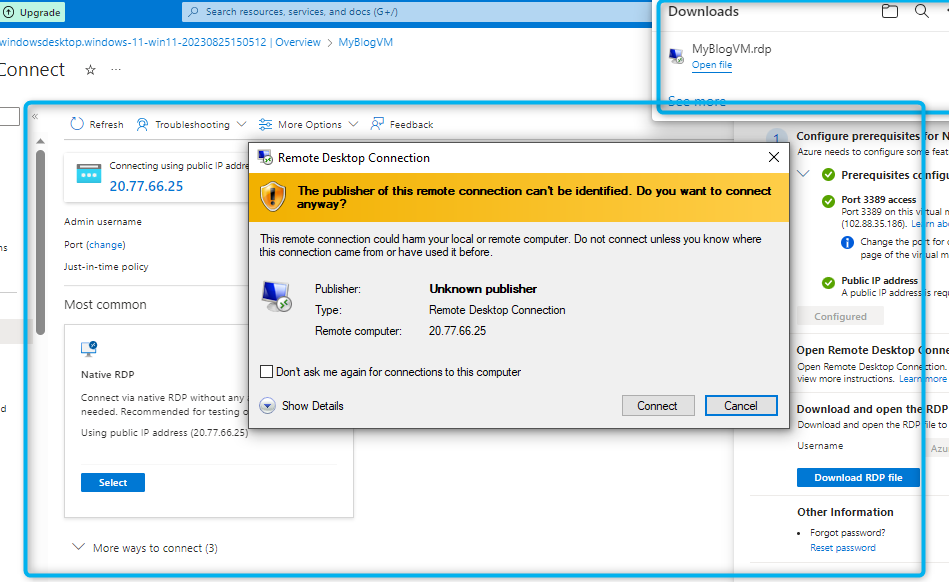
- Locate the downloaded file and open and you will have a prompt to Connect as highlighted below:
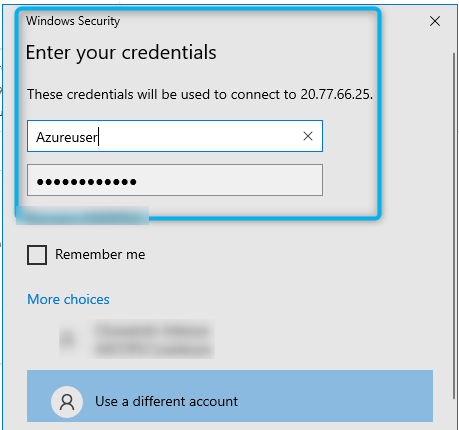
- Do you still remember your administrative password? Input it
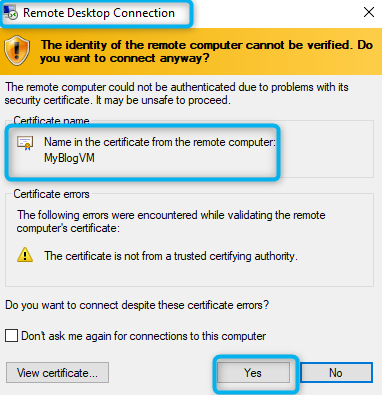
- Next is for you to confirm the details of your VM and click yes as described below:
- The next set of instructions in the interface would configure your remote desktop for you. Welcome to your personal Virtual Machine.
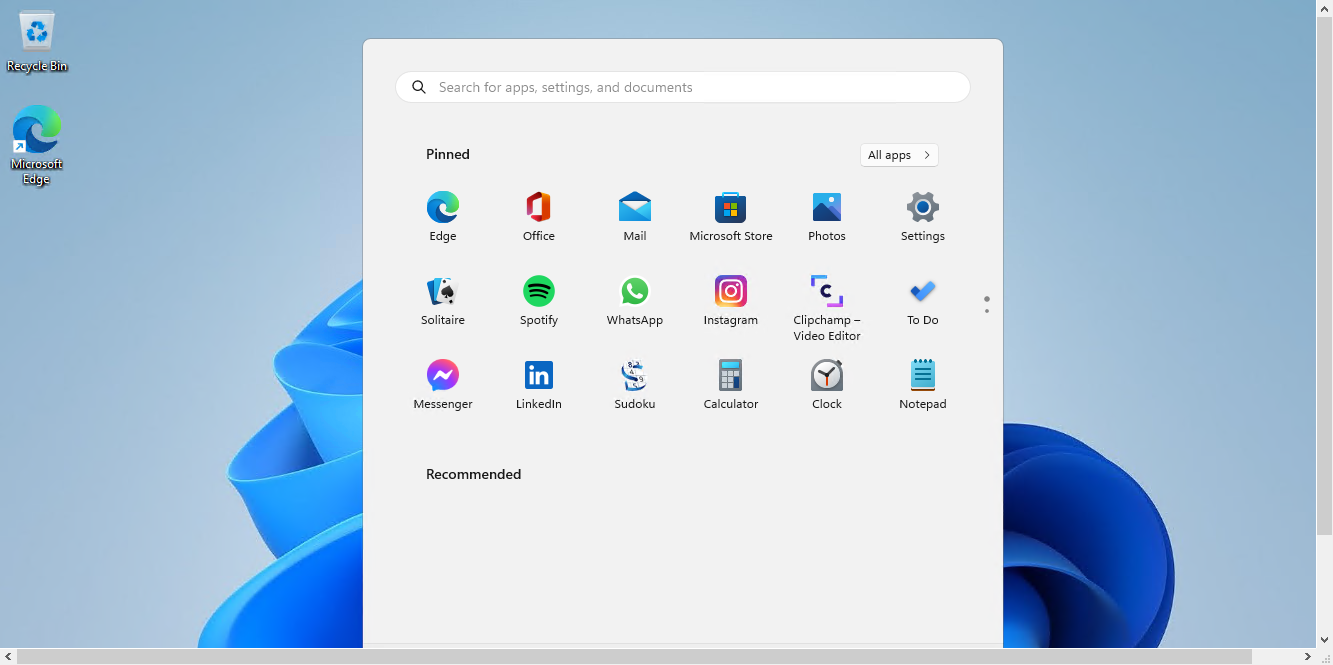
What you now have is your local computer connecting with your remote machine. You can do everything your local computer is capable of doing.
I hope my article is able to guide you through your Virtual Machine creation journey. Please I anticipate your feedback.
To get articles like this directly in your mail, please subscribe.
Subscribe to my newsletter
Read articles from Oluwatobi Adeoye Atobatele directly inside your inbox. Subscribe to the newsletter, and don't miss out.
Written by
