A Guide To Create An Azure Virtual Machine Scale Set On A VM Captured Image.
 OBUMNEME ANTHONY IKECHEBELU
WHAT IS AZURE VIRTUAL MACHINE SCALE SET?
An Azure Virtual Machine Scale Set (VMSS) is a group of identical, load-balanced virtual machines (VMs) in Microsoft Azure. It allows you to deploy and manage a set of VMs that automatically increase or decrease in number based on demand or a defined schedule.
Here are some key features and benefits of Azure VMSS:
1. Auto-Scaling: VMSS can automatically scale out (add instances) or scale in (remove instances) based on metrics like CPU usage, memory, or custom application metrics. This helps ensure that your application can handle varying levels of traffic efficiently.
2. Load Balancing: Azure Load Balancer distributes incoming network traffic across the instances in a VMSS, ensuring that the workload is evenly distributed and improving application availability.
3. High Availability: VMSS instances are spread across multiple fault and update domains, which enhances the availability of your application. If one domain experiences issues, the others remain unaffected.
4. Consistency: All VM instances within a scale set are based on the same VM image, ensuring consistency in configuration and application deployments.
5. Customization: While the VM instances are similar, you can customize individual instances using extensions, custom scripts, and configuration settings.
6. Rolling Updates: VMSS supports rolling updates, allowing you to apply updates, patches, or changes to instances in a controlled and gradual manner to minimize downtime.
7. Integration with Azure Services: VMSS integrates with other Azure services like Azure Autoscale, Azure Virtual Network, and Azure Availability Zones.
8. Stateless Workloads: VMSS is ideal for stateless applications that can horizontally scale by adding more instances. Stateful applications may require additional considerations.
9. Managed Disks: VMSS instances can use managed disks for more efficient and reliable storage management.
10. Template-Based Deployment: You can define and deploy VMSS instances using Azure Resource Manager templates, making it easier to automate and repeat deployments.
Azure VMSS is commonly used for web applications, microservices, and other workloads that need to handle variable levels of traffic. It simplifies the management of VM fleets and helps ensure high availability and scalability for your applications.
To create Azure VMSS, an Azure compute gallery with a Virtual machine image captured first before deployment of Azure VMSS.
A more detailed practical approach on how to create an Azure Virtual Machine Scale Set is well explained below as we cover these key vital steps. [Let’s navigate].
1). Create Azure Virtual Machine Scale Set.
Let’s dwell on the basic prerequisite needed first before going through the steps listed above.
PREREQUISITE:
Your PC with online access.
Microsoft Azure account - If you don't have an Azure paid subscription, create a Free Account before you begin.
Create a Windows Virtual machine.
Create an Azure Compute Gallery and Capture a VM Image.
Follow the below steps to create an Azure Virtual Machine Scale Set.
STEP 1: CREATE AZURE WINDOW 11 VIRTUAL MACHINE.
Login to https://portal.azure.com/ from your PC.
On the Windows dashboard, search "Virtual machine", and select "Virtual machine". Then select “+Crate” This will launch you on the sequential pages starting from "Basics", “Disk”, “Networking”, “Management”, “Monitoring”, “Advanced”, “Tags”, and “Review + Create” pages. Successful validation after a review triggers the Create command for application deployment. A successful deployment message will direct you to go to resource for further actions.
Do follow the link below for a guide to creating an Azure Windows 11 virtual machine.
https://hashnode.com/post/clldxo98f000008l804fof7eh
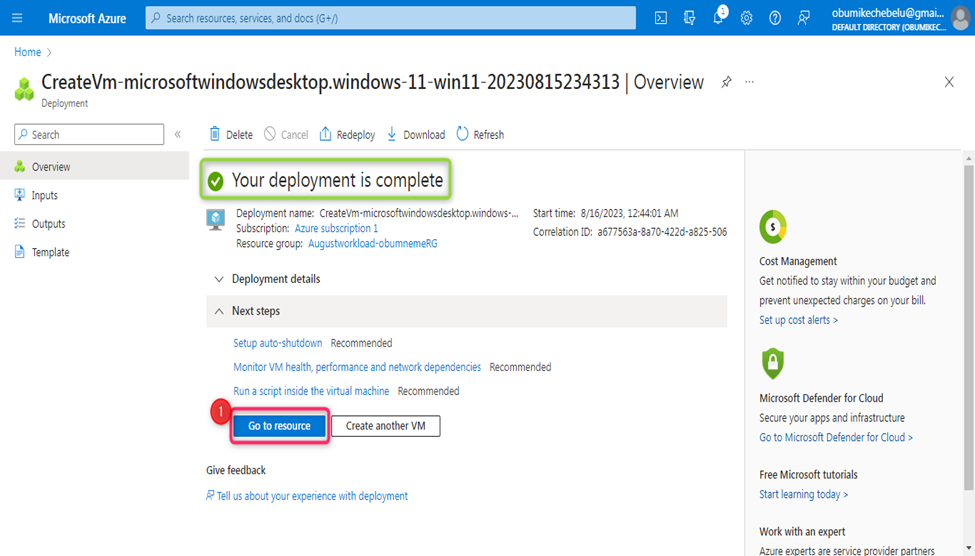
The last action on VM creation is as follows:
1). Click “+create” after a successful / passed validation for Azure window 11 virtual machine deployment. A successful deployment message will redirect you to “Go to Resource” for other operation activities [Step 2: Create a Compute gallery and Capture VM Image].
STEP 2: CREATE AZURE COMPUTE GALLERY AND CAPTURE VM IMAGE.
On your Azure portal, after creating a Windows 11 Virtual Machine, navigate to create an Azure compute gallery and capture the virtual Machine Image. Successful validation after a review will trigger a Create command for application deployment. This will redirect you to go to resource for further actions.
Do follow the link below for a guide to create an Azure Compute Gallery and capture a Windows 11 Virtual Machine Image.
https://hashnode.com/post/cllqvw4y6000208mc8tolbl1a
STEP 3: CREATE AZURE VIRTUAL MACHINE SCALE SET VMSS.
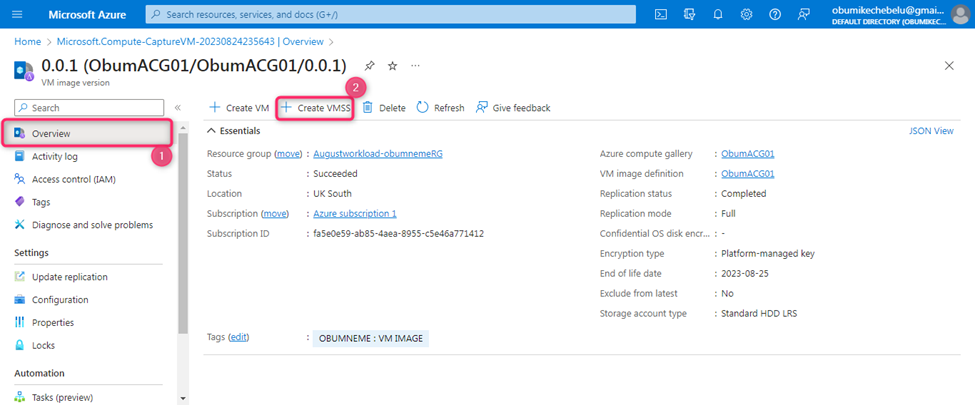
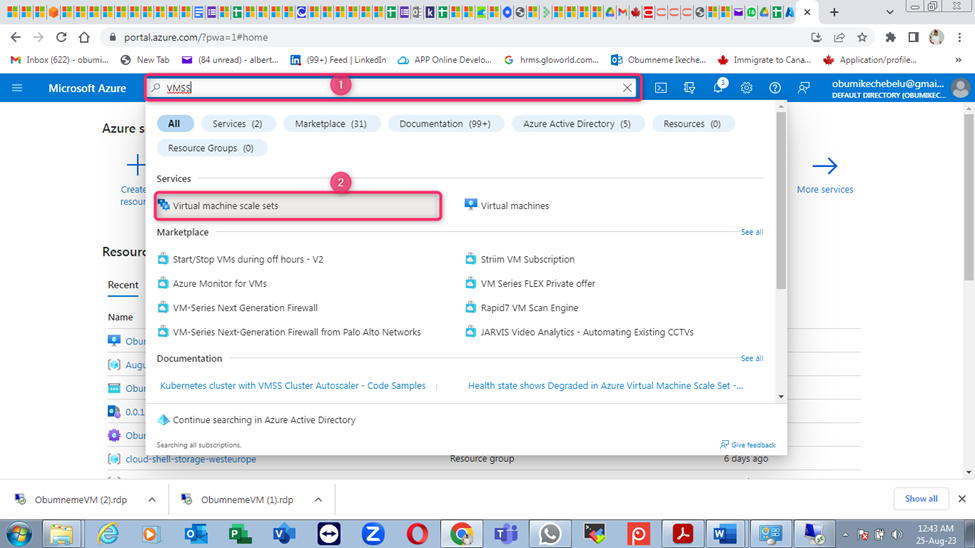
VMSS can be created through direct launch on the Virtual Machine captured Image overview to select “+VMSS” or a launch on the Azure portal bar and type VMSS [Virtual Machine Scale Set]. Both approaches will lead to the actual VMSS creation page.
1A). Direct Launch on the Virtual Machine captured Image overview. Then, select “+VMSS”
1B). Input VMSS on the search bar. Then, select Virtual Machine Scale Set.
2). Select “+Create”
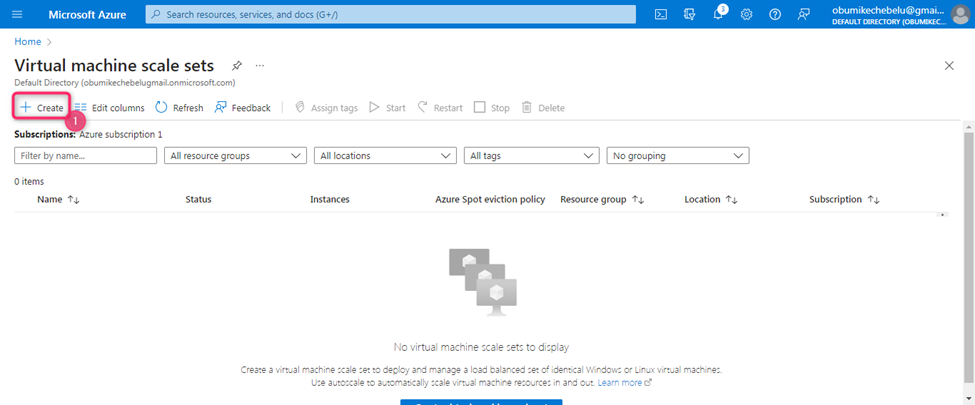
The selected “+Crate” will launch you on the sequential pages starting from "Basics", “Spot”, “Disks”, “Networking”, “Scaling”, “Management”, “Health”, “Advanced”, “Tags”, and “Review + Create” pages. Successful validation after a review will trigger a Create command for application deployment. A successful deployment message will direct you to go to resource for further actions.
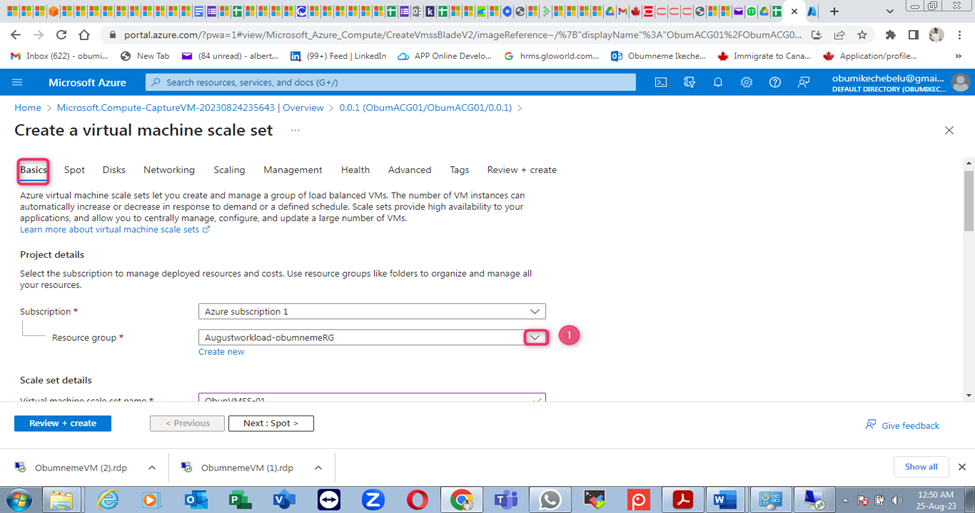
3). On the Basic page, Input the right data for the various key details; Project details, Scale set details, Orchestration, Instance details and Administrator details. Select Resource group.
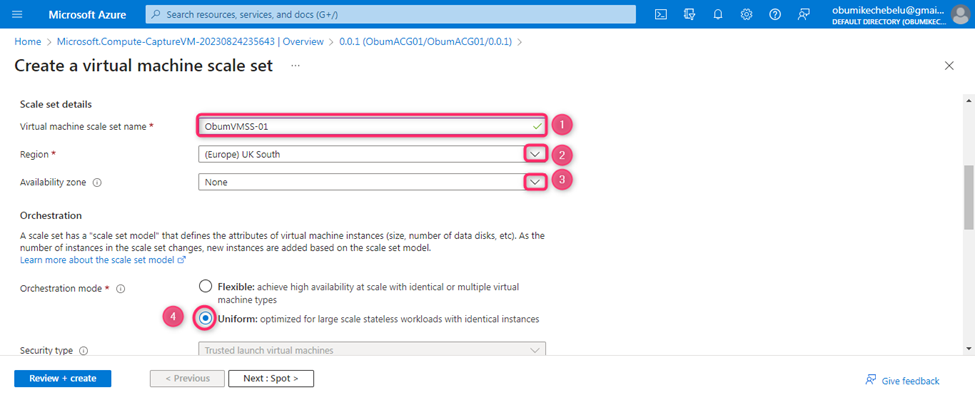
4). On the Basic page - Scale set details, input the VM scale set name, Region and Availability zone.
Orchestration in Azure refers to the management and coordination of various resources and processes to achieve a specific goal or outcome. It involves automating and organizing the deployment, configuration, scaling, and management of complex applications or services within the Azure cloud ecosystem. Orchestration helps ensure that different components work together seamlessly to deliver a complete solution.
Azure provides several tools and services for orchestration, including:
1. Azure Resource Manager (ARM): ARM is the primary tool for deploying and managing resources in Azure. It allows you to define infrastructure as code using templates, enabling consistent and repeatable deployments.
2. Azure Logic Apps: Logic Apps provide a way to automate workflows and integrate different services, both within Azure and across other platforms. It helps orchestrate actions and data flow across various applications and services.
3. Azure Kubernetes Service (AKS): AKS is a managed Kubernetes service that enables you to deploy, manage, and orchestrate containerized applications using Kubernetes.
4. Azure Functions: Azure Functions allow you to write and deploy event-driven functions that can be triggered by various Azure services, enabling the orchestration of specific actions based on events.
5. Azure Data Factory: Data Factory is used for data integration and transformation. It helps orchestrate and automate the movement and transformation of data from various sources to destinations.
6. Azure DevOps: Azure DevOps provides a set of tools for software development, including release pipelines and automated testing, which contribute to the orchestration of the development lifecycle.
7. Azure Automation: Azure Automation helps automate repetitive tasks by using runbooks, enabling the orchestration of administrative and management tasks.
8. Azure Service Fabric: Azure Service Fabric is a distributed systems platform that enables you to build and manage scalable, reliable, and easily managed applications.
These orchestration tools and services allow you to create, deploy, manage, and scale complex solutions within the Azure cloud environment while maintaining consistency, reliability, and efficiency.
Orchestration mode:
A). Flexible: is an approach where the orchestration of processes, tasks, or resources allows for adaptability and customization based on the specific requirements of different tasks or applications. In this mode, the orchestration framework provides the flexibility to accommodate diverse use cases, configurations, and variations while still maintaining a degree of control and management.
B). Uniform: generally refers to an approach where the orchestration of processes, tasks, or resources follows a consistent and standardized pattern. In this mode, regardless of the specific task or application being orchestrated, the overall workflow, structure, and processes remain uniform and consistent. This can help simplify management, reduce complexity, and ensure predictable outcomes.
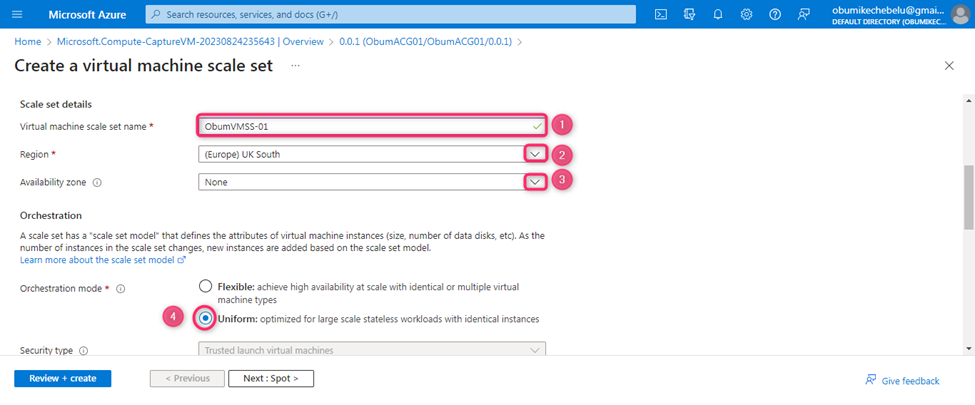
5). On the Basic page - Orchestration details, Select Uniform.
6). On the Basic page-Instance details, Select the captured VM image for image option.

Note:
On the basic page-Administrator details, username, password and confirm password are greyed out. Why? Uniform orchestration mode as selected allows the same administrator account [VM username and password] used during VM creation to be used. You do not need a new administrator account on the VMSS resources.
7). On the Basic page - License details, Select Window server.
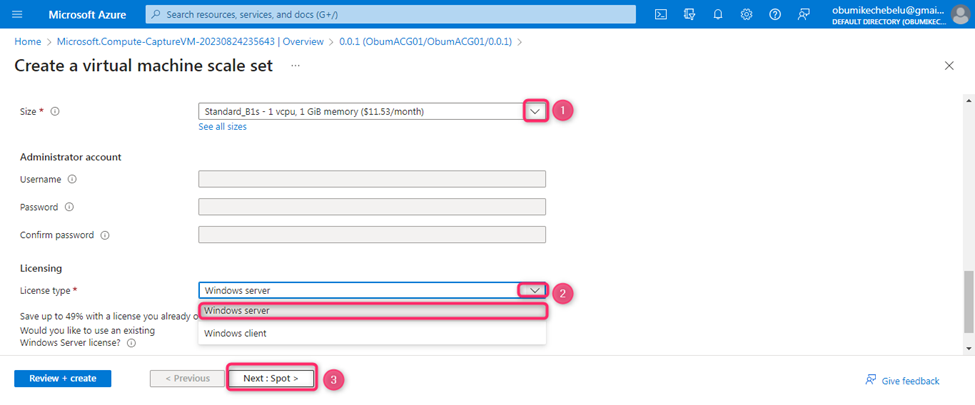
Note:
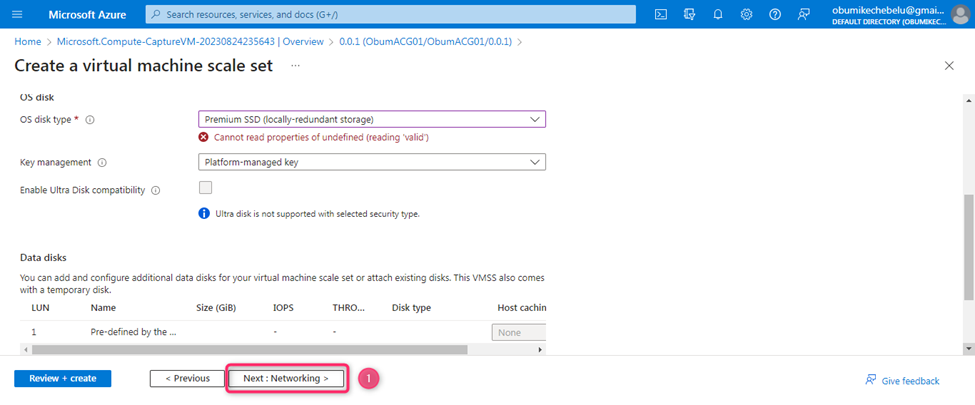
Spot, Disks, Networking, Management and Advanced pages should be left on their default paraments.
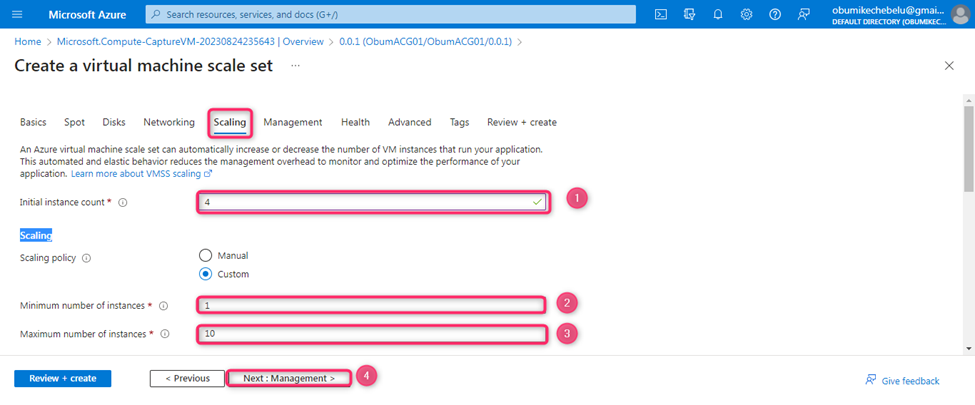
8). On the Scaling page, Input the initial instance count [VM count for the VMSS] and select Custom for the scaling policy on the scaling data.
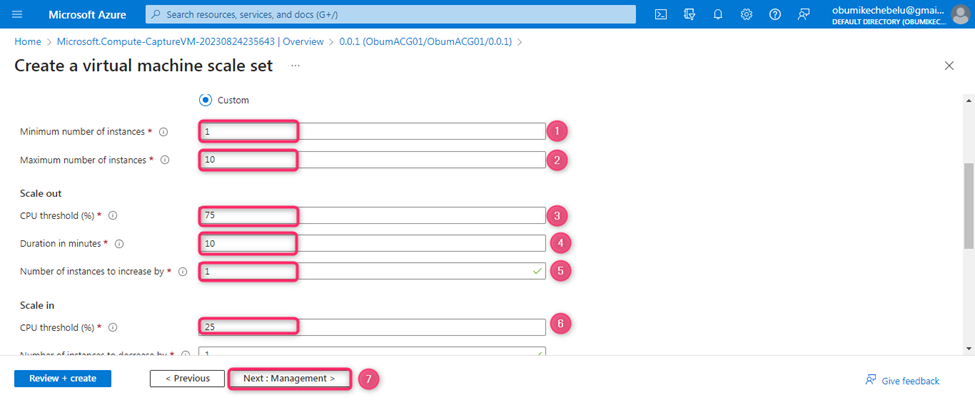
9). On the Scaling page - Scale out/in details, Set the right parameters or keep the data as default.
10). On the Health page - Health details, select Enable application health monitoring.
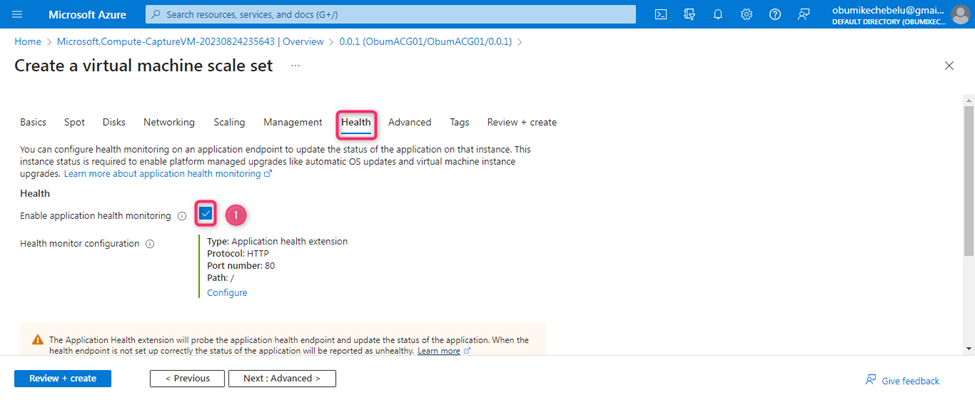
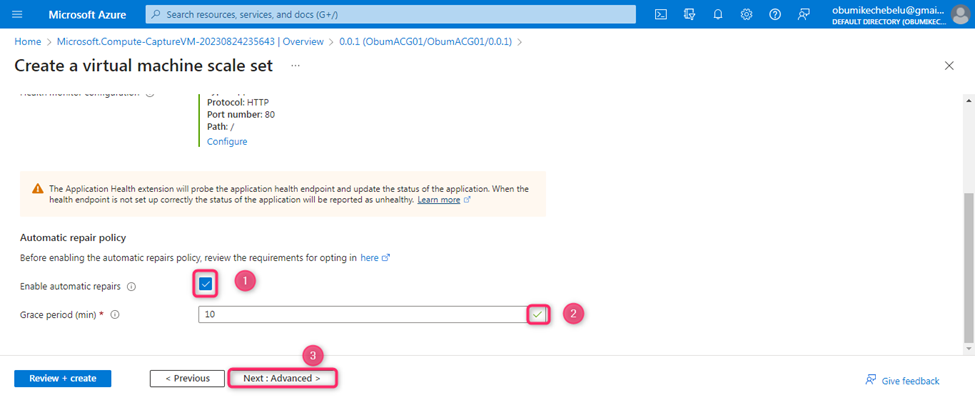
11). On the Health page-Automatic repair policy, Select enable automatic repairs.
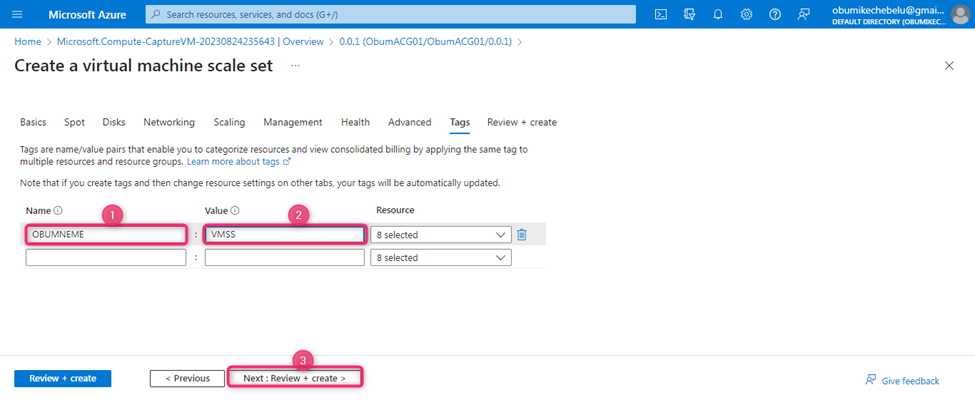
12). On Tags, Input the specific Name and values.
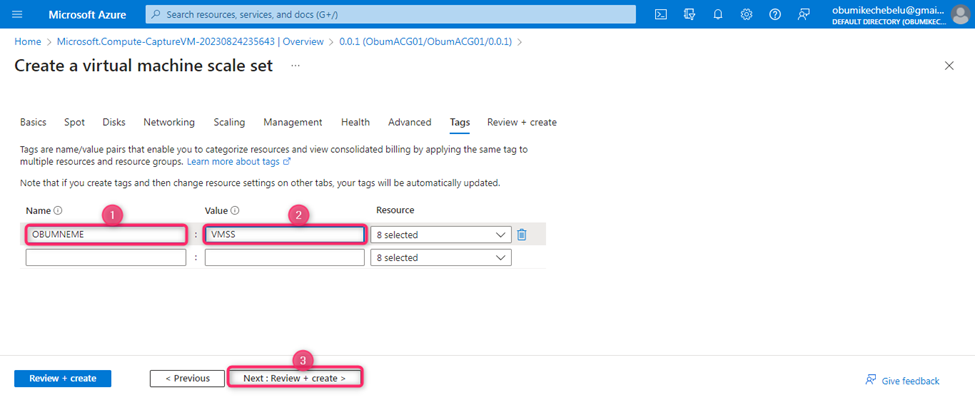
13). “Review + Create”, the system run a check of all data inputted and an endpoint successful message “Validation passed” will trigger a Create process for Resource deployment.
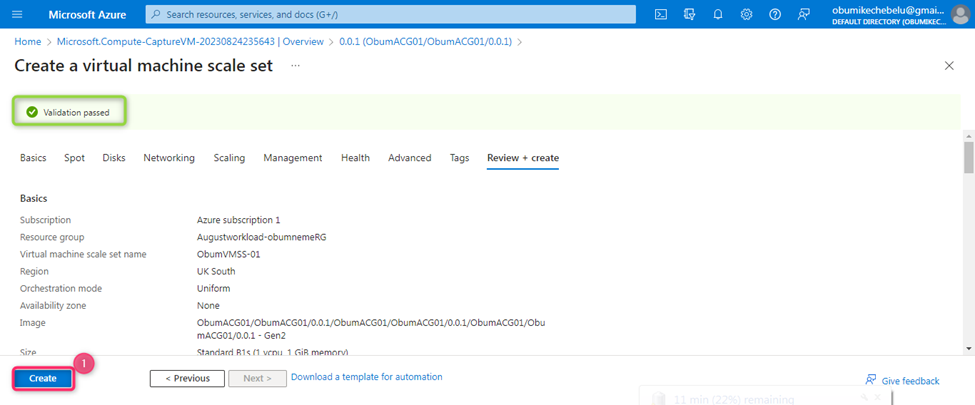
14). Azure Virtual Machine Scale Set on VM captured Image is successfully deployed. Go to Resource for further action.
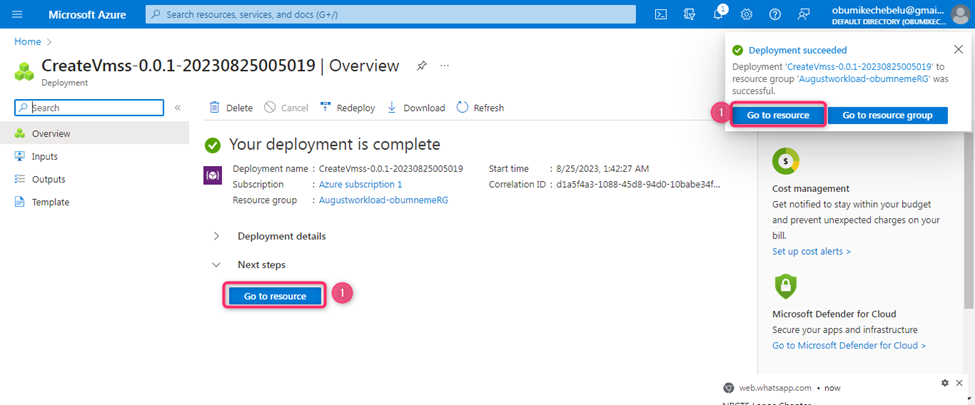
15). Navigate to VM instances on the VMSS [newly deployed].
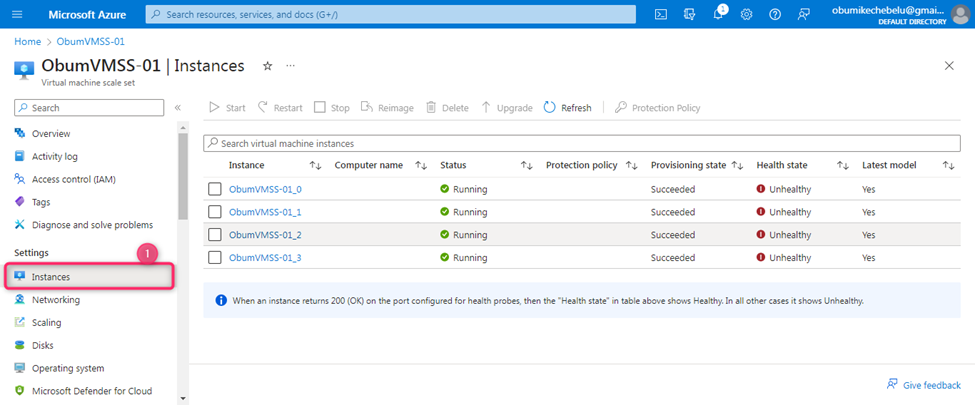
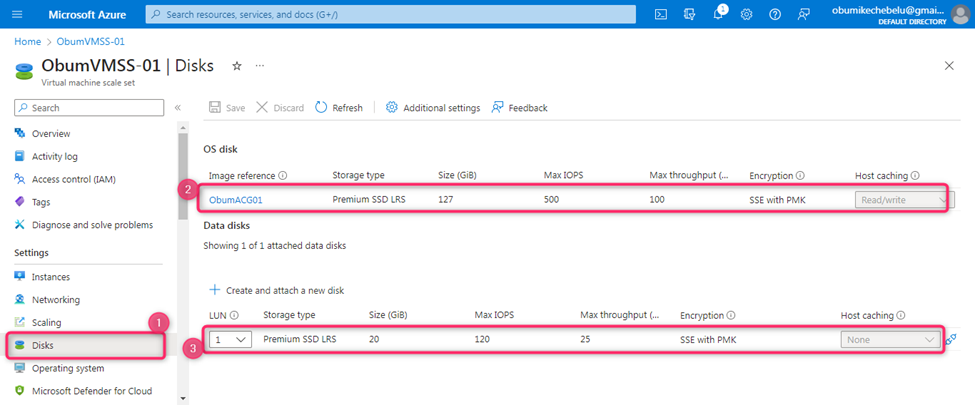
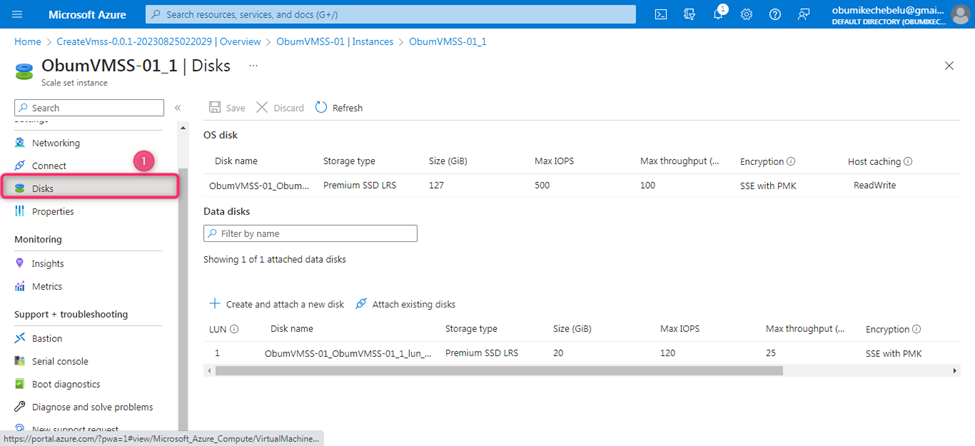
16). Navigate to VM instances on the VMSS [newly deployed]. Then, Select Disks on each of the VMs.
A.
B.
SUMMARY:
We were able to successfully explore the following Azure Cloud journey and I am confident that you can navigate on your own through the above guide made easy in the areas below;
1). Create Azure Virtual Machine Scale Set.
Thank You!...
Subscribe to my newsletter
Read articles from OBUMNEME ANTHONY IKECHEBELU directly inside your inbox. Subscribe to the newsletter, and don't miss out.
Written by
