Microsoft Azure Mobile App: Managing your VMs On-The-Go
 Lawal Azeez
Azure Mobile App refers to the Microsoft Azure mobile application that allows users to manage and monitor their Azure resources directly from their mobile devices. It provides a convenient way to stay connected and informed about the status and health of your Azure services while on the go.
Here's what the Azure Mobile App can typically do:
Resource Monitoring: The app provides real-time monitoring of your Azure resources, enabling you to view the health and status of virtual machines, databases, storage accounts, and more.
Alerts and Notifications: You can set up custom alerts and notifications to receive updates about critical events, such as service outages or resource usage exceeding thresholds.
Resource Management: The app allows you to start, stop, restart, and scale your Azure resources. You can perform essential management tasks directly from your mobile device.
Dashboard Access: Access Azure dashboards that show an overview of your resources, their performance metrics, and key insights.
Authentication and Security: The app is typically secured with authentication methods such as Azure Active Directory, ensuring that only authorized users can access and manage resources.
Troubleshooting: You can diagnose issues and troubleshoot problems with your resources, accessing logs, metrics, and performance data.
Cost Management: Get insights into your Azure spending, set up budget alerts, and monitor costs to ensure you stay within your budget.
Service Health: Stay informed about the health of Azure services and regions, and receive updates about planned maintenance and incidents.
Service Integration: The Azure Mobile App is designed to work seamlessly with various Azure services and components, enhancing the overall Azure management experience.
Integration: The Azure mobile App can be integrated with other apps like Remote Desktop, Termius - SSH and SFTP client, etc. to perform advanced functions like RDP into a Windows VM, SSH into a Linux VM and so on
Installing the App on your Android or iOS Mobile Devices
You can install the application on your mobile devices by scanning the QR code below or just visiting your app store to search for "Azure Mobile App" and install


After installing, Launch/Open the app to explore its features. You can take a tour by clicking on the "View Tour" to familiarize yourself with the app's functionalities and features or you can skip that part by clicking on "Skip for Now".
Click "Sign in" to log in to your portal and subscription. Enter your Username/Email/Phone no and click "Next", Enter your password and click Next (confirm any authentication prompt to sign in).

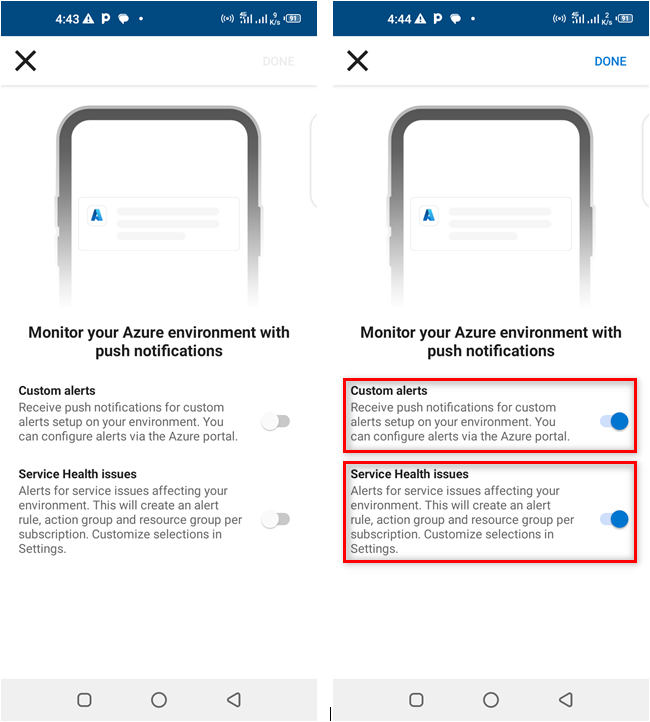
Once you are logged in, you can explore all the features of the app and monitor your services on the go. To start with, turn on Custom alerts and Service Health issues. Custom alerts allow you to get notifications for custom alerts, while the Service Health issues allow you to get notifications of any issues affecting resources in your regions or geography.

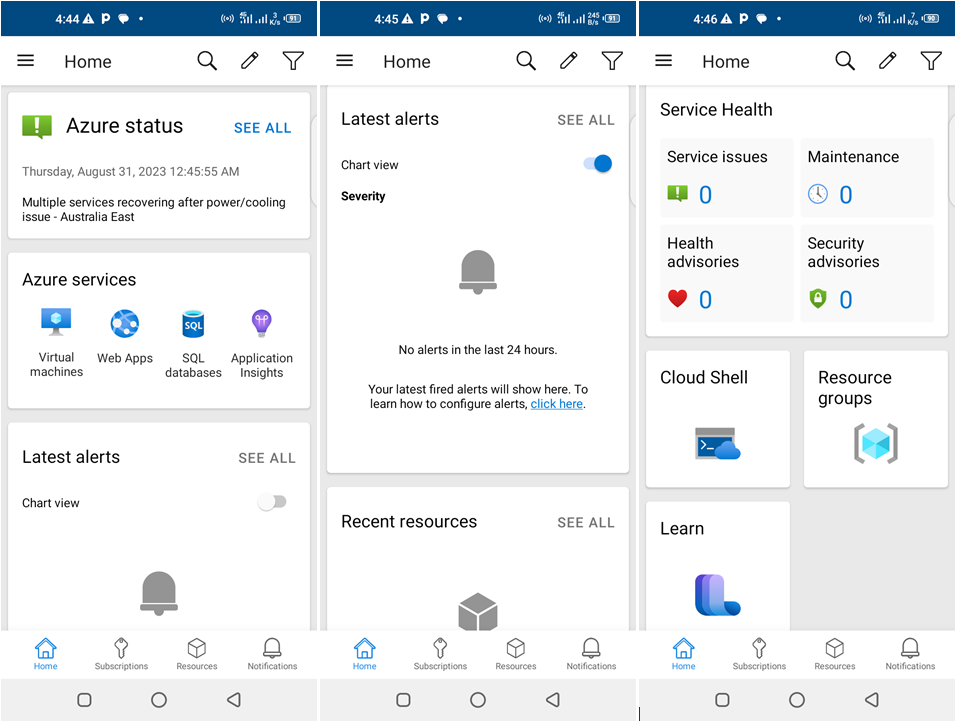
From the dashboard, you can scroll down to view your Azure status, Azure services, Latest alerts, Recent resources, Service health, etc. All these sections can be drilled down by clicking on them to get detailed information.

The Hamburger icon at the top left part of the screen can be clicked on to view your account(s) and settings, Directories, Billing, Help & feedback, Support requests, Privacy and terms just like you have it in your Azure portal

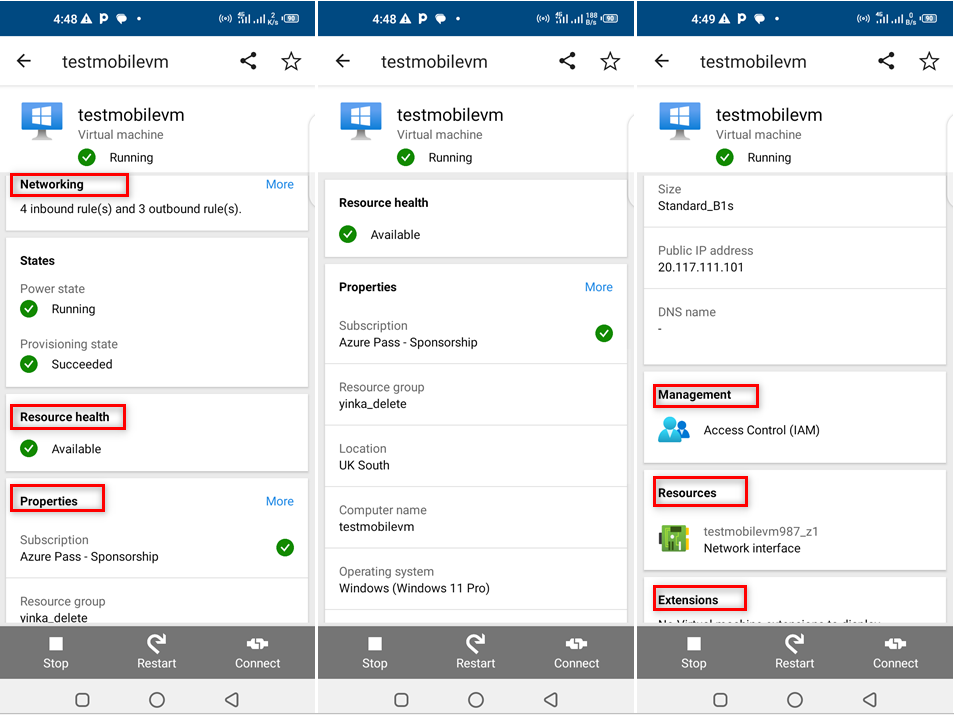
Now let's view the Virtual machine we created in the Azure portal from our mobile device. On the mobile Azure app dashboard, scroll to resources and click on "Virtual machine" then click on the "testmobilevm" VM that we created to view (see image below for a guide).

We can see that our VM is running perfectly. What can we do with this VM? A lot, We can scroll down to see the state of our VM via the metrics data and other telemetry provided, we can start, stop and connect our VM. We can view other aspects of our Virtual machine by scrolling down such as your VM networking configuration, VM health, VM properties, Identity Access Management, Extensions (if any), Dependent resources like NIC, Disks, Vnet, IP, etc.

We can view the VM metrics to see CPU usage, Network traffic usage report, Disk management report, etc. Under the Network rules, we can view the Inbound and outbound rules.

Let's try to stop our Virtual machine. Go to the VM homepage, at the bottom of the screen, click "Stop" and then select "Stop" to confirm your action, you will notice the VM going to the stop/deallocation state (see image below for clarification).

We can Start our stopped/deallocated VM again by going through the same process. Click "Start" at the bottom of the screen and confirm your action by selecting "Start" from the pop menu. Similar action can be used to Restart your VM and connect or Disconnect your VM.

All the above activities we did on the Virtual machine we created can be done on any other Azure resources created and even more. The Azure mobile App is indeed a robust tool for managing your Azure resources from any mobile device on the go.
I hope this write-up is informative enough and I would like to thank you for viewing it.
Subscribe to my newsletter
Read articles from Lawal Azeez directly inside your inbox. Subscribe to the newsletter, and don't miss out.
Written by

Lawal Azeez
Lawal Azeez
I am a cloud administrator, simply documenting my cloud computing journey.