Building a Bluetooth Communication Interface Between ESP32 and Flutter Mobile App for Configurable Settings
 Shabo Andrew
Establishing Bluetooth Communication
As you already know from part one, Bluetooth communication involves a client-server model, where the ESP32 acts as the server (peripheral) and the Flutter app serves as the client (central). 📚 Haven't read Part One yet? Catch up here: Exploring ESP32-Flutter Bluetooth Communication: Conceptual Overview and Development Environment Setup
Building ESP32 BLE Communication
We will use ESP32 BLE for Arduino library to implement Bluetooth communication in ESP32 the good news is that the library is installed by default when you install ESP32 so if you followed the installation and setup steps in part one you already have it and you can proceed with the following steps.
Step 1: Create a new sketch in Arduino IDE then include the required libraries
Open a new sketch by going to File > New then add this line of code at the beginning of the sketch. These add the required library for BLE functionalities.
#include <BLEDevice.h>
#include <BLEServer.h>
#include <BLEUtils.h>
#include <BLE2902.h>
Step 2: Set up Server, Service and Characteristics
To remind you, Characteristics are the data you want to exchange between devices and they must have a unique 128-bit identifier called a UUID (Universally Unique Identifier).
Service is a container for one or more characteristics. It represents a group of related functionalities or data on a BLE device. Services are also defined with a UUID.
A server is a BLE device (like an ESP32) that provides one or more services to other devices. A BLE server hosts services and allows other BLE devices, known as "clients," to connect, discover the services it offers, and interact with them. Servers can send data to clients and receive data from the
#define SERVICE_UUID        "0000180d-0000-1000-8000-00805f9b34fc"
#define CHARACTERISTIC_UUID "00002a37-0000-1000-8000-00805f9b34fc"

BLEServer* pServer = NULL;
BLECharacteristic* pCharacteristic = NULL;
These codes start by defining UUIDs for service and characteristics followed by defining BLE server and BLE characteristics.
Step 3: Create BLE Device, Server, Characteristics and Service
This is done inside the setup function. A BLE device should have a name that will be detected by the client, the device name I named is KayaTech.
// Create the BLE Device
  BLEDevice::init("KayaTech");

  // Create the BLE Server
  pServer = BLEDevice::createServer();

  // Create the BLE Service
  BLEService* pService = pServer->createService(SERVICE_UUID);

  // Create the BLE Characteristic
  pCharacteristic = pService->createCharacteristic(
                      CHARACTERISTIC_UUID,
                      BLECharacteristic::PROPERTY_READ |
                      BLECharacteristic::PROPERTY_WRITE
                    );
Step 4: Add Descriptor, Start the service and start advertising the device
A descriptor is a data structure associated with a characteristic that provides additional information or configuration options for that characteristic
// Add a descriptor for the characteristic
  pCharacteristic->addDescriptor(new BLE2902());
// Start the service
  pService->start();

  // Start advertising
  BLEAdvertising* pAdvertising = BLEDevice::getAdvertising();
  pAdvertising->addServiceUUID(SERVICE_UUID);
  pAdvertising->start();
}
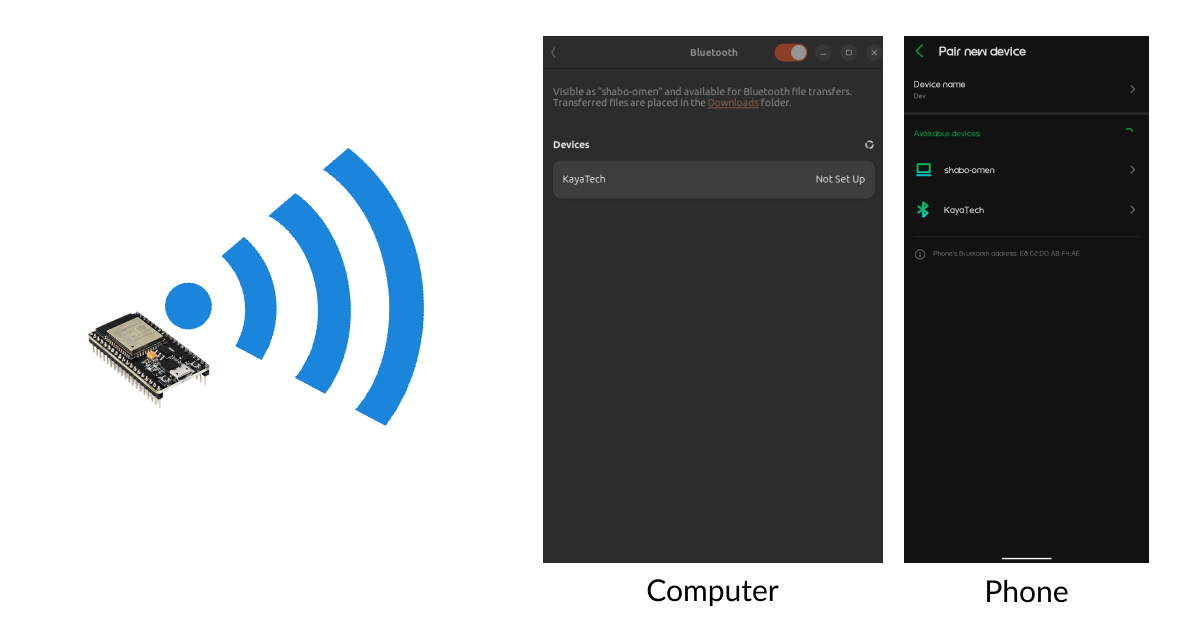
To advertise the BLE device is to broadcast its presence and capabilities to nearby devices(Client) to allow other devices to discover and connect to them. Up to this point, the device can be detected by any Bluetooth device. I tried using my phone and Computer and here is the result.

Step 5: Handle BLE Characteristics events
Create a class, I named MyCharacteristicCallbacks that inherits from BLECharacteristicCallbacks. This class is used in the context of Bluetooth Low Energy (BLE) communication to handle events related to a specific BLE characteristic. Define onWrite and onRead functions which will be listening to data from a client
class MyCharacteristicCallbacks : public BLECharacteristicCallbacks {
    void onWrite(BLECharacteristic* pCharacteristic) {
      // Implement write operation if needed
    }

    void onRead(BLECharacteristic* pCharacteristic) {
      // Implement read operation if needed
    }
};
For the matter of testing, I implemented onWrite to accept the data sent from a client
void onWrite(BLECharacteristic* pCharacteristic) {
      std::string value = pCharacteristic->getValue();

      if (value.length() > 0) {
        String inputData, username, password;
        for (int i = 0; i < value.length(); i++) {

          inputData = inputData + value[i];

        }
        int spaceIndex = inputData.indexOf(' '); // Find the index of the space character
        if (spaceIndex != -1) { // If space character is found
          username = inputData.substring(0, spaceIndex); // Extract the first word
          password = inputData.substring(spaceIndex + 1); // Extract the second word
        } else {
          Serial.println("No space Found in" + inputData);
        }
        Serial.println("Username: " + username);
        Serial.println("Password: " + password);
        Serial.println();

        // Handle the received data, e.g., save WiFi credentials, etc.
      }
    }
Finally, Set the CallBack inside the setUp function after creating the BLE Server.
pServer->setCallbacks(new MyServerCallbacks());
You can get this code on this GitHub repo.
Building a BLE Flutter App
This app will be able to turn ON/OFF phone Bluetooth, Scan all available BLE Devices, Connect to a BLE device and Send data to a connected BLE device.
Step 2: Create a flutter app
Create a flutter app and add the name of an app, I named my app as esp32wizard. This is done by the following command:
flutter create esp32wizard
Step 2: Install all required packages
The packages used are:
flutter_blue_plus ( version: ^1.14.11**)**: This is used to provide BLE functionalities in the flutter app
permission_handler ( version: ^10.4.3**)**: This provides API to request permissions and check their status
google_fonts( version: ^1.0.2)
To install these packages run the following commands in your project directory: These install the latest version of the packages
flutter pub add flutter_blue_plus
flutter pub add permission_handler
flutter pub add google_fonts
Step 3: Set permission
- For Android, add these permissions in the android/app/src/main/AndroidManifest.xml
<uses-feature android:name="android.hardware.bluetooth_le" android:required="false" />
<uses-permission android:name="android.permission.BLUETOOTH_SCAN"/>
<uses-permission android:name="android.permission.BLUETOOTH_CONNECT" />
<uses-permission android:name="android.permission.ACCESS_FINE_LOCATION" />
<uses-permission android:name="android.permission.BLUETOOTH" android:maxSdkVersion="30" />
<uses-permission android:name="android.permission.BLUETOOTH_ADMIN" android:maxSdkVersion="30" />
<uses-permission android:name="android.permission.ACCESS_COARSE_LOCATION" android:maxSdkVersion="28"
- For iOS, add in the ios/Runner/Info.plist
<dict>
        <key>NSBluetoothAlwaysUsageDescription</key>
        <string>Need BLE permission</string>
        <key>NSBluetoothPeripheralUsageDescription</key>
        <string>Need BLE permission</string>
        <key>NSLocationAlwaysAndWhenInUseUsageDescription</key>
        <string>Need Location permission</string>
        <key>NSLocationAlwaysUsageDescription</key>
        <string>Need Location permission</string>
        <key>NSLocationWhenInUseUsageDescription</key>
        <string>Need Location permission</string>
Step 4: Create a User Interface(UI) and BLE functionalities
In the lib folder create my_app.dart and home_screen.dart file, the lib folder structure will look like this:

- In main.dart file, import the required packages and add Permissions for location, storage, Bluetooth, bluetoothConnect, and bluetoothScan, permission is added for only the Android platform. It will be like this :
import 'dart:io';
import 'package:espwizard/my_app.dart';
import 'package:flutter/material.dart';
import 'package:permission_handler/permission_handler.dart';

void main() {
  if (Platform.isAndroid) {
    WidgetsFlutterBinding.ensureInitialized();
    [
      Permission.location,
      Permission.storage,
      Permission.bluetooth,
      Permission.bluetoothConnect,
      Permission.bluetoothScan
    ].request().then((status) {
      runApp(const MyApp());
    });
  } else {
    runApp(const MyApp());
  }
}
- In my_app.dart file, Create MateralApp then set true the useMaterial3 attributes and set the HomeScreen to be the app home.
import 'package:espwizard/home_screen.dart';
import 'package:flutter/material.dart';

class MyApp extends StatefulWidget {
  const MyApp({super.key});

  @override
  State<MyApp> createState() => _MyAppState();
}

class _MyAppState extends State<MyApp> {
  @override
  Widget build(BuildContext context) {
    return MaterialApp(
        debugShowCheckedModeBanner: false,
        theme: ThemeData.dark(useMaterial3: true),
        home:  const HomeScreen());
  }
}
- Create HomeScreen inside home_screen.dart file
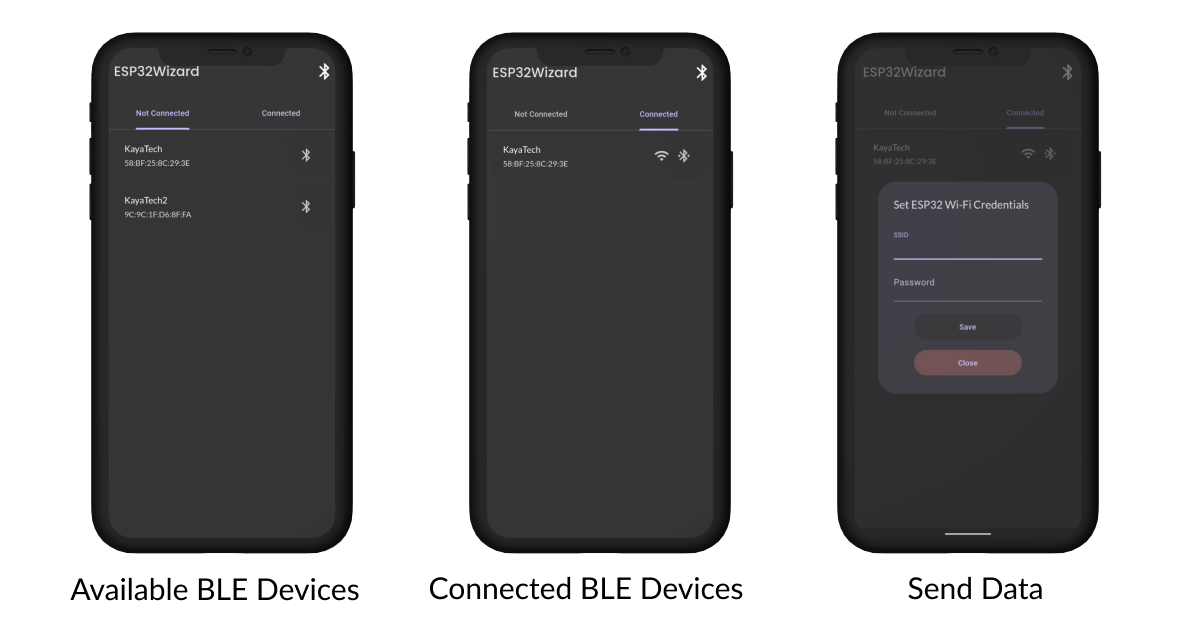
The home screen contains an app bar that has a title and an action icon button for turning ON/OFF the platform Bluetooth.
It also has two tab bars at the top (Not connected and Connected tab bar). Not connected tabBar lists all BLE devices that are discovered but are not connected and you can connect, also The connected tabBar lists all connected devices and you can disconnect and Send data to the BLE device(WiFi SSID and Password). A link to the Github repo for this app is here you can clone and use it for your projects.

- Turn ON Platform Bluetooth
if (Platform.isAndroid) {
                  await FlutterBluePlus.turnOn();
                }
                var state = await FlutterBluePlus.adapterState
                    .map((s) {
                      return s;
                    })
                    .where((s) => s == BluetoothAdapterState.on)
                    .first;
Scan all BLE Devices
This return all device except the devices which are already connected. Since I use the device location, therefore, to get the BLE devices you must turn ON the device location
 List<BluetoothDevice> devices = [];
                var subscription =
                    FlutterBluePlus.scanResults.listen((newResults) {
                  for (ScanResult result in newResults) {
                    if (result.device.localName.isNotEmpty) {
                      if (!devices.contains(result.device)) {
                        devices.add(result.device);
                      }
                    }
                  }
                  setState(() {
                    availableDevices = devices;
                  });
                });

                subscription.onDone(() {});
                if (!FlutterBluePlus.isScanningNow) {
                  FlutterBluePlus.startScan(
                    timeout: const Duration(seconds: 5),
                  );
                }
- Get connected Devices
 List<BluetoothDevice> devices =
                    await FlutterBluePlus.connectedSystemDevices;
                setState(() {
                  connectesDevices = devices;
                });
- Connect/Disconnect the App to the BLE device
 device.connectionState
                      .listen((BluetoothConnectionState state) async {
                    if (state == BluetoothConnectionState.disconnected) {
                      // typically, start a periodic timer that tries to periodically reconnect.
                      // Note: you must always re-discover services after disconnection!
                    }
                  });
                  isConnected
                      ? await device.disconnect()//Disconnect
                      : await device.connect(autoConnect: true);//Connect
Send Data to the BLE device
  Future changePassword(
      BluetoothDevice device,
      String ssid,
      String password,
    ) async {
      String data = "$ssid $password";
      final services = await device.discoverServices();
      for (BluetoothService service in services) {
        for (BluetoothCharacteristic characteristic in service.characteristics) {
          final isWrite = characteristic.properties.write;
          if (isWrite) {
            await characteristic.write(data.codeUnits);
          }
        }
      }
    }
If you want to learn more about BLE in Flutter, feel free to visit Flutter_Blue_Plus documentation.
Conclusion
In conclusion, my project to establish a Bluetooth communication interface between ESP32 and Flutter for configuring BLE devices is just the tip of the iceberg. The potential applications are vast and limited only by your imagination. As technology continues to evolve, I encourage you to explore and innovate further, pushing the boundaries of what is possible with this versatile combination of hardware and software. Whether you're a hobbyist, a developer, or a business looking to integrate IoT solutions, the tools and knowledge provided in this article can serve as a solid foundation for your next groundbreaking project.
🚀 Ready to Dive Deeper? Let's Connect and Collaborate! 🤝
If you're as passionate about tech and innovation as I am, let's stay connected! 🌟 Follow me on Twitter and LinkedIn for the latest updates, insights, and discussions on all things technology. 📲🔗
But that's not all! 🌐 I'm not just here to share information – I'm here to collaborate and create. If you're ready to turn ideas into reality, whether it's a project, article, or any tech-related venture, I'm all ears! Let's work together to bring innovation to life.
🔗 Follow me on Twitter: X(TWITTER) 🔗 Connect with me on LinkedIn: LinkedIn
The journey of technology is best when shared. Let's embark on it together! 🚀🌈
Subscribe to my newsletter
Read articles from Shabo Andrew directly inside your inbox. Subscribe to the newsletter, and don't miss out.
Written by

Shabo Andrew
Shabo Andrew
👋 Hey there, fellow tech enthusiasts! I'm your go-to mobile app magician, fluttering my way through the digital realm with finesse. 📱✨ 🌍 I'm a tech explorer on a mission to create, innovate, and inspire. Join me as I share my insights, experiences, and the occasional 'aha' moments right here on Hashnode. Let's connect, learn, and geek out together! 🌟 #CodeAndCreat