Deployment of a Microservices Application on Kubernetes🚀
 Ayushi Vasishtha
Table of contents
- Problem Statement: Deployment of a Microservices Application on K8s🌐
- - Do Mongo Db Deployment
- - Do Flask App Deployment
- - Connect both using Service Discovery
- 💡 Requirements:
- 🔹 Step 1: Cloning the repository of the project
- 🔹 Step 2: Build the Dockerfile
- 🔹 Step 3: Crafting a Persistent Volume Definition for Kubernetes
- 🔹 Step 4: Crafting a Manifest for Kubernetes Persistent Volume Claim (PVC)
- 🔹 Step 5: Creating a Manifest File for MongoDB Deployment
- 🔹 Step 6: Creating a Service Manifest File for MongoDB
- 🔹 Step 7: Creating the Manifest File for the Flask App Deployment
- 🔹 Step 8: Creating the Manifest File for the Flask App Service
- 🔹 Step 9: Test the Application
- 🌟 Conclusion
Welcome to another exciting assignment in your DevOps journey! In this assignment, we'll delve into Kubernetes by tackling a problem statement. So, roll up your sleeves, and let's get hands-on!
Problem Statement: Deployment of a Microservices Application on K8s🌐
- Do Mongo Db Deployment
- Do Flask App Deployment
- Connect both using Service Discovery
💡 Requirements:
Fundamental Familiarity with Kubernetes: This tutorial presupposes that you possess a foundational grasp of Kubernetes components like Pods, Deployments, and Services.
Git Installation: Ensure that Git is installed on your Ubuntu workstation.
Availability of a Kubernetes Cluster: To actively participate in this practical exercise, you must have access to a functional Kubernetes cluster.
🔹 Step 1: Cloning the repository of the project
To initiate the process, you'll need to retrieve the project's source code by executing the following command.
git clone https://github.com/Vasishtha15/microservices-k8s.git
🔹 Step 2: Build the Dockerfile
Navigate to the project root directory, i.e: /microservices-k8s/
cd microservices-k8s/

Dockerfile:
FROM python:alpine3.7
COPY . /app
WORKDIR /app
RUN pip install -r requirements.txt
ENV PORT 5000
EXPOSE 5000
ENTRYPOINT [ "python" ]
CMD [ "app.py" ]
Now we will build a Docker Image from this Dockerfile.
docker build . -t /microservicespythonapp:latest
🔹 Step 3: Crafting a Persistent Volume Definition for Kubernetes
Let's deploy the app in our Kubernetes (K8s) cluster by creating a dedicated storage space called a Persistent Volume (PV). PVs ensure secure and reliable data storage, particularly for databases like MongoDB. Your data remains safe and accessible, even when applications or containers change or restart.
mongo-pv.yml
apiVersion: v1
kind: PersistentVolume
metadata:
  name: mongo-pv
spec:
  capacity:
    storage: 256Mi
  volumeMode: Filesystem
  accessModes:
    - ReadWriteOnce
  persistentVolumeReclaimPolicy: Retain
  hostPath:
    path: /home/node/mongodata
We're creating a 256Mi persistent volume with a "Retain" policy to safeguard data, even if the associated claim is deleted.
To introduce this persistent volume to your cluster, execute the command
kubectl apply -f mongo-pv.yml.Afterward, utilize
kubectl get pvto examine the available volumes.
Your output should resemble the following:

🔹 Step 4: Crafting a Manifest for Kubernetes Persistent Volume Claim (PVC)
Having created the persistent volume, we can now create a Persistent Volume Claim (PVC) for our MongoDB deployment to secure its data storage. PVCs act like custom storage requests in Kubernetes, specifying the storage amount and type needed. Kubernetes ensures these requests are matched with available storage, ensuring your apps have the necessary storage for data operations.
mongo-pvc.yml
apiVersion: v1
kind: PersistentVolumeClaim
metadata:
  name: mongo-pvc
spec:
  accessModes:
    - ReadWriteOnce
  resources:
    requests:
      storage: 256Mi
In this YAML definition, we request a 256Mi volume with ReadWriteOnce access mode, mirroring the configuration we previously applied to the persistent volume.
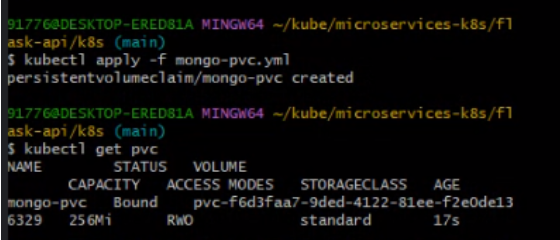
To introduce this persistent volume claim into your cluster, employ the following command:
kubectl apply -f mongo-pvc.yml.Subsequently, utilize
kubectl get pvcto monitor the PVC status.
The expected output should resemble the following:

🔹 Step 5: Creating a Manifest File for MongoDB Deployment
mongo.yml
apiVersion: apps/v1
kind: Deployment
metadata:
  name: mongo
  labels:
      app: mongo
spec:
  selector:
    matchLabels:
      app: mongo
  template:
    metadata:
      labels:
        app: mongo
    spec:
      containers:
        - name: mongo
          image: mongo
          ports:
            - containerPort: 27017
          volumeMounts:
            - name: storage
              mountPath: /data/db
      volumes:
        - name: storage
          persistentVolumeClaim:
            claimName: mongo-pvc
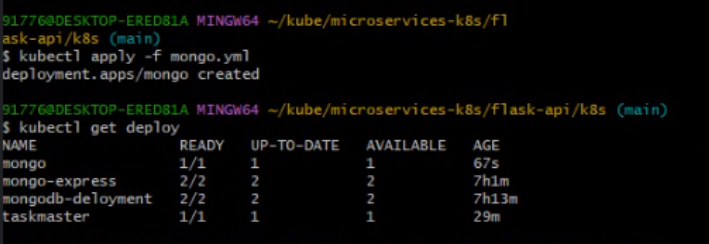
To deploy this in your cluster:
use
kubectl apply -f mongo.yml.After creation, run
kubectl get deploymentto verify pod readiness.
The expected output should resemble this:

🔹 Step 6: Creating a Service Manifest File for MongoDB
mongo-svc.yml
apiVersion: v1
kind: Service
metadata:
  labels:
    app: mongo
  name: mongo
spec:
  ports:
    - port: 27017
      targetPort: 27017
  selector:
    app: mongo
To establish this service within your cluster,:
Employ the command
kubectl apply -f mongo-svc.yml.Subsequently, execute
kubectl get svcafter a brief interval to confirm the readiness of the service.
The expected output should resemble this:

🔹 Step 7: Creating the Manifest File for the Flask App Deployment
taskmaster.yml
yamlCopy codeapiVersion: apps/v1
kind: Deployment
metadata:
  name: taskmaster
  labels:
    app: taskmaster
spec:
  replicas: 1
  selector:
    matchLabels:
      app: taskmaster
  template:
    metadata:
      labels:
        app: taskmaster
    spec:
      containers:
        - name: taskmaster
          image: microservicespythonapp:latest
          ports:
            - containerPort: 5000
          imagePullPolicy: Always
Execute
kubectl apply -f taskmaster.ymlto introduce this deployment object into Kubernetes.Subsequently, run
kubectl get deployment.The expected output should resemble the following:


🔹 Step 8: Creating the Manifest File for the Flask App Service
taskmaster-svc.yml
yamlCopy codeapiVersion: v1
kind: Service
metadata:
  name: taskmaster-svc
spec:
  selector:
    app: taskmaster
  ports:
    - protocol: TCP
      port: 80
      targetPort: 5000
Run kubectl apply -f taskmaster-svc.yml to create this service in K8s. Run kubectl get svc to check if the service has been created.
🔹 Step 9: Test the Application
You can see the deployed application on 127.0.0.1:64639, make sure to replace 127.0.0.1 with your node’s/service’s IP based on the cluster you are using.
Note:- Make sure we open the 64639 port in a security group of your Ec2 Instance.
🌟 Conclusion
In conclusion, the journey through Kubernetes in this assignment has been an exciting adventure into the world of container orchestration.
In the above problem statement, we embarked on a microservices magic quest. We successfully deployed a MongoDB database and a Flask web application, bringing them together through service discovery. This hands-on experience taught us the fundamental aspects of managing stateful and stateless applications within Kubernetes. We learned how to define and apply Deployments and Services, ensuring scalability, reliability, and seamless communication between microservices.
As we celebrate our achievements in launching Kubernetes clusters, deploying microservices, and mastering Ingress controllers, let's remember that our learning journey continues. Kubernetes offers a universe of possibilities, and our exploration has just begun. So, keep exploring, keep learning, and keep sharing your DevOps adventures with the world.
Thank you for joining me on this Kubernetes expedition.
Stay tuned for more exciting challenges and discoveries in the world of DevOps. 🚀
Subscribe to my newsletter
Read articles from Ayushi Vasishtha directly inside your inbox. Subscribe to the newsletter, and don't miss out.
Written by

Ayushi Vasishtha
Ayushi Vasishtha
👩💻 Hey there! I'm a DevOps engineer and a tech enthusiast with a passion for sharing knowledge and experiences in the ever-evolving world of software development and infrastructure. As a tech blogger, I love exploring the latest trends and best practices in DevOps, automation, cloud technologies, and continuous integration/delivery. Join me on my blog as I delve into real-world scenarios, offer practical tips, and unravel the complexities of creating seamless software pipelines. Let's build a strong community of tech enthusiasts together and embrace the transformative power of DevOps!