🎉Minikube Installation & Launching your First ☸️ Kubernetes Cluster with Nginx running 🖥️
 Deepak Patil
Table of contents
- 🎆Introduction
- 🖥️ Minikube
- 🔣Features of Minikube
- ⚙️ Setting Up Minikube on Locally
- 🖥️ Minikube System Requirements
- 🖥️ Apply updates
- 🖥️ Install Minikube Dependencies
- 🖥️ Install Docker
- 🔄 Download Minikube Binary
- 📝 Verify the Minikube version
- 🖥️ Install Kubectl
- 📝 Verify the kubectl version
- 📖 Start Minikube
- 📝Check Minikube Status
- 📝 Verifying the Minikube Cluster
- 📝 Managing Minikube Cluster
- 📝Let's understand the concept of "pod"
- 📝 Create your first pod on Kubernetes through Minikube
- 📝 Creating the YAML configuration file for the pod
- 📝 Explanation of the above YAML file:
- 📝 Creating the Pod
- 🔄 Running the Nginx application
- 🎉Conclusion

Awesome! You learned the architecture of one of the top most important tool "Kubernetes"/(K8s) in your previous task.
🎆Introduction
So now it's time to do some hands-on in the Kubernetes and will explore more about the Kubernetes.
Before moving forward we need to install some tool that gives us the capability to work on K8s.
There are several tools we can use to work on K8s like
Minikube
Kubeadm
kind
K3s
And so on...you can check more here https://github.com/tomhuang12/awesome-k8s-resources#cluster-provisioning
In this article, we will work with Minikube
🖥️ Minikube
Minikube is an open-source tool that allows you to run a single-node Kubernetes cluster locally on your machine.
Minikube is designed to make it easy for developers to set up a Kubernetes environment for local development and testing purposes. It creates a lightweight, isolated Kubernetes cluster that runs inside a virtual machine (VM) on your local system.
This is an excellent way to test in a Kubernetes environment locally, without using up too much resources.
🔣Features of Minikube
Supports the latest Kubernetes release (+6 previous minor versions)
Cross-platform (Linux, macOS, Windows)
Deploy as a VM, a container, or on bare-metal
Multiple container runtimes (CRI-O, containerd, docker)
Direct API endpoint for blazing-fast image load and build
Advanced features such as LoadBalancer, filesystem mounts, FeatureGates, and network policy
Addons for easily installed Kubernetes applications
Supports common CI environments
⚙️ Setting Up Minikube on Locally
Follow the below step-by-step instructions to install Docker, Minikube, and Kubelet and make sure the Minikube single-node cluster is setting up locally.
Without any further delay, let’s deep dive into the Minikube Installation steps. Here we will work on the Ubuntu Operating System.
🖥️ Minikube System Requirements
2 GB RAM or more
2 CPU / vCPU or more
20 GB free hard disk space or more
Docker Apply updates
🖥️ Apply updates
 $ sudo apt update -y
 $ sudo apt upgrade -y
🖥️ Install Minikube Dependencies
Install the following Minikube dependencies by running the command.
$ sudo apt install -y curl wget apt-transport-https🖥️ Install Docker
Install the Docler by running the command.
sudo apt install docker.ioAdding a user to the docker group.
sudo usermod -aG docker $USERStart Docker and enable it to launch on system startup.
  sudo systemctl start docker
  sudo systemctl enable docker
🔄 Download Minikube Binary
Download the Minikube binary using curl and make it executable.
  curl -Lo minikube https://storage.googleapis.com/minikube/releases/latest/minikube-linux-amd64
  chmod +x minikube
  sudo mv minikube /usr/local/bin/
📝 Verify the Minikube version
minikube version
🖥️ Install Kubectl
Kubectl is a command line utility that is used to interact with the Kubernetes cluster. It is used for managing deployments, services and pods, etc. Use the below curl command to download the latest version of kubectl.
curl -LO "https://dl.k8s.io/release/$(curl -L -s https://dl.k8s.io/release/stable.txt)/bin/linux/amd64/kubectl"Once kubectl is downloaded then set the executable permissions on kubectl binary and move it to the path /usr/local/bin.
  chmod +x kubectl
  sudo mv kubectl /usr/local/bin/
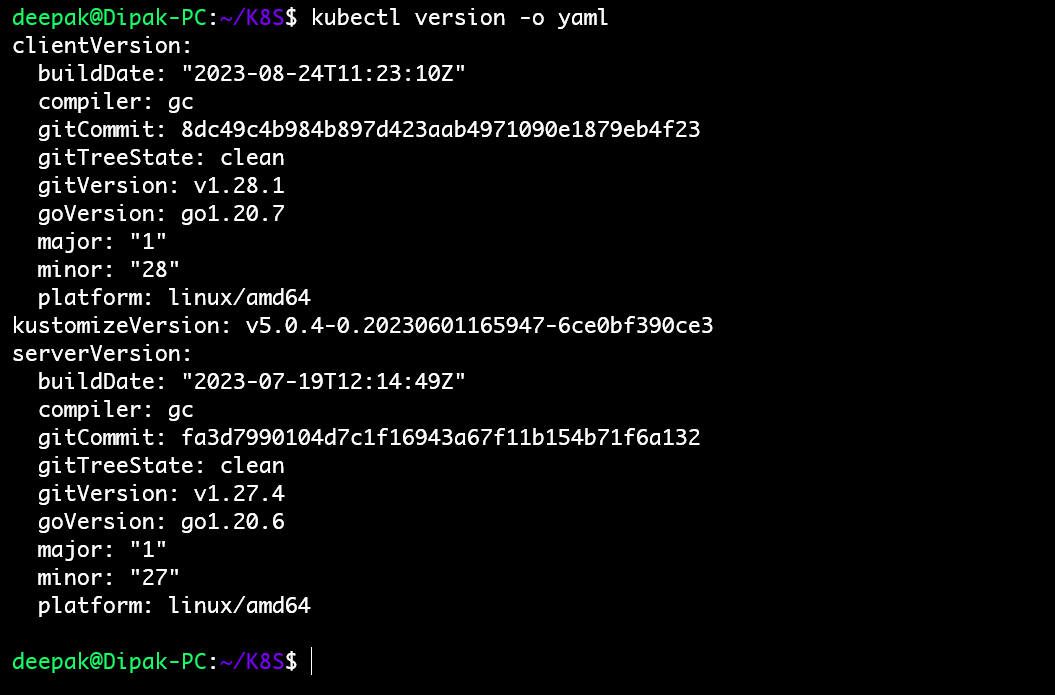
📝 Verify the kubectl version
$ kubectl version -o yaml
📖 Start Minikube
As we are already stated in the beginning that we would be using docker as the base for Minikue, so start the Minikube with the docker driver, run
$ minikube start --driver=docker📝Check Minikube Status
Run the below minikube command to check the status,
$ minikube status
📝 Verifying the Minikube Cluster
Run the below kubectl command to check the minikube cluster
kubectl get nodes
Inspect the statuses of pods and namespaces
kubectl get pods --all-namespacesThis action will display active pods categorized within various namespaces within the Minikube cluster.

Run the following kubectl command to verify cluster-info
$ kubectl cluster-info
📝 Managing Minikube Cluster
To stop the minikube, run
$ minikube stopTo delete the minikube, run
$ minikube deleteTo Start the minikube, run
$ minikube startIn case you want to start the minikube with higher resources like 8 GB RM and 4 CPU then execute the following commands one after the other.
$ minikube config set cpus 4
$ minikube config set memory 8192
$ minikube delete
$ minikube start
📝Let's understand the concept of "pod"
Pods are the smallest deployable units of computing that you can create and manage in Kubernetes.
A Pod (as in a pod of whales or pea pod) is a group of one or more containers, with shared storage and network resources, and a specification for how to run the containers. A Pod's contents are always co-located and co-scheduled, and run in a shared context. A Pod models an application-specific "logical host": it contains one or more application containers whi
📝 Create your first pod on Kubernetes through Minikube
📝 Creating the YAML configuration file for the pod
Here we will create our first Nginx pod with the help of
nginx.yamlfile where we can configure our pod information.To know more about YAML https://www.geeksforgeeks.org/what-is-the-difference-between-yaml-and-json/?ref=gcse
 apiVersion: v1
 kind: Pod
 metadata:
   name: nginxpod
   labels:
     app: nginx
 spec:
   containers:
   - name: nginxcontainer
     image: nginx:latest
     ports:
     - containerPort: 80
📝 Explanation of the above YAML file:
apiVersionandkind: These fields specify theAPI versionand the kind of Kubernetes resource you're defining. In this case, it'spod, which is the smallest deployable unit in Kubernetes.metadata: This section contains metadata about the pod, including its name and labels. Labels are key-value pairs that can be used for identifying and grouping pods.name:The name of the pod is set to "nginx-pod."labels: A label with the key "app" and the value "nginx" is assigned to this pod. Labels are used for selecting and organizing pods.spec: This is the specification for the pod, which defines its desired state.containers: This section specifies the containers to run within the pod. In this case, there is one container.name: The name of the container is set to "nginxcontainer."image: The Docker image to use for this container is "nginx:latest." This means it will pull the latest version of the official Nginx Docker image from Docker Hub.
ports:This will specify that the Nginx will run onport 80.
📝 Creating the Pod
To create the Nginx application pod run the below command to create the Kubernetes pod
kubectl apply -f <pod-yaml-filename>Once you run the above command the pod will be created and you can see the pod by running the below command.
 kubctl get pods

 #Run this command for more information about pod
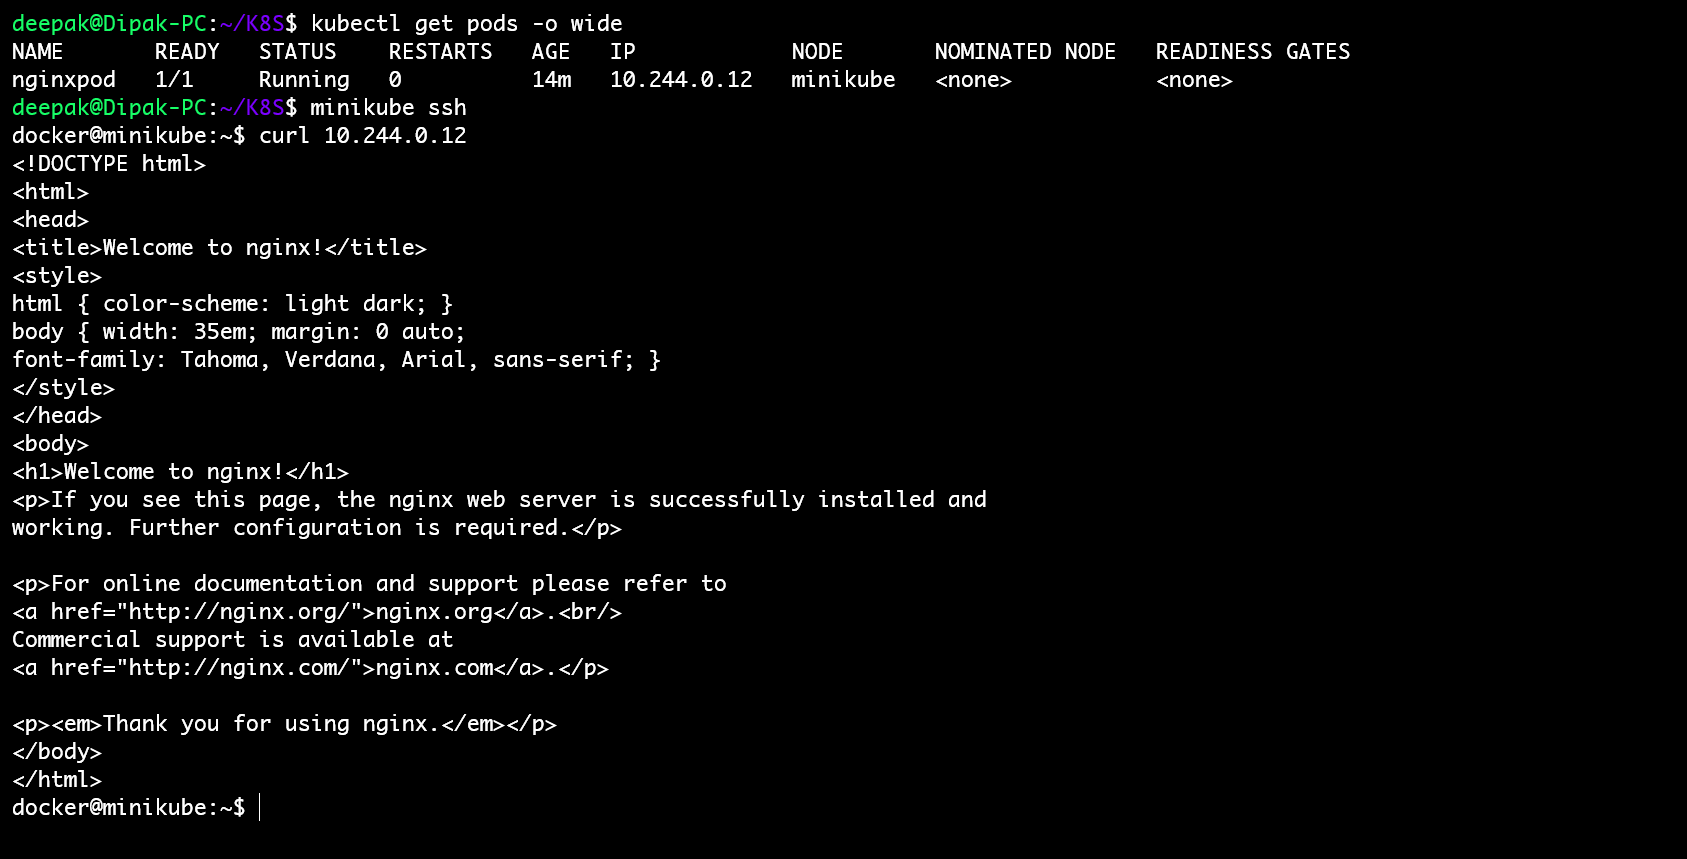
 kubctl get pods -o wide
Here you can see the IP is assigned to the pod that is
10.224.0.12.🔄 Running the Nginx application
As we know pod is the smallest object of the Kubernetes and the container is present in the pod only.
Here in the Kubernetes container inside the pod does not have any
IP address. Here the pod has the IP address.As of now, we are not exposing the application to the external world, So to run the application we have to log in to the cluster using the below command.
We will learn more about networking in upcoming blogs how to expose the application to external worlds and so on...
minikube ssh
🎉Conclusion
That’s all from this tutorial, I hope you have learned how to install Minikube and how to create the pod and deploy the pod, accessing your containerized application.
Stay tuned for more about Kubernetes...
Please don’t hesitate to share your feedback and comments.
Thank you🙏🙏... for taking the time to read this blog. I hope you found the information helpful and insightful. So please keep yourself updated with my latest insights and articles on DevOps 🚀 by following me on
So, Stay in the loop and stay ahead in the world of DevOps!
Happy Learning !... Keep Learning ! 😊
Subscribe to my newsletter
Read articles from Deepak Patil directly inside your inbox. Subscribe to the newsletter, and don't miss out.
Written by

Deepak Patil
Deepak Patil
Hey there! I am Deepak!! Passionate About Cloud & AWS☁️| DevOps ♾️ Technologies 👩🏻💻 And Skilled with Git 🔀 | Docker 🐳 | Kubernetes ☸ | Jenkins 🛠️ 👏 Welcome to my blog!!