Migrating From Gradle To Maven
 Prateek Meti
Migrating a Java project from one build tool to another is not a simple task as it may seem, especially when you have a large project size. Through this blog, I will share my experience and how to tackle the issues you may come across when migrating a project from Gradle to Maven.
First, let us start by understanding what are gradle and maven:
Gradle and Maven are the two most popular, open-source build tools present in the Java ecosystem, which are used to automate the build process.
What do we mean by build process? Downloading the required dependencies, compiling the project source code, executing the unit test cases and packaging the project as an executable jar file or a war file is called the build process. Instead of doing this process manually, we can automate the process by using Gradle or Maven.
Gradle: An open-source build automation system that builds upon the concepts of Apache Ant and Apache Maven and introduces a Groovy-based domain-specific language (DSL) for scripting builds, as opposed to the XML configuration used by Maven.
Maven: A widely-used, older build automation tool primarily for Java projects. Maven uses conventions for the build lifecycle, which means less scripting for the developer but can be restrictive.
What are build.gradle? and pom.xml?
build.gradle for Gradle and pom.xml for Maven are the configuration files that define how the tasks should be executed: tasks like compiling, testing, packaging, deploying, managing dependencies, and more for your project.
How Maven Downloads Dependencies :
When you run a Maven command such as
mvn compileormvn package, Maven reads your pom.xml file.It checks the section to identify the required dependencies for your project.
Maven first checks the local repository for the specified dependencies.
If the dependencies are not found in the local repository, Maven will then attempt to download them from the central repository or any other repositories you have specified.
After downloading, Maven stores these dependencies in the local repository for future use, so it doesn't need to download them again.
Location of Local Repository
By default, Maven stores downloaded artifacts (dependencies) in the local repository on your machine. The default location for this repository is:
Windows: C:\Users[username].m2\repository
Unix/Mac: /home/[username]/.m2/repository
Here, [username] is your computer's username.
What is settings.xml?
In Maven, the settings.xml file is a configuration file that provides information about the environment in which Maven runs. This configuration is user-specific, meaning it's typically tailored to individual development environments. The settings.xml file contains elements used to define values that configure Maven's execution in various ways, such as the local repository's location, active build profiles, and authentication information for remote repositories.
There are two main locations where a settings.xml file may reside:
Maven's conf directory: The Maven installation has a settings.xml in the conf directory ({Maven_Home}/conf/settings.xml). This serves as a global settings configuration for all Maven builds on that machine.
User's home directory: You can also have a settings.xml specific to a user, which is located in the .m2 directory in the user's home directory (e.g., ~/.m2/settings.xml on Unix/Mac or C:\Users[username].m2\settings.xml on Windows). This is a user-specific configuration.
The user-specific configuration overrides the global configuration.
It's important to note that while the settings.xml is powerful, not all projects or developers will need to make changes to it. Many Maven operations work perfectly well with the default settings. However, in enterprise environments, when working behind proxies, or when interfacing with private repositories, adjustments to the settings.xml might become necessary.
Now that we have a basic understanding let's look at how can we migrate our project from gradle to maven:
Migrating from Gradle to Maven involves several steps, primarily because the two systems represent build configurations differently.
1st step: Generating pom.xml
The first step in the process of migrating is generating a pom.xml for your project
Gradle ships with a Maven plugin, which adds support to convert a Gradle file to a Maven POM file. The plugin uses the group and the version present in the Gradle file and adds them to the POM file.
The following two plugins need to be added to your build.gradle file.
apply plugin: 'maven'
apply plugin: 'java'
After adding these 2 plugins run the command: ./gradlew build or gradle build
The above build command will generate a pom-default.xml file inside the build/poms/ location of your project.
Now, just to be sure compare all the dependencies present in our build.gradle and pom-default.xml to make sure all the dependencies, with proper versions present in our build.gradle are migrated to pom-default.xml. If some of the dependencies are missing from your project after comparing add the missing dependencies with proper versions. In case your build.gradle has excludes for some of the dependencies, the generated pom-default.xml will add those excludes to all the dependencies by default. We can clear those excludes which are not required.
2nd step: Placing pom.xml in the root directory
By default, the pom.xml should be present in the root directory of your project. So, Create a file pom.xml in the root directory of your project and copy the content of the pom-default.xml to pom.xml.
Setting up the Maven compiler plugin:
The Compiler Plugin is used to compile the sources of your project. Since 3.0, the default compiler is javax.tools.JavaCompiler (if you are using Java 1.6) is used to compile Java sources. Alternatively, we can configure the compiler plugin directly:
<plugins>
     <plugin>
         <artifactId>maven-compiler-plugin</artifactId>
         <configuration>
           <source>1.8</source>
           <target>1.8</target>
         </configuration>
      </plugin>
 </plugins>
3rd step: Setup Maven Project Structure
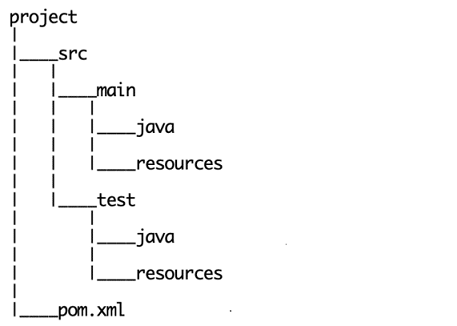
Maven expects a specific directory layout. The most basic structure looks like this:

Make sure your project aligns with this structure.
After 3rd step, you can try building your Maven project by using the command "mvn clean install". If you have a small project with fewer dependencies and no unit test cases and if Maven can resolve all the dependencies then ideally the build should pass, which is not the case most of the time.
Let us look at some of the possible issues we may come across:
"Maven Could not resolve dependencies, artifacts could not be resolved"
Now If you are getting the error "Maven Could not resolve dependencies, artifacts could not be resolved" then there may be a high chance that the particular artifact is not present in the repository in which Maven is looking or you may have given the wrong version in pom.xml. This situation will arise when you have multiple repositories for your project.
We have two options to add multiple repositories to our Maven project:
You can define them within the
<repositories>tag in yourpom.xmlfile.You can specify multiple repositories by creating a profile in the
${user.home}/.m2/settings.xmlIf you frequently use a set of repositories across multiple projects, consider moving the repository configurations to the
settings.xmlso that you don't have to repeat the configurations in every project'spom.xml.You can add your repos by creating multiple profiles in pom.xml as shown in the sample code below.
<profiles> ... <profile> <id>myprofile</id> <repositories> <repository> <id>my-repo2</id> <name>your custom repo</name> <url>http://abc.xyz.com</url> </repository> </repositories> </profile> ... </profiles>You will have to use a mirror tag in settings.xml to force Maven to use the repository mentioned in the mirror tag.
 <settings>
     ...
     <mirrors>
         <mirror>
             <id>internal-repo</id>
             <url>http://internal-repo.example.com/maven2/</url>
             <mirrorOf>central</mirrorOf>
         </mirror>
     </mirrors>
     ...
 </settings>
In the above example, the internal repository mirrors the central repository. Whenever Maven tries to fetch from the central repository, it'll fetch from
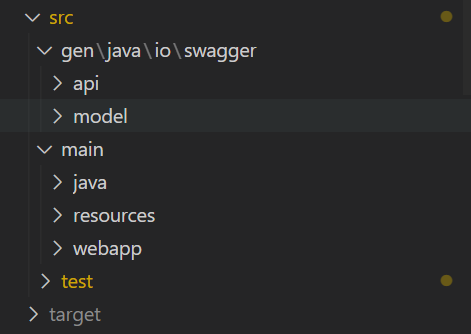
http://internal-repo.example.com/maven2/instead."Cannot find symbol" error
You will face this error if your project has class files outside of the Maven standard project structure as shown in the below image:

In this case, you will have to add that extra source directory for Maven to compile and include in the build. You can do so by adding the below plugin to your pom.xml inside the build tag.
    <plugin>
            <groupId>org.codehaus.mojo</groupId>
            <artifactId>build-helper-maven-plugin</artifactId>
            <version>3.2.0</version>
            <executions>
              <execution>
                <id>add-source</id>
                <phase>generate-sources</phase>
                <goals>
                  <goal>add-source</goal>
                </goals>
                <configuration>
                  <sources>
                    <source>some directory</source>
                  </sources>
                </configuration>
              </execution>
            </executions>
         </plugin>
Here "some directory" is the source directory you want to add for example: "src/gen/java"
"web.xml attribute is required" error
This is because you have not included web.xml in your web project and trying to build war using Maven. To resolve this error, you need to set the failOnMissingWebXml to false in the pom.xml file.
    <properties>
          <failOnMissingWebXml>false</failOnMissingWebXml>
    </properties>
If this is not helpful then create an empty file as web.xml under the path: "src/main/webapp/ WEB-INF".
"There are no tests to run"
After all this, In some cases, the build me go through but the build will not include the unit test cases present in java/src/test To include the test cases as part of your build add the following plugin to your pom.xml.
    <plugin>
          <groupId>org.apache.maven.plugins</groupId>
          <artifactId>maven-surefire-plugin</artifactId>
          <version>2.22.1</version>
    </plugin>
Maven-surefire-plugin handles [unit] test execution and fails the build process if there are test failures.
Throughout our journey of migration in this blog, we've witnessed that while both tools have their strengths and weaknesses, the transition is quite feasible with careful planning. The key to a smooth migration is understanding the fundamental concepts of both tools, mapping them appropriately, and testing the setup rigorously. As the tech ecosystem continues to evolve, the debate between Gradle and Maven will persist. Yet, by equipping ourselves with knowledge and hands-on experience, we can make informed decisions that best suit our project's unique requirements.
Subscribe to my newsletter
Read articles from Prateek Meti directly inside your inbox. Subscribe to the newsletter, and don't miss out.
Written by
