Understanding Selectors in CSS
 Radhakant Panda
Let's start with a quick understanding of what CSS is-
CSS stands for Cascading Style Sheet which is used to style web pages as we can add colour, make text bold, add the hovering feature and lots of such amazing features we can add.
CSS Selectors:
In CSS We use selectors to target a particular element in HTML and add the required styling to it. We can precisely select the element which is of our requirement without affecting the others.
Types of CSS Selectors:
Universal Selector-
As the name suggests, universal selector (*) matches elements of any type.
(which means that all types of elements get selected by using this selector)
Syntax-
*{ style properties }
<body>
  <div> <span> hello </div> </span>
  <P> this is a para1 </P>
  <P> this is a para2 </P>
  <div class="para">
     <P> this is a para3 </P>
     <P> this is a para4 </P>
    </div>
   <div class="para">
     <P> this is a para </P>
     <ul>
       <li>l1</li>
       <li>l2</li>
       <li>l3</li>
     </ul>
     <ol>
       <li>ool</li>
       <li>lk</li>
       <li>vhvg</li>
     </ol>
     <P> this is a parap </P>
    </div>
  <P> this is a para5 </P>
  <P> this is a para6 </P>
</body>
*{
  background-color:#23C4ED;
}
Output-

Individual Selector-
It is clear from its name itself about its function, With this selector we can easily select an element and perform the required styling but all the elements with the same name will get selected.
Syntax-
name_of_element{ style properties }
  <div>
    <p> this is a paragraph </p>
    <p> this is another paragraph </p>
    <ol>
      <li>  aaa </li>
      <li> bbb </li>
      <li> ccc </li>
      <li> ddd </li>
    </ol>
  </div>
p{
  background-color:#23C4ED;
}
Output-

In the above example, all the styling properties were applied only to the paragraph tag because we selected the paragraph tag. Here both the paragraph elements got selected but sometimes we might not need all the same named elements For such it will be better to use ID selector as it is more specific.
Class Selector-
It starts with a dot(.). It will select everything in the document with that class applied to it. It is also one of the widely used selectors.
Syntax-
.class_name{ style properties }
  <div>
        <ul class="fruits">
            <li> MANGO </li>
            <li> AVOCADO </li>
            <li> STRAWBERRY </li>
        </ul>
    <ol class="fruitzz">
      <li> APPLE </li>
      <li> GUAVA </li>
      <li> BANANA</li>
      <li> PINE APPLE </li>
    </ol>
    </div>
.fruits{
background-color:#00D84A;
color:#120E43;
}
.fruitzz{
  background-color:#46B2E0;
}
Output-

Here we can see that there are two classes named fruits and fruitzz, The style properties written inside the class named fruits, were applied to elements having that name and similarly, those belonging to the class of fruitzz got the corresponding properties. If elements with class names other than the above were present then none of the style properties would have been applied. So we can make various classes and apply styling properties.
ID selector-
An ID selector begins with a #, it is used in the same way as a class selector. Unlike a class selector, an ID can be used only once per page, and elements can only have a single id (you can give multiple elements the same ID it willn't throw an error but that's considered as a bad coding practice )value applied to them. It can select an element that has the ID set on it, and you can precede the ID with a type selector to only target the element if both the element and ID match.
Syntax-
#id_value{
    styling properties
}
You can see both of these uses in the following example:
<body>
  <P id="p1"> this is a para1 </P>
  <P id="p2"> this is a para2 </P>
  <P id="p3"> this is a para3 </P>
  <P id="p4"> this is a para4 </P>
  <P id="p5"> this is a para5 </P>
  <P id="p6"> this is a para6 </P>
</body>
#p1{
  border:3px solid black;

}
#p3:hover{
  border:2px solid #808080;
  border-radius:3px;
  background-color:#120E43;
  color:white;
}
#p5{
  color:#E6425E;
}
Output-

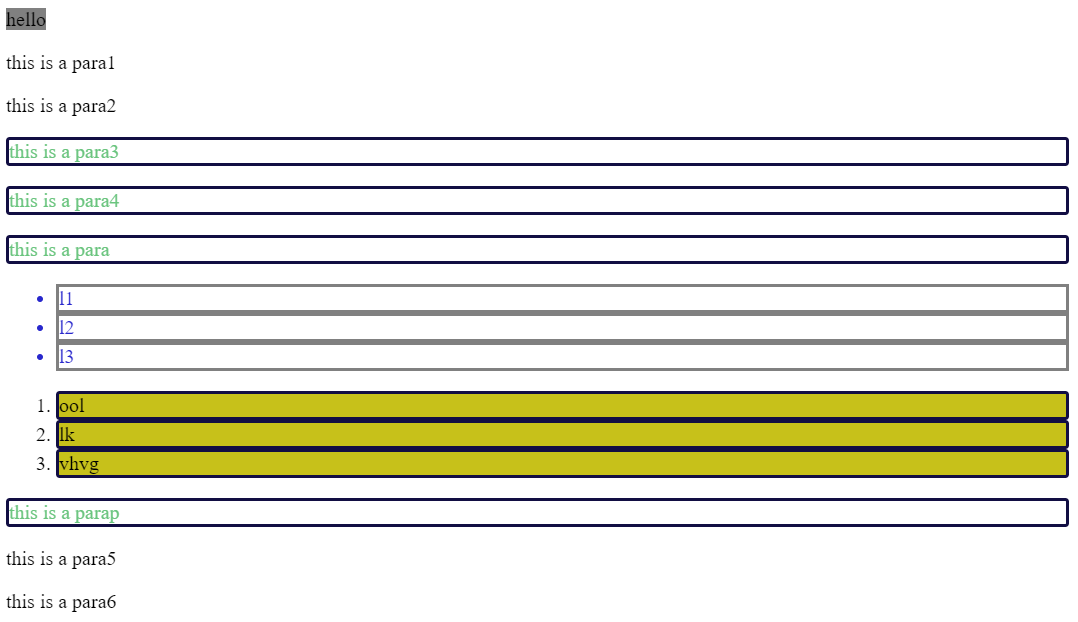
Child combinator-
The child combinator which is denoted by > ( >) is placed between two CSS elements. It matches only those elements matched by the second selector that are the direct children of elements matched by the first. Descendant elements further down the hierarchy don't match.
Syntax-
element1 > element2 > element3{
Styling properties
}
<body>
  <div> <span> hello </div> </span>
  <P> this is a para1 </P>
  <P> this is a para2 </P>
  <div class="para">
     <P> this is a para3 </P>
     <P> this is a para4 </P>
    </div>
   <div class="para">
     <P> this is a para </P>
     <ul>
       <li>l1</li>
       <li>l2</li>
       <li>l3</li>
     </ul>
     <ol>
       <li>ool</li>
       <li>lk</li>
       <li>vhvg</li>
     </ol>
     <P> this is a parap </P>
    </div>
  <P> this is a para5 </P>
  <P> this is a para6 </P>
</body>
body>div>span{
  background-color:#808080;
}
div>ul>li{
  border:3px solid #808080;
  color:#2827CC;
}
div>p{
  border:3px solid #120E43;
  border-radius:3px;
  color:#6AC47E;
}
div>ol>li{
  border:3px solid #120E43;
  border-radius:3px;
  color:##C7C11A;
  background-color:#C7C11A;
}
Output-

That's all about some of these selectors feel free to give suggestions.
Subscribe to my newsletter
Read articles from Radhakant Panda directly inside your inbox. Subscribe to the newsletter, and don't miss out.
Written by
