Understanding GitHub Actions: Part 2 - Customizing Your Workflows
 akash more
Introduction:
Welcome back to Part 2 of our GitHub Actions series, where we delve deeper into the world of workflow customization. In this instalment, we'll explore essential attributes and tips to help you create tailored workflows that suit your project's needs.
If you missed Part 1, we recommend giving it a read before diving into this section.
Job Dependencies:
As a quick recap, remember that each GitHub Actions workflow consists of one or more jobs, each identified by a unique name. By default, these jobs run in parallel. However, you can control job execution using the needs attribute.
Let's illustrate this with an example:
jobs:
  job1:
    # Job configuration here

  job2:
    needs: job1
    # Job configuration here

  job3:
    needs: [job1, job2]
    # Job configuration here
In this example, job2 will only run if job1 completes successfully. Likewise, job3 depends on both job1 and job2.
Sequential Jobs Regardless of Success:
But what if you want jobs to run in sequence without waiting for the success of the previous one? You can achieve this using the if attribute with the value always(). For instance:
jobs:
  job1:
    # Job configuration here

  job2:
    if: always()
    needs: job1
    # Job configuration here
Here, job2 will run after job1 regardless of whether job1 succeeds or fails.
Conditionals:
GitHub Actions allows you to define conditions for workflow execution using the on attribute. This attribute specifies the event that triggers the workflow. Common events include push, pull_request, and release. For example:
on:
  push:
    branches:
      - main

  pull_request:
    branches:
      - develop

  release:
Environment Variables
You may already be familiar with the concept of environment variables, but let's take a closer look at how they work within GitHub Actions workflows. These dynamic key-value pairs play a significant role in configuring and customizing your automation processes.
Here are some important aspects to consider when working with environment variables in GitHub Actions:
1. Dynamic Key-Value Pairs:
Environment variables act as dynamic containers that store valuable pieces of information during the execution of your workflow. They are like virtual sticky notes that hold data relevant to your automation tasks.
2. Case Sensitivity Matters:
One crucial thing to keep in mind is that environment variables are case-sensitive. This means that "myVariable" and "myvariable" would be treated as distinct variables. Consistency in naming and casing is essential to avoid confusion.
3. Flexibility in Setting:
GitHub Actions provides flexibility in setting environment variables. You can define them at different levels within your workflow, including at the workflow level, job level, or even at the individual step level. This allows you to scope variables to specific parts of your workflow, keeping things organized and efficient.
4. Timing of Injection:
Environment variables come into play precisely when you need them. They are injected into the workflow's environment and become accessible as the job runs, right before any commands are executed. This timing ensures that your variables are available when required, allowing you to pass data, secrets, or configuration settings seamlessly.
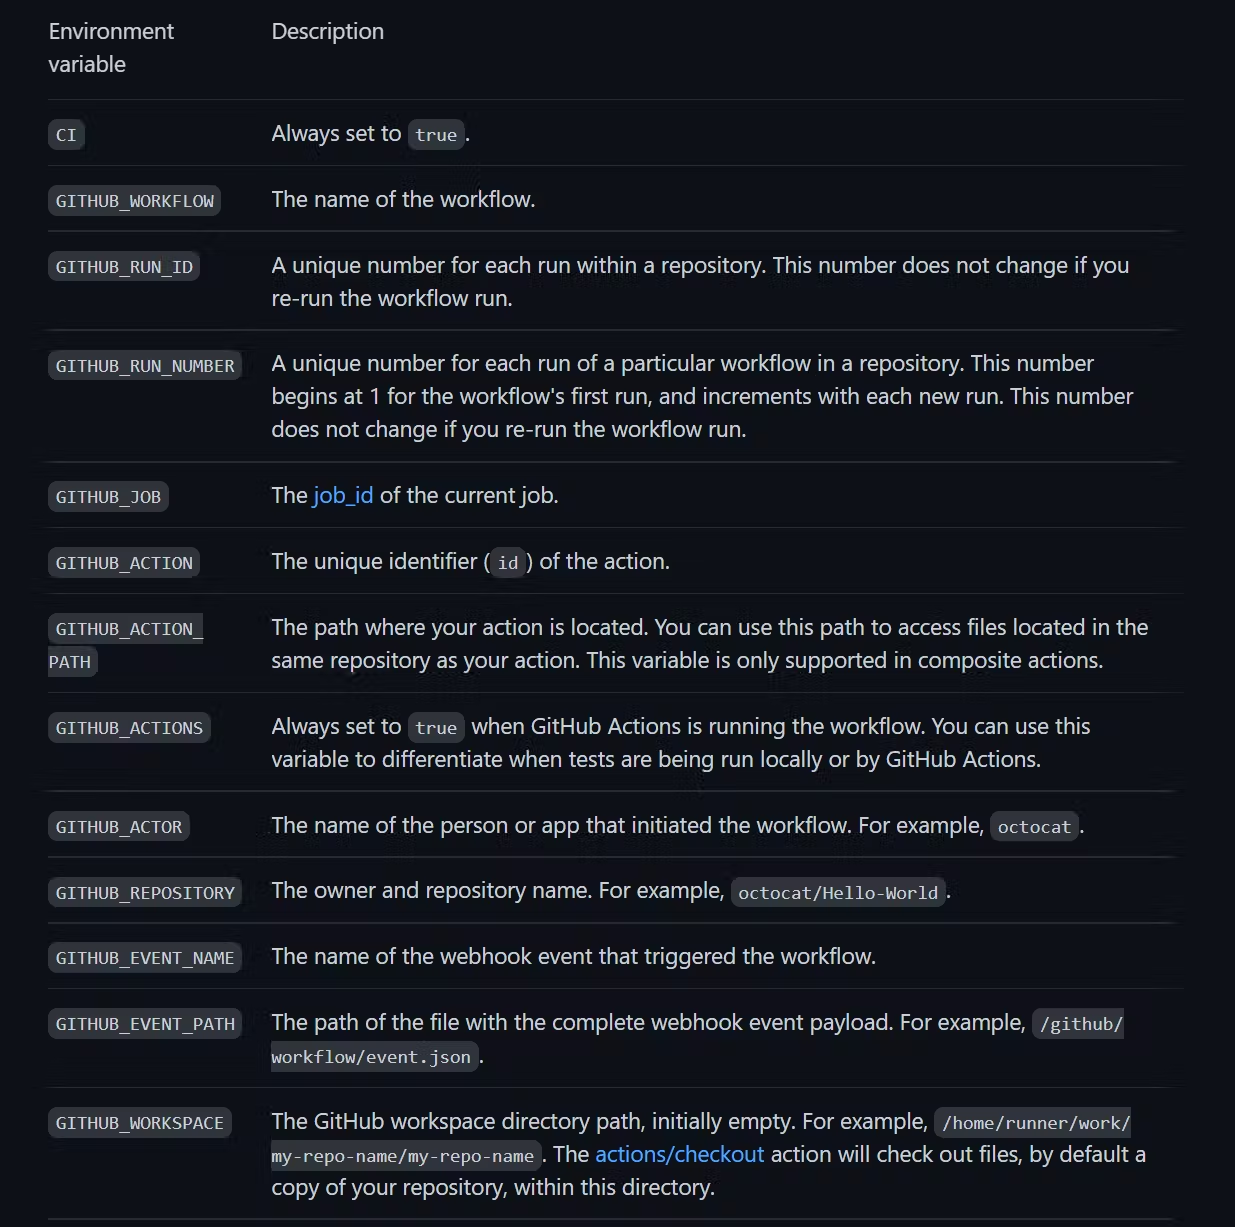
Here are some of the commonly used default environment variables:

Creating Custom Environment Variables
In GitHub Actions, environment variables play a crucial role in configuring workflows and passing data between different steps and jobs. While GitHub provides default environment variables, you can also create your custom ones to tailor your workflows to specific requirements.
Here's how you can create and use custom environment variables within your GitHub Actions workflows:
1. Using the env Attribute:
Environment variables can be defined at three different levels within your workflow: at the workflow level, the job level, or the step level. The primary attribute used for creating these variables is env.
For instance, let's consider a simple workflow where we define custom variables in these different areas:
name: Environment Variable Tutorial

env:
  WORKFLOW_VARIABLE: "This is a workflow-level variable!"

on:
  push:
    branches: [main]

jobs:
  build:
    runs-on: ubuntu-latest
    env:
      JOB_VARIABLE: "This is a job-level variable!"

    steps:
      - name: Print environment variables
        env:
          STEP_VARIABLE: "This is a step-level variable..."
        run: |
          echo "Here are my custom environment variables"
          echo $WORKFLOW_VARIABLE
          echo $JOB_VARIABLE
          echo $STEP_VARIABLE
In this example:
WORKFLOW_VARIABLEis defined at the workflow level.JOB_VARIABLEis defined at the job level.STEP_VARIABLEis defined at the step level.
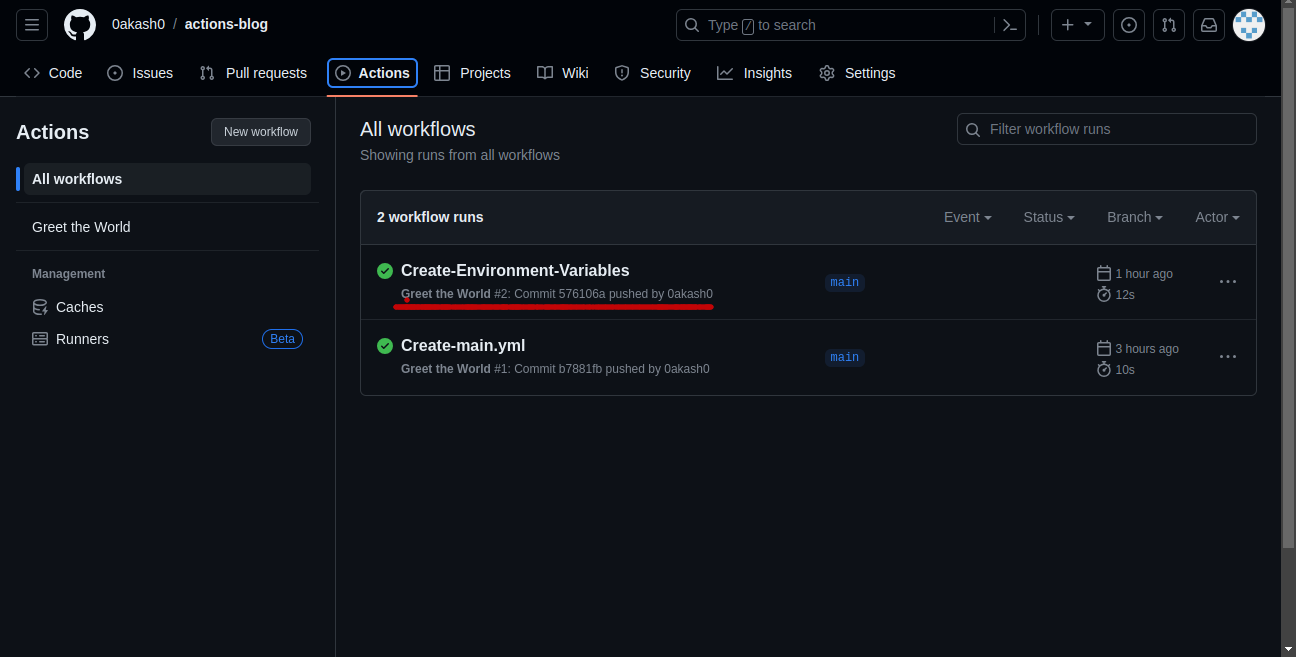
Now let's run this workflow and see the results:

2. Accessing Custom Variables:
To access and use these custom environment variables, you have different syntax options depending on your environment:
In a Unix-based environment like Ubuntu, you can use the standard shell syntax:
$VARIABLE_NAME.In a Windows environment, you can use the
$env:VARIABLE_NAMEsyntax.The YAML syntax
${{ env.VARIABLE_NAME }}works universally across different environments, making it a versatile choice.
3. Naming Convention:
It's a good practice to follow a consistent naming convention for your custom environment variables. Many developers use an all-uppercase format with underscores as spaces, ensuring clarity and readability. For example, MY_CUSTOM_VARIABLE or API_KEY.
By creating and effectively using custom environment variables in your GitHub Actions workflows, you can customize your automation processes to suit your project's unique needs. These variables enable you to pass data, secrets, and configuration parameters seamlessly, enhancing the flexibility and power of your workflows.
Conclusion:
In this segment of our GitHub Actions series, we've explored job dependencies, conditionals, and environment variables to enhance workflow customization. Stay tuned for Part 3, where we'll dive deeper into GitHub Actions and actions themselves.
If you found this article helpful, please consider sharing it and leaving any questions or comments below. Your feedback is invaluable.
Thank you for joining us on this GitHub Actions journey!
Subscribe to my newsletter
Read articles from akash more directly inside your inbox. Subscribe to the newsletter, and don't miss out.
Written by
