Day 9: Deep Dive in Git & GitHub 🖥️
 Khushbu Koradiya
Table of contents
What is Git and why is it important? 💡
Git is a DevOps tool used for source code management. It is a free and open-source version control system used to handle small to very large projects efficiently. Git is used to tracking changes in the source code, enabling multiple developers to work together on non-linear development.
Git provides access to previous versions of the project. If there is any mistake, we can always roll back or undo the changes without losing any work. GIT is a hero that helps us handle possible problems that may occur while working on a software project.
Git Track Changes – Changes can be tracked as someone making a change leaves a commit message about it. Backup and Restore – It helps to maintain the source code backup. Collaboration - It enables software team to collaborate with each other.
What is difference Between Main Branch and Master Branch?? 🤔
The terms “main branch” and “master branch” refer to the default branch in a Git repository. The difference between these terms lies mainly in their naming conventions and historical context:
Master Branch
Historically, “master” was the default branch name used in Git repositories for many years. It originated from the original version control system called BitKeeper.
The “master” branch typically represents the main development branch, where the latest changes and features are integrated before being released or merged into other branches.
However, the use of “master” has been recognized as carrying connotations of slavery and oppression, leading to a movement to replace it with more inclusive terminology.
Main Branch
In response to the concerns raised about the term “master”, many Git hosting platforms and communities have moved towards adopting more inclusive naming conventions.
“main” is a commonly used alternative to “master” as the default branch name. It aims to promote diversity and inclusion within the software development community.
The “main” branch serves the same purpose as the “master” branch, representing the primary branch for development, integration, and the latest changes.
To view all available branches, use the “git branch” command:
git branch
Can you explain the difference between Git and GitHub? 💭
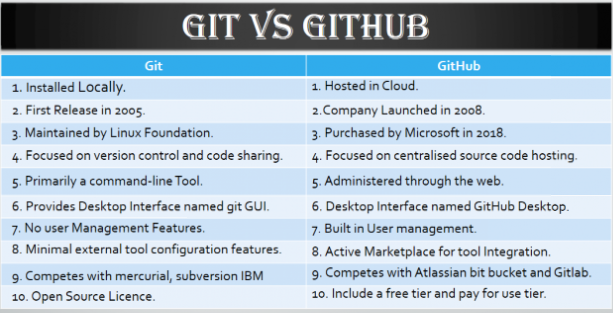
Git is a version control system that allows developers to track changes in their code. GitHub is a web-based hosting service for git repositories. In simple terms, you can use git without Github, but you cannot use GitHub without Git.
Git is focused on version control and code sharing. GitHub is focused on centralized source code hosting.
Git is a command line tool, GitHub is a Web-based graphical interface which provides you with the access control, basic task management tools along with several collaboration features.
How do you create a new repository on GitHub? 💡
1. Creating a repo from GitHub.
To create a repo from GitHub, you need a verified account from GitHub before you can follow the below steps as illustrated.
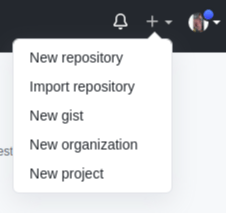
- Step 01 – Go to github.com. Create an account. On the top right-most corner, locate the drop-down menu shown below. From the drop-down menu, select
new repository.
New repository drop-down menu.
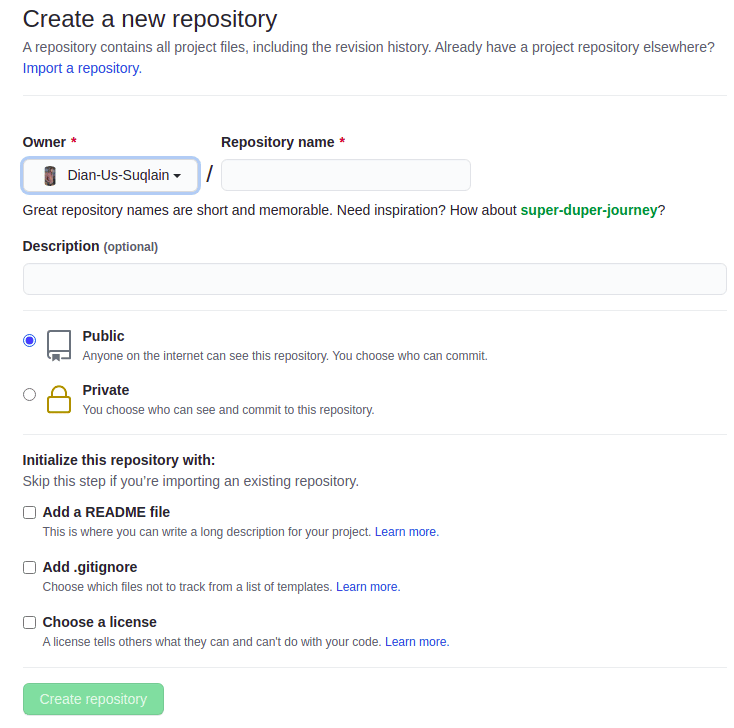
- Step 02 – The following page will be displayed. Write a name for your repository.
We can describe our repository, including its purpose and its functionality.
If you want to make the repository private and not visible to others, select the private radio button.
The check buttons include a README file for your project, including the technologies and basics of importing your project to another machine.
You can check all or none of the options, depending on your requirements.
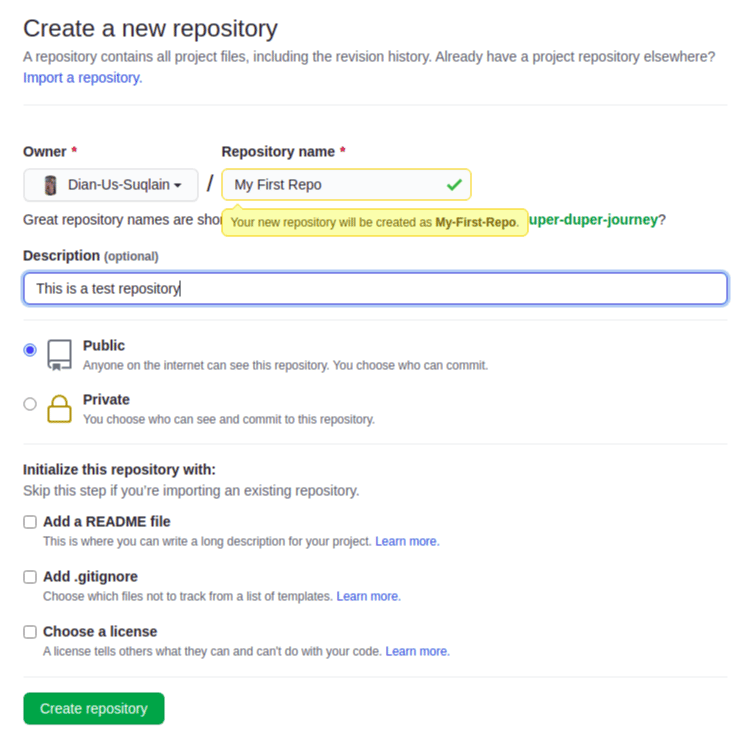
- Step 03 – After filling in the name and description of your first repo, it will look like this.
Click on the Create Repository button to create your first repo.
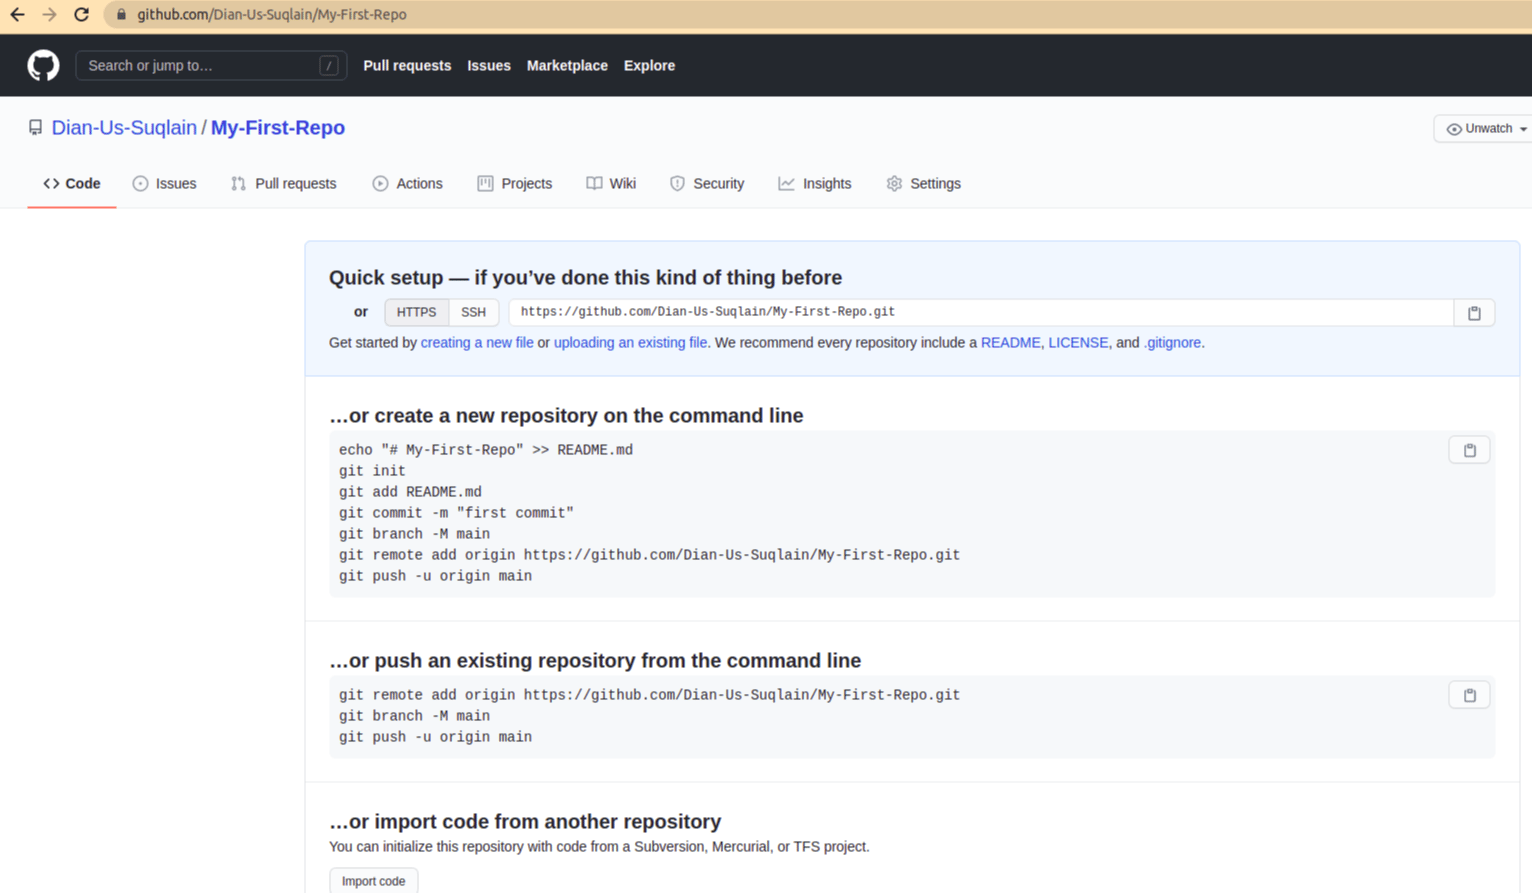
- Step 04 – After following the above steps, you are ready to use your first repository.
Now we can push any project on this repo.
2. Creating a repo from CLI
We created our first repo from a GitHub account. Now let’s learn how to do it by using the git command line from your local machine.
The following commands must be entered to create a repository using this method:
git init
git add somefilename
git commit -m "initial commit"
git remote add origin https://github.com/username/new_repo
git push -u origin master
The git init commands initializes your repository. You do not want to create an empty repository, so you must add git add somefile in the procedure.
The commit commands save your changes to a local repository on GitHub. Every time we make any changes in the code, we commit the code.
The remote command states that this is a remote repository, and we have to add a path to it that shows its origin. The path is your repository URL shown in the below image.
And finally, we have to push our repo to the master branch. master is the actual project file we work on.
What is difference between local & remote repository? How to connect local to remote?
In Git, a local repository is a copy of a project that is stored on your computer. You can make changes to the code in your local repository, commit those changes, and manage the history of your project without an internet connection.
A remote repository, on the other hand, is a version of your project that is stored on a server and is accessible from anywhere with an internet connection. Remote repositories are typically used for collaboration and sharing code with others.
To connect a local repository to a remote repository, you need to use the “git remote” command. Here are the basic steps to connect a local repository to a remote repository:
Initialize a Git repository in your local directory by running the “git init” command.
Go to GitHub and create a new remote repository for your project.
Copy the URL of the remote repository to your clipboard.
In your local repository, run the following command to add the remote repository:
git remote add origin <remote repository URL>
Replace “<remote repository URL>” with the URL of the remote repository.
5. To push your local repository to the remote repository, run the following command:
git push -u origin master
This command pushes the “master” branch of your local repository to the “origin” remote repository and sets the “origin” remote as the default remote for future pushes.
Subscribe to my newsletter
Read articles from Khushbu Koradiya directly inside your inbox. Subscribe to the newsletter, and don't miss out.
Written by

