Python Music Recommender: A Practical Guide Part-1
 Vineet Singh Negi
Why this?
You have your headphones on with your favorite Spotify playlist on shuffle. You like this music, but somehow it just isn't doing it for you today. You hit the next button a few times in searching for a feeling.
Determined, you start scrolling through your algorithmically created playlists. The ones Spotify makes just for you. But they don't feel like they are for you.
If this sounds familiar, you aren't alone. I experience this regularly, and when I started to tell others, they told me their similar stories. So I decided to learn a few things and as it was my college summer break, I could consider it as a project. In the end, I did come up with the insight I was looking for.
Setting up Spotify API
Since we are dealing with Spotify, I thought maybe the Spotify Developer API could give me something to work with. Luckily, Spotify has an API endpoint that lets you get information about artists and tracks
Humans communicate with one another by sending notes. A computer could do the same via an API.
APIs help the computer to communicate with another computer and obtain various information using calls and requests.
To begin, you would have to log in and sign up for a Spotify developer account.
The key information required from an API usually consists of a “client” and a “secret” key. This helps in authentication and use of the API to make calls and requests of various types of data through endpoints.
The keys can be found inside the dashboard of your application, Click to show client secret key.
Getting Artist info using Spotify API
Before getting started with Python coding we need to install Spotipy. Write this on terminal type:
pip install spotipy
Now we can start coding and use Spotify API using python.
# Importing libraries
import spotipy
import spotipy.oauth2 as oauth2
from spotipy.oauth2 import SpotifyOAuth
from spotipy.oauth2 import SpotifyClientCredentials
import pandas as pd
import time
Instead of setting the client and secret key for every call using the SpotifyClientCredientals() function, you can assign them to a variable.
Note: Ensure you have already set your environment variables before executing the code. The environment variables that should be set:
-> SPOTIPY_CLIENT_ID - Get this from your Spotify app in the Developer Console.
-> SPOTIPY_CLIENT_SECRET - Get this from your Spotify app in the Developer Console.
client_id = '' # <-- Enter your client_id
client_secret = '' # <-- Enter your client secret

# Function to get Client Id and Client Secret
auth_manage = SpotifyClientCredentials(client_id = client_id,
                                       client_secret = client_secret)

# Spotify object to access API
sp = spotipy.Spotify(client_credentials_manager = auth_manage)
Get the information of an artist using the artist() function by giving the artist’s ID, URI or URL. To obtain your desired artist Spotify URI, right-click on the name of the artist on Spotify’s desktop application and select > Copy Spotify URI
# Getting artist URI
artist_name = input("Enter the atrist name: ")
results = sp.search(q = artist_name, type = "artist")
artist_uri = results["artists"]["items"][0]["uri"]
artist = sp.artist(artist_uri)

if len(artist_uri) > 0:
    artist = results["artists"]["items"][0]
    print(artist['name'], artist['images'][0]['url']) # <-- Prints the Name and profile pic for artist
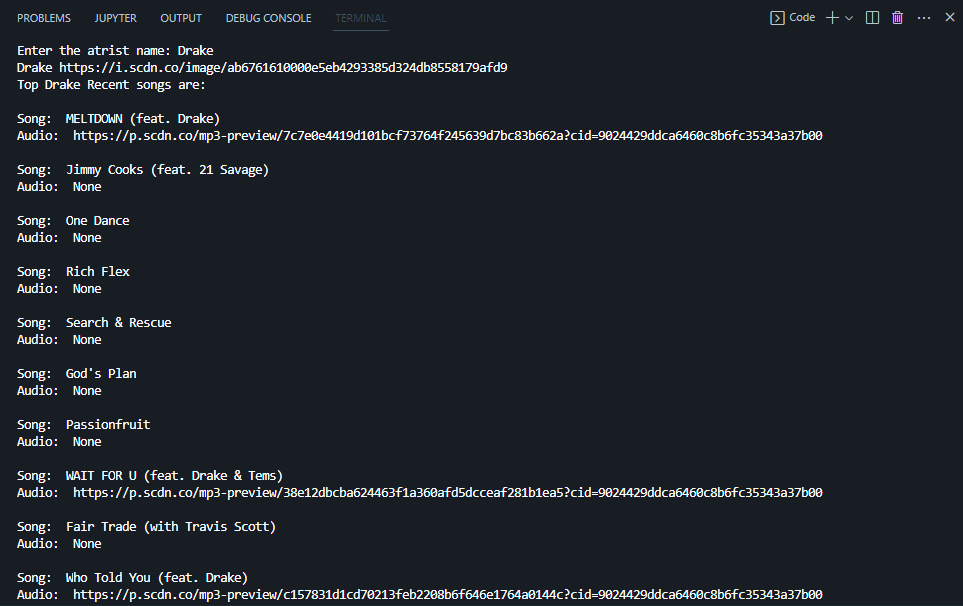
To get the artist's top tracks and music previews, use the artist_top_tracks() function.
# Atrist top tracks
print("Top", artist_name,"Recent songs are:\n")
artist_top_track = artist_uri
results = sp.artist_top_tracks(artist_top_track)

for track in results['tracks'][:10]:
    print("Song: ", track['name'])
    print("Audio: ", track["preview_url"])
    print()
Output:
Playlist Analysis
Firstly import the required libraries
import spotipy
import spotipy.oauth2 as oauth2
from spotipy.oauth2 import SpotifyOAuth
from spotipy.oauth2 import SpotifyClientCredentials
import time
from pprint import pprint
from datetime import date
import pandas as pd
import plotly.express as px
# Function to get Client Id and Client Secret
client_id = '' # <-- Enter your client_id.
client_secret = '' # <-- Enter your client secret
auth_manage = SpotifyClientCredentials(client_id = client_id,
                                      client_secret = client_secret)

# Spotify object to access API
sp = spotipy.Spotify(client_credentials_manager = auth_manage)
Define a function to obtain the music IDs which would help to obtain information such as the name, album, artist etc.
# Getting ID of songs in Playlist
def getPlayListIDs (user, playlist_id):
    track_ids = []
    album = sp.user_playlist(user, playlist_id)
    for item in album ['tracks']['items']:
        track = item['track']
        track_ids.append(track['id'])
    return track_ids

# Drake Playlist URI: 37i9dQZF1DX7QOv5kjbU68,
# One Direction URI: 37i9dQZF1DX6p4TJxzMRDe
# Top Hindi Hits URI: 37i9dQZF1DX0XUfTFmNBRM
track_ids = getPlayListIDs('spotify', '37i9dQZF1DX0XUfTFmNBRM') # <-- Enter any playlist URI
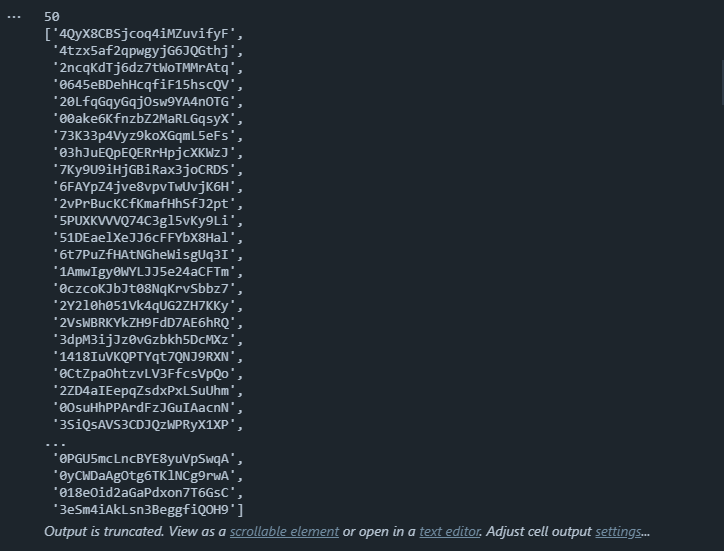
print(len(track_ids))
pprint(track_ids)
Using the playlist, you can see that our playlist contains 50 songs and IDs.
Output:
Now define another function that aids in extracting the features of the tracks in this playlist with a return statement to end the execution of the function call.
# Extracting the Track info and features

def getPlaylistFeatures(id):
    track_info = sp.track(id)
    features_info = sp.audio_features(id)

# Track Info
    name = track_info['name']
    album = track_info['album']['name']
    artist = track_info['album']['artists'][0]['name']
    release_date = track_info['album']['release_date']
    length = track_info['duration_ms']
    popularity = track_info['popularity']

# Track Features
    acousticness = features_info[0]['acousticness']
    danceability = features_info[0]['danceability']
    energy = features_info[0]['energy']
    instrumentalness = features_info[0]['instrumentalness']
    liveness = features_info[0]['liveness']
    loudness = features_info[0]['loudness']
    speechiness = features_info[0]['speechiness']
    tempo = features_info[0]['tempo']
    time_signature = features_info[0]['time_signature']

    track_data = [name, album, artist, release_date, length, popularity,
                  acousticness, danceability, energy, instrumentalness,
                  liveness, loudness, speechiness, tempo, time_signature]

    return track_data
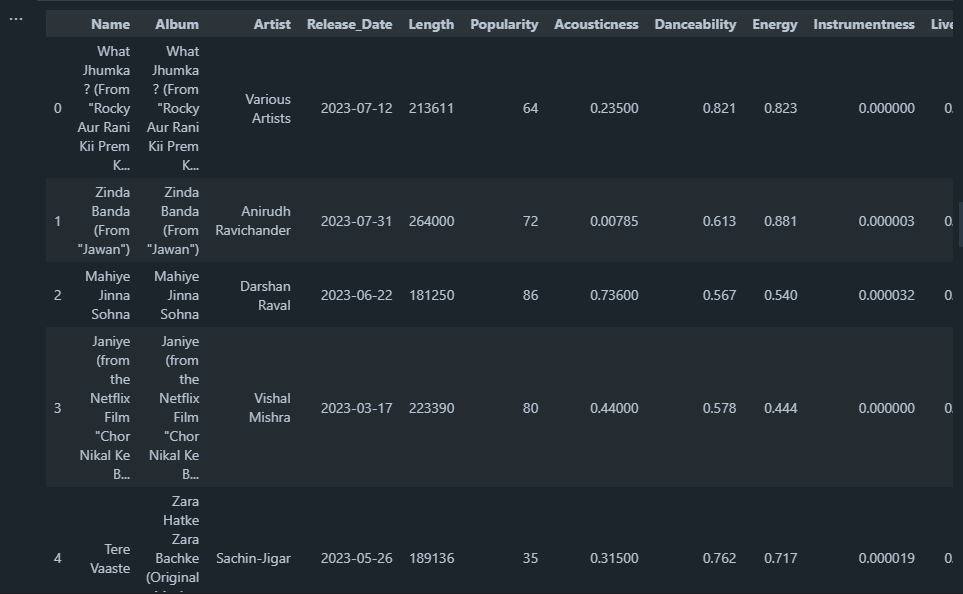
Use a for loop and append the track features for each music into a list before combining it with the music information.
# Appending the track features for each music into a list
track_list = []
for i in range(len(track_ids)):
    time.sleep(.3)
    track_data = getPlaylistFeatures(track_ids[i])
    track_list.append(track_data)

playlist = pd.DataFrame(track_list, columns = ['Name', 'Album', 'Artist',
                                               'Release_Date', 'Length',
                                               'Popularity', 'Acousticness',
                                               'Danceability', 'Energy',
                                               'Instrumentness', 'Liveness',
                                               'Loudness', 'Speechness',
                                               'Tempo', 'Time_Signature'])

playlist.to_csv("playlist_features.csv")
playlist.head()
The time.sleep() function suspends the execution of the current thread for a given number of seconds. This is to prevent sending too many requests within a period of time.
Output:
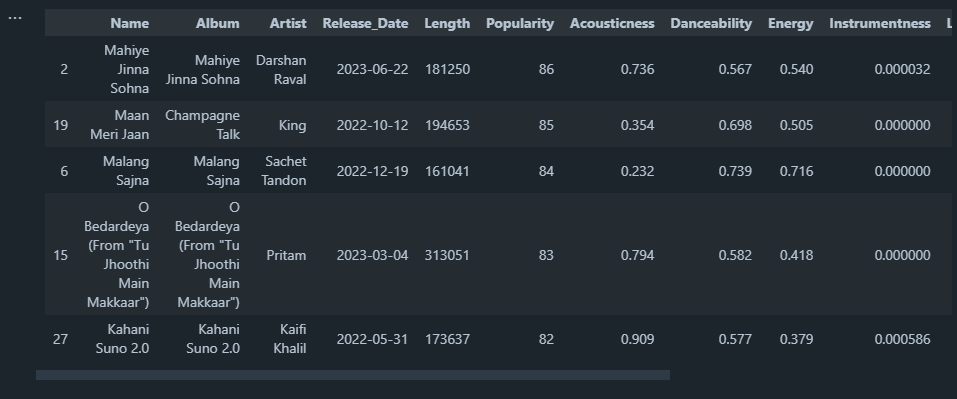
The most popular songs in this playlist:
# Getting Highest Populated Song
high_po = playlist.loc[lambda playlist: playlist["Popularity"] >= 60].sort_values(by=["Popularity"], ascending = False)
high_po.head()
Output:
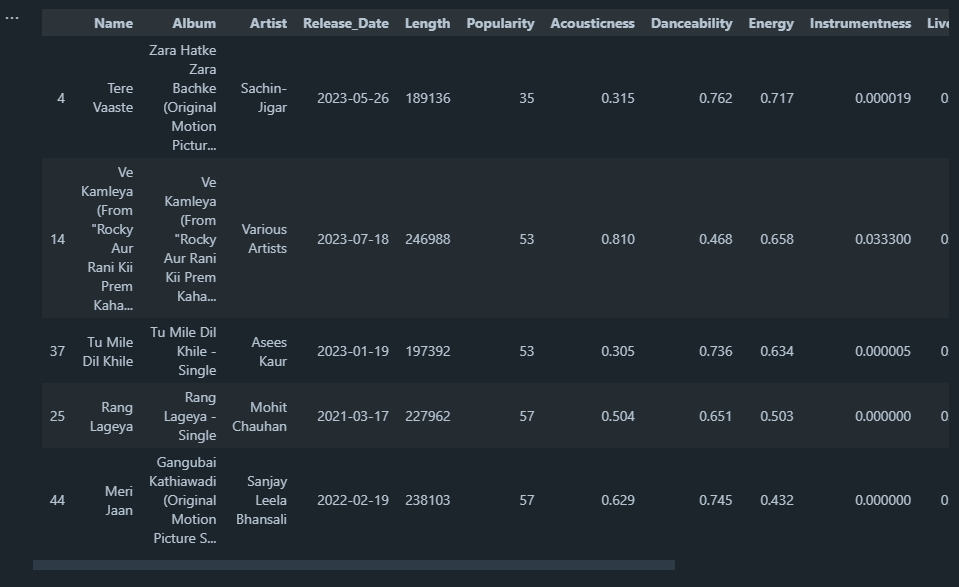
The Least Popular Songs in the Playlist:
# Getting Lowest Populated Song
low_po = playlist.loc[lambda playlist: playlist["Popularity"] <= 60].sort_values(by=["Popularity"], ascending=True)
low_po.head()
Output:
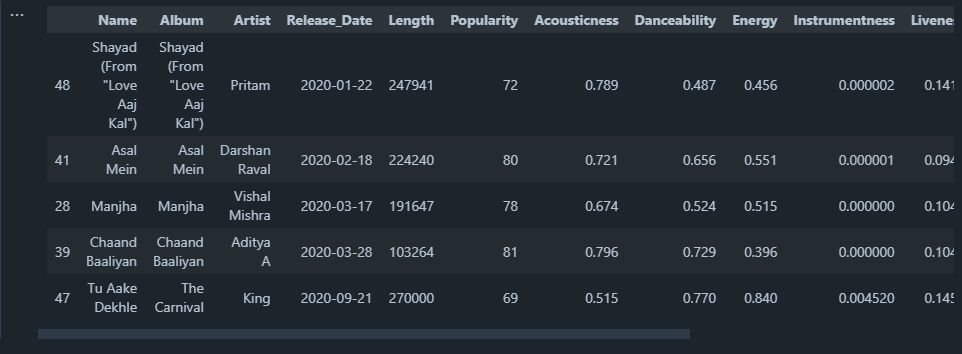
Oldest Song in the Playlist
# Changing the 'Release_Date' column type from object to date
playlist["Release_Date"] = pd.to_datetime(playlist["Release_Date"])

# today = date.today()
# date = today.strftime("%Y/%m/%d")
# old_songs = playlist.loc[lambda playlist: playlist["Release_Date"] < date].sort_values(by=["Release_Date"], ascending=True)
# old_songs.head()
                            #OR
old_songs = playlist.sort_values(by="Release_Date", ascending=True)
old_songs.head()
Output:
Data Visualization of the Data Frame:
To execute basic data visualization and gain insights from this playlist, I recommend you use the plotly express library.
pip install plotly_express
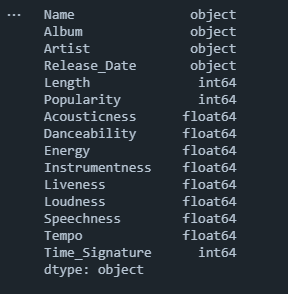
Now, check the data types of various columns
# Knowing the Datatype of Columns before working on it
playlist.dtypes
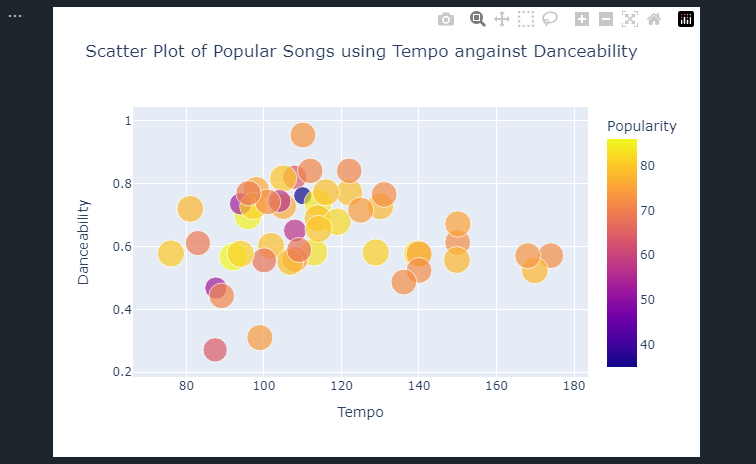
I used the Tempo column against the Danceability column to determine the scatter plots of popular songs in the playlist.
# Using the Tempo column against the Danceability column to
# determine the scatter plots of popular songs in the playlist.
fig = px.scatter(playlist, x = playlist['Tempo'], y = playlist['Danceability'], color = playlist['Popularity'],
                size = playlist['Popularity'], title = 'Scatter Plot of Popular Songs using Tempo angainst Danceability')

fig.show()
Output:
Which Artist topped this Playlist?
To determine which Artist's song had a high popularity greater than 70.
# Artist whose song has high popularity greater than 70
pop_70 =  playlist.loc[lambda playlist: playlist["Popularity"] > 70].sort_values(by=["Popularity"], ascending=False)

fig = px.pie(pop_70, values = "Popularity", names = "Artist",
             title = 'Artist whose song has high popularity greater than 70')
fig.update_traces(textposition = "inside", textinfo = "percent + label")
fig.show()
Output:
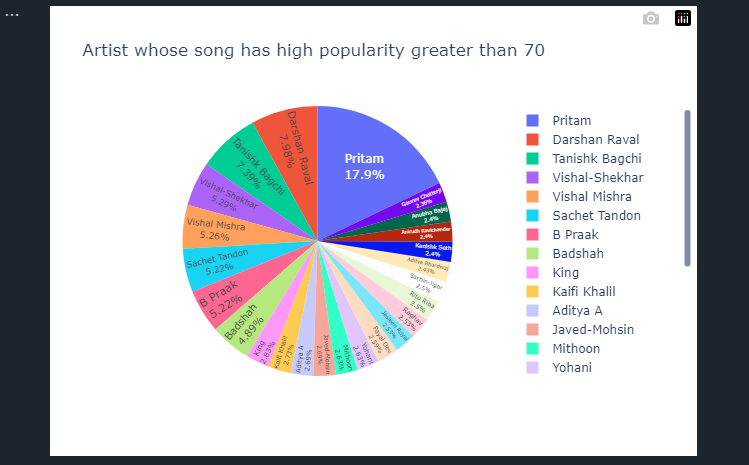
Using the pie chart above, it could be seen that Pritam songs topped this playlist, followed by Darshan Raval and Tanishk Bagchi.
So in this blog, we learned about Spotify API and how to use it in Python to get desired data.
Do look out for the upcoming Part 2, in which I will tell you how we could recommend songs using Spotify API.
You can find the code and data I used in this blog at this link.
Until then take care, Happy Learning!
Thanks for Reading!
Subscribe to my newsletter
Read articles from Vineet Singh Negi directly inside your inbox. Subscribe to the newsletter, and don't miss out.
Written by

Vineet Singh Negi
Vineet Singh Negi
Hi there! I'm Vineet Singh Negi and I have just started writing blogs. I'm passionate about DevOps and Machine Learning exploring all the different technologies involved in the process. I am constantly seeking new opportunities to expand my skill set and am actively working on various projects to improve my knowledge. On my Hashnode blogs, you'll find a mix of tutorials and insights as I navigate the world of DevOps and Machine Learning. I will be sharing everything I learn along the way.