Deployment pipeline for NextJS with Azure Static Web Apps and GitHub Actions
 Adil
Adil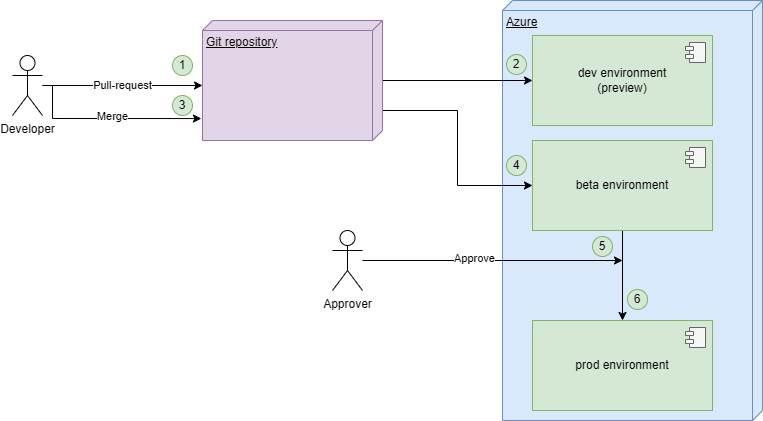
Introduction
In today's fast-paced digital landscape, having a reliable and scalable platform to host your web applications is crucial. Azure Static Web Apps, offered by Microsoft Azure, is a powerful solution for deploying static websites and single-page applications with ease.
In this blog post, we'll walk you through the process of deploying a static Next.js app to Azure Static Web Apps using GitHub. You'll learn how to set up your environment, configure Azure, automate the deployment process with GitHub Actions, and finally, enjoy the benefits of a highly available and globally distributed web application.
So, whether you're a seasoned developer looking to streamline your deployment workflow or a newcomer eager to explore modern web development practices, this guide is for you. Let's dive in and discover how to harness the power of Azure Static Web Apps for hosting your Next.js projects.
Create NextJS application
First of all, we need a sample NextJS application. This can be your existing NextJS application too. In this tutorial, we will use a sample from Vercel based on the tutorial [1].
Type the following command in your terminal to create a sample NextJS application in nextjs-blog directory.
npx create-next-app@latest nextjs-blog --use-npm --example "https://github.com/vercel/next-learn/tree/main/basics/learn-starter"
After the app is created test it to make sure it works.
cd nextjs-blog
npm install
npm run dev
Go to your browser and check the URL (http://localhost:3000).
As we want to deploy it to Azure Static Web Apps we need to do some tricks, in particular, we want to export the NextJS app statically.
Create a file next.config.js in the home folder of the application with the following content:
module.exports = {
    images: {
        unoptimized: true
    },
    trailingSlash: true,
    output: 'export'
}
Now, let's try to build
npm run build
If successful you will see a newly created directory /out. This directory contains static HTML/JS/CSS files compiled from your NextJS app.
Hooray, we are ready to deploy it to Azure using the Static Web Apps service.
Set up the GitHub repository
Create a GitHub repository and upload your NextJS application to that repository.
Deploy to Static Web Apps
In this stage, we want to explore how Static Web Apps work and do a basic setup. In the next phase, we will refine our pipeline.
In this tutorial, I will follow the steps from the tutorial published on Microsoft's web page [2].
Go to the Azure portal
Search for
Static Web AppsClick
Create
Enter the necessary data in the form and Sign in with GitHub:
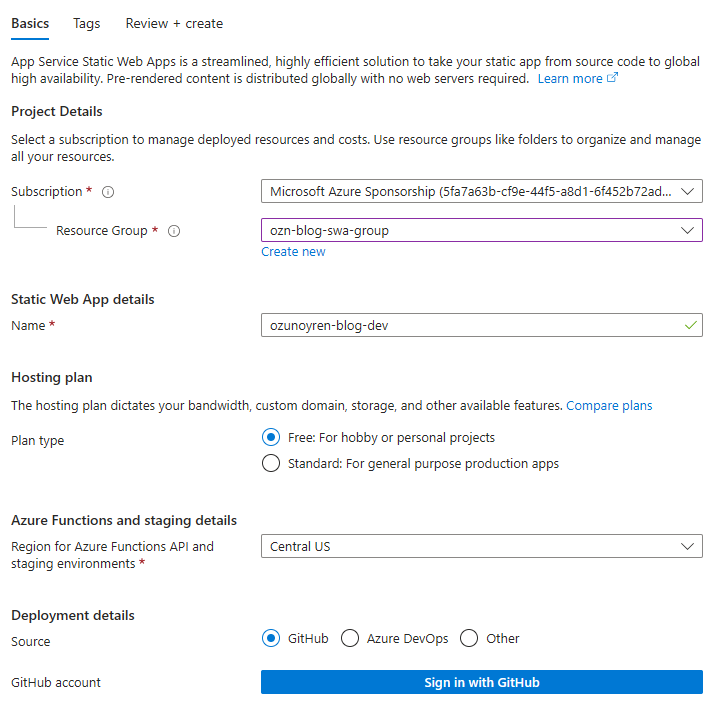
Follow the instructions and workflow file will be created automatically in your repository with the following content (we will edit it in the next section):
name: Azure Static Web Apps CI/CD

on:
  push:
    branches:
      - main
  pull_request:
    types: [opened, synchronize, reopened, closed]
    branches:
      - main

jobs:
  build_and_deploy_job:
    if: github.event_name == 'push' || (github.event_name == 'pull_request' && github.event.action != 'closed')
    runs-on: ubuntu-latest
    name: Build and Deploy Job
    steps:
      - uses: actions/checkout@v3
        with:
          submodules: true
      - name: Build And Deploy
        id: builddeploy
        uses: Azure/static-web-apps-deploy@v1
        with:
          azure_static_web_apps_api_token: ${{ secrets.AZURE_STATIC_WEB_APPS_API_TOKEN_<GENERATED_HOSTNAME> }}
          repo_token: ${{ secrets.GITHUB_TOKEN }} # Used for Github integrations (i.e. PR comments)
          action: "upload"
          ###### Repository/Build Configurations - These values can be configured to match your app requirements. ######
          # For more information regarding Static Web App workflow configurations, please visit: https://aka.ms/swaworkflowconfig
          app_location: "/" # App source code path
          api_location: "" # Api source code path - optional
          output_location: "out" # Built app content directory - optional
          ###### End of Repository/Build Configurations ######

  close_pull_request_job:
    if: github.event_name == 'pull_request' && github.event.action == 'closed'
    runs-on: ubuntu-latest
    name: Close Pull Request Job
    steps:
      - name: Close Pull Request
        id: closepullrequest
        uses: Azure/static-web-apps-deploy@v1
        with:
          azure_static_web_apps_api_token: ${{ secrets.AZURE_STATIC_WEB_APPS_API_TOKEN_<GENERATED_HOSTNAME> }}
          action: "close"
The basic pipeline is set. Whenever you raise a pull request in your repository GitHub Action will be triggered and deploy your web app into Azure.
The wizard in the previous step created a workflow file and pushed it into your repository. And also necessary secrets (AZURE_STATIC_WEB_APPS_API_TOKEN_<GENERATED_HOSTNAME>) has been created for you to integrate GitHub with Azure. You can see it in the settings of your GitHub repository.
When PR is created the workflow will be triggered and after a while, the endpoint URL will be seen in the comments section:

Multiple staged deployment
When your webpage goes to production and gains an audience you won't publish any experimental untested code into production. On the other hand, you still need some environment where you want to see the output of the latest codes before deciding to publish. Here the idea of multi-staged deployment comes.
The diagram below explains the high-level idea:
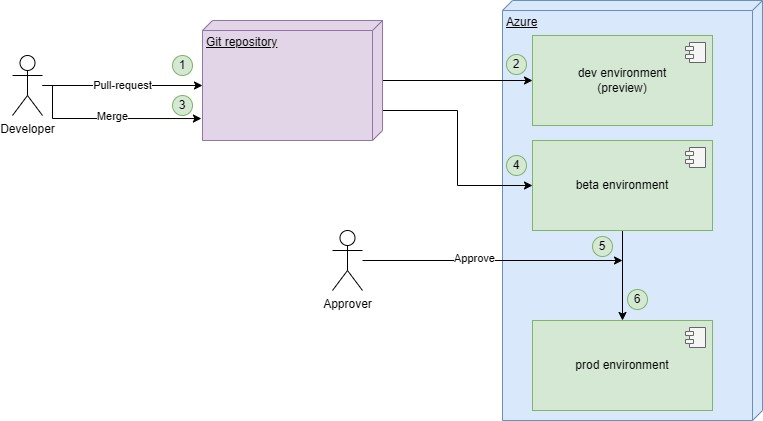
Now, let's implement it. At first, we will edit our workflow file and we will trigger deployment on PR only for the development environment (we will call it preview).
Magically, when you raise a PR Azure Static Web Apps (actually Azure scripts that GHA uses) and create a temporary environment. The URL will be published as a comment in the PR. Therefore, the preview environment is done for us out of the box.
Now we want a beta environment. Any code that is merged into the main branch will trigger an action to deploy it to a beta environment without approval. To make things easier we will use an already existing environment as a preview of and beta. Because Azure already did all the magic for us.
Now it is my turn to create a production environment. We go to Azure portal -> Static Web Apps -> Create.
This time under the source we chose Other:

- After the app is created go to the Overview page and click "Manage deployment token":

Copy the token.
Then go to the GitHub repository. Click Settings.
Secrets and Variables -> Actions
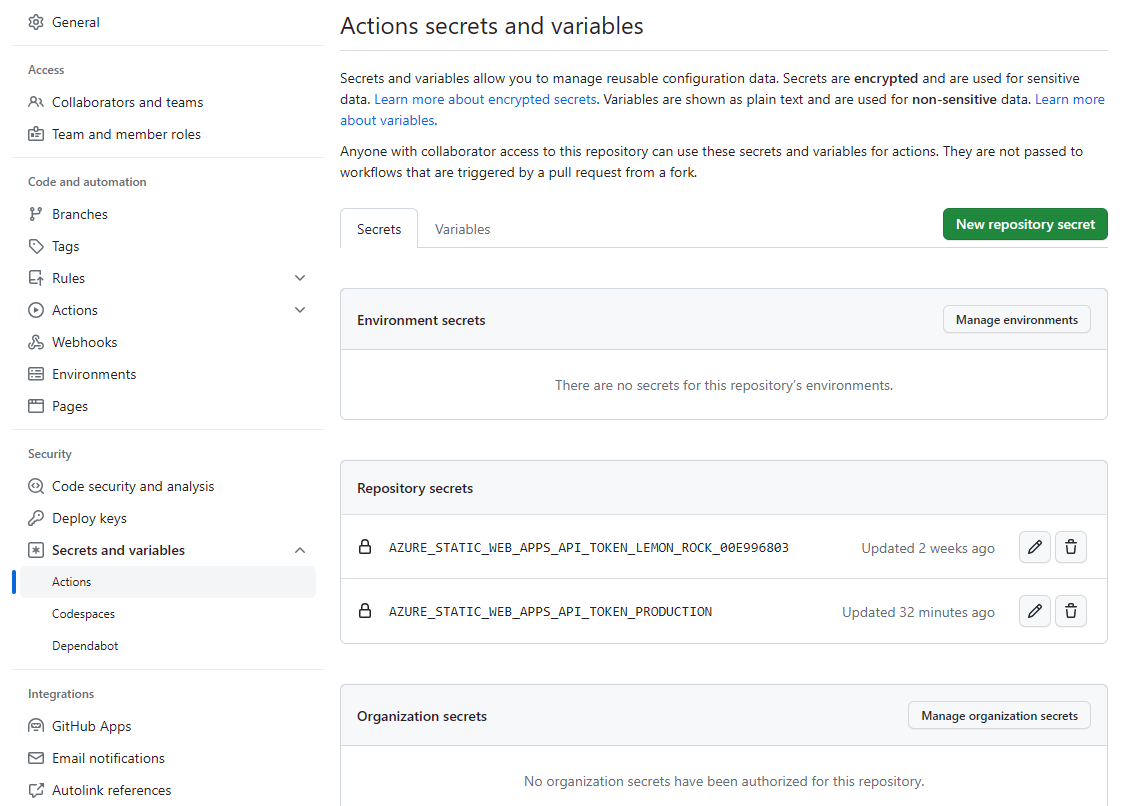
New repository secret.
Paste the token and give a name. In my example the name was
AZURE_STATIC_WEB_APPS_API_TOKEN_PRODUCTION
Now it is time to edit our workflow file. Here is my final workflow file:
name: Azure Static Web Apps CI/CD

on:
  push:
    branches:
      - main
  pull_request:
    types: [opened, synchronize, reopened, closed]
    branches:
      - main

jobs:
  build_and_deploy_job:
    needs: [build_and_deploy_to_beta]
    if: github.event_name == 'push'
    runs-on: ubuntu-latest
    name: Deploy to PROD
    environment:
      name: production
    steps:
      - uses: actions/checkout@v3
        with:
          submodules: true
      - name: Build And Deploy
        id: builddeploy
        uses: Azure/static-web-apps-deploy@v1
        with:
          azure_static_web_apps_api_token: ${{ secrets.AZURE_STATIC_WEB_APPS_API_TOKEN_PRODUCTION }}
          repo_token: ${{ secrets.GITHUB_TOKEN }} # Used for Github integrations (i.e. PR comments)
          action: "upload"
          ###### Repository/Build Configurations - These values can be configured to match your app requirements. ######
          # For more information regarding Static Web App workflow configurations, please visit: https://aka.ms/swaworkflowconfig
          app_location: "/" # App source code path
          api_location: "" # Api source code path - optional
          output_location: "out" # Built app content directory - optional
          ###### End of Repository/Build Configurations ######
        env: # Add environment variables here
          IS_STATIC_EXPORT: true

  build_and_deploy_to_dev:
    if: (github.event_name == 'pull_request' && github.event.action != 'closed')
    runs-on: ubuntu-latest
    name: Deploy to DEV
    environment:
      name: development
    steps:
      - uses: actions/checkout@v3
        with:
          submodules: true
      - name: Build And Deploy
        id: builddeploy
        uses: Azure/static-web-apps-deploy@v1
        with:
          azure_static_web_apps_api_token: ${{ secrets.AZURE_STATIC_WEB_APPS_API_TOKEN_LEMON_ROCK_00E996803 }}
          repo_token: ${{ secrets.GITHUB_TOKEN }} # Used for Github integrations (i.e. PR comments)
          action: "upload"
          ###### Repository/Build Configurations - These values can be configured to match your app requirements. ######
          # For more information regarding Static Web App workflow configurations, please visit: https://aka.ms/swaworkflowconfig
          app_location: "/" # App source code path
          api_location: "" # Api source code path - optional
          output_location: "out" # Built app content directory - optional
          ###### End of Repository/Build Configurations ######
        env: # Add environment variables here
          IS_STATIC_EXPORT: true
      - name: Comment URL
        uses: actions/github-script@v6
        env:
          STATIC_WEB_APP_URL: ${{ steps.builddeploy.outputs.static_web_app_url }}
        with:
          script: |
            console.log(JSON.stringify(process.env))
            github.rest.issues.createComment({
                issue_number: context.issue.number,
                owner: context.repo.owner,
                repo: context.repo.repo,
                body: '👋 Eşq olsun!\nWeb sayt müvəqqəti olaraq bu ünvanda yerləşdirildi: ' + process.env["STATIC_WEB_APP_URL"]
              })

  build_and_deploy_to_beta:
    if: github.event_name == 'push'
    runs-on: ubuntu-latest
    name: Deploy to BETA
    environment:
      name: development
    steps:
      - uses: actions/checkout@v3
        with:
          submodules: true
      - name: Build And Deploy
        id: builddeploy
        uses: Azure/static-web-apps-deploy@v1
        with:
          azure_static_web_apps_api_token: ${{ secrets.AZURE_STATIC_WEB_APPS_API_TOKEN_LEMON_ROCK_00E996803 }}
          repo_token: ${{ secrets.GITHUB_TOKEN }} # Used for Github integrations (i.e. PR comments)
          action: "upload"
          ###### Repository/Build Configurations - These values can be configured to match your app requirements. ######
          # For more information regarding Static Web App workflow configurations, please visit: https://aka.ms/swaworkflowconfig
          app_location: "/" # App source code path
          api_location: "" # Api source code path - optional
          output_location: "out" # Built app content directory - optional
          ###### End of Repository/Build Configurations ######
        env: # Add environment variables here
          IS_STATIC_EXPORT: true

  close_pull_request_job:
    if: github.event_name == 'pull_request' && github.event.action == 'closed'
    runs-on: ubuntu-latest
    name: Close Pull Request Job
    steps:
      - name: Close Pull Request
        id: closepullrequest
        uses: Azure/static-web-apps-deploy@v1
        with:
          azure_static_web_apps_api_token: ${{ secrets.AZURE_STATIC_WEB_APPS_API_TOKEN_LEMON_ROCK_00E996803 }}
          action: "close"
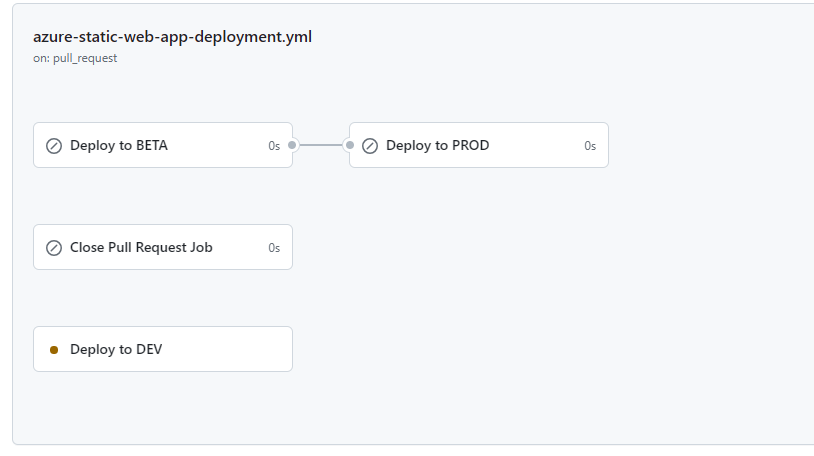
I have three jobs:
build_and_deploy_to_dev- a job to deploy to the preview environment.build_and_deploy_to_beta- a job to deploy to the betabuild_and_deploy_job- a job to deploy to the production
To demonstrate some features I created an environment variable STATIC_WEB_APP_URL in build_and_deploy_to_dev job. This variable will contain content from the output of the previous step [3][4]. The next step will use this environment variable to put a comment in PR [5].
Another important point is we need an approval mechanism for production deployment. To achieve this:
In GitHub go to Settings.
Environment -> New Environment
Environment name:
production(because in workflow file inbuild_and_deploy_jobwe used the same name underenvironmentattribute.Create
Now you can add reviewers.
Done :)
Conclusion
Deploying a Next.js application to Azure Static Web Apps through GitHub Actions provides you with a robust and efficient workflow. It enables you to focus on what matters most—building amazing web experiences—while automation takes care of the deployment process.
As you've learned in this guide, Azure Static Web Apps offers numerous advantages, including scalability, global availability, and effortless integration with your GitHub repositories. With a simple push to your main branch, your changes are automatically deployed to the Azure cloud without worrying about infrastructure management. Azure Static Web Apps and GitHub Actions give you the tools you need to succeed in this environment.
We hope this guide has been valuable in your journey towards efficient Next.js deployments on Azure. Now, go ahead and leverage this newfound knowledge to take your web applications to the next level. Happy coding!
References
Subscribe to my newsletter
Read articles from Adil directly inside your inbox. Subscribe to the newsletter, and don't miss out.
Written by
