Using Next.js version 13
 Ademola Ade-akanfe
Introduction:
What Next.js is?
Using Next.js version 13.4
Understanding Next.js file structure
Working with Next.js built-in files
Pre-requisites:
Knowledge of JavaScript
Knowledge of React
Little Knowledge of Next.js 's previous Version (Not required but nice to have)
Table of Contents
What NextJS is
Why Next.js
Previous Versions of Next.js
What’s new in Next.js v13 is about
Using the new features of Next.js V13
Introduction to Next.js ( What Next.js is )
Next.js is a popular open-source framework for building modern, server-side rendered, and search-engine optimized React applications. It’s built on top of React but provides more out-of-the-block features such as Server side rendering (SSR), and static site generation (SSG) than ReactJS, and this makes it a great choice to build a web application. The Next.js Compiler is written in Rust using SWC (Speedy web Compiler), which allows Next.js to transform and minify your JavaScript code for production faster, and also under the hood uses Node.js run time engine to execute server-side code. This is why Next.js is usually called a Full-stack React framework.
Why Next.js?
Here are some of the reasons why Next.js is preferred over React.js
Server-side rendering (SSR): In React, we can only pre-generate the HTML for the index page. This is because React is a client-side rendering library. This means that the HTML for all other pages is generated on the client after the JavaScript bundle has been downloaded and executed. Next.js is a framework that builds on React and adds support for SSR. This means that Next.js can pre-generate the HTML for all pages in a website, including subsequent pages. This can improve website performance, accessibility, and search engine optimization (SEO).
Static site generation (SSG) is a technique for generating HTML pages at build time. This means that the HTML for each page is generated once, and then served to users on subsequent requests. This can improve website performance and SEO, as search engines can index the pre-generated HTML. These are pages that do not contain any dynamic content.
Routing: Next.js has built-in support for file-based routing, a powerful routing system that uses the directory or file name to denote the URL to access the content of the page. This makes it easy to create and manage complex routing schemes without having to use external routing libraries.
File-based routing is different from traditional routing systems in that it does not require the use of route handlers. Instead, Next.js automatically generates routes for each file in the
pages/directory for version 12 and in theapp/directory for the latest version. This means that you can simply create a new file in thepages/orapp/directory to create a new route.Data Fetching: Unlike React.js which only offers client-side data fetching, with Next.js you can fetch data before the page is loaded using Server side rendering, pre-generate pages at build time using static site generation, and also client-side data fetching that React.js offers.
Next.js provides a way to create API endpoints using the same syntax as Express.js. This allows you to handle server-side logic that is not accessible to the client, while still being able to create a user interface for your application.
Previous Versions of Next.js
We’ve had different versions of Next.js over, but here are some notes about the previous versions of NextJS
File Structure: In the previous versions of Next.js, we had each of our routes in the Pages folder as shown below. This folder contains the name of each of our URL endpoints as a filename with extensions of
js,jsx,ts, ortsx.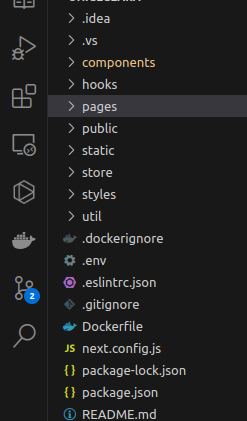
Presence of Routes File and Document file: Before the latest versions of NextJS, we had the leisure of using the
_app.jsfile to work as a router file, to share resources from parent to child components, and to make resources available on a global scope.
The Filename Structure: The filename structure of Next.js is straightforward. Each page or component file is named using the route that it corresponds to. For example, the file
pages/index.jscorresponds to the route/, while the filepages/contactcorresponds to the route/contact. The filename extension can be.js,.jsx,.ts, or.tsx
Fetching of Data: in this version of Next.js, when we want to do server-side fetching, we mostly use functions like
getStaticProps,getServerSideProps,getInitialProps, These functions run on the server side and some on the client side and the code block here is not available to the client on the client side.
What's New:
Starting from NextJS version 13, we have a very pleasant and interesting way of writing our web application using the best features. this latest version provides us so many features, a few of which will be listed below:
File Structure: In the previous version we had the pages folder to contain each of our routes, we don’t have that again, now we have the
src/appfolder which houses every of the routes.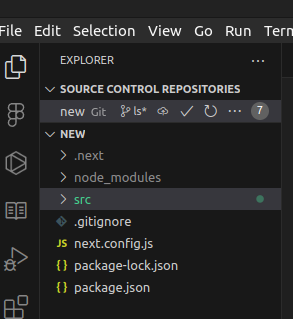
Filename Structure: in the previous versions we just name the file what we want our route handle should be or create a folder with the name being the name of the route handle then create an index file in the folder to create our components, not that anymore.
Presence of a Layout to define a general-based layout and make sure each component of the page focuses on the business logic.

Presence of error file and not found file: This error file is rendered if there is an error during the build process of a requested file or if there is an error during server-side rendering or server-side fetching of the page the error will be rendered, and the not-found file is rendered is the requested page is not defined in the route or can’t be found.
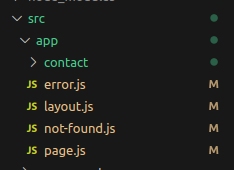
Presence of loading file: This file is rendered while the building of the requested page is going on.

Getting Started With Version 13:
To install Nextjs version 13 make sure you have node installed. To install Nodejs Go tohttps://nodejs.org/en. After installing Node, then follow the following installation processes. There are two ways, using the NextJs Template (Recommended) or creating from scratch.
1. Creating from Scratch
To create Nextjs version 13 from scratch, you need to run the following commands in your preferred directory:
npm init -y
npm install react react-dom next@latest
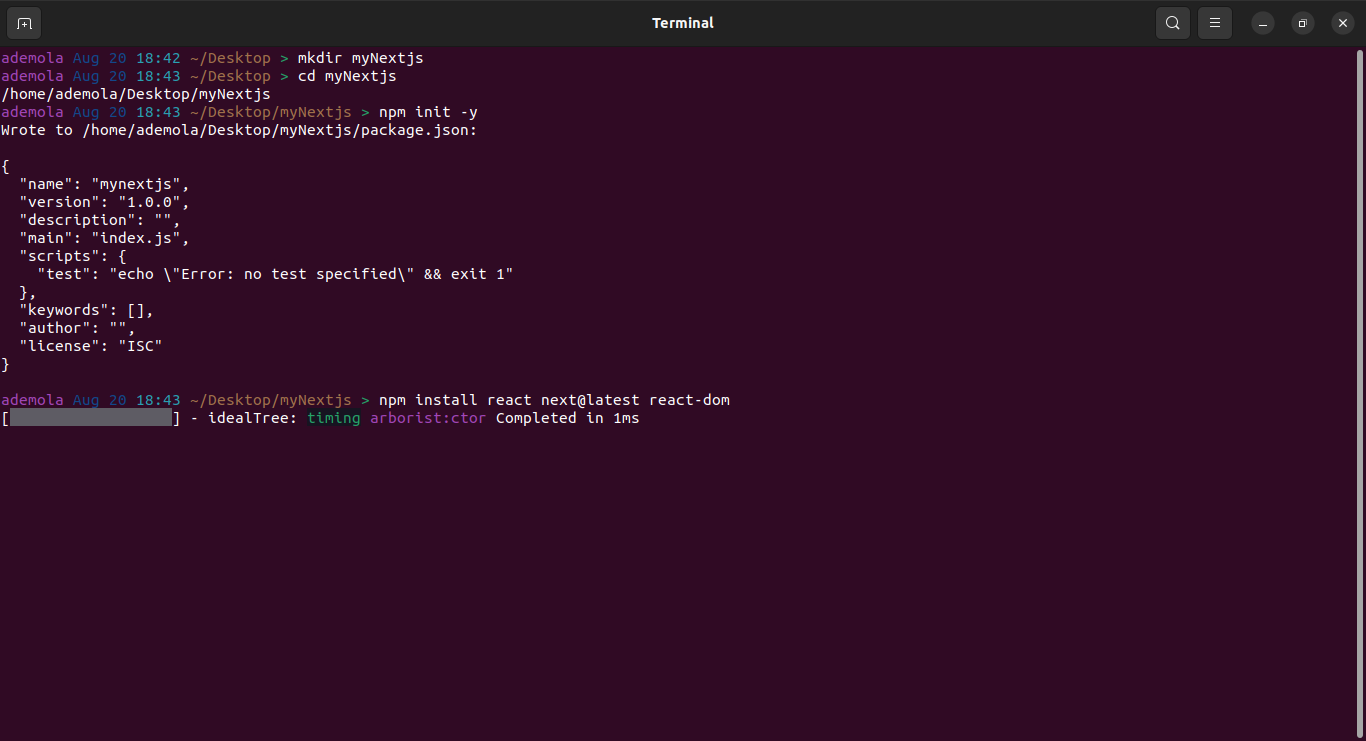
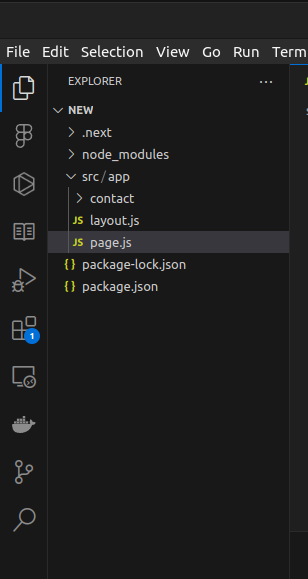
After running these commands, open the directory in any code editor of yours and create a src folder, in the src folder, create app directory. which looks like this below.
After creating the folder in the above form, in the app folder create a layout.js file, a page.js file and a contact directory. Enter the following content into the layout.js file
Enter the below into the layout.js file
"use client";

// this content goes into the layout.js file
//this file can be used to set a common Navigation header

const Layout = ({ children }) => {
  return (
    <html>
      <head></head>
      <body>
        <main>{children}</main>
      </body>
    </html>
  );
};
export default Layout;
The below code into the page.js
"use client";

const HomePage = async (props) => {
  return <> Homepage Component</>;
};

export default HomePage;
After doing all these, in your package.json file add a new script to the script blog which should look like this
 "scripts": {
    "dev": "next dev"
  },
After creating a new entry into the script block in the package.json file, so we need to start our server, go to the terminal, navigate to your current directory, and run npm run dev so we should have something that looks like this when we run localhost:3000 on our preferred browser.

in your contact/ directory create a new page.js file, and add the following content to the page.js file in contact directory
const Contact = () => {
  return <>Contact</>;
};
export default Contact;
Then go to your browser and navigate to localhost:3000/contact you should have something that looks like below

with these, we can see how the file-based routing of the latest version of Next.js works. Here is an image showing the file structure we just put together.
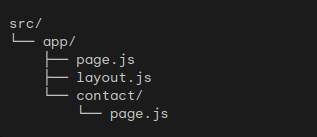
Using the Latest Features of NextJS
Using Layout File: this file can be used to set a common navigation header. This is the place to define providers for React-Redux or React Context because it cuts across every page of the application. The Layout file can be used as below to define a common navigation or header. Add the following code to your
layout.jsfile,"use client"; import Link from "next/link"; //this file can be used to set a common Navigation header const Layout = ({ children }) => { return ( <html> <head></head> <body style={{ backgroundColor: "red", height: "100vh", }} > <header> <Link href={"/"}>Home</Link> <br /> <Link href={"/contact"}>Contact</Link> </header> <main>{children}</main> </body> </html> ); }; export default Layout;From the above, we can see we set the header for the application and this header will be visible as long as there's no other sub-directory defined
layout.jsfile. For example, if we create alayout.jsfile in the contact directory and add the following code content below"use client"; //this file can be used to set a common Navigation header const Layout = ({ children }) => { return ( <html> <head></head> <body style={{ backgroundColor: "blue", height: "100vh", }} > <main>{children}</main> </body> </html> ); }; export default Layout;If we start our development server by running
npm run devon the homepage, we should have a background color red with our content in it as shown below.
When we go to the contact page, we should see a page that looks different from the rest. This is because the original file in the directory has been replaced by a newly created one in the same directory. The resulting page should look something like this:

from the above we can see that there's a level of precedence when defining the layout.js file, the one closest to the current route file will be loaded instead of a root one and with this implementation, we can define different headers for our application
Server-Side Fetching: You can fetch data from the server on any file located in the app folder, which will be displayed as a page in the browser. By default, these pages are server-based components and do not allow the use of react-based APIs without the need to specify at the top of the file that it is a client file. However, when working with client-based APIs, server-side fetching cannot be done. For example, let's try to fetch data from this URL in our
page.jsfile and try to set the fetched value into state using the reactuseStatehook https://jsonplaceholder.typicode.com/users/1.// this is the homepage: url/ // By default each of the pages of our application url file/folder are always server based component // So it is easier to fetch data here from an api, "use client"; import { useEffect, useState } from "react"; const fetchData = async () => { const url = "https://jsonplaceholder.typicode.com/users/1"; const response_val = await fetch(url); let fetch_result = await response_val.json(); return fetch_result; }; const HomePage = async (props) => { const [val, setVal] = useState({}); let result = await fetchData(); useEffect(() => { if (result) { setVal(val); } }, []); console.log(val); return <> Homepage Component</>; }; export default HomePage;If we start our development server, we will see we're getting an error that looks something similar to this below
async/await is not yet supported in Client Components, only Server Components. This error is often caused by accidentally adding 'use client' to a module that was originally written for the server. It's clear from the error that page.js is primarily designed as a server-based component. However, we attempted to use it as a client-based project by adding the'use client'tag and then tried to perform server-side fetching, which led to the error. The solution here is to split thepage.jsfile into separate server and client-based components. This involves creating a client-based component and conditionally adding it to the page.js file, as demonstrated below. create acomponent/directory in the src folder and add a new file called, add the following content"use client"; import { useEffect } from "react"; const HomeComponent = ({ email }) => { useEffect(() => { console.log("Testing " + email); }); return <h2>{email}</h2>; }; export default HomeComponent;Then we can refactor our
page.jsfile as this below// this is the homepage: url/ import HomeComponent from "../component/home"; // By default each of the pages of our application url file/folder are always server based component // So it is easier to fetch data here from an api, const fetchData = async () => { const url = "https://jsonplaceholder.typicode.com/users/1"; const response_val = await fetch(url); let fetch_result = await response_val.json(); return fetch_result; }; const HomePage = async () => { let result = await fetchData(); return ( <> {result ? ( <HomeComponent {...result} /> ) : ( <h2>Something went wrong please try again later</h2> )} </> ); }; export default HomePage;The HomeComponent is imported from the page.js file and utilized as a React client component. The fetched data result is passed as props, as demonstrated. This approach enables us to retrieve data and serve client-side components simultaneously.
Using the error.JS file: To send customized error messages when there is a failure in generating the requested page or server-side fetching, we use the error.js file. To use this file, we create an error.js file in our directory, and its contents should appear as follows:
 "use client";
 const ErrorComponent = ({ error, reset }) => {
   <div>
     <h2>An Error occurred</h2>
     {error.message && <h3>Reason: {error.message ? error.message : ""}</h3>}
     <button onClick={() => reset()}>Reload Page</button>
   </div>;
 };

 export default ErrorComponent;
The error.js file should be a client-based component, so we need to add our
use clientflag, From the above, we can see that we restructured the properties and extracted the error data and a reset method. The reset method helps us retry the process that led to the error.Using the Loading file: As a client-based component, there is no need to add a flag at the top by default. The
loading.jsfile should be placed in theapp/directory and is utilized to communicate with the client while the requested page is being fetched. It is important to note that this file cannot perform any server-side actions. Below is an example of what a loading file should look like.export default () => { return ( <div> <div>Loading...</div> </div> ); };Using the Not-found file: this is also a client-based component and this is used to send a custom 404 or not-found error page to the client. The not-found.js file is the replacement of the
404.jspage from Next.js Version 12. Thenot-found.jsfile can contain anything client. A simplenot-found.jspage looks like this below:import React from "react"; const NotFound = () => { return <>Page not found</>; }; export default NotFound;Using the API directory: Within this directory, we must define all of our API endpoints alongside their respective business logic. It is important to note that we utilize a Node.js runtime environment, as previously discussed. To properly create an API endpoint within Next.js, we must adhere to the same folder structure convention as the client, but with a different file name. It is crucial to remember that for the API, we must utilize a
route.jsfile instead of thepage.jsfile that we've been using. To define an API route file for a specific path, follow this convention. Create aapifolder within the app folder and then create aroute.jsfile. Add the following code base.import { NextResponse } from "next/server"; export async function GET(request) { return NextResponse.json({ msg: "Testing Api" }); }Looking at this code, we can observe that it exports a function named
GETwhich indicates the type of request being made and takes in a parameter that contains data about the request coming in. Similarly, we can define other request types such asPOST,PUT, andDELETE. To create a response, we use the Next.js classNextResponseand call its static methodjsonto convert our response to JSON, just like it's done using Node.js.
Other features of the latest version of Next.js include the use of template.js file, the introduction of next/navigation, next/legacy/image, etc. which will be talked about in coming articles.
Conclusion:
sub-topics covered in this article:
Introduction to NEXTJS
Why NextJS
Previous Versions
What’s new:
Getting Started With Version 13
Using the Latest Features of NextJS
About the Author
Ademola Ade-akanfe is an experienced full-stack software engineer, with more than 3 years of experience in designing and developing both Web and mobile application
Linkedin: https://linkedin/in/ademola-ade-akanfe
twitter: @dev demola
portfolio: https://portfolio-vcpf.vercel.app
Subscribe to my newsletter
Read articles from Ademola Ade-akanfe directly inside your inbox. Subscribe to the newsletter, and don't miss out.
Written by
