How to Create a Virtual Private Cloud (VPC) in AWS - A Step-by-Step Guide
 Ayotomide Bankole
Table of contents
- What is an Amazon Virtual Private Cloud (VPC)?
- Components of Amazon VPC
- Getting Started
- Step 01: Create a AWS account
- Step 02: Create a VPC
- Step 03: Create Subnets
- Step 04 - Create an Internet Gateway and attach it to our VPC
- Step 05 - Create Public and private Route tables
- Step 06 - Add Internet gateway to the public route table
- Step 07 - Add a public subnet to the public route table
- Step 08 - Create NAT Gateway
Building a Virtual Private Cloud (VPC) is one of the most important steps when creating a robust or scalable cloud infrastructure.
With VPC, you define your environment - create subnets, security groups, Network Access Control Lists, and Route tables. These give you full control over your AWS resources.
This step-by-step guide will teach you how to create your VPC making sure your cloud-based services and applications have a robust foundation.
Also, the guide will start from scratch; if you are new to AWS or want to add to your knowledge, it will provide you with the information necessary to build a VPC for your needs.
But before we get into the console…
What is an Amazon Virtual Private Cloud (VPC)?
VPC is a virtual network that is created specially for your organization in AWS. It is isolated away from the AWS Cloud and given to you.
Amazon VPC enables you to launch resources in a virtual network environment that you can define.
It gives you full control over the environment including resource placement, connectivity, creation of subnets, security, and configuration of route tables.
Components of Amazon VPC
These components enable you to set up your VPC in a way that meets your application's connectivity needs:
Virtual Private Cloud (VPC)
Just like the traditional network you operate in a data center, a VPC is also an isolated virtual network but with the benefits of AWS's scalable infrastructure. After creating a VPC, you create segments. These segments are known as the subnets.
Subnets
These are segments in the VPC with a range of IP addresses. After creating your subnets, you can deploy your servers/resources. There are two main types of subnets - Public and Private subnets.
Internet Gateway
It is seated at the boundary of the VPC, it takes traffic from the VPC to the internet and back to the VPC.
Route Table
A route table is a set of instructions that tells how traffic should move. Every subnet has a route table.
NAT Gateway
This is used to connect a private subnet to the internet.
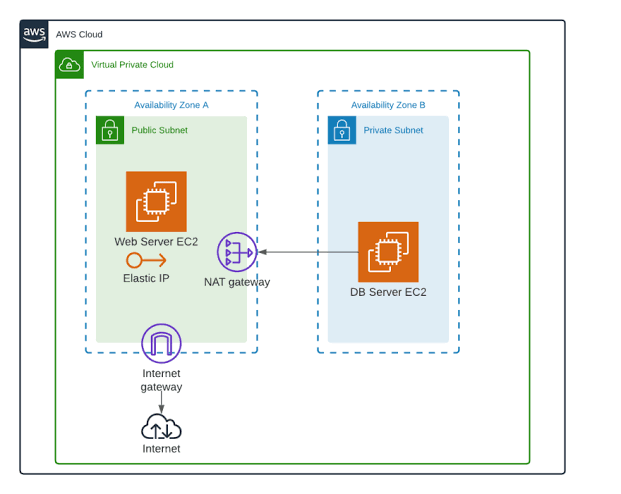
Block Diagram of a VPC
Getting Started
Step 01: Create a AWS account
(If you have an AWS account already, go to step 02)
Go to AWS and sign up for a free tier account. With this, you will be allowed to use AWS for free for one year.
There are 7 steps you will go through when signing up for an AWS account.
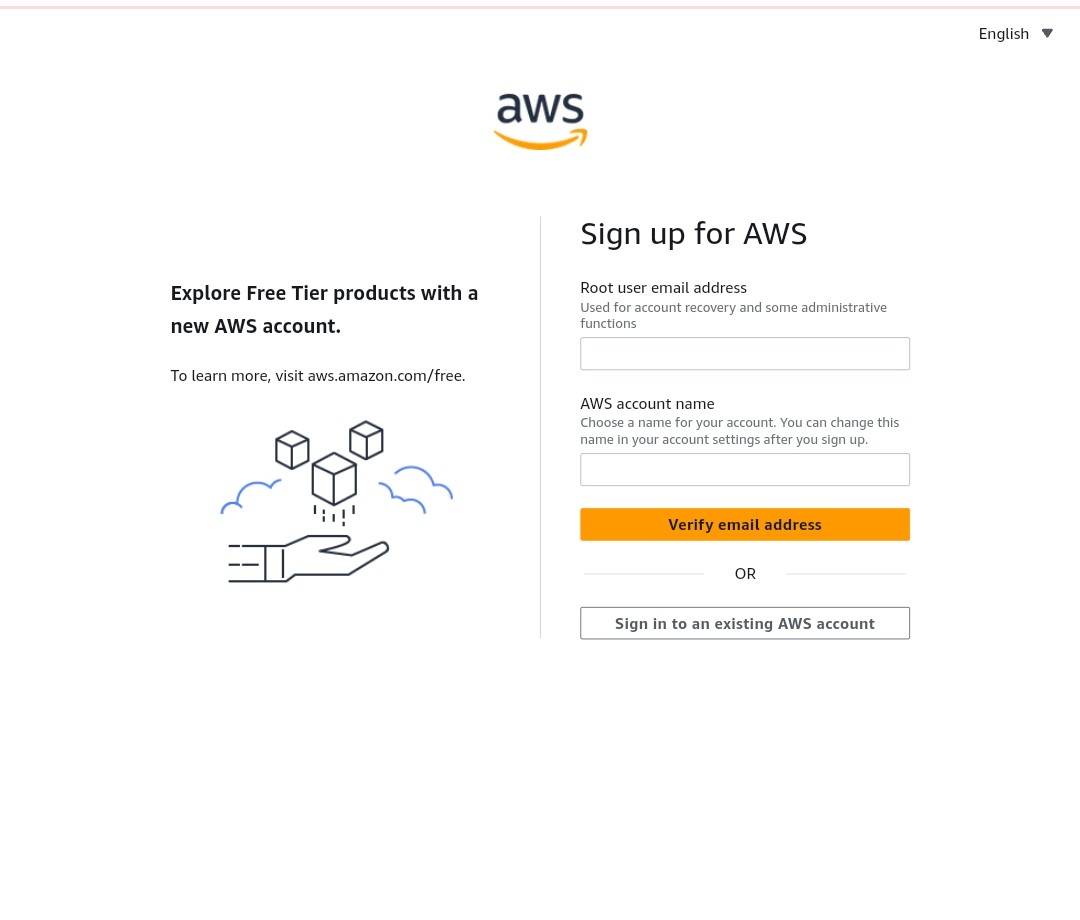
1. Input the root email address and the account name you want to use. Then, verify the email address.
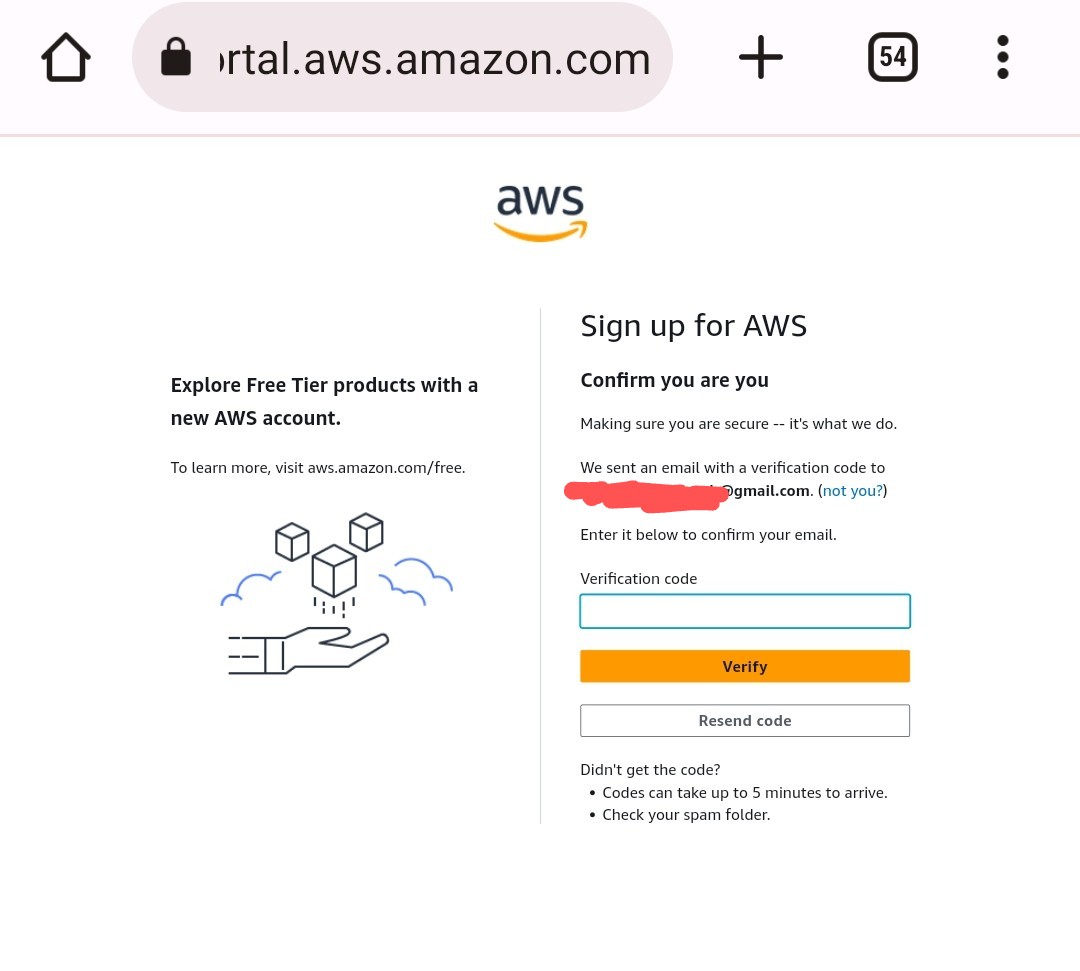
2. A password will be sent to your mail. Input the code in the verification code box and click "verify".
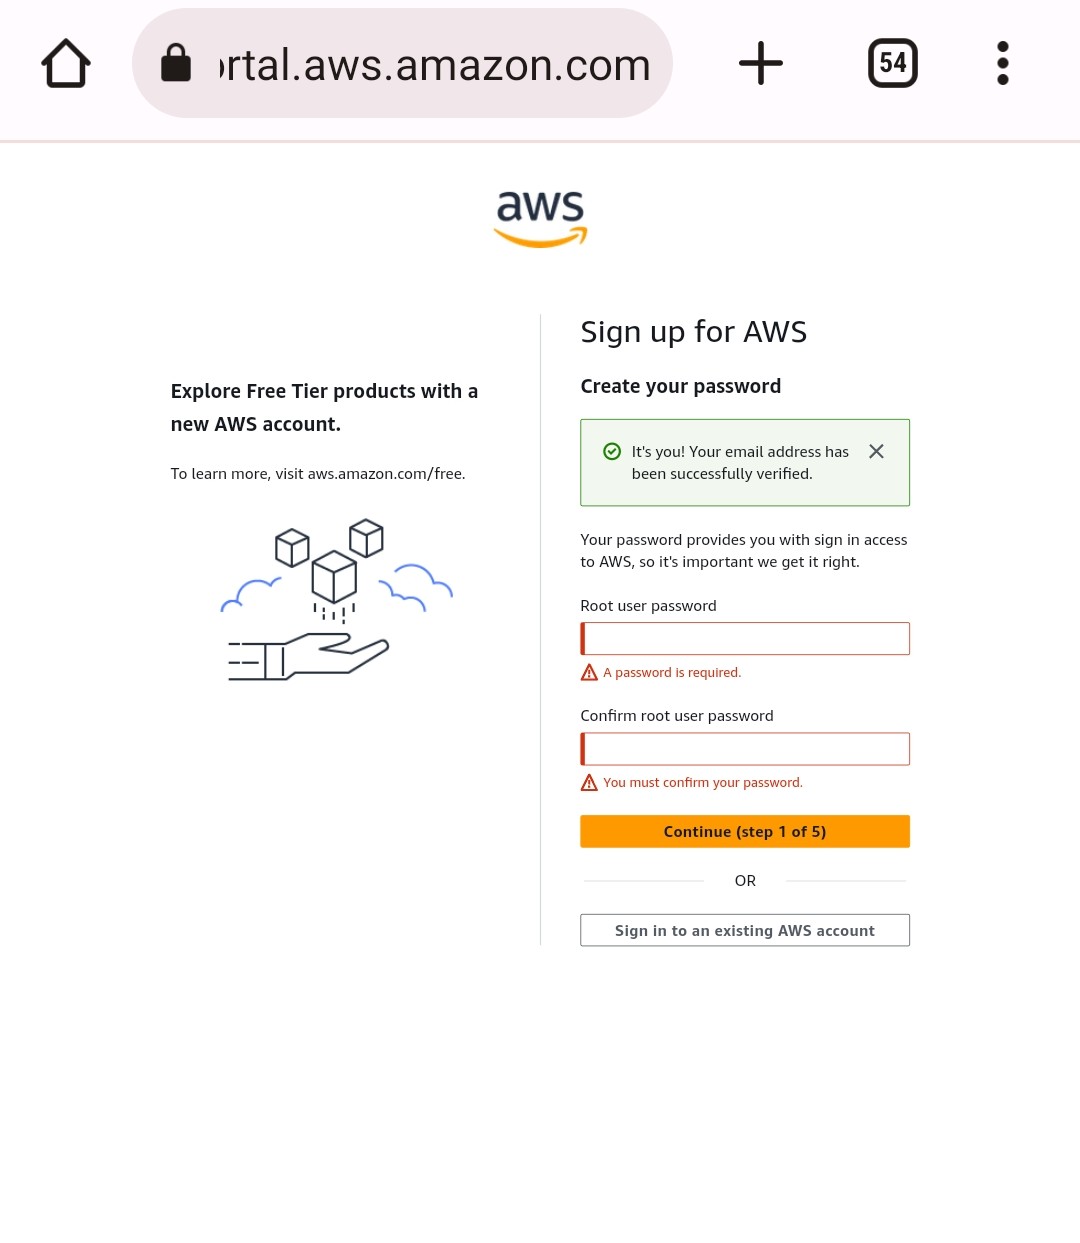
3. Your email is verified. Input your preferred password. Your password should at least be 8 characters long and must contain at least 3 of the following:
Uppercase letters
Lowercase letters
Numbers
Non-alphanumeric characters
4. Next is to fill in your contact information. Your phone number, and address, then agree to AWS's terms and conditions.
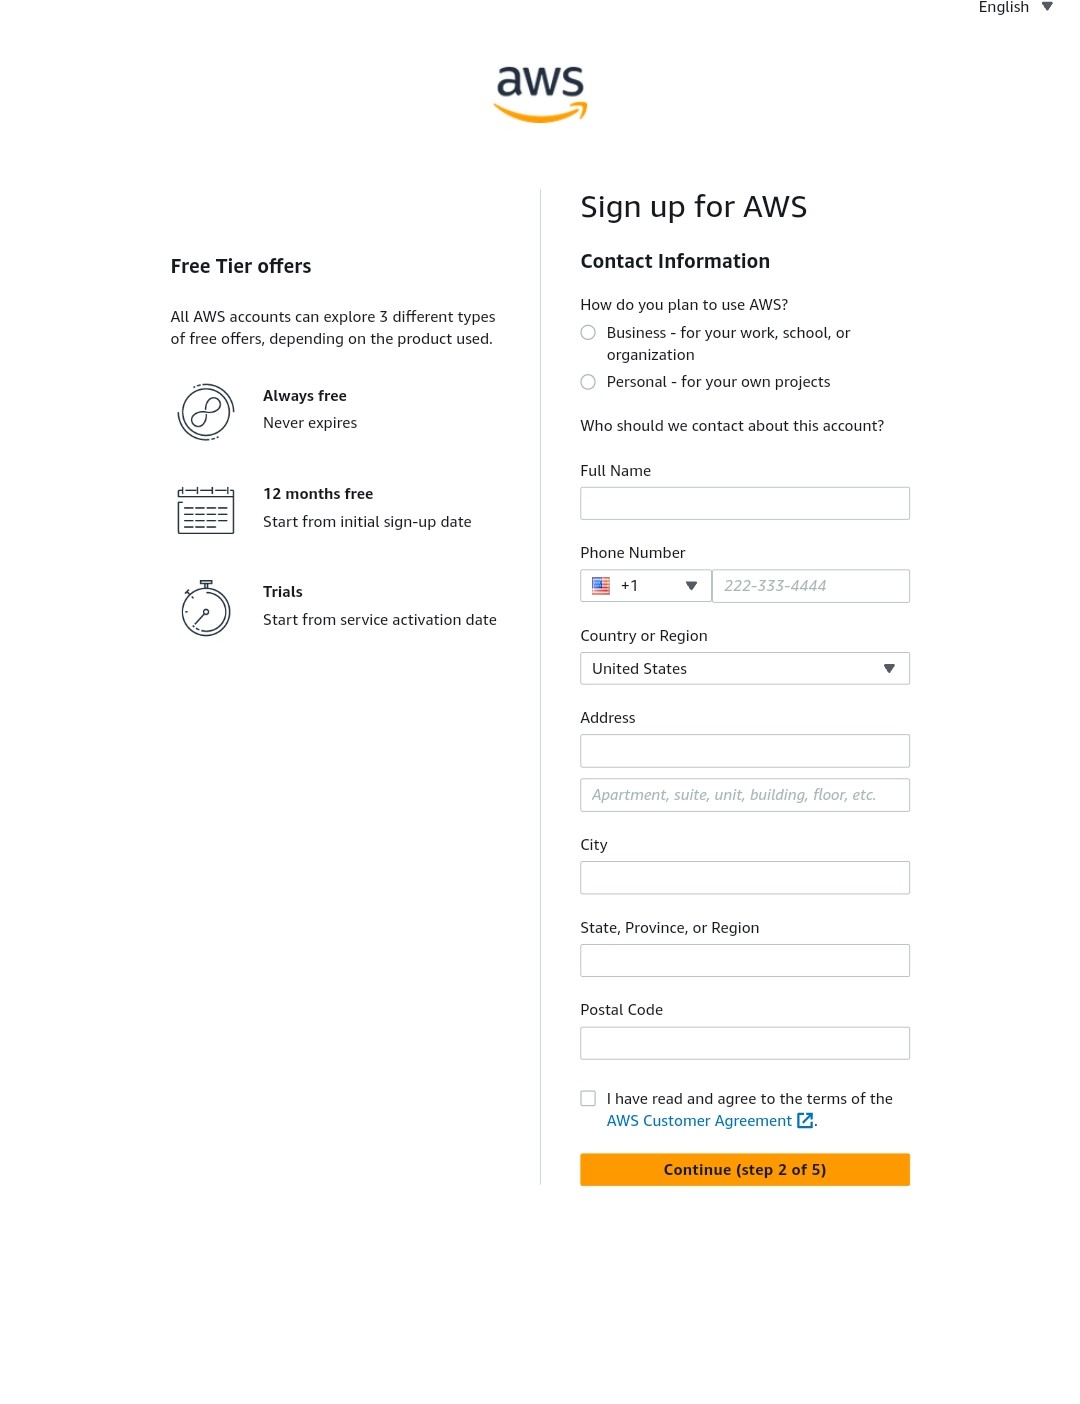
5. The next step is to fill in your billing address (card details). AWS might deduct $1 but they will return it. Doing this is to know if money can be deducted from your account/card.
You might be wondering since it is a free tier account, why are my card details necessary? Here is your answer - A free tier account does not cover all AWS services.
If you launch resources that are not covered in the AWS free tier account, you will be charged.
6. The next step is to verify your phone number. You will be prompted to input your mobile number and a code will be sent to your number. Input the code and continue.
7. This is the last step where you are asked to select the account you want. Select the free tier (free for one year) and continue.
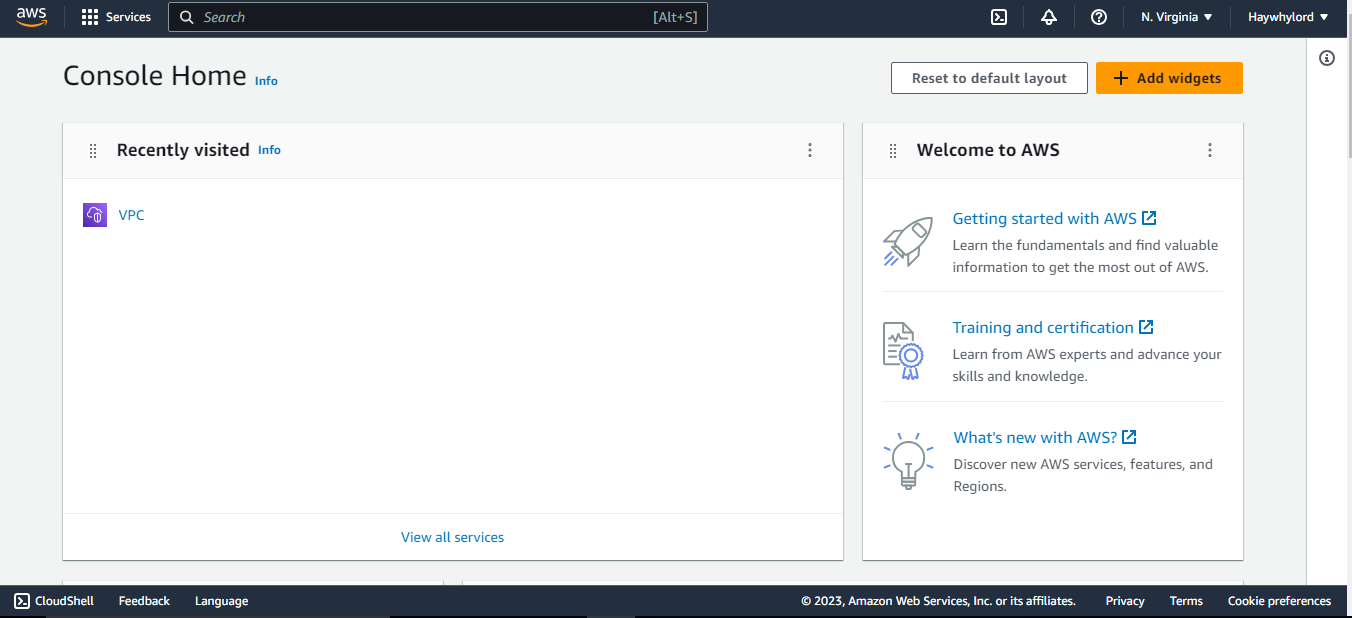
- After registering, go to the AWS Management Console.
Step 02: Create a VPC
- Go to the search box at the top and search for VPC.
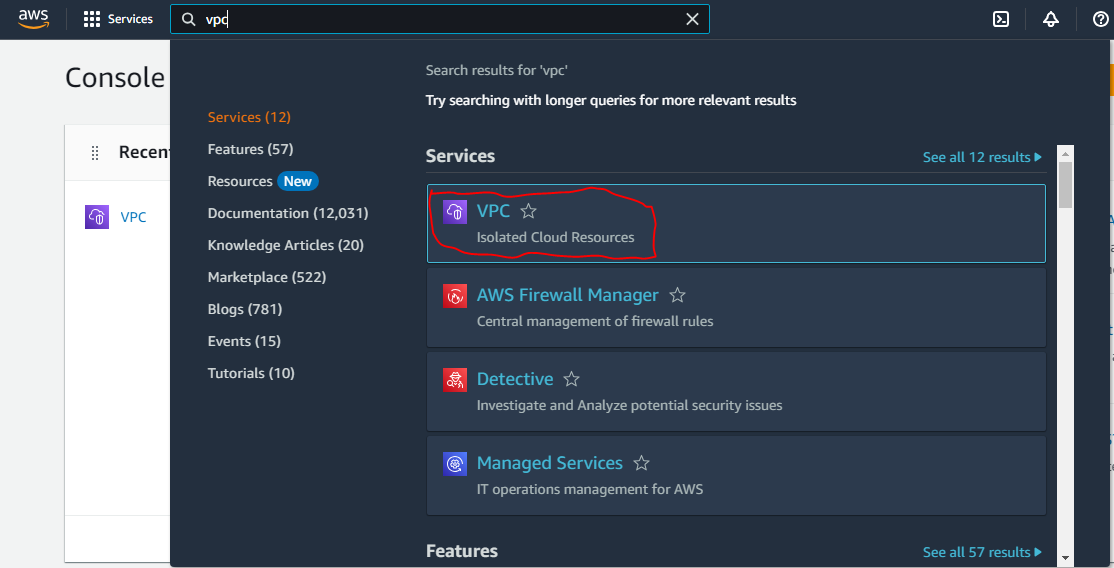
- Click VPC (the place circle is red in the picture). On the next page, select "Create VPC". And below is the next thing you would see.
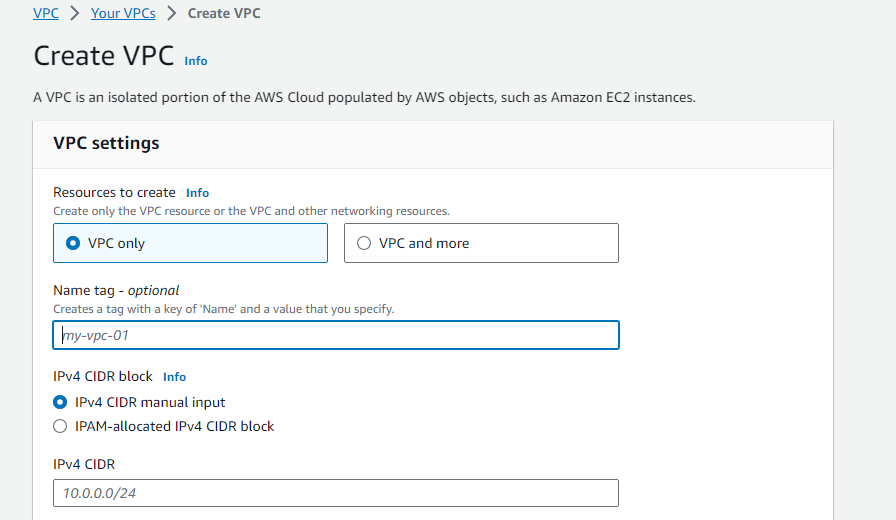
Under "Resources to create" select "VPC only".
Give your VPC a name.
Next is "IPv4 CIDR"; use your preferred CIDR address and if you have none, you can use 10.0.0.0/16.
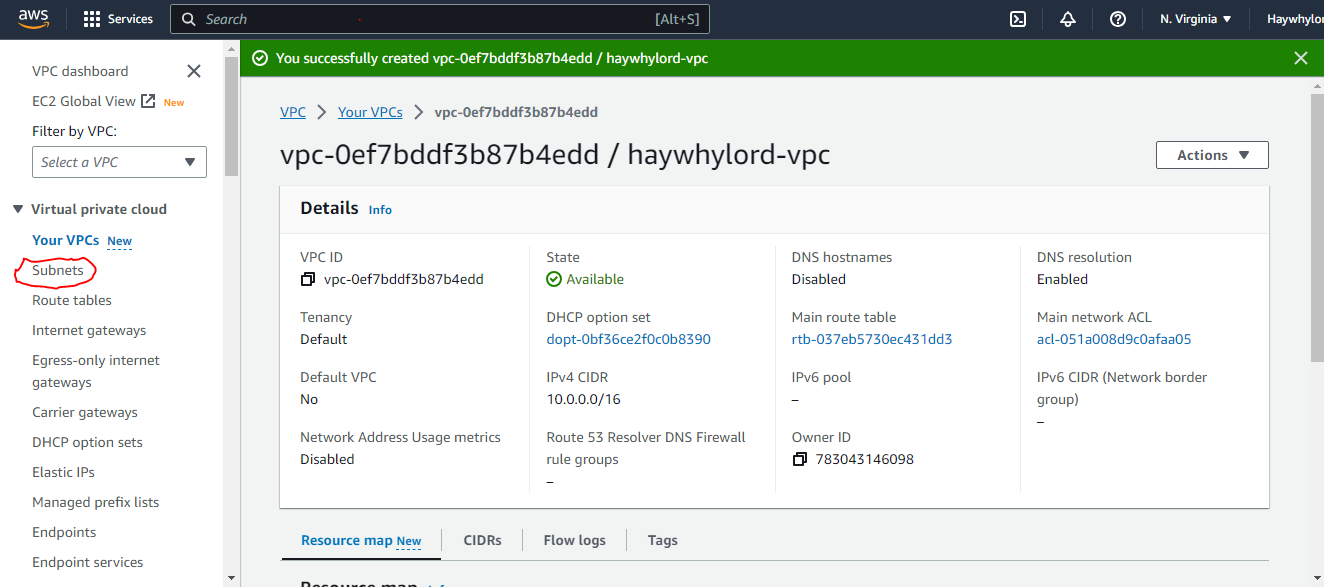
Go down and click "Create VPC". You will get a message like the picture below saying "You successfully created vpc…"
Time to create subnets.
Step 03: Create Subnets
- In the picture above, look at the left-hand side, You will see "subnets" (the place circled in red), Click on it and click "Create Subnet" on the next page.
You can also go back to VPC, you will also see subnets on the left-hand side after the VPC's page opens.
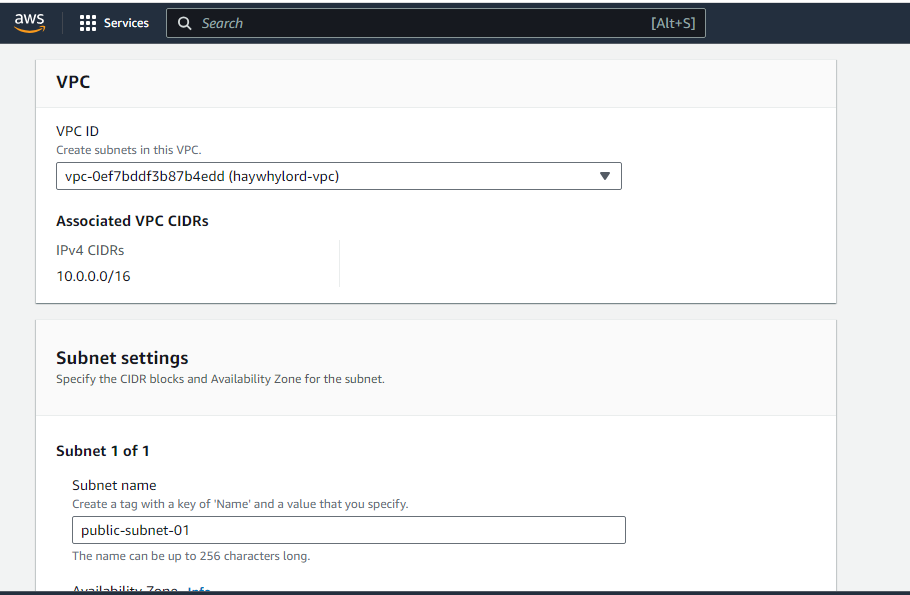
Under "VPC - ID", select your VPC.
Under "Subnet name", give your subnet a name. When creating a public subnet, ensure to add "public" to the subnet name (look at the picture below), this is done to easily differentiate it from a private subnet.
Select your preferred availability zone.
Use your preferred CIDR address for the IPv4 address block. If you have none, you can use 10.0.1.0/24.
Go down and click on "Create Subnet".
Congratulations! You have created a public subnet. Now, create a private subnet by using the same procedure.
Ensure you include "private" in the subnet name and for the CIDR address, use 10.0.2.0/24 (Don't use the same CIDR address as the public subnet).
Now you have both public and private subnets, let's create our internet gateway.
Step 04 - Create an Internet Gateway and attach it to our VPC
Check the left-hand side (just as you did when you created subnets), and you will see "Internet gateways", Click on it, and on the next page, select "Create Internet gateway"
Give your internet gateway a name.
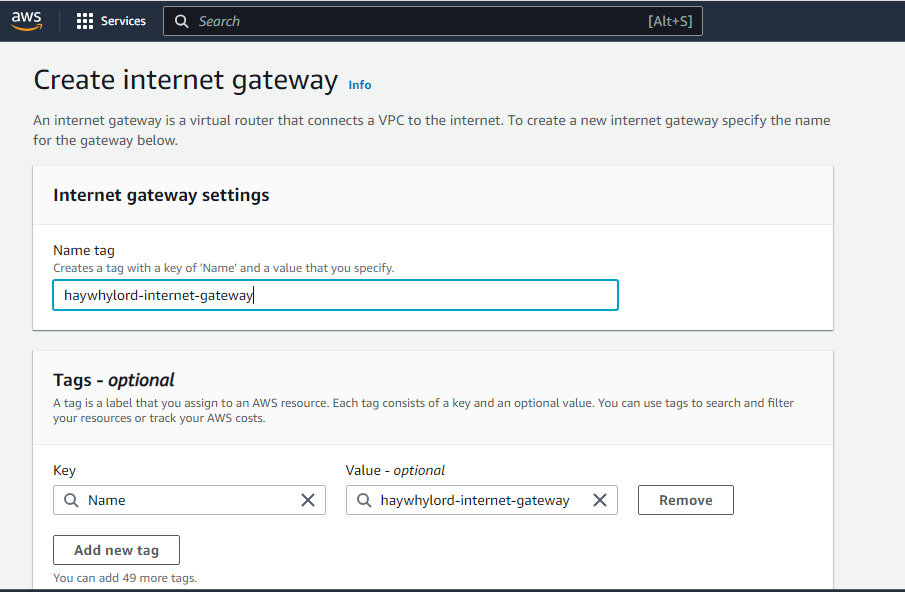
Scroll down and click on "Create Internet Gateway"
On the next page, you will get a message that your gateway has been successfully created,
in front of that message you will see a box with the name "Attach VPC" (the place circled in red), Click on it, select your VPC, and "Attach Internet Gateway"
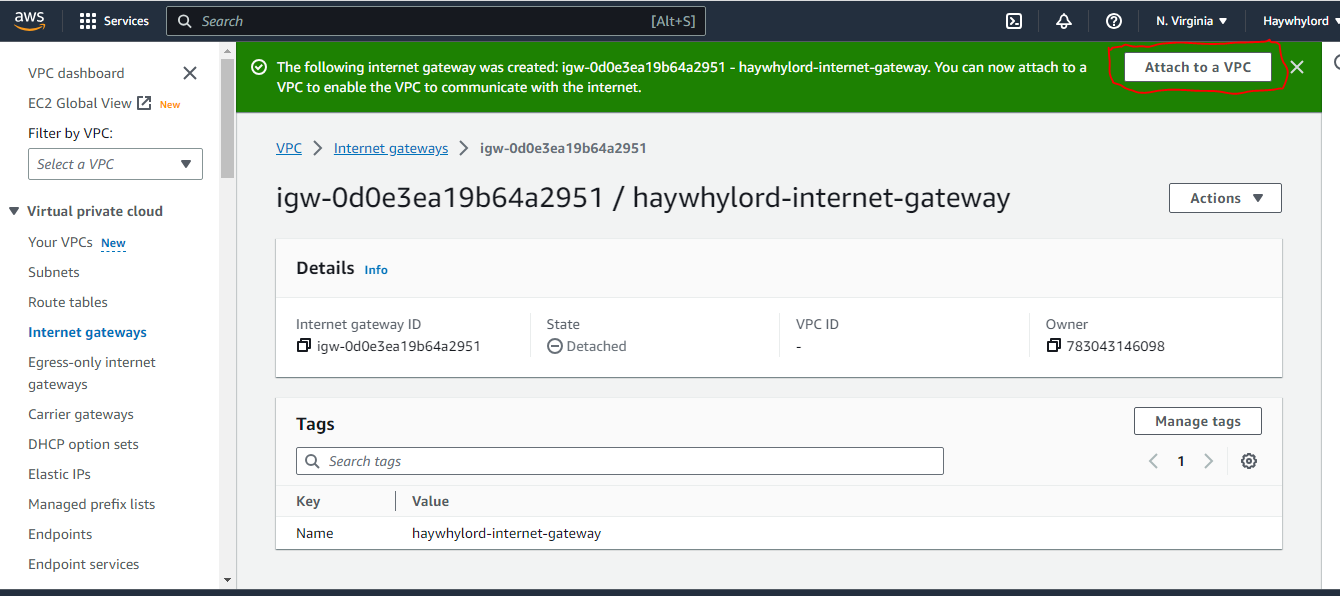
When you do this, you will get a message that your Internet gateway has been attached to your VPC.
In case you have closed the "Attach VPC" message, you can also attach your internet gateway to your VPC by doing this:
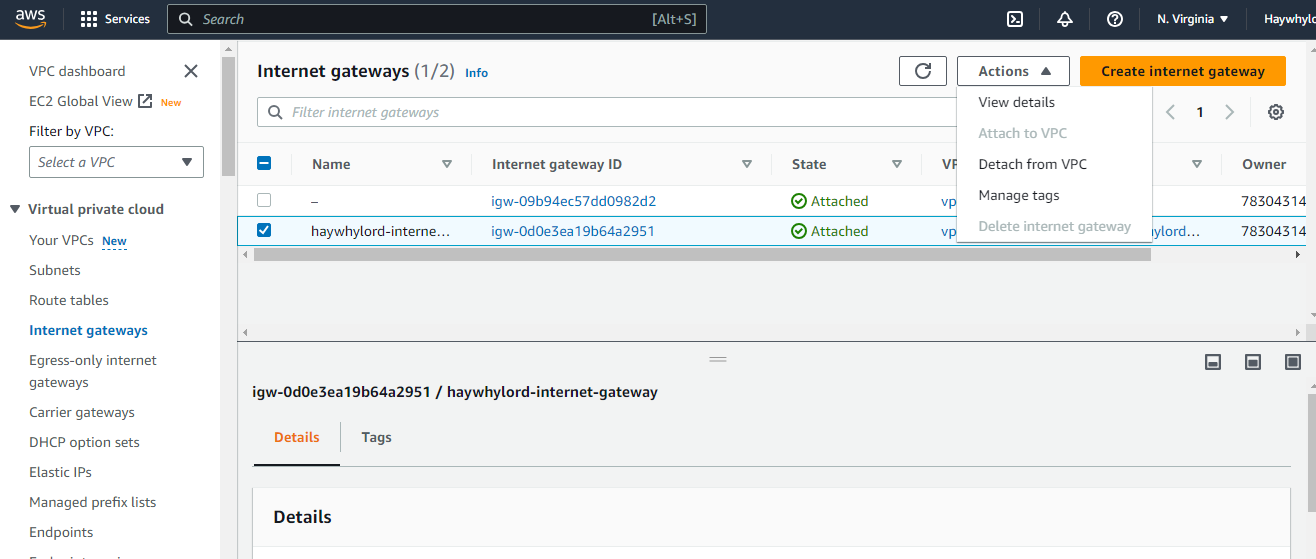
Go to your left-hand-side and select "Internet gateways".
Select the internet gateway you just created by ticking the box beside it.
Click on "Actions" on top, and a drop-down box will show, then click "Attach your VPC"
Step 05 - Create Public and private Route tables
Go back to the left-hand side of your VPC, and you will see "Route tables", Click on it, and on the next page, select "Create Route table"
Give your Route table a name. Remember, to use "Public" for a public route table for easy identification.
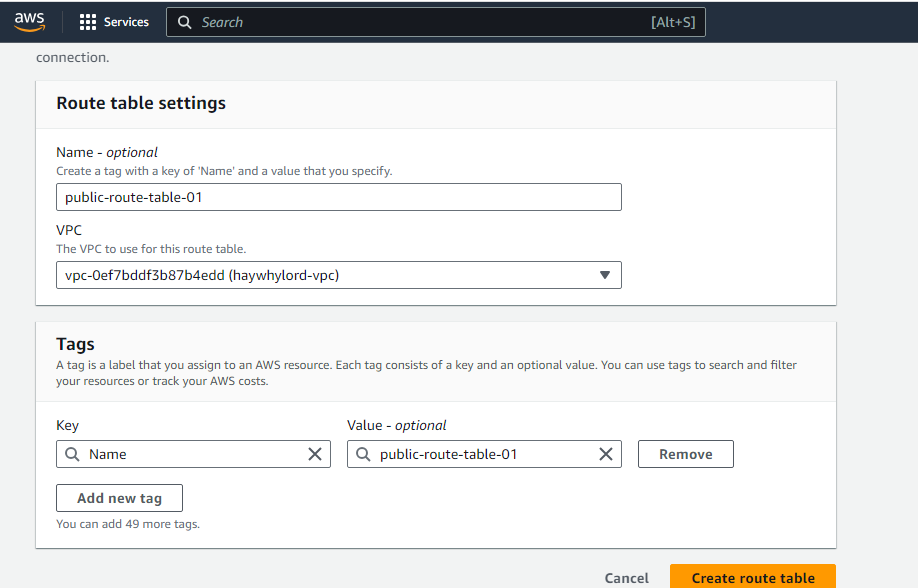
Go down and click on "Create route table"
Repeat the same procedure for the private route table.
Step 06 - Add Internet gateway to the public route table
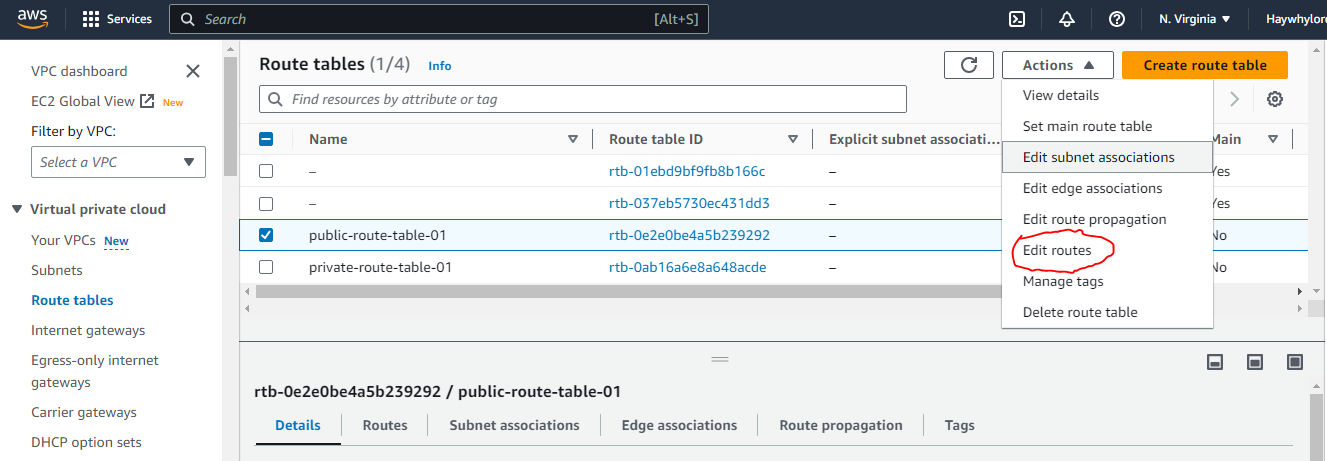
Go to the "route tables" on the left-hand side of your VPC and select your public route table (tick the box beside the public route table).
Click on "Actions" and from the drop-down menu, select "Edit routes" (the place circled red).
Click on "Add route" and select 0.0.0.0/0 from the destination drop-down menu.
Select "Internet Gateway" from the Target drop-down menu and select your Internet gateway.
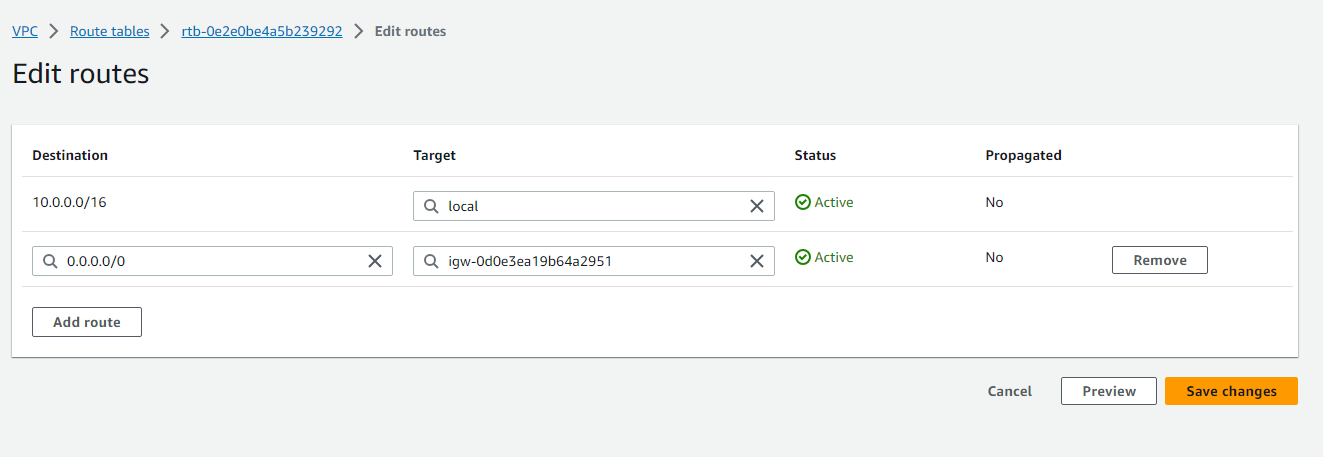
- Click on "save changes".
Step 07 - Add a public subnet to the public route table
Select your public route table.
Click on "Actions" and from the drop-down menu, select "Edit subnet associations"
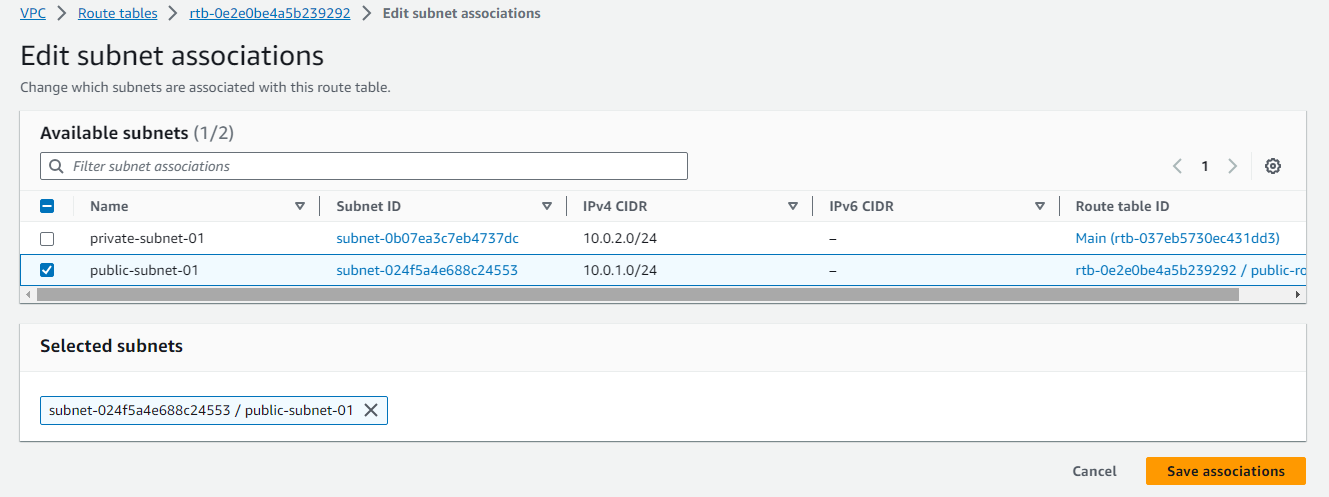
- Select your public subnet and click on "Save associations".
Step 08 - Create NAT Gateway
Normally, only a public subnet can connect to the Internet (since it has a route that points to the Internet).
But if we want our private subnet to connect to the internet, we use the NAT gateway and this can be done by:
- Creating a NAT Gateway in the public subnet
1. Go to the left-hand side of your VPC, Click on "NAT gateways", and on the next page, select "Create NAT gateway".
2. Give your NAT gateway a name and select your public subnet.
3. Under "Elastic IP allocation ID", select any existing EIP you have. If you don't, click on the "Allocate Elastic IP" box (this automatically generates an EIP address for you and assigns to NAT).
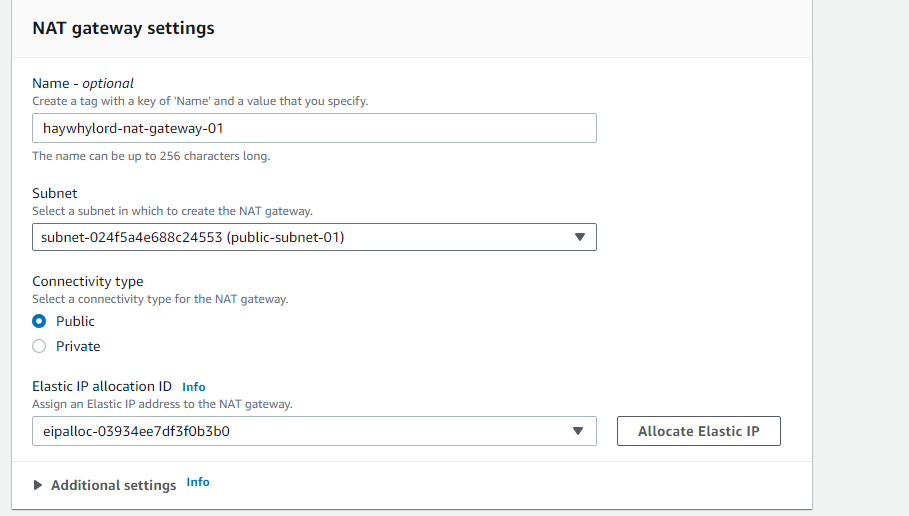
4. Scroll down and click on "Create NAT gateway".
- Add the NAT Gateway to the private route table.
1. Select your private route table (tick the box beside the public route table).
2. Click on "Actions" and from the drop-down menu, select "Edit routes".
3. Click on "Add route" and select 0.0.0.0/0 from the destination drop-down menu.
4. Select "NAT gateway" from the Target drop-down menu and select your NAT gateway.
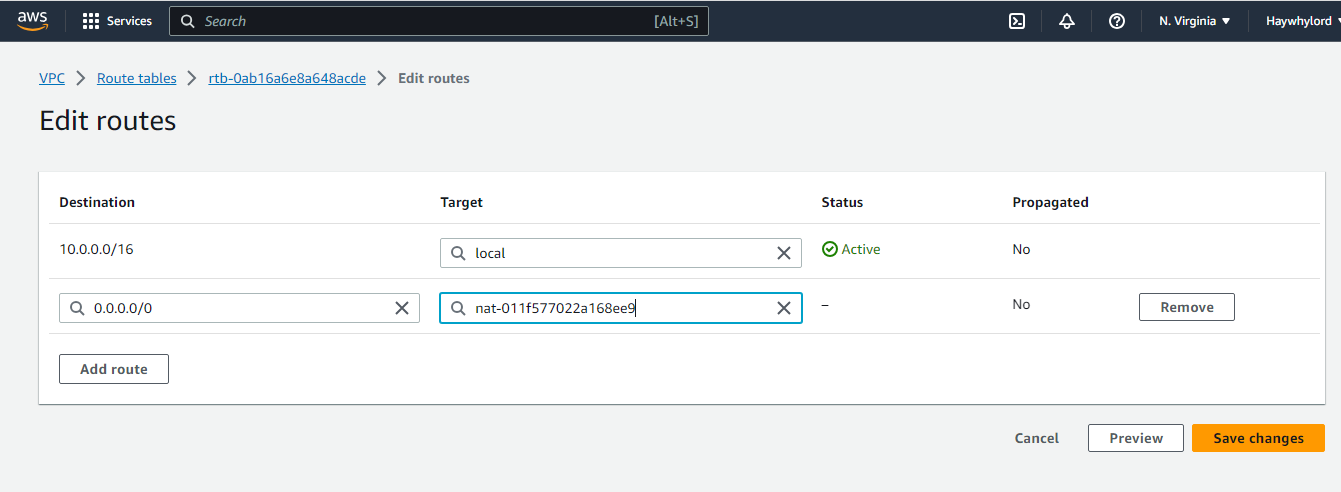
5. Click on "save changes".
- Add the private subnet to the private route table.
1. Select your private route table.
2. Click on "Actions" and from the drop-down menu, select "Edit subnet associations".
3. Select your private subnet and click on "Save associations".
Now, both your public and private subnet have access to the internet.
Congratulations! You have just finished creating your Virtual Private Cloud (VPC).
But this is just the beginning…
Creating a VPC is the first significant step when building a secure and scalable cloud infrastructure, but your AWS journey doesn't end there.
You can now explore several AWS services that can be integrated into your VPC which allows you to modify your cloud environment to meet your needs.
Below are a few AWS services you can explore:
AWS Lambda - Lambda functions can connect your serverless functions to your VPC's resources.
Amazon RDS: Hosting your database on your VPC.
Amazon Redshift: used to create a data warehouse in your VPC and to analyze structured and semi-structured data using SQL.
AWS Transit Gateway: to connect and centrally manage connectivity between multiple VPCs in several regions.
AWS Direct Connect: a dedicated private network connection between your VPC and your data center.
Other AWS services include Amazon EC2, Amazon S3, AWS Elastic Beanstalk, VPC peering, Amazon Dynamo DB, and many more.
Remember, there is a lot of AWS documentation and resources that help you as you explore these services and integrate them easily into your VPC.
Whether you are a beginner or an experienced AWS cloud user, creating and managing a VPC is an important skill that will enhance your cloud computing journey.
To assist you in creating and managing your VPC to meet your application's required needs, AWS provides you with a powerful set of tools and functionalities.
Happy cloud computing!
Subscribe to my newsletter
Read articles from Ayotomide Bankole directly inside your inbox. Subscribe to the newsletter, and don't miss out.
Written by

Ayotomide Bankole
Ayotomide Bankole
Passionate AWS Technical Writer on a mission to demystify the cloud. Join me as I translate complex AWS concepts into plain English. Let's embark on a journey through the cloud together, one blog post at a time. ☁️