From Code to Cluster: Implementing CI/CD for Kubernetes and Docker
 Divyansh Kohli
Introduction
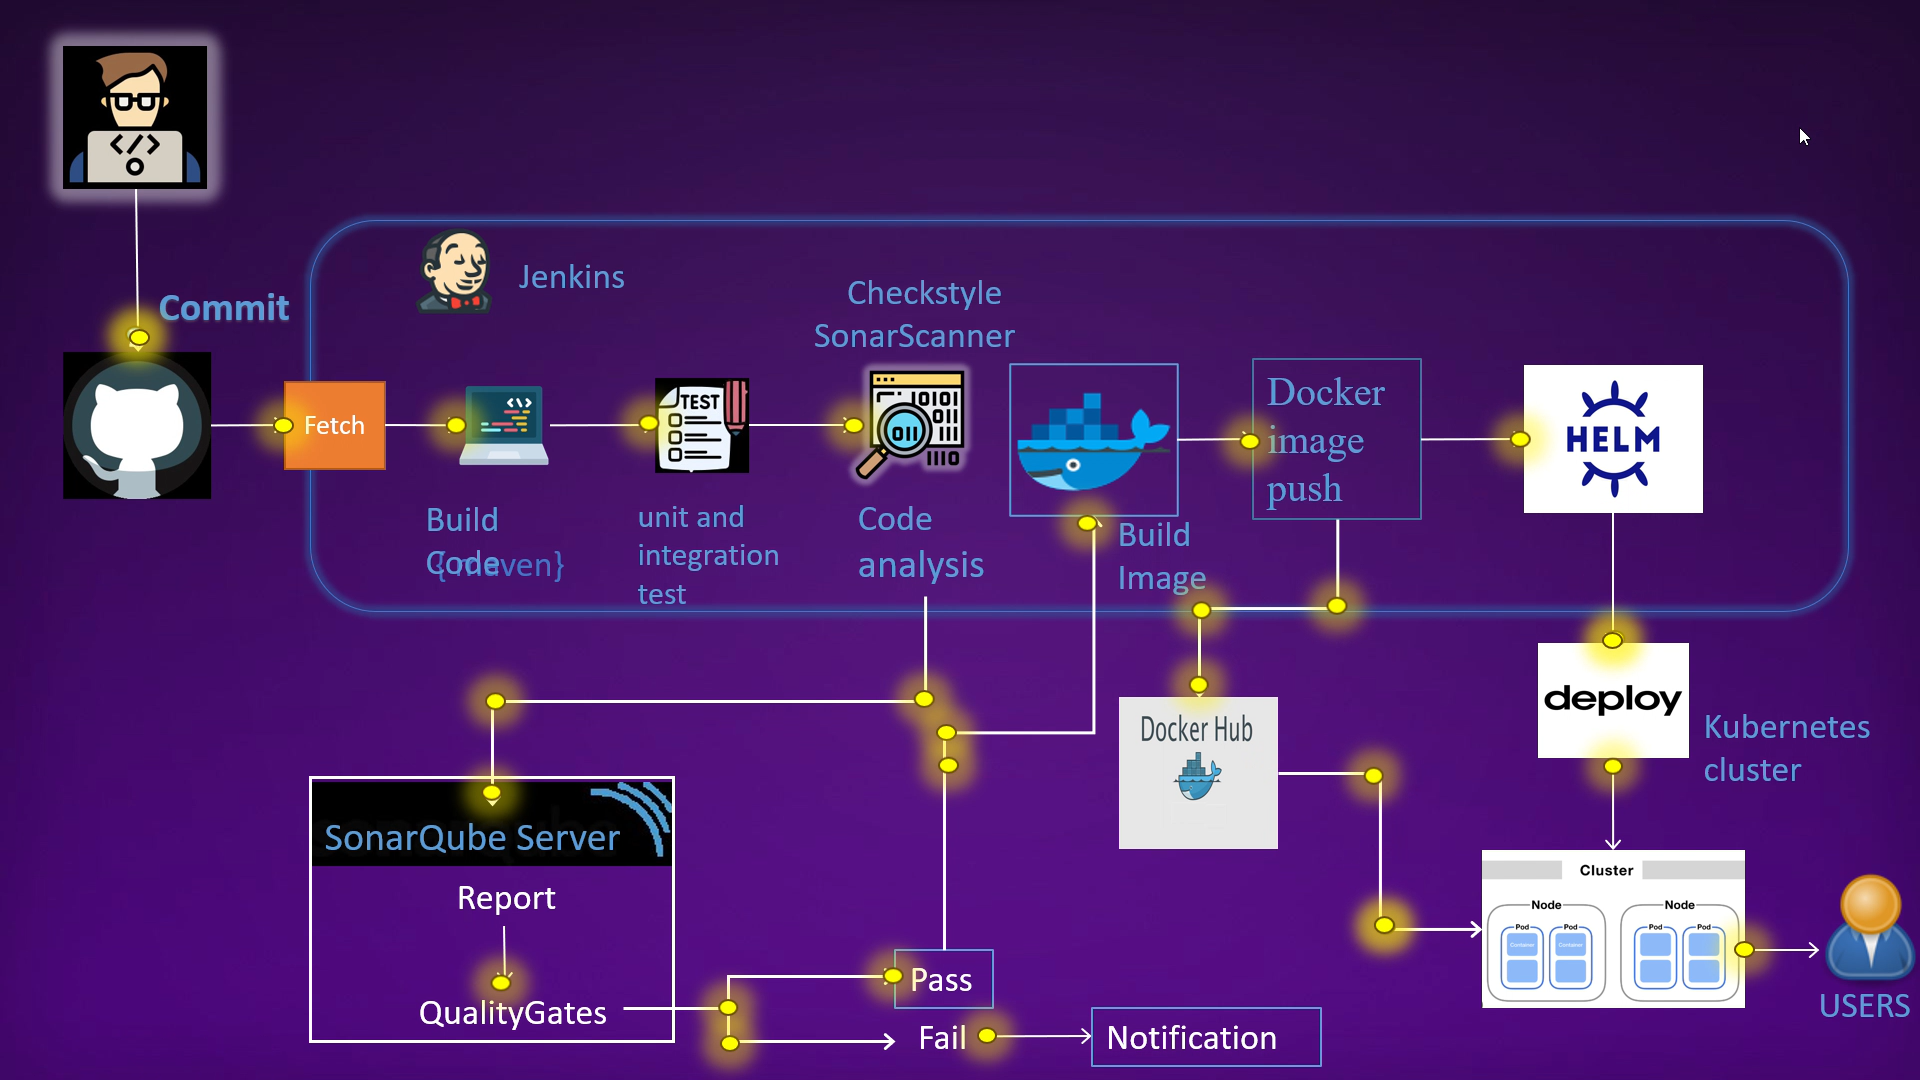
I have created an automated CI/CD pipeline that deploys a Java application to a Kubernetes cluster using Docker, kops and Helm. The pipeline automates the entire process, from code commits to deployment, with a focus on maintaining code quality and scalability.
Project link https://github.com/DIVYANSH856/cicd-kube-docker/
Workflow
Code Changes:
- Developers commit changes to the code repository.
Build and Test:
Jenkins detects new commits and triggers a build job.
The build job:
Clones the code repository.
Builds the software.
Runs unit tests.
Code Quality Analysis:
- If unit tests pass, the build job performs a code quality analysis using SonarQube.
Docker Image:
If the code quality analysis passes:
The build job builds a Docker image of the software.
The Docker image is pushed to Docker Hub.
Deployment to Kubernetes:
Jenkins deploys the Docker image to a Kubernetes cluster using Helm.
The application is now accessible to users.
AWS Infrastructure Setup
the intricacies of our CI/CD pipeline, let's lay the foundation by examining the AWS infrastructure that powers our project. We have three vital instances in play:
Jenkins Instance: This serves as the heart of our CI/CD operations. Jenkins automates the build and deployment processes and orchestrates the entire pipeline.
Kops Instance: Kubernetes Operations, or Kops for short, manages our Kubernetes cluster. It provides a hassle-free way to deploy, upgrade, and maintain production-ready Kubernetes clusters.
SonarQube Instance: To maintain code quality and ensure our applications are in peak condition, SonarQube is employed. It scrutinizes code, identifies issues, and enhances overall software quality.

Setup of all three instances
Jenkins server: install openJDk and then install the Jenkins on instance, enable the Jenkins service Once Jenkins is running, open a web browser and navigate to http://<your_server_ip>:8080. You will be prompted to enter an initial administrator password. This password can be found on your server in the following file: /var/lib/jenkins/secrets/initialAdminPassword
Plugin Integration: Jenkins provides a rich ecosystem of plugins that enhance its functionality. Here are some of the crucial plugins used in this project:
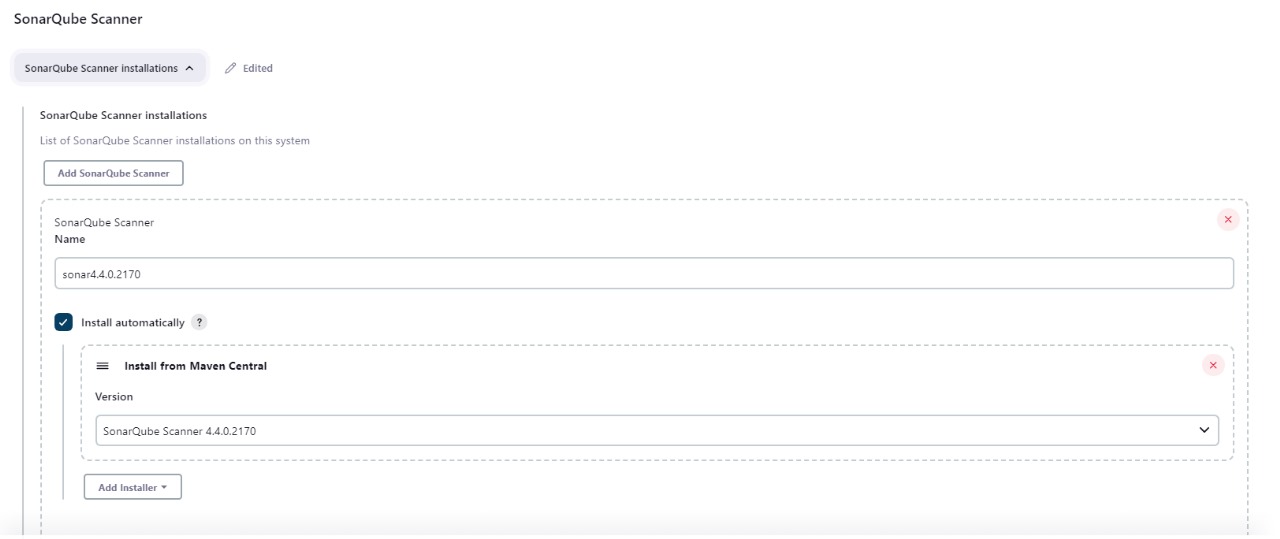
SonarQube Scanner: This plugin enables seamless integration with SonarQube for code quality analysis.
Pipeline Maven Integration: It streamlines the integration of Apache Maven, a powerful project management and comprehension tool.
Build Timestamp: This plugin allows you to timestamp your builds, aiding in versioning and tracking.
Docker: This plugin simplifies the integration of Docker, making it easy to build and push Docker images. Docker Plugin: It provides a set of convenient steps for working with Docker within your pipeline. Docker Build Step: This step allows you to execute Docker commands in your pipeline, facilitating image creation.
Jenkins provides a rich ecosystem of plugins that enhance its functionality. Here are some of the crucial plugins used in this project:
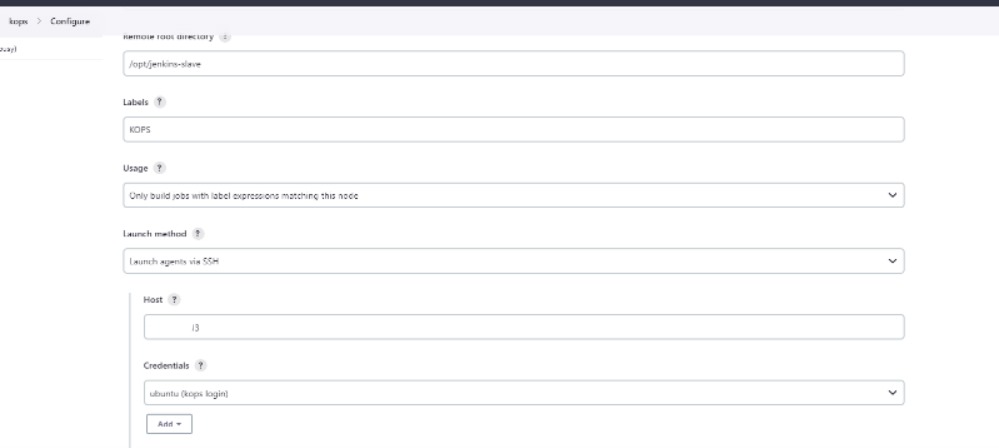
Kops Server: Install Kops, kubectl and helm chart. Now we will make the Kops slave node in Jenkins following the below steps. Make directory Jenkins-slave, sudo apt install OpenJDK-11-jdk -y,sudo mkdir /opt/jenkins-slave sudo chown ubuntu. ubuntu /opt/Jenkins-slave -R, Add new node named kops in Jenkins remote root directory /opt/Jenkins-slave private ip of kops instance like 172.1.3.1, create new credential with id - kops login username - ubuntu and kops. pem with ssh public key.
Now we will create a Kops cluster
with below commands such as mentioned below
kops create cluster --name=kubevpro.learningdevops1008.software
--state=s3://vprofile-kops-state11 --zones=us-east-1a,us-east-1b
--node-count=2 --node-size=t2.micro --master-size=t2.medium
--dns  zone=kubevpro.learningdevops1008.software --node-volume-size=8 --master-volume-size=8

kops update cluster --name=kubevpro.learningdevops1008.software --yes --admin --state=s3://vprofile-kops-state11


As you can see our 1 master and 2 worker nodes has been created in our cluster . kubectl create namespace Prod. Where we will run helm charts with jenkins .
Sonarqube Server : https://github.com/DIVYANSH856/cicd-kube-docker/blob/main/SonarQube_Script.sh
This script automates the setup of SonarQube on an Ubuntu server. It includes adjusting system parameters, installing OpenJDK 11, configuring PostgreSQL, downloading and setting up SonarQube, creating a systemd service, configuring Nginx as a reverse proxy, opening necessary ports, and initiating a system reboot. by default your username and password will be admin . Also create jenkins webhook for continuing pipeline according to pass or fail of quality gates .

Pipeline Configuration and Plugin Integration with plugins :
The Jenkinsfile, residing in our project repository, defines the pipeline stages and plugin integration. Key stages include building, testing, code analysis, Docker image creation, Kubernetes deployment, and more.
pipeline {
    agent any
    environment {
        registry = "divyanshkohli856/vprofileappdock"
        registryCredentials = 'dockerhub'
    }
    stages {
        stage('BUILD') {
            steps {
                sh 'mvn clean install -DskipTests'
            }
            post {
                success {
                    echo 'Now Archiving...'
                    archiveArtifacts artifacts: '**/target/*.war'
                }
            }
        }
        stage('UNIT TEST') {
            steps {
                sh 'mvn test'
            }
        }
        stage('INTEGRATION TEST') {
            steps {
                sh 'mvn verify -DskipTests'
            }
        }
        stage('CODE ANALYSIS WITH CHECKSTYLE') {
            steps {
                sh 'mvn checkstyle:checkstyle'
            }
            post {
                success {
                    echo 'Generated Analysis Result'
                } }
        }
        stage('CODE ANALYSIS with SONARQUBE') {
            environment {
                scannerHome = tool 'sonar4.4.0.2170'
            }
            steps {
                withSonarQubeEnv('sonar-pro') {
                    sh """${scannerHome}/bin/sonar-scanner -Dsonar.projectKey=vprofile \
                       -Dsonar.projectName=vprofile-repo \
                       -Dsonar.projectVersion=1.0 \
                       -Dsonar.sources=src/ \
                       -Dsonar.java.binaries=target/test-classes/com/visualpathit/account/controllerTest/ \
                       -Dsonar.junit.reportsPath=target/surefire-reports/ \
                       -Dsonar.jacoco.reportsPath=target/jacoco.exec \
                       -Dsonar.java.checkstyle.reportPaths=target/checkstyle-result.xml"""
                }
                timeout(time: 5, unit: 'MINUTES') {
                    waitForQualityGate abortPipeline: true
                }//used webhook
            }
        }
        stage('Build App Image') {
            steps {
                script {
                    dockerImage = docker.build("${registry}:V${BUILD_NUMBER}")
                }
            }
        }
        stage('Upload Image') {
            steps {
                script {
                    docker.withRegistry('', registryCredentials) {
                        dockerImage.push()
                        dockerImage.push('latest')
                    }
                }
            }
        }
        stage('Remove Unused docker image') {
            steps {
                sh "docker rmi ${registry}:V${BUILD_NUMBER}"
            }
        }
        stage('Kubernetes Deploy') {
            agent { label 'KOPS' }
            steps {
                sh "helm upgrade --install --force vprofile-stack helm/vprofilecharts --set appimage=${registry}:V${BUILD_NUMBER} --namespace prod"
            }
        }
    }
}
this is our Jenkinsfile which will be placed in our project repository .This comprehensive setup ensures a seamless, automated CI/CD pipeline that maintains code quality and scalability throughout the development process.


on Kubernetes deploy stage i have mention agent Kops which we created before


where i have helm , kops and kubectl installed and our cluster running .
now we will create a new pipeline and Configuring SCM with Git:
In the pipeline configuration, scroll down to the "Pipeline" section.
Under the "Definition" dropdown, select "Pipeline script from SCM".
In the "SCM" dropdown, choose "Git".
Now, i have provide the Git repository URL that contains your
Jenkinsfile. This is the repository where your new project's code is hosted.Save and Build:
Save your pipeline configuration.
Trigger a build manually to ensure everything is set up correctly.
Now lets test the pipeline
Save your pipeline configuration.
Trigger a build manually to ensure everything is set up correctly.By manually triggering a build, we can verify that your pipeline is functioning correctly and that it can successfully build, test, and deploy your application. If any issues arise during the build process,we can investigate and make necessary adjustments to the pipeline configuration.

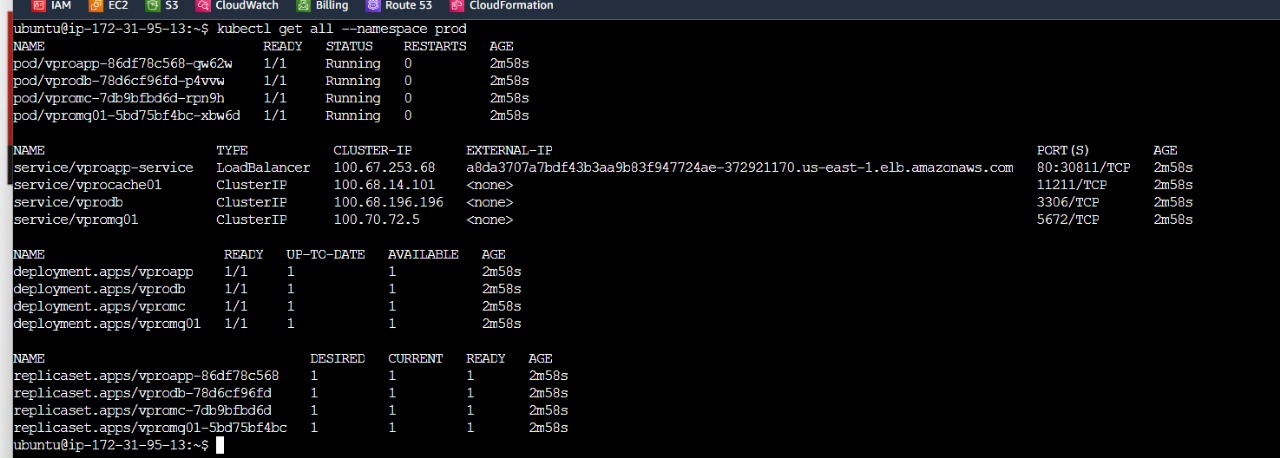
as we can see our pipeline is working properly . With our CI/CD pipeline in action, it's time to ensure that Helm has successfully deployed our application to the Kubernetes cluster. Let's take a closer look:

Our pipline has sucessfully created and started pods and service
we have also obtained LoadBalance external ip where Users can access our deployed tomcat application .Navigate to
http://YOUR_LOAD_BALANCER_EXTERNAL_IP**. This action directs us to freshly deployed Tomcat application.
**
Subscribe to my newsletter
Read articles from Divyansh Kohli directly inside your inbox. Subscribe to the newsletter, and don't miss out.
Written by
