How to Create Your Own Google Chrome Extension
 Mahendra Dewangan
If you're a Google Chrome enthusiast, you've likely explored various browser extensions.
But have you ever been curious about building one of your own? In this blog post, I'll guide you through the process of constructing a Chrome extension entirely from the ground up.
What is Chrome Extensions:
A Chrome extension is a software module integrated into the Chrome browser to amplify its capabilities. It can be crafted using familiar web technologies such as HTML, CSS, and JavaScript.
Google Chrome extensions are powerful tools that can enhance your browsing experience or add specific functionalities to your browser. Producing a Chrome extension shares similarities with developing a web application. However, it necessitates the inclusion of a vital file known as manifest.json.
In this tutorial, we'll walk through the process of creating a simple Chrome extension called QuickNote. This extension allows users to take quick notes directly from their browser.
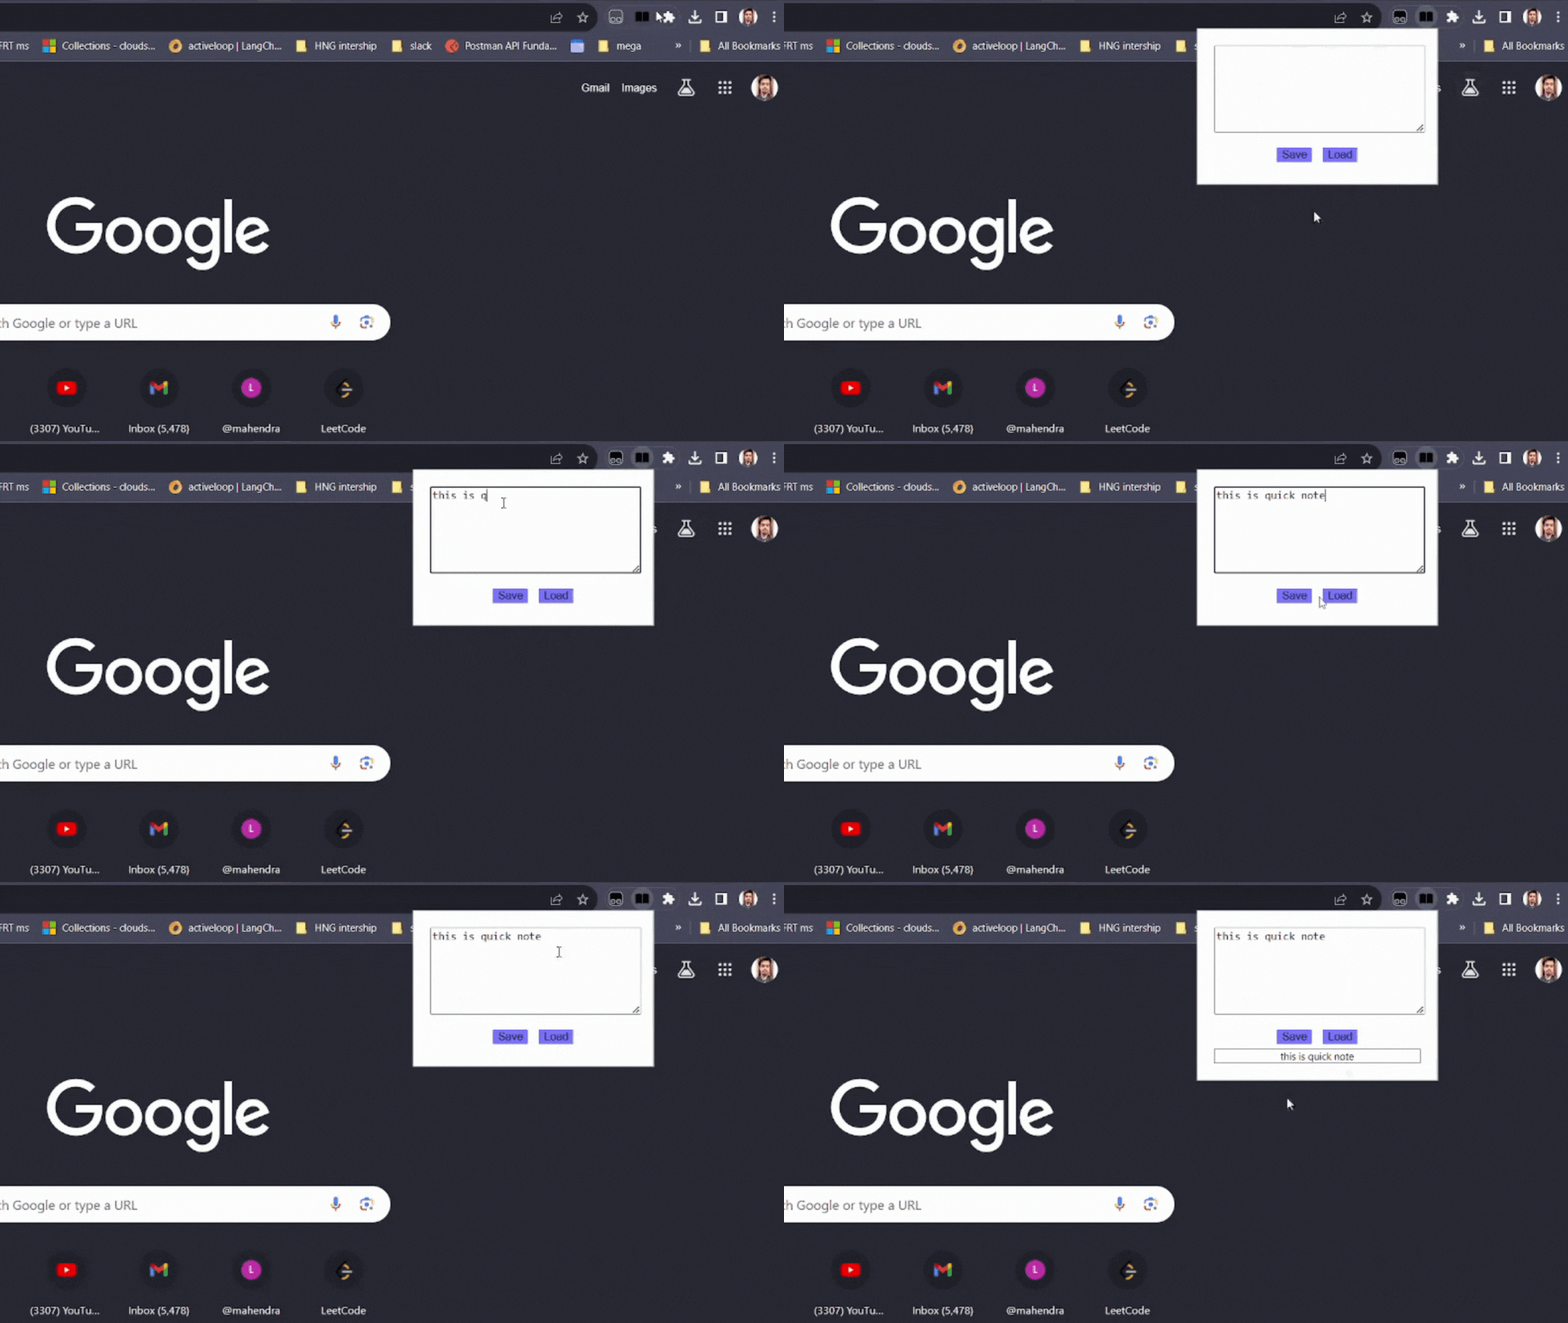
What Will our Chrome Extension Look Like?

This is a quick look on how our end product looks like
Prerequisites
Before we start, ensure you have the following:
A Text Editor: Use your preferred code editor. Visual Studio Code, Sublime Text, or Atom are popular choices.
Basic Knowledge of HTML, CSS, and JavaScript: Familiarity with these languages will be helpful.
How to Create a Chrome Extension?
Step 1: Set Up Your Project
Create a new folder for your project. Let's call it
QuickNote.Inside this folder, create the following files:
manifest.json: Contains metadata about your extension.popup.html: The HTML file that will be displayed when the extension's icon is clicked.popup.js: The JavaScript file to control the behavior of the popup.styles.css: CSS file for styling the popup.icon16.png,icon48.png, andicon128.png: Icons for the extension (16x16, 48x48, and 128x128 pixels respectively). Here we'll only be using 128x128 pixel icon.
Step 2: Edit manifest.json
{
    "name": "QuickNote",
    "version": "1.0.0",
    "description": "A simple note-taking extension for Chrome.",
    "manifest_version": 3,
    "icons": {
        "128": "logo.png"
    },
    "author": "Mahendra Dewangan",
    "action": {
        "default_popup": "popup.html",
        "default_title": "QuickNote",
        "default_icon": "logo.png"
    },
    "permissions": [
        "storage"
    ]
}
This manifest file provides information about the extension, including its name, description, version, and the permissions it requires.
Step 3: Edit popup.html
<!DOCTYPE html>
<html>
<head>
    <link rel="stylesheet" type="text/css" href="styles.css">
    <link rel="stylesheet" href="style.css">
</head>
<body>
    <textarea id="note"></textarea>
    <button id="save">Save</button>
    <button id="load">Load</button>
    <div id="load-area"></div>
    <script src="popup.js"></script>
</body>
</html>
Here, we've created a simple HTML file with a textarea for note-taking and buttons for saving and loading notes.
Step 4: Edit popup.js
var store;
document.getElementById('save').addEventListener('click', function () {
    store = document.getElementById('note').value;
    console.log(store)
});

document.getElementById('load').addEventListener('click', function () {
    document.getElementById('load-area').innerHTML = store;
    document.getElementById('load-area').classList.add("loadArea")

});
This JavaScript file handles the logic for saving and loading notes using Chrome's storage API.
Step 5: Create styles.css
body {
    width: 250px;
    text-align: center;
    margin: 20px;
}
textarea {
    width: 100%;
    height: 100px;
    margin-bottom: 10px;
}
button {
    border: none;
    background-color: rgb(125, 125, 255);
    margin: 5px;
}
button:hover {
    background-color: rgb(97, 97, 249);
}
.loadArea{
    border: 1px solid gray;
}
The CSS file provides basic styling for the popup.
Step 6: Load the Extension
Open Chrome and go to
chrome://extensions/.Turn on Developer mode.
Click on Load unpacked and select the folder
QuickNotecontaining your project files.

Step 7: Test the Extension
Click the Chrome extension icon in your toolbar.
A popup with a text area for note-taking, along with "Save" and "Load" buttons, will appear.
Congratulations! You've successfully created a basic Chrome extension called QuickNote. This example serves as a foundation for more complex extensions with additional functionalities. Experiment and build upon this knowledge to create extensions tailored to your specific needs. Happy coding!
Conclusion
If you have some HTML, CSS, and JavaScript knowledge, you can easily build Chrome extensions. I hope after reading this blog post, you will create some cool extensions.
Happy Coding!
You can find source code Here
Follow me on:
Hashnode: Mahendra Dewangan
X (Twitter) : Mahendra Dewangan
LinkedIn : Mahendra Dewangan
Subscribe to my newsletter
Read articles from Mahendra Dewangan directly inside your inbox. Subscribe to the newsletter, and don't miss out.
Written by

Mahendra Dewangan
Mahendra Dewangan
I love shipping web apps!