Advanced Linux Shell Scripting for DevOps Engineers with User management
 Vinayak Salunkhe
If you haven't learned the Basics of Bash Scripting Please visit my first blog
Link= https://hashnode.com/post/clmf69rdk000c08jidgdt3ila
Let's learn some basics to understand bash scripts better,
Bash Scripting-For Loop
We can use loops and conditional statements in BASH scripts to perform some repetitive and tricky problems in a simple programmatic way.
1) Simple For loop
#!/bin/bash

for n in Vinayak Madhu Vansh Ansh;
do
   echo $n
done
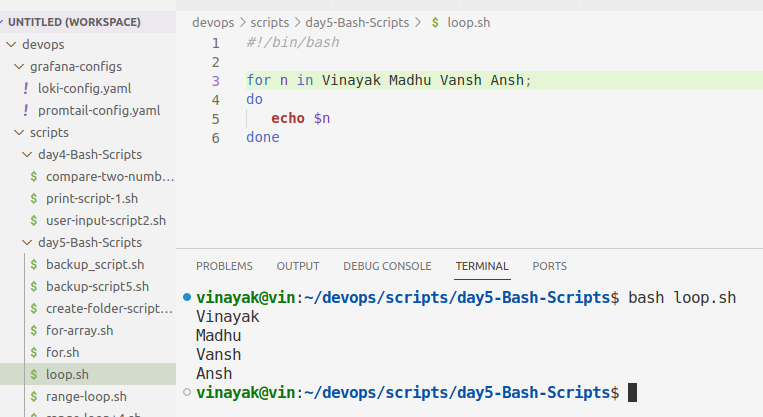
The above script will iterate over the specified elements after the "in" keyword one by one. The elements can be numbers, strings, or other forms of data.
Iterating means what?
In the context of the explanation above, “iterating” refers to the process of repeating a set of instructions or operations.
In programming and computing, to iterate means to repeat a process, especially as part of a computer program. It’s a fundamental concept in most programming languages, not just Bash. It allows us to efficiently perform operations on collections of data.
2) Range-based for loop
We can use range-based "for" loops. In this type of loop, we can specify the number to start, to stop, and to increment at every iteration (optional) in the statement. There are two ways you can do this i.e. by mentioning the increment/decrementer value and by incrementing by one by default.
a) Incrementing by one by default
#!/bin/bash
#we use the “{}” to specify a range of numbers.
for n in {1..10};
#Inside the curly braces, we specify the start point followed by two dots and an endpoint.
#By default, it increments by one.
#Hence we print 10 numbers from 1 to 10 both inclusive.
do
    echo $n
done
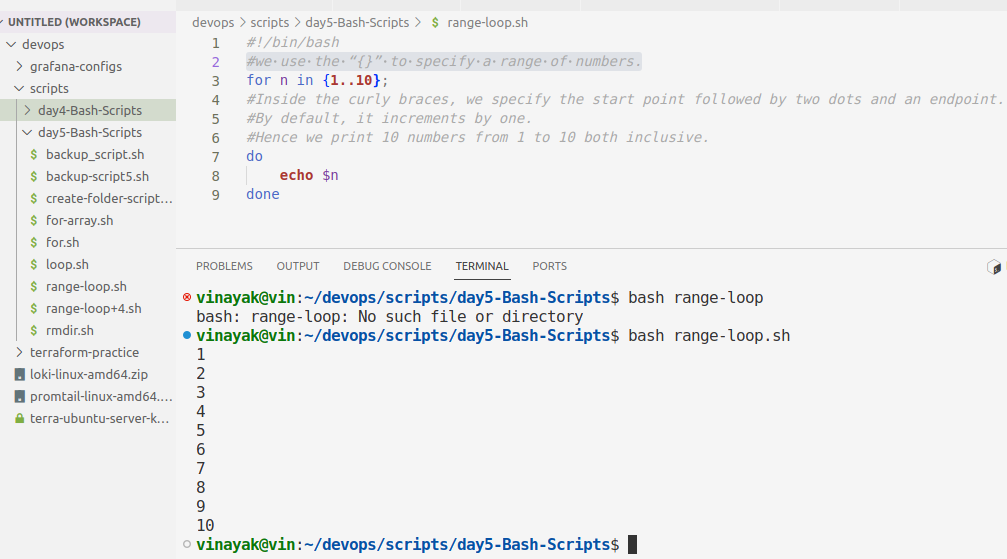
The “{}” specifies a range of numbers. Inside the curly braces, we specify the start point followed by two dots and an endpoint. By default, it increments by one.
b) Mentioning the increment
#!/bin/bash

#we use the “{}” to specify a range of numbers.

for n in {4..30..4};
#Inside the curly braces, we specify the start point followed by two dots and an endpoint.
#Third number "4" is incremental object By default, it increments by one but here we mention to increment by "4"

do
    echo $n
done
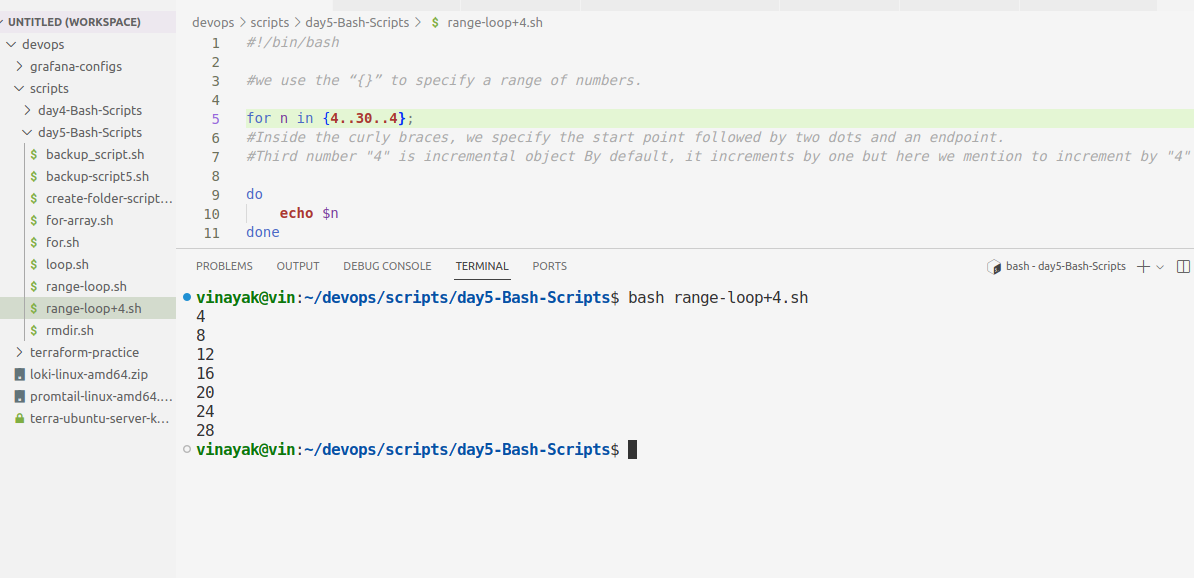
The loop incremented by 4 units as mentioned in the curly braces. Thus, this makes working with numbers very easy and convenient. This can also be used with alphabetical characters.
NOTE: We cannot use variables inside the curly braces, so we will have to hardcode the values. To use the variables, we see the traditional C-styled "for" loops in the next few sections.
Arrays
Arrays in Bash are a type of data structure that allows you to store multiple values in a single variable.
Creating Arrays: You can create an array in Bash using the following syntax
array_name=(value1 value2 value3 … )
For example, if you want to create an array named files that stores five filenames, you can do it as follows:
files=("f1.txt" "f2.txt" "f3.txt" "f4.txt" "f5.txt")
Accessing Array Elements: The first element of an array starts at index 0. To access the nth element of the array, you use the n-1 index1.
For example, to print the value of the 2nd element of your files array, you can use the following echo statement1:
echo ${files[1]}
3) Array iteration for loops
We can iterate over arrays conveniently in bash using "for" loops with a specific syntax. We can use the special variables in BASH i.e @ to access all the elements in the array.
#!/bin/bash

##Array iteration for loops##
#We can iterate over arrays conveniently in bash using for loops with a specific syntax.
#We can use the special variables in BASH i.e @ to access all the elements in the array.

s=("Vinayak" "Vansh" "Ansh")
for n in ${s[@]};
#Here, the “n” is the iterator hence, we can print the value or do the required processing on it.

do
    echo $n
done
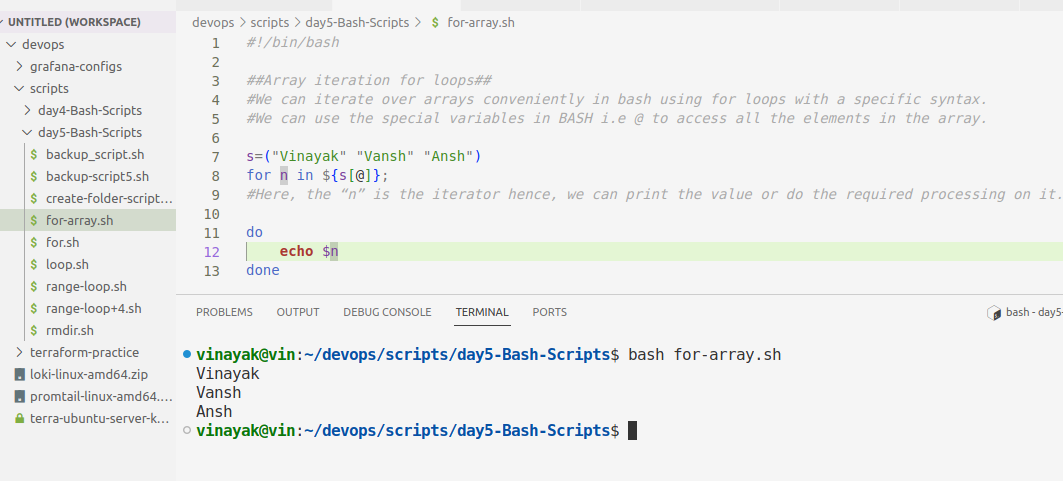
We can iterate over the array elements using the @ operator that gets all the elements in the array. Thus using the for loop we iterate over them one by one. We use the variable ${variable_name[@]} in which, the curly braces here expand the value of the variable “s” here which is an array of strings. Using the [@] operator we access all the elements and thus iterate over them in the for a loop. Here, the “n” is the iterator hence, we can print the value or do the required processing on it.
4) C-Styled for loops
We need to use the variables inside the for loops to iterate over a range of elements. Thus, the C-styled "for" loops play a very important role. #!/bin/bash
#!/bin/bash

n=20
for (( i=2 ; i<=$n ; i+=2 ));
do
    echo $i
done
Advanced Linux Shell Scripting
We can create 90 directories within seconds using a simple command.
mkdir day{1..90}
Example 1: You have to do the same using Shell Script that uses either Loops or command with start day and end day variables using arguments.
Task-1 Script to create the directories from day 1 to day 90
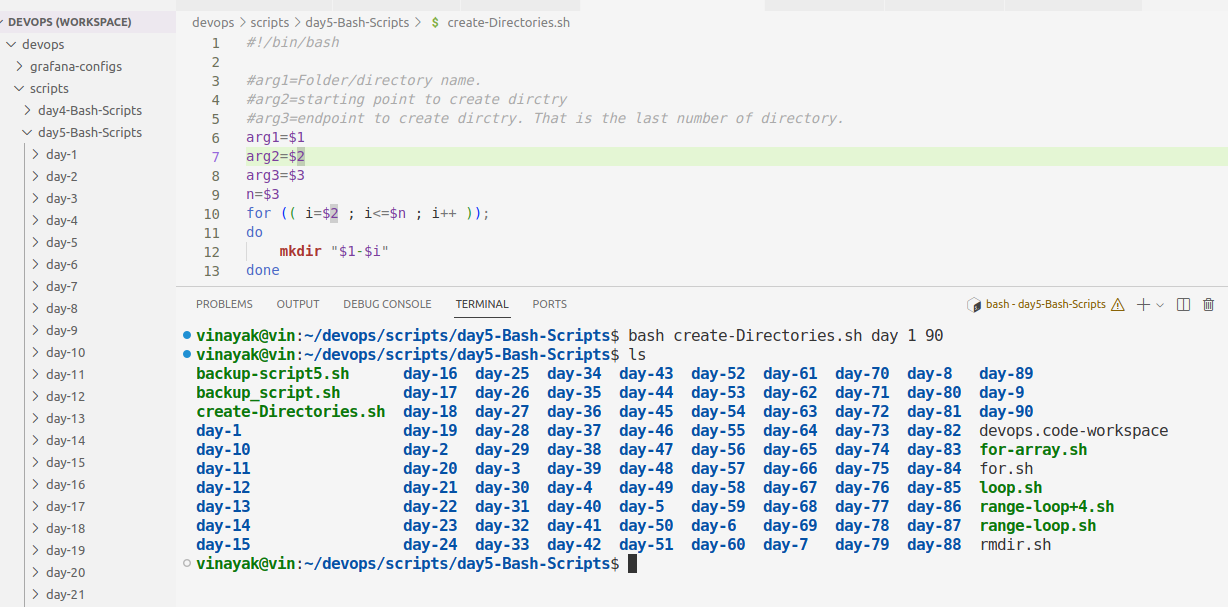
Below is the bash script, when the script is executed with three given arguments (one is the directory name second is the start number of directories and third is the end number of directories) it creates a specified number of directories with a dynamic directory name.
Run the script using the below command
bash create-Directories.sh day 1 90
Explanation= In the above command bash is to run the bash scripts. The "create-Directories.sh" is a file name where the below-mentioned script is present. The "day" is the first argument to the command, and it's a directory name to be created. "1" is the second argument and starting point of the directories. This means we want to create directories named day-1, day-2 ... up to day-90. Hence, the last "90" is the third argument for the command, and it's an endpoint for the number of directories we want to create.
#!/bin/bash

#arg1=Folder/directory name.
#arg2=starting point to create dirctry
#arg3=endpoint to create dirctry. That is the last number of directory.
arg1=$1
arg2=$2
arg3=$3
n=$3
for (( i=$2 ; i<=$n ; i++ ));
do
    mkdir "$1-$i"
done
Script to remove the directories
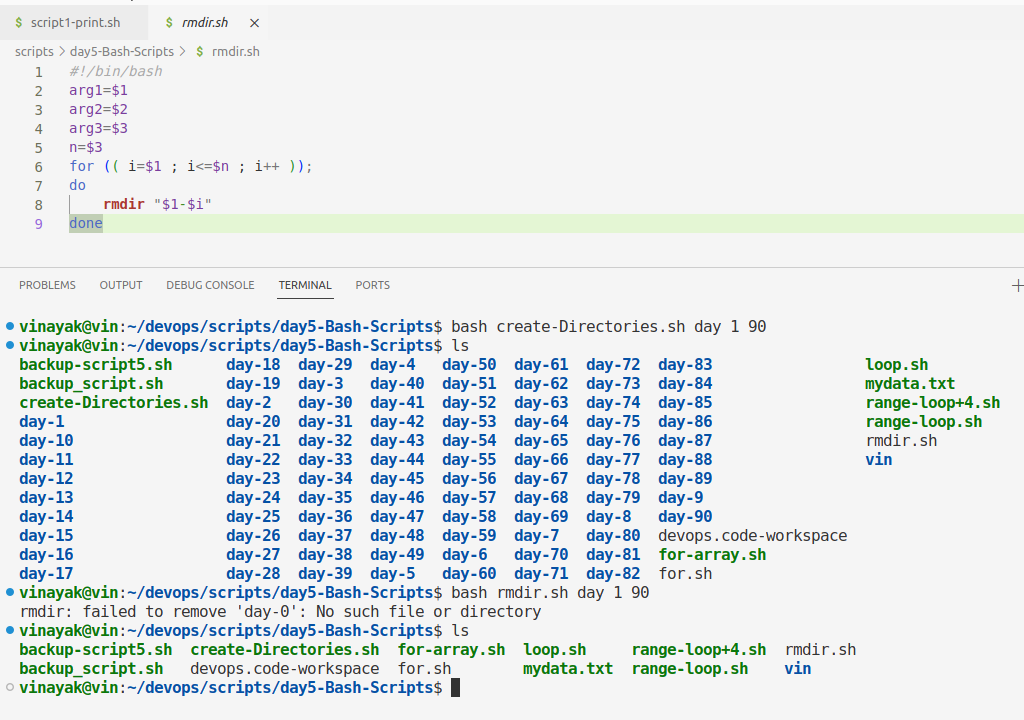
Similarly, we can create a script to remove the directories using the below script
Run the script using the below command
bash rmdir.sh day 1 90
#!/bin/bash
arg1=$1
arg2=$2
arg3=$3
n=$3
for (( i=$1 ; i<=$n ; i++ ));
do
    rmdir "$1-$i"
done
Example 2: When the script is executed as
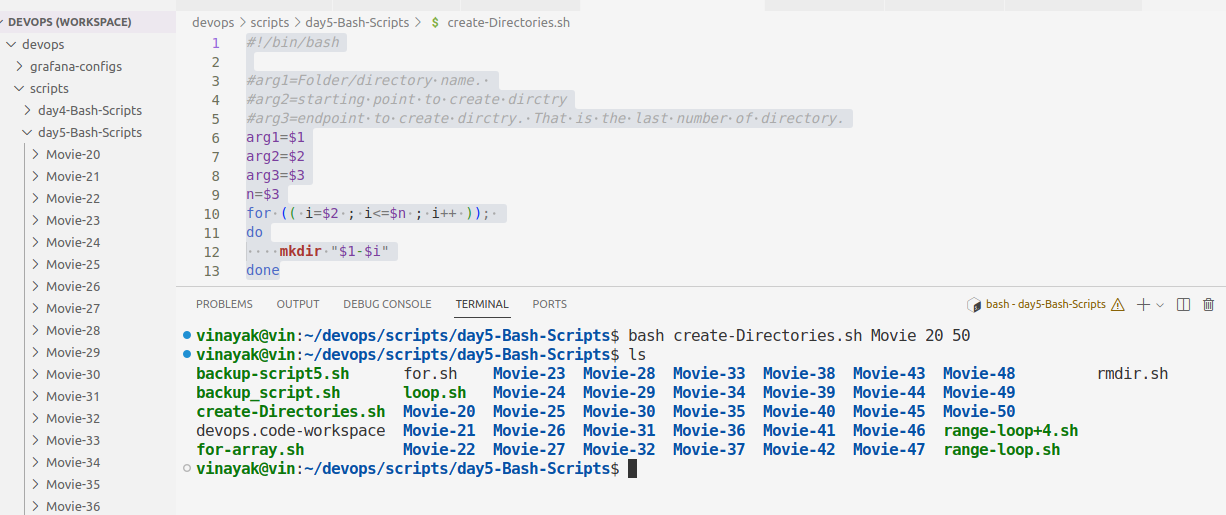
./createDirectories.sh Movie 20 50 then it creates 50 directories as Movie20 Movie21 Movie23 ...Movie50
Use the same script as in example:1
Run the script using the below command
bash create-Directories.sh Movie 20 50
Task2 Creating backup of our work-
Script to create a backup with an explanation of each command.
#!/bin/bash
# This is a shebang line, which tells the shell which interpreter to use for executing the script

###########################################################################
# Script: backup_script.sh
# Purpose: Automate backups of IMP files and directories.
# Auther: Vinayak Salunke
# Date: 29-09-2023
###########################################################################

# Check if an argument is given
if [ -z "$1" ]; then
# This is a conditional statement, which checks if the first argument is empty or not
  echo "Usage: $0 folder"
  # This prints a message to the standard output, showing how to use the script
  exit 1
  # This exits the script with an error code of 1, indicating a failure
fi

# Assign the argument to a variable
folder="$1"
# This assigns the value of the first argument to a variable named folder

# Get the current date and time
date=$(date +"%Y-%m-%d_%H-%M-%S")
# This assigns the output of the date command to a variable named date, using the specified format

# Create the backup file name
backup="$folder/backup_$date.tar"
# This concatenates the folder name, a slash, the word backup, an underscore, the date, and the extension .tar to create a backup file name

# Print a message
echo "Backing up $folder to $backup"
# This prints a message to the standard output, showing what is being backed up and where

# Use tar command to create an archive
tar cf $backup $folder
# This uses the tar command to create an archive file named backup, containing all the files and subfolders in folder

# Print a message
echo "Backup completed"
# This prints a message to the standard output, showing that the backup is done

# Print a message
echo "Compressing $backup using bzip2"
# This prints a message to the standard output, showing that the compression is starting

# Use bzip2 command to compress the backup file
bzip2 -z $backup
# This uses the bzip2 command to compress the backup file, appending .bz2 to its name

# Print a message
echo "Compression completed"
# This prints a message to the standard output, showing that the compression is done
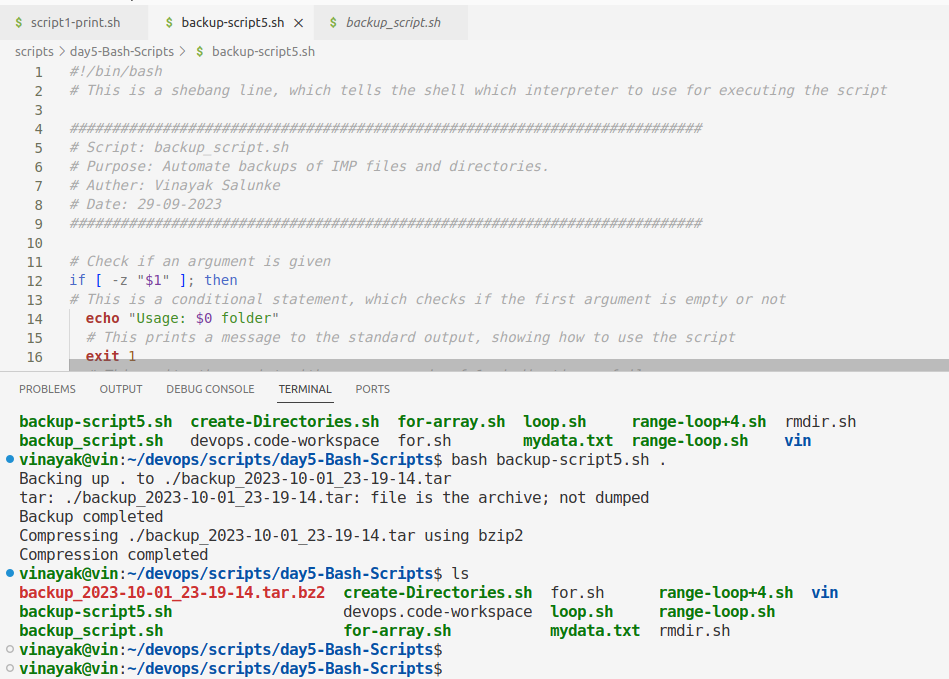
Output of the script:
The script uses the following symbols and their meanings are:
#!/bin/bash: This is called a shebang line, which tells the shell which interpreter to use for executing the script.#: This is used for writing comments, which are ignored by the shell.$: This is used for referencing variables, which store values that can be used later in the script.=: This is used for assigning values to variables, without any spaces around it.$( ): This is used for command substitution, which means the output of the command inside the parentheses is assigned to the variable.": This is used for quoting strings, which can contain variables or special characters.echo: This is a command that prints a message to the standard output.tar: This is a command that creates or extracts compressed archive files.cf: These are options for the tar command, which mean create a new archive and specify the file name of the archive.bzip2: This is a command that compresses and decompresses files using the bzip2 algorithm.-z: This is an option for the bzip2 command, which means force compression of the file.
Difference between tar and bzip2?
Tar and bzip2 are two different tools that serve different purposes. Tar is an archiving tool that can combine multiple files and directories into a single file, preserving their structure and metadata. Bzip2 is a compression tool that can reduce the size of a file by applying an algorithm that eliminates redundant data. Both tools can work together to create a compressed archive of multiple files and directories, which will have the extension .tar.bz2.
The use cases of tar and bzip2 depend on the needs and preferences of the user. Some possible use cases are:
- To backup or transfer multiple files and directories as a single file, without compressing them. This can be done by using tar alone, which will create a .tar file.
- To compress a single file, without archiving it. This can be done by using bzip2 alone, which will create a .bz2 file. Bzip2 can offer better compression than gzip, another compression tool, but it may be slower and use more memory.
- To compress and archive multiple files and directories as a single file, with high compression ratio. This can be done by using tar and bzip2 together, which will create a .tar.bz2 file. This can save more space than using tar and gzip together, which will create a .tar.gz file. However, it may take longer to create and extract the archive.
- To compress and archive multiple files and directories as a single file, with fast compression speed. This can be done by using tar and gzip together, which will create a .tar.gz file. This can be faster than using tar and bzip2 together, but it may not save as much space.
Task-3- Read About Cron and Crontab, to automate the backup Script
Cron and Crontab are Linux utilities that allow you to schedule and automate tasks on your system. Cron is the service that runs in the background and reads crontab files, which are files that contain the commands or scripts to be executed at a specified time or interval. Crontab is also the command that you use to create, edit, or delete your own crontab file.

Some basic commands related to cron and crontab are:
crontab -e
: This command opens your crontab file for editing. You can use any text editor of your choice, such as nano, vim, or emacs. If you don't have a crontab file yet, this command will create one for you.
crontab -l
: This command lists the contents of your crontab file. You can use this command to check if your cron jobs are correctly defined.
crontab -r
: This command removes your crontab file. You should use this command with caution, as it will delete all your cron jobs without confirmation.
sudo systemctl status cron
: This command checks the status of the cron service. You need sudo privileges to run this command. You can use this command to see if the cron service is running, active, or failed.
To define a cron job in your crontab file, you need to use a specific syntax that consists of six fields:
- **Minute**: The minute when the cron job should run, from 0 to 59.
- **Hour**: The hour when the cron job should run, from 0 to 23.
- **Day of month**: The day of the month when the cron job should run, from 1 to 31.
- **Month**: The month when the cron job should run, from 1 to 12 or by name (Jan, Feb, etc.).
- **Day of week**: The day of the week when the cron job should run, from 0 to 6 or by name (Sun, Mon, etc.).
- **Command**: The command or script that should be executed by the cron job.
Each field is separated by a space, and you can use asterisks (*) to match any value, commas (,) to specify multiple values, dashes (-) to specify ranges of values, and slashes (/) to specify increments of values.
For example, if you want to automate a backup script that runs every day at 3:00 AM, you can write the following line in your crontab file:
`0 3 * * * /path/to/backup/script.sh`
This means that at minute 0 of hour 3 of any day of any month of any day of the week, the script `/path/to/backup/script.sh` will be executed by cron.
Task-4- User Management
A user is an entity, in a Linux operating system, that can manipulate files and perform several other operations. Each user is assigned an ID that is unique for each user in the operating system. We will learn about users and commands which are used to get information about the users. After installation of the operating system, the ID 0 is assigned to the root user and the IDs 1 to 999 (both inclusive) are assigned to the system users hence the IDs for local user begins from 1000 onwards.
To create local users we use useradd command in linux.
useradd vinayak = This command will add user "vinayak" in our operating system.
useradd madhu = This command will add user "madhu" in our operating system.
The user's information is in the file "/etc/passed" use command "cat /etc/passed" to get the list of available users.
Output will look like this
Awk is a scripting language used for manipulating data and generating reports. The awk command programming language requires no compiling and allows the user to use variables, numeric functions, string functions, and logical operators.
awk command
Awk is a utility that enables a programmer to write tiny but effective programs in the form of statements that define text patterns that are to be searched for in each line of a document and the action that is to be taken when a match is found within a line.
To print only usernames we need to use "awk" command.
awk -F':' '{ print $1}' /etc/passwd
Explanation= In the above command awk is a command as explained above. "-F" is to mention the field separator ":". Inside {} brackets we are mentioning the operation here it is print. "$1" is to mention the column number.
I hope you enjoy the blog post!
If you do, please show your support by giving it a like 👍🏻, leaving a comment 💬, and spreading the word 📢 to your friends and colleagues 🙂
Subscribe to my newsletter
Read articles from Vinayak Salunkhe directly inside your inbox. Subscribe to the newsletter, and don't miss out.
Written by

Vinayak Salunkhe
Vinayak Salunkhe
DevOps Engineer with 8+ Years of Experience | AWS, Azure DevOps, Linux | CKA & RHCSA Certified | Docker+K8S Expert