Kubernetes advanced all about k8s objects
 NILESH GUPTA
Kubernetes offers various objects to manage containerized applications efficiently. Each object serves a specific purpose within the Kubernetes ecosystem. Below, I'll explain the most commonly used Kubernetes objects, their use cases, and provide detailed examples for each.
click for kubectl commands cheatsheet
click on the link for K8s architecture
1. Pod:
Pods are the smallest deployable units of computing that you can create and manage in Kubernetes.These are the fundamental building blocks of the Kubernetes system. They are used to deploy, scale, and manage containerized applications in a cluster.
A Pod can host a single container or a group of containers that need to "sit closer together". By grouping two or more containers in a single Pod, they will be able to communicate much faster and share data more easily. It's important to note that, when a Pod contains multiple containers, all of the containers always run on a single worker node. They never span across multiple worker nodes.
One important characteristic of Pods is that they are ephemeral in nature. This means that they are not guaranteed to have a long-term lifespan. They can be created, destroyed, and recreated at any time if required.
in kubernetes everything we do is by manifest file i.e yml file
A Pod object in Kubernetes has the following structure:
apiVersion: v1
kind: Pod
metadata:
  name: nginx
  labels:
     env: testing
spec:
  containers:
  - name: nginx
    image: nginx:latest
    ports:
    - containerPort: 80
apiVersion: Specifies the Kubernetes API version to use.kind: Identifies the type of Kubernetes object, which is "Pod" in this case.metadata: Contains metadata about the Pod, such as its name and labels.spec: Defines the desired state of the Pod, including the containers it should run.Explanation of Fields
name: This is the name of the Pod. It must be unique within the namespace.
labels: Labels are key-value pairs that can be used for organizing and selecting Pods. Labels are optional but are useful for grouping and filtering Pods.
containers: This field is an array that specifies the containers to run within the Pod. Each container has a name and an image to use.
2.Namespaces A Kubernetes namespace is a way to divide a single Kubernetes cluster into multiple virtual clusters. This allows resources to be isolated from one another. Once a namespace is created, you can launch Kubernetes objects, like Pods, which will only exist in that namespace.namespace is a logical entity which allows you isolate k8s resources.
For example, imagine you have a Kubernetes cluster running two applications, "AppA" and "AppB". To keep things organized, you create two namespaces, "AppA-Namespace" and "AppB-Namespace".
Now, when you deploy Pods for "AppA", you can do so within the "AppA-Namespace". Similarly, when you deploy Pods for "AppB", you can do so within the "AppB-Namespace". What's a possible use case?
Well, imagine AppA, and AppB are almost identical. One is version 1.16 of an app, the other is version 1.17. They use almost the same objects, the same Pod structures, the same Services, and so on. Since they're so similar, there's a risk of them interfering with each other. For example, AppA might accidentally send requests to a similar Service or Pod used by AppB. But you want to test the new 1.17 version in a realistic scenario in the same cluster, using the same objects and definitions.
By using namespaces, you can perform as many operations as you need while eliminating the risk of impacting resources that are in another namespace. It's almost as if you have a second Kubernetes cluster. AppA runs in its own (virtual) cluster. AppB runs in a separate (virtual) cluster. But you don't actually have to go through the trouble of setting up an additional cluster. AppA and AppB are logically isolated from each other when they exist in separate namespaces. Even if they run identical Pods that want to access Services with identical names, there's no risk of them interfering with each other.
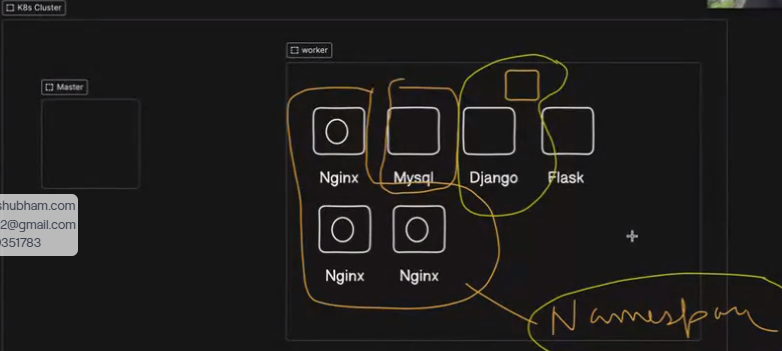
To create a namespace use below command
kubectl create namespace nginx
kubectl get namespace
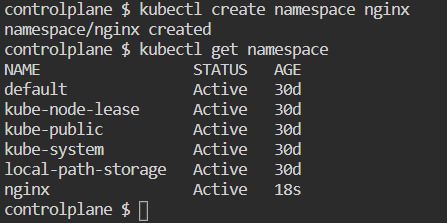
Define namespace in pod.yml
apiVersion: v1
kind: Pod
metadata:
  name: nginx
  namespace: nginx
  labels:
     env: testing
spec:
  containers:
  - name: nginx
    image: nginx:latest
    ports:
    - containerPort: 80
To run a pod use below command
kubectl apply -f pod.yml :-
kubectl get pods :- it shows default namespace pods
kubectl get pods -n nginx :- now it will show pod
kubectl get pods -o wide :-  give complete details with ip
(pod and node both and both communicate using private ip)and all
kubectl describe pod/nginx or kubectl describe pod nginx
( write pod name) or kubectl describe -f pod.yml

3.Deployment:
A Deployment provides declarative updates for Pods and ReplicaSets.
You describe a desired state in a Deployment, and the Deployment Controller changes the actual state to the desired state at a controlled rate. You can define Deployments to create new ReplicaSets, or to remove existing Deployments and adopt all their resources with new Deployments.
In Kubernetes, a Deployment object is used to manage the lifecycle of one or more identical Pods. A Deployment allows you to declaratively manage the desired state of your application, such as the number of replicas, the image to use for the Pods, and the resources required. Declaratively managing the state means specifying the desired end state of an application, rather than describing the steps to reach that state. Kubernetes figures out the steps on its own. So it will know what it has to do to launch the Deployment, according to the specifications provided by the user.
When you create a Deployment, you provide a Pod template, which defines the configuration of the Pods that the Deployment will manage. The Deployment then creates Pods that match this template, using a ReplicaSet. A ReplicaSet is responsible for creating and scaling Pods, and for ensuring that Pods that fail are replaced. When you update a Deployment, it will update the ReplicaSet, which in turn updates the Pods.
It's important to note that Deployment objects are used to manage stateless applications. Stateless applications are those that do not maintain any persistent data or state. This means that if a container running the application crashes or is terminated, it can be easily replaced. There's no need to preserve any data before deleting the old container and replacing it with a new one. Examples of stateless applications include web servers and load balancers.
writing a deployment file
apiVersion: apps/v1
kind: Deployment
metadata:
  name: nginx-deployment
  namespace: nginx
  labels:
    app: nginx
spec:
  replicas: 3
  selector:
    matchLabels:
      app: nginx
  template:
    metadata:
      labels:
        app: nginx
    spec:
      containers:
      - name: nginx
        image: nginx:latest
        ports:
        - containerPort: 80
Commands for deployment
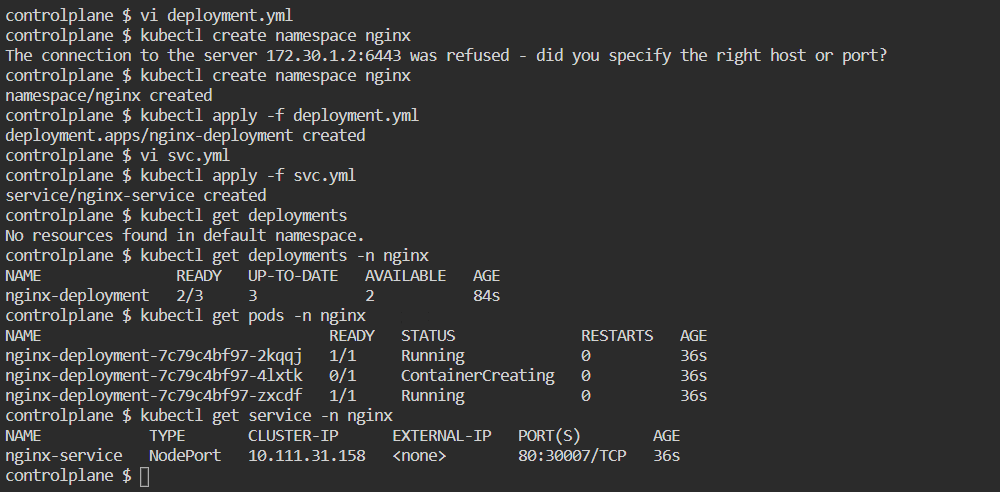
kubectl apply -f deployment.yml :-
kubectl get deployment :- it shows default namespace
kubectl get deployment -n nginx :- now it will show pod
kubectl get deployment -o wide -n nginx :-  give complete details with ip
(pod and node both and both communicate using private ip)and all
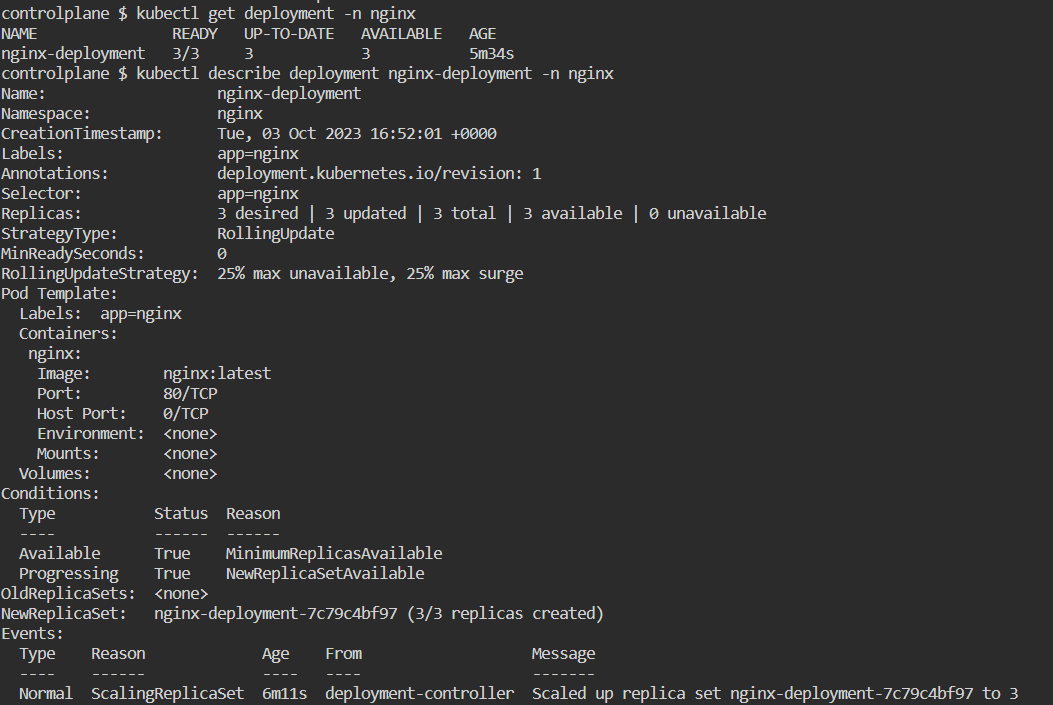
kubectl describe deployment/nginx-deployment -n nginx
or kubectl describe deployment nginx-deployment -n nginx
( write pod name) or kubectl describe -f deployment.yml
kubectl describe deployment nginx-deployment -n nginx

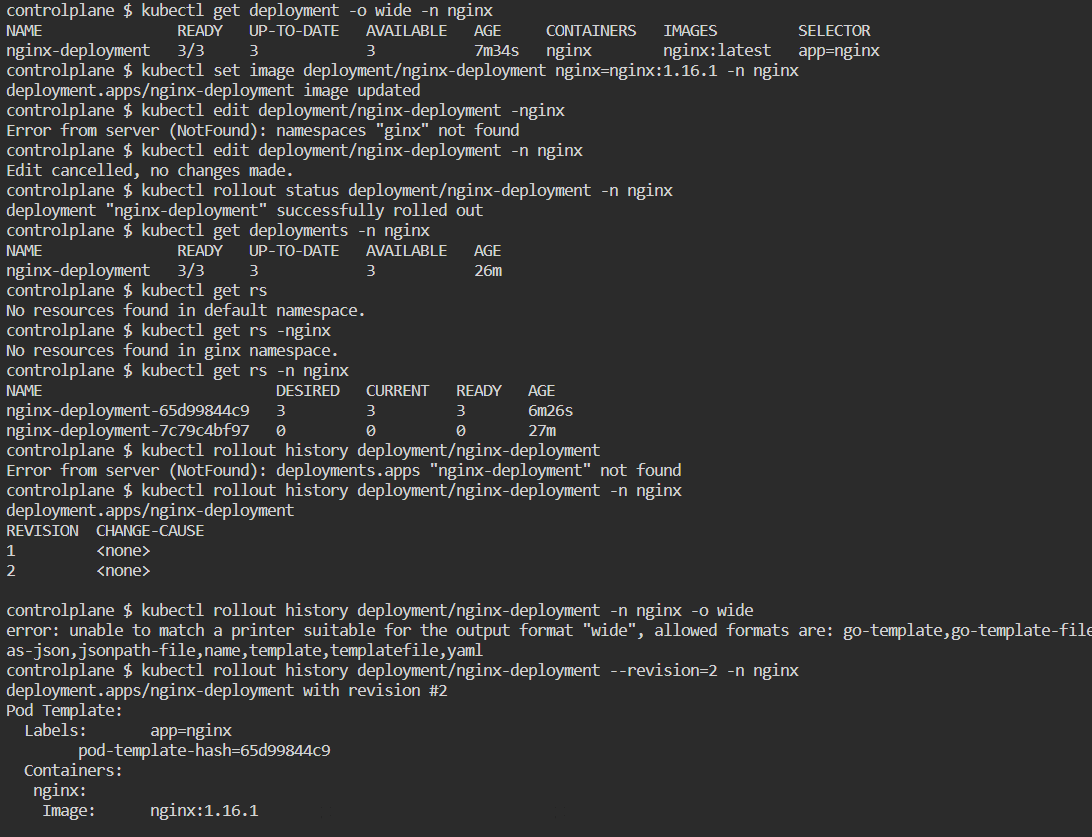
remember if you are using name space then use -n namespace in our
case namespace is nginx so we are using -n nginx

When you want to update the application (e.g., change the image version),
 you edit the Deployment:
kubectl set image deployment/nginx-deployment nginx=nginx:1.16.1
To see the rollout status, run:
kubectl rollout status deployment/nginx-deployment
to check replica set :-
kubectl get rs
Checking Rollout History of a Deployment :
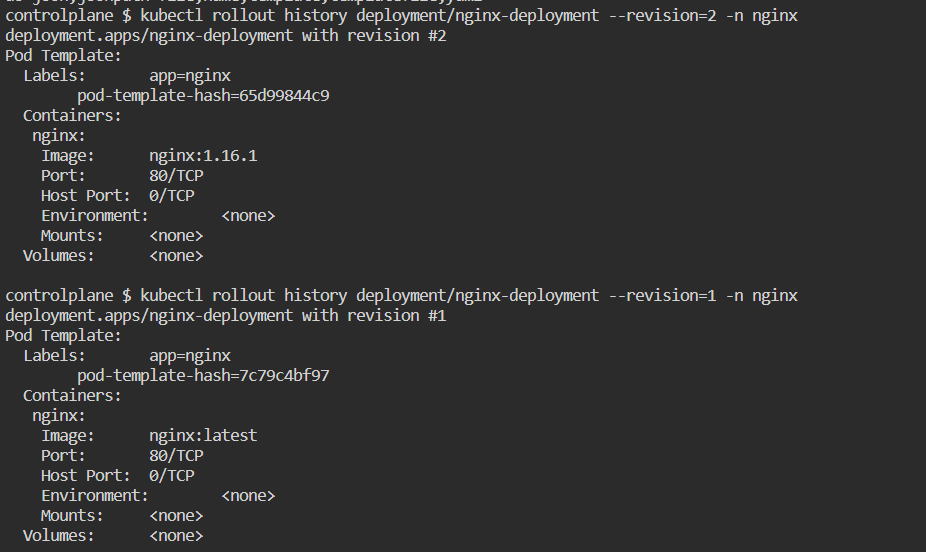
kubectl rollout history deployment/nginx-deployment
to see details of each revesion:
kubectl rollout history deployment/nginx-deployment --revision=2
rollback to the previos version :
kubectl rollout undo deployment/nginx-deployment
you can rollback to a specific revision by specifying it with --to-revision:
kubectl rollout undo deployment/nginx-deployment --to-revision=2
Scaling a Deployment:
kubectl scale deployment/nginx-deployment --replicas=5


Assuming horizontal Pod autoscaling is enabled in your cluster, you can set up an autoscaler for your Deployment and choose the minimum and maximum number of Pods you want to run based on the CPU utilization of your existing Pods.
kubectl autoscale deployment/nginx-deployment --min=10 --max=15 --cpu-percent=80
The output is similar to this:
deployment.apps/nginx-deployment scaled
4.Service:
A Service in Kubernetes is a resource object used to define a network service that exposes a set of Pods as a network service. It provides an abstraction layer that allows you to access Pods using a stable, DNS-based hostname or IP address. Services enable networking within the cluster and allow external traffic to reach the Pods.
A Kubernetes Service is a way to access a group of Pods that provide the same functionality. It creates a single, consistent point of entry for clients to access the service, regardless of the location of the Pods.
For example, imagine you have a Kubernetes cluster with multiple Pods running a web application. Each Pod has its own IP address, but this can change at any time if the Pod is moved to another node, or recreated. So the IP address becomes a "moving target". The destination(s) that clients should reach is unstable, and hard to track.
To make it easier for clients to access the web application, you can create a Kubernetes Service that has a stable IP address. Clients can then connect to that IP, and their requests will be routed to one of the Pods running the web application.
One of the key benefits of using a Service is that it provides a stable endpoint that doesn't change even if the underlying Pods are recreated or replaced. This makes it much easier to update and maintain the application, as clients don't need to be updated with new IP addresses.
Furthermore, the Service also provides some simple load balancing. If clients would connect to a certain IP address of a specific Pod, that Pod would be overused, while the other ones would be sitting idle, doing nothing. But the Service can spread out requests to multiple Pods (load balance). By spreading these out, all Pods are used equally. However, each one has less work to do, as it only receives a small part of the total number of incoming requests.
Different types of Kubernetes Services: ClusterIP, NodePort, LoadBalancer, and ExternalName
The output is similar to this:
apiVersion: v1
kind: Service
metadata:
  name: nginx-service
  namespace: nginx
spec:
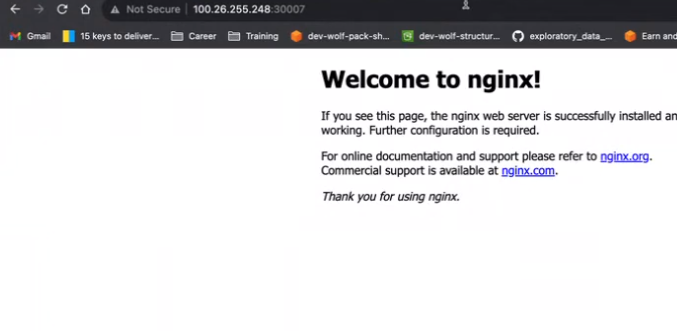
  type: NodePort
  selector:
    app: nginx
  ports:
      # By default and for convenience, the `targetPort` is set to the same value as the `port` field.
    - port: 80
      targetPort: 80
      # Optional field
      # By default and for convenience, the Kubernetes control plane will allocate a port from a range (default: 30000-32767)
      nodePort: 30007
ConfigMaps & Secrets
ConfigMaps and Secrets are two very important objects that allow you to configure the apps that run in your Pods. Configuring apps refers to setting various parameters or options that control the behaviors of the apps. This can include things like database connection strings or API keys.
ConfigMaps are used to store non-sensitive configuration values. For example, environment variables used to provide runtime configuration information such as the URL of an external API, rather than confidential information such as passwords, are considered non-sensitive data.
Secrets, on the other hand, are meant to hold sensitive configuration values, such as database passwords, API keys, and other information that only authorized apps should be able to access.
ConfigMaps and Secrets can be injected into Pods with the help of environment variables, command-line arguments, or configuration files included in the volumes attached to those Pods.
By using ConfigMaps and Secrets, you decouple the applications running in your Pods from their configuration values. This means you can easily update the configuration of your applications without having to rebuild or redeploy them.
example of configmap and secrets using my sql container
configMap.yml
kind: ConfigMap
apiVersion: v1
metadata:
  name: mysql-config
  labels:
    app: todo
data:
  MYSQL_DB: "todo-db"
In this example:
The ConfigMap is named "mysql-config"
It contains a key-value pairs: MYSQL_DB.
kubectl apply -f configmap.yml
Now create a secret which contains database pwd
apiVersion: v1
kind: Secret
metadata:
  name: mysql-secret
type: Opaque
data:
  password: dHJhaW53aXRoc2h1YmhhbQ== # Base64-encoded "test123"

---------------------------------------------------------
apiVersion: Specifies the Kubernetes API version to use, typicallyv1for Secrets.kind: Identifies the type of Kubernetes object, which is "Secret" in this case.metadata: Contains metadata about the Secret, such as its name.type: Specifies the type of the Secret, which can be "Opaque" (generic binary data) or other types like "kubernetes.io/tls" for TLS certificates.data: Defines the actual key-value pairs of encoded data.
in above example
The Secret is named "mysql-secret."
It contains a key-value pairs:
passwordwith base64-encoded values.
kubectl apply -f secret-definition.yaml
Now lets apply configmap and secrets in depolyoment.yml file
apiVersion: apps/v1
kind: Deployment
metadata:
  name: mysql
  labels:
    app: mysql
spec:
  replicas: 1
  selector:
    matchLabels:
      app: mysql
  template:
    metadata:
      labels:
        app: mysql
    spec:
      containers:
      - name: mysql
        image: mysql:8
        ports:
        - containerPort: 3306
        env:
        - name: MYSQL_ROOT_PASSWORD
          valueFrom:
            secretKeyRef:
              name: mysql-secret
              key: password
        - name: MYSQL_DATABASE
          valueFrom:
            configMapKeyRef:
              name: mysql-config
              key: MYSQL_DB
The
envsection defines environment variables for the Pod.The
valueFromfield references the ConfigMap by name (mysql-config)and specifies the key (MYSQL_DB) to retrieve the values.The
envsection defines environment variables for the Pod.The
valueFromfield references the secret by name (mysql-secret)and specifies the key (password) to retrieve the values.
PersistentVolume and persistent volume claim
PersistentVolume represents a piece of storage that you can attach to your Pod(s).
The reason it's called "persistent" is because it's not tied to the life cycle of your Pod. In other words, even if your Pod gets deleted, the PersistentVolume will survive.
And there are a lot of different types of storage that you can attach using a PersistentVolume, like local disks, network storage, and cloud storage.
There are a few different use cases for PersistentVolumes in Kubernetes. One common use case is for databases. If you're running a database inside a Pod, you'll likely want to store the database files on a separate piece of storage that can persist even if the Pod gets deleted. And PersistentVolume can do that.
persistent volume
apiVersion: v1
kind: PersistentVolume
metadata:
name: mysql-pv-volume
namespace: mysql
labels:
    app: mysql
spec:
    storageClassName: manual
    capacity:
        storage: 2Gi
    accessModes:
        - ReadWriteOnce
    persistentVolumeReclaimPolicy: Retain
    hostPath:
        path: "/mnt/data"
In this example:
apiVersion: Specifies the Kubernetes API version to use, typicallyv1for PVs.kind: Identifies the type of Kubernetes object, which is "PersistentVolume."metadata: Contains metadata about the PV, such as its name.spec: Defines the desired state of the PV, including capacity, access modes, and storage class.
Explanation of Fields
metadata: This section includes metadata such as the name of the PV. You can also add labels and annotations for additional information.
spec: The
specsection defines the desired state of the PV.capacity: Specifies the capacity of the PV (e.g.,10Gifor 10 gigabytes).accessModes: Lists the access modes that the PV supports (e.g.,ReadWriteOnce).persistentVolumeReclaimPolicy: Specifies what happens to the PV when it's released. Common values includeRetain(PV is not automatically deleted) andDelete(PV is automatically deleted).storageClassName: Associates the PV with a storage class.hostPath: Defines the host path where the storage is physically located. This is typically used for testing purposes.

Now as we have created pv now it needs to be claimed by pod.
A PersistentVolumeClaim (PVC) is a request for storage by a Pod. It acts as a declaration for the storage needs of a Pod and allows the Pod to access a specific amount of storage with specific characteristics (e.g., storage class, access mode).
a sample pvc file:-
persistent volume claim
apiVersion: v1
kind: PersistentVoLumeCLaim
metadata:
    name: mysql-pv-claim
    namespace: mysql
spec:
    storageClassName: manual
    accessModes:
        -readWriteOnce
    resources:
        requests:
           storage: 2Gi
In this example:
apiVersion: Specifies the Kubernetes API version to use, typicallyv1for PVCs.kind: Identifies the type of Kubernetes object, which is "PersistentVolumeClaim."metadata: Contains metadata about the PVC, such as its name.spec: Defines the desired state of the PVC, including access modes and resource requests.
Explanation of Fields
metadata: This section includes metadata such as the name of the PVC. You can also add labels and annotations for additional information.
spec: The
specsection defines the desired state of the PVC.accessModes: Specifies the access modes that the PVC requires. Common modes includeReadWriteOnce(can be mounted by a single node) andReadOnlyMany(can be mounted by multiple nodes).resources.requests.storage: Requests a specific amount of storage (e.g.,5Gifor 5 gigabytes).

Now we will write it in deployment file
    apiVersion: apps/v1
    kind: Deployment
    metadata:
      name: mysql
      labels:
        app: mysql
    spec:
      replicas: 1
      selector:
        matchLabels:
          app: mysql
      template:
        metadata:
          labels:
            app: mysql
        spec:
          containers:
          - name: mysql
            image: mysql:8
            ports:
                - containerPort: 3306
            env:
                - name: MYSQL_ROOT_PASSWORD
                    valueFrom:
                        secretKeyRef:
                          name: mysql-secret
                          key: password
                - name: MYSQL_DATABASE
                      valueFrom:
                        configMapKeyRef:
                          name: mysql-config
                          key: MYSQL_DB
            volumeMounts:
                - name: mysql-persistent-storage
                  mountPath: /var/lib/mysql
          volumes:
              - name: mysql-persistent-storage
                persistentVolumeClaim:
                  claimName: mysql-pv-claim
volumeMounts:
name: Defines the name of the volume to mount, which is "mysql-persistent-storage."mountPath: Specifies the path inside the container where the volume should be mounted, which is "/var/lib/mysql" in this case. This is the directory where MySQL stores its data.
volumes:
name: Specifies the name of the volume, which should match the name used involumeMounts.persistentVolumeClaim:claimName: Specifies the name of the PersistentVolumeClaim (PVC) that this volume should be associated with, which is "mysql-pv-claim."

There are many more k8s objects but these are the basic k8s objects.
I hope you like this blog .
Happy learning.
Subscribe to my newsletter
Read articles from NILESH GUPTA directly inside your inbox. Subscribe to the newsletter, and don't miss out.
Written by
