DevOps(Day-64): Terraform with AWS
 Biswaraj Sahoo
TABLE OF CONTENTS
Provisioning on AWS is quite easy with Terraform.
Prerequisites
AWS CLI installed
The AWS Command Line Interface (AWS CLI) is a unified tool to manage your AWS services. With just one tool to download and configure, you can control multiple AWS services from the command line and automate them through scripts.
Install AWS CLI on the Ubuntu server.


AWS IAM user
IAM (Identity Access Management) AWS Identity and Access Management (IAM) is a web service that helps you securely control access to AWS resources. You use IAM to control who is authenticated (signed in) and authorized (has permissions) to use resources.
In order to connect your AWS account and Terraform, you need the access keys and secret access keys exported to your machine.
COPY
COPY
export AWS_ACCESS_KEY_ID=<access key>
export AWS_SECRET_ACCESS_KEY=<secret access key>
Create an IAM user with suitable permissions.

Export the access keys to configure aws console to terminal through awscli

Install required providers
COPY
COPY
Explainterraform {
 required_providers {
        aws = {
        source  = "hashicorp/aws"
        version = "~> 4.16"
}
}
        required_version = ">= 1.2.0"
}
Create a terraform file to download required providers on the system from a specific region.

Add the region where you want your instances to be.
COPY
COPY
provider "aws" {
region = "us-east-1"
}
Terraform will go to the region and download all the utilities required for aws connection to the terminal for infrastructure provisioning.

Task-01: Provision an AWS EC2 instance using Terraform
- Provision an AWS EC2 instance using Terraform.

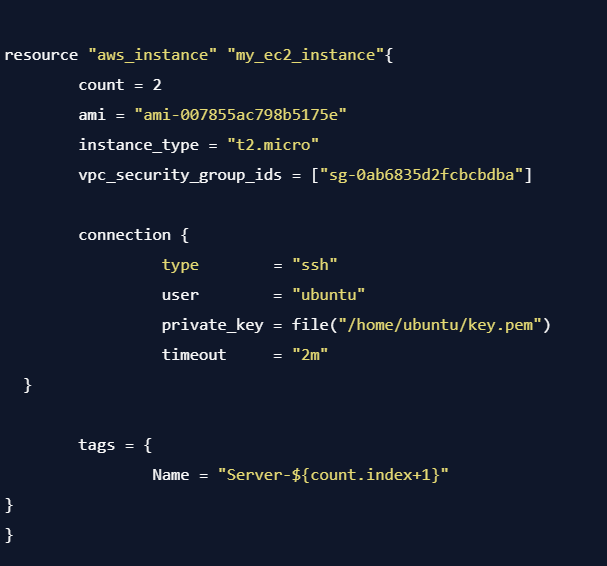
Create a resource in terraform file to spin the servers in AWS.
Count: It specifies the number of EC2 instances to be created.
ami: Amazon Machine Image is the ami of the operating system that needs to be flavoured for the instances.
Instance_type: It specifies the CPU and storage configurations of EC2 instances.
VPC_security_group_ids: We can specify the security group our instances are in, otherwise this will assign by default by creating a new security group.
Connection: This block contains the type of connection to be made to the servers, which user to be allowed as a root user, and the private key having access to login to the servers.
tags: this will assign the new names to the AWS EC2 instance.

Initialise the terraform in the servers to download the required providers.

View the plan of Terraform to check the servers spin up with given configurations.


Now, apply the terraform file to create the servers.


Finally, let's check the console. We can see two servers Server-1 and Server-2 are created.

Thanks for reading my article. Have a nice day.
WRITTEN BY Biswaraj Sahoo --AWS Community Builder | DevOps Engineer | Docker | Linux | Jenkins | AWS | Git | Terraform | Docker | kubernetes
Empowering communities via open source and education. Connect with me over linktree: linktr.ee/biswaraj333

Subscribe to my newsletter
Read articles from Biswaraj Sahoo directly inside your inbox. Subscribe to the newsletter, and don't miss out.
Written by

Biswaraj Sahoo
Biswaraj Sahoo
--AWS Community Builder | DevOps Engineer | Docker | Linux | Jenkins | AWS | Git | Terraform | Docker | kubernetes Empowering communities via open source and education.