How I run a blog with free hosting on AWS
 Hamza
Hamza
I was a big Wordpress fan for years, but I got sick of its bloat and continuously babysitting its "sneeze and you'll get hacked" vulnerabilities.
Then I used Wix for my wife's blog for a while, but the cost just wasn't worth it.
So now I'm running a Laravel blog on free hosting with AWS free tier for 12 months.
(And after the first 12 months the cost will be less than $6 per month with a 3-year commitment)
Here's how I did it from installation through to optimization - and I'll share some benchmarking results on just how many hits your blog can realistically handle for $0 hosting.
(I'm not going into crazy detail here, just providing a high-level guide. You will need a basic understanding of PHP / Laravel / Linux / AWS to follow along. Feel free to Google, or ask me anything and I will be happy to help you)
🎯 Objectives and Tech Stack
My objective was to get a fully functional blog online - and loading pages as fast as any commercial offering - with zero hosting costs for at least a year.
"Fully functional" means that my wife - the antithesis of a techie - can operate it on a day-to-day basis without assistance (creating posts, categories etc). So sadly "just push your posts to Github in markdown" wouldn't cut it...
The tech stack I decided on was:
Off-the-shelf Laravel blog app - I didn't want to spend 40 hours creating a blog system from scratch, and I wanted a tech that I was comfortable messing around with to customize, add features etc.
Amazon Web Services (AWS) - specifically their free tier offering: EC2 instance to host the blog, and RDS MySQL database.
Cloudflare - I wanted Cloudflare's caching to max out the performance of the blog and and to reduce egress charges from AWS (OK so AWS gives you 100GB per month free, but a just-in-case strategy doesn't hurt...)
💻 The Laravel App
I'm a big fan of Creative Tim, and I had just picked up their entire Laravel collection for a bargain in their 10-year anniversary sale. Included in that collection is a blog app which has a nice clean layout and a pretty comprehensive backend feature set: CRUD for users (including readers who can comment on posts), categories, tags and of course posts. It even includes a full-text search feature.
Although the app I chose was technically a paid solution, you can find many free Laravel-based blogs on the internet, from simple to crazy-fully-featured to entire CMS platforms.
After downloading the app, the first thing I did was strip out all the junk templated content that Creative Tim always helpfully bloats for you: Lorum ipsum text, footer links, placeholders, etc.
I also cleaned up the included database seeders to make them more useful, and connected my local installation to my sqlite database for testing.
I want to re-use the same blog app for multiple blogs (my kids are pestering me to build one for them) so next I replaced some of the hardcoded text with .env variables. This included the site name, homepage hero heading and sub-heading, copyright text, logo URL and social link URLs. I did this using .env instead of database to make it super easy (<img src="{{ env('LOGO_URL') }}"/>) and to avoid DB hits.
There are lots of other hardcoded details like OG Meta Tags that I will fix later.
Finally, I made some small customizations like adding the logo to the navbar and changing some of the wording on the app. I didn't make any changes to the backend (admin panel) code. There's a lot of theme junk there too, but no-one is going to see it yet. I'll worry about that if someone actually signs up as a member...
🧠 AWS
I opened a brand new AWS account in my wife's name to make use of their 12 month free tier. There is actually a ton of stuff they give you to play around with for free, but for now all I want to use is EC2 for a linux instance on which to run my blog, and RDS for its MySQL database.
Set up EC2 Instance
I created a new t2.micro instance with Amazon Linux 2023, and gave it 30gb of gp3 disk space, which is basically what you can use for the free tier. t2.micro is an ancient instance type, with 1GB RAM and 1 vCPU, but it runs nginx, PHP and Laravel with no problems at all. We're not going to run MySQL server on the instance, which helps.
Create a new Security Group with inbound SSH, HTTP and HTTPS access from anywhere. When you have SSL set up later, remove the HTTP access.
Once your EC2 instance is created, assign an Elastic IP to it and log in via SSH (you did save your PEM didn't you...?) Now it's time to install nginx, PHP and your blog.
Here's a quick summary:
Make sure OS is up to date:
sudo dnf updateInstall and run nginx:
 sudo dnf install nginx
 sudo systemctl enable --now nginx
Install PHP 8.2:
sudo dnf install php8.2Install Composer:
 curl -sS https://getcomposer.org/installer | php
 sudo mv composer.phar /usr/local/bin/composer
 sudo chmod +x /usr/local/bin/composer
Install PHP MySQL module:
sudo dnf install php8.2-mysqlnd.x86_64I pushed my modified blog app to github, so I needed to install git:
sudo dnf install git
Then it was a case of pulling my code, doing the usual Laravel stuff (chmod, chown, symlinking storage, etc) and creating my .env file.
It's also time to configure the nginx virtual server. I created a .conf file for my site in /etc/nginx/conf.d. So far I've left the PHP-FPM configuration as default (eg. max workers 50) but I may tweak them later to optimize.
Set up RDS database
Next I created the MySQL database in RDS. In the UI for creating a new database, there's actually an option to set up within the free tier, so it's very simple.

You get a t3.db.micro instance (1GB, 2vCPU) which is slightly less sucky than the EC2 offering, but again it gets the job done. You also get 20GB of storage which is plenty for a blog. Make sure you change the default gp2 SSD storage setting to gp3 for better performance.
Also, make sure you have public access disabled. That means that only your EC2 instance (or anything else in your VPC) can access the database, and it cannot be accessed from outside.
Finally, just set the master (root) username and password (and make a note of them!) and you're good to go. It will take a few minutes to create your DB, and then you will get its endpoint (host URL) from the "Connectivity & security" tab in the RDS console.
Once your DB is created, log in with your master credentials tunnelling via your EC2 instance (remember, there is no public access to your database) and create a new schema and user for your blog.
create database blog;
create user 'blogger'@'<ipaddress>' identified by '<password>';
grant all privileges on blog.* to 'blogger'@'<ipaddress>' with grant option;
Replace <ipaddress> with the private IP address of your EC2 instance. This ensures that only the server itself can access the database.
Finally, configure your DB driver, host, database name, user and password in the Laravel app and run the seeders.
☁️ Cloudflare
I love Cloudflare. There aren't many companies that give so much functionality for free and update their product so often with new features.
Cloudflare gives you performance enhancements and free CDN which I use to reduce AWS egress charges (AWS charges you for all data sent out from your EC2 instance etc S3 buckets etc).
I'm also using Cloudflare's free SSL to give me a lovely long 15 year certificate instead of using Certbot and having to renew it every 3 months.
I created a new Cloudflare account for my blog, but you can add as many domains as you like to a single account.
The first step was to switch my domain's DNS nameservers to Cloudflare. Cloudflare can't help you until they have full control of your domain.
I was expecting to have to set up my DNS entries for email MX records etc. again once the nameservers switched over, but I was pleased to find that Cloudflare had automatically imported them all.
DNS Settings
I created 2 DNS entries for my blog. I want it accessible on the root domain name, and also on www.
So I created an A Record with Name as @ and Value as the Elastic IP address of my EC2 instance. Then I created a CNAME Record with Name as www and Value as the domain name.
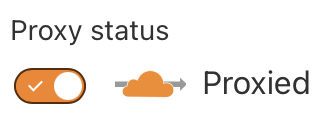
Both records are set as "Proxied" which means they can make use of Cloudflare's caching, DDOS protection and SSL.
Performance Settings
Most of Cloudflare's default performance settings are fine, but I enabled a couple of extra settings. There isn't much else to do on the free package.
Go to Optimization -> Content Optimization
Rocket Loader - enabled
Auto-Minify - enabled for all media types
SSL Certificate
It's very simple to create an SSL certificate on Cloudflare and use it on your website. The expiry time is up to 15 years, which is far more convenient than using Certbot and hoping that the renewal cron job is going to work every 3 months...
(Note on long certificate expiry: the certificate we are creating here is just for Cloudflare's use; it is not served to the user's browser. Cloudflare will generate a browser cert for your site and automatically renew it every 6 months)
From the Cloudflare dashboard go to SSL / TLS -> Origin Server. Click "Create Certificate" button.
Ensure the hostnames are correct (you can use
*.yourdomain.comto generate a wildcard SSL for all your hosts which is really nice) and choose your certificate validity (15 years FTW). Click "Create"Copy the Origin Certificate and Private Key that Cloudflare generates, and put them into files on your server called
origin.pemandprivate.key. Place them in theetc/ssldirectory.Update your nginx conf file to change the port from 80 to 443 and to add the certificates.
server {
    listen 443 ssl;
    ....
    ....
    ....
    ssl_certificate /etc/ssl/.pem;
    ssl_certificate_key /etc/ssl/private.key;
}
Restart nginx service for your changes to take effect.
On the Cloudflare dashboard go to SSL / TLS -> Overview and change the encryption mode to "Full (strict)"
That's it! You now have a fully SSL'd up site, with a certificate that will be automatically renewed for the next 15 years.
💨 Performance and Capacity
So now I have my nice shiny blog, and it's running fine in my browser. Time to run some performance tests to ensure it won't fall over if someone else views it at the same time....
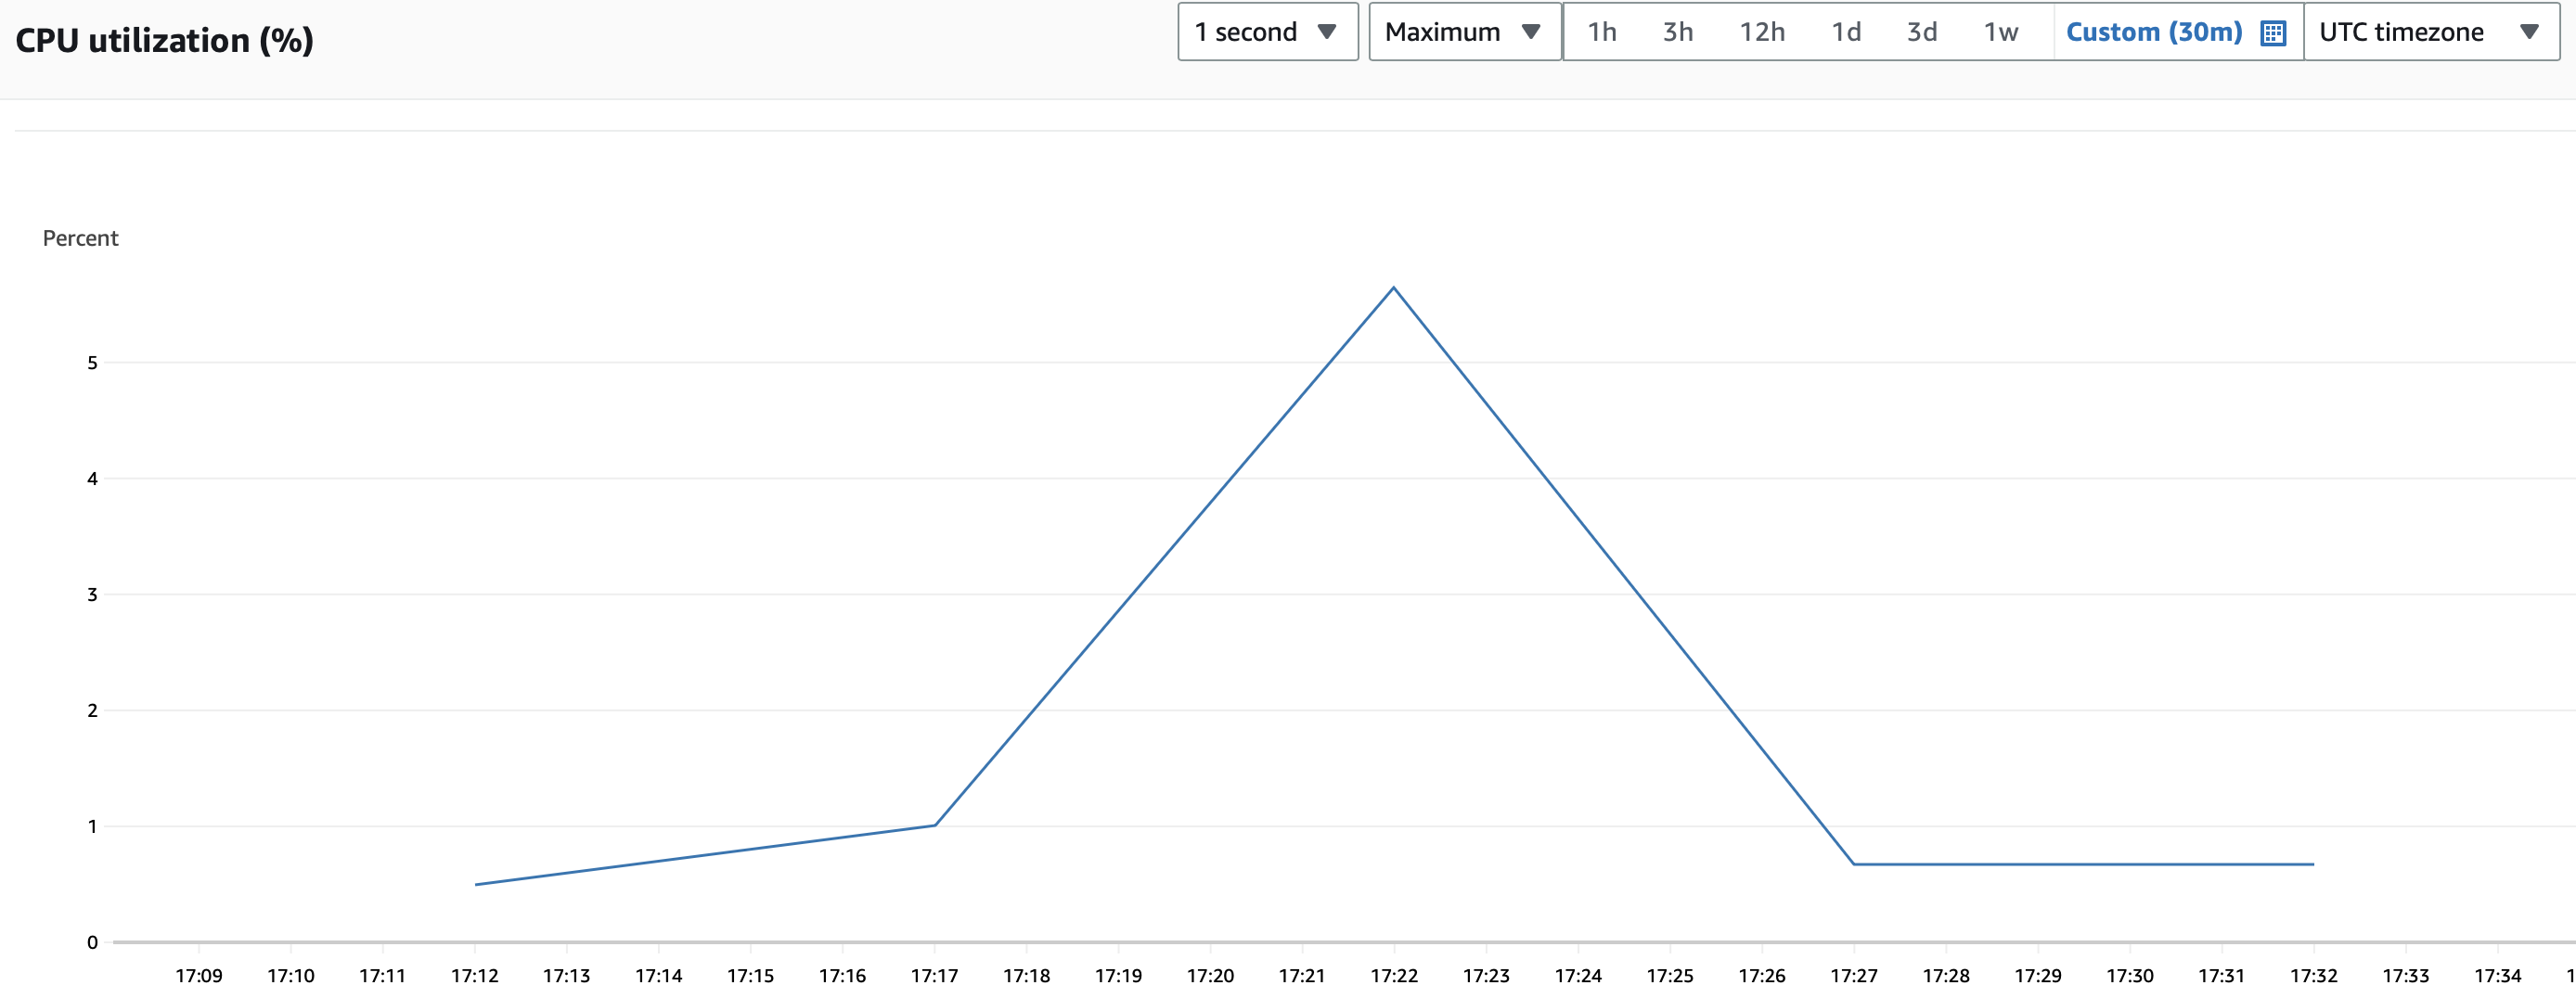
I spammed the refresh button on the homepage continuously for over a minute, and the CPU hardly noticed: utilization only went up to 5%:
The 1GB RAM is comfortably settled, with only ~250mb in use when idle.

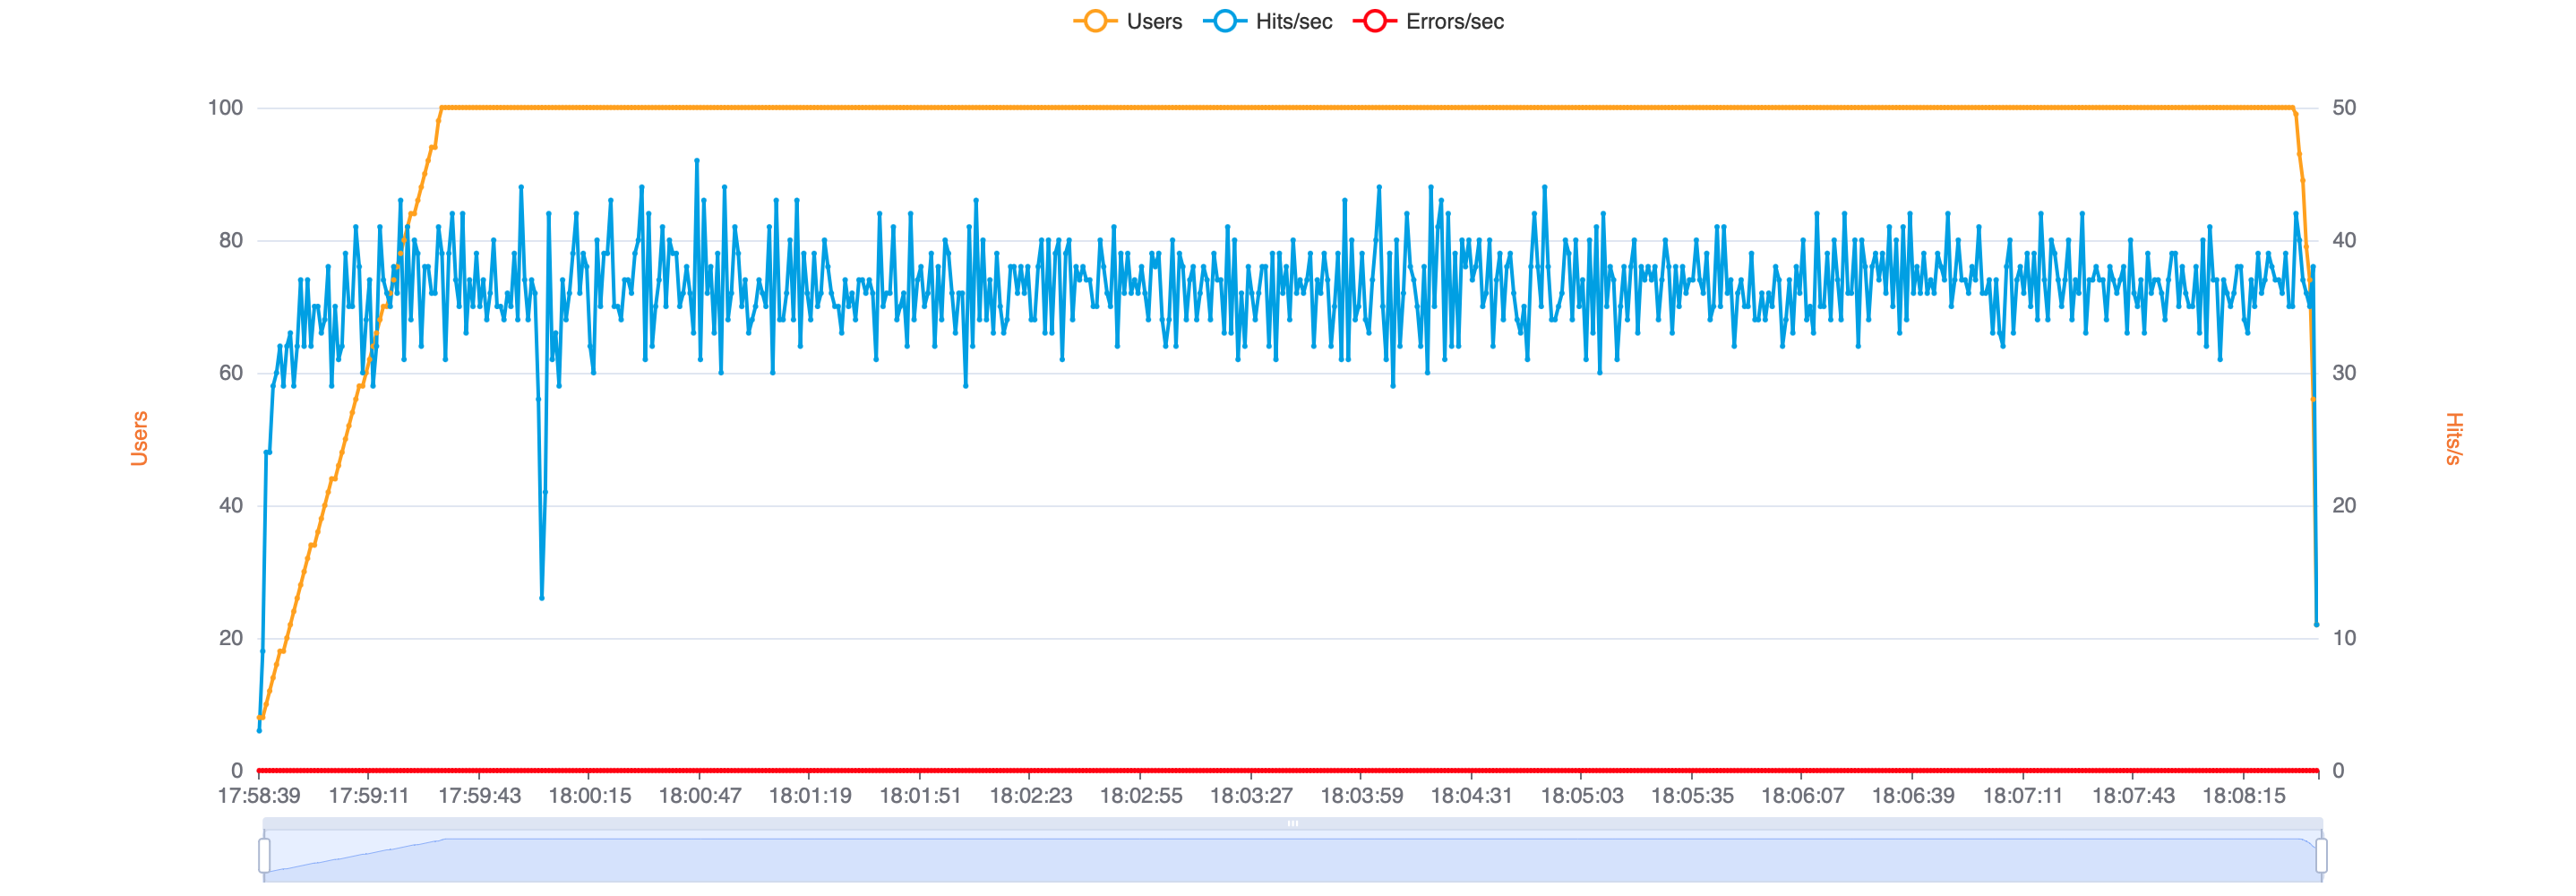
I stress-tested with 50 simultaneous users using Loadium. They have a free package which gives you 10 tests per month. I programmed it to simulate each user hitting the homepage and then 2 other pages with a few seconds pause between each page.
Even with a ton of php-fpm processes (each process is a single connection, and nginx is currently configured to allow 50 maximum by default) the CPU never really maxed out and the RAM still had 500mb buffer.
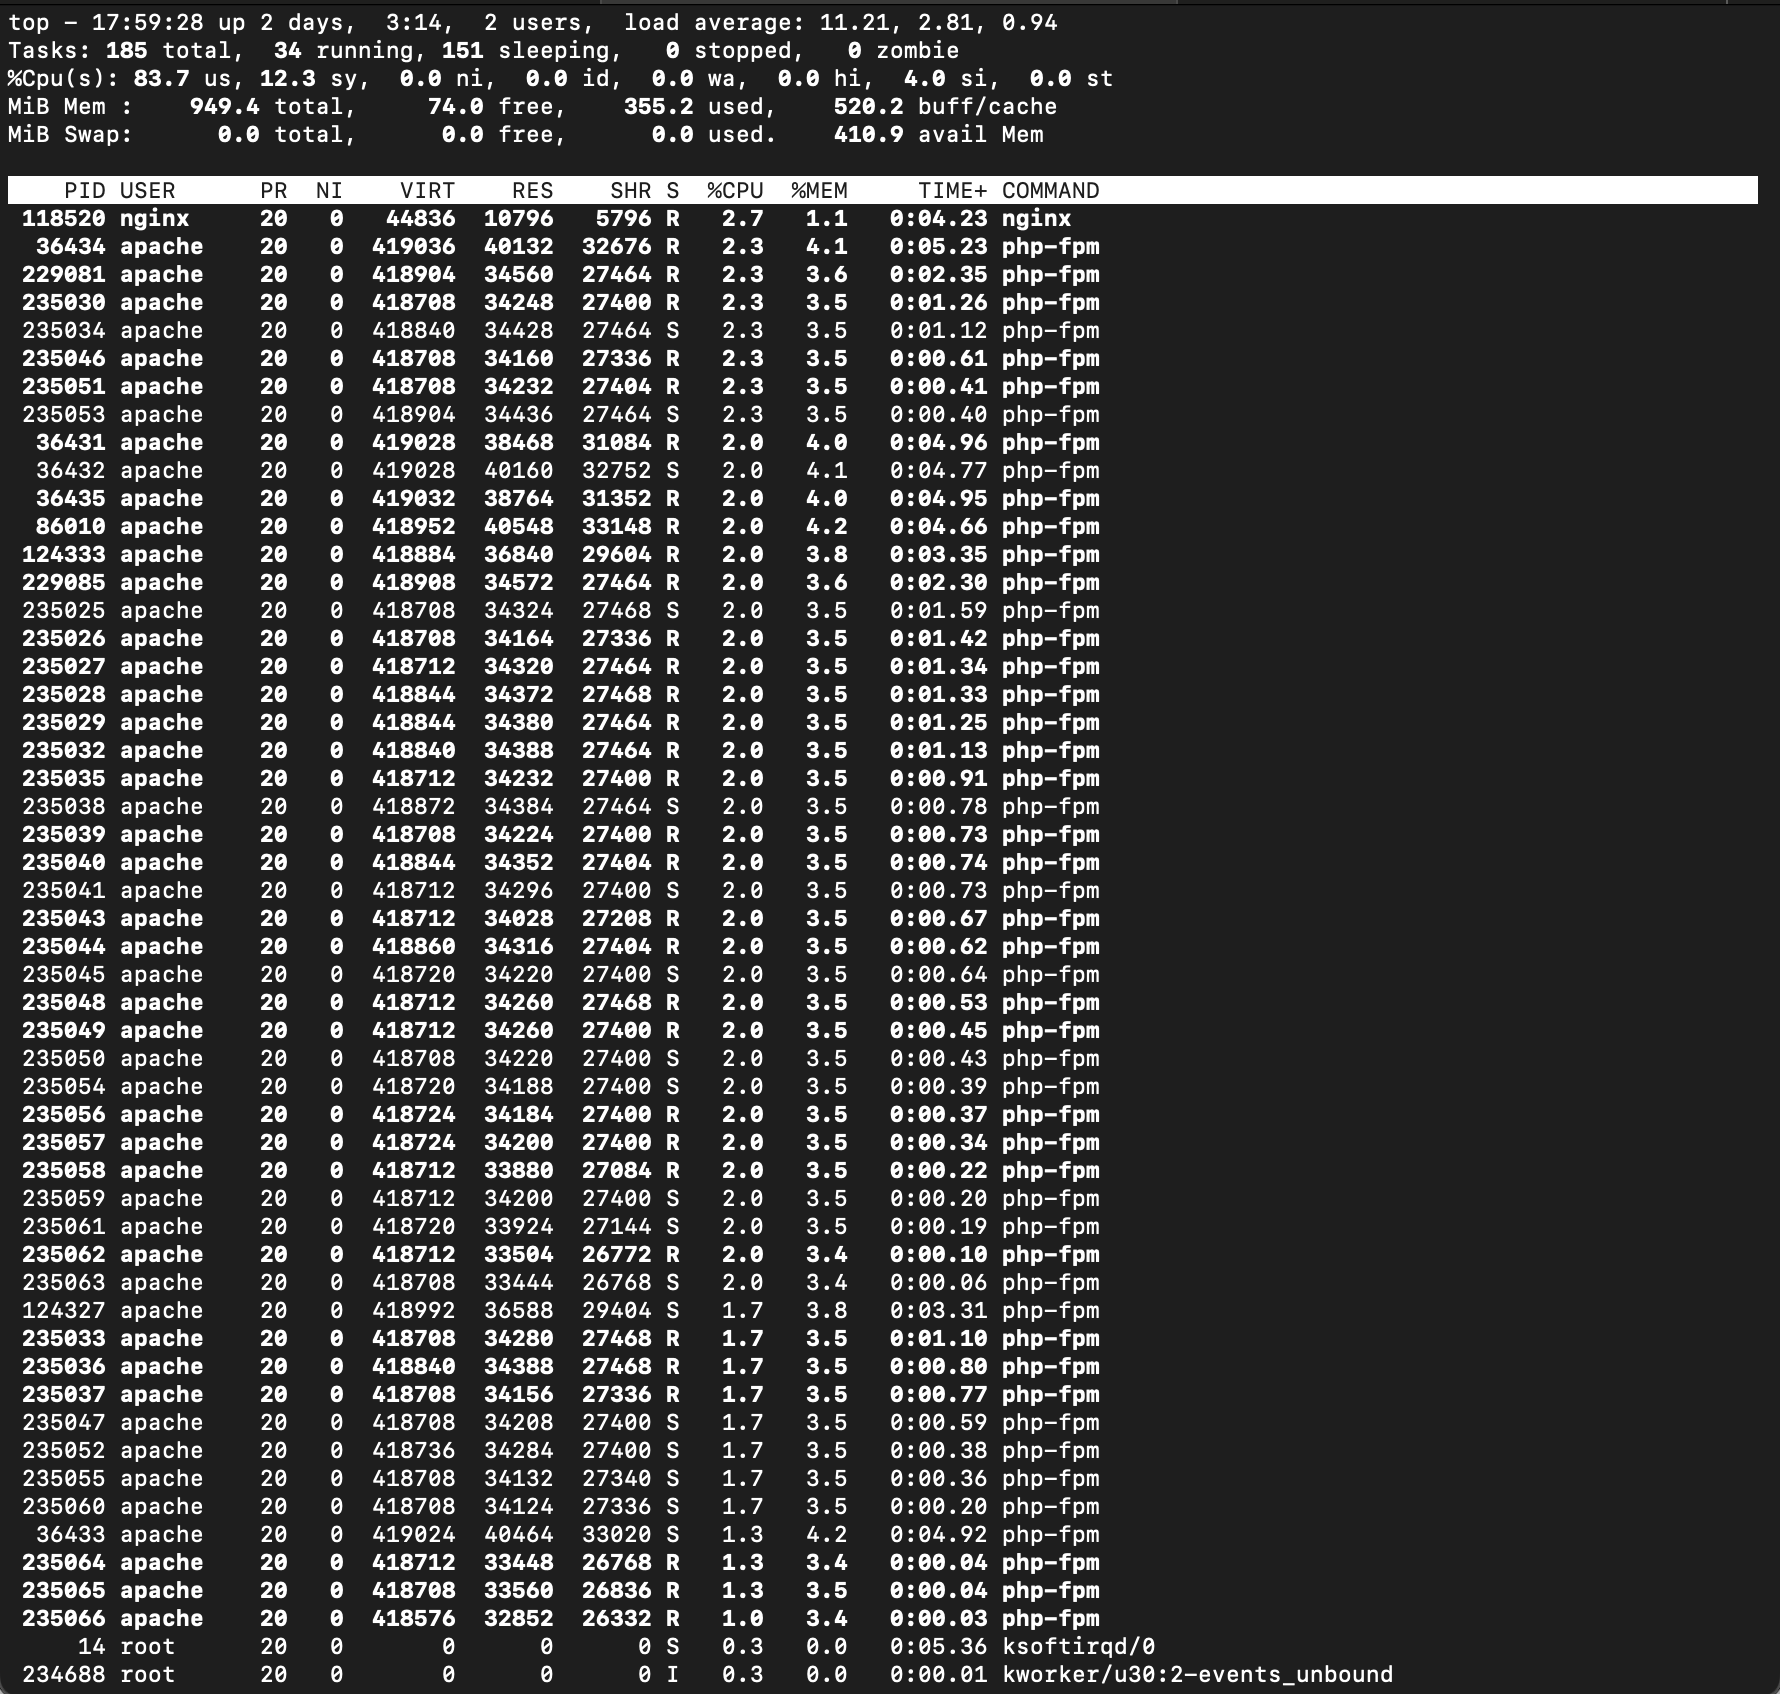
I was browsing the site while the test was going on and although each page load was a little bit slow, it was still very usable.
Here are the stress test results:
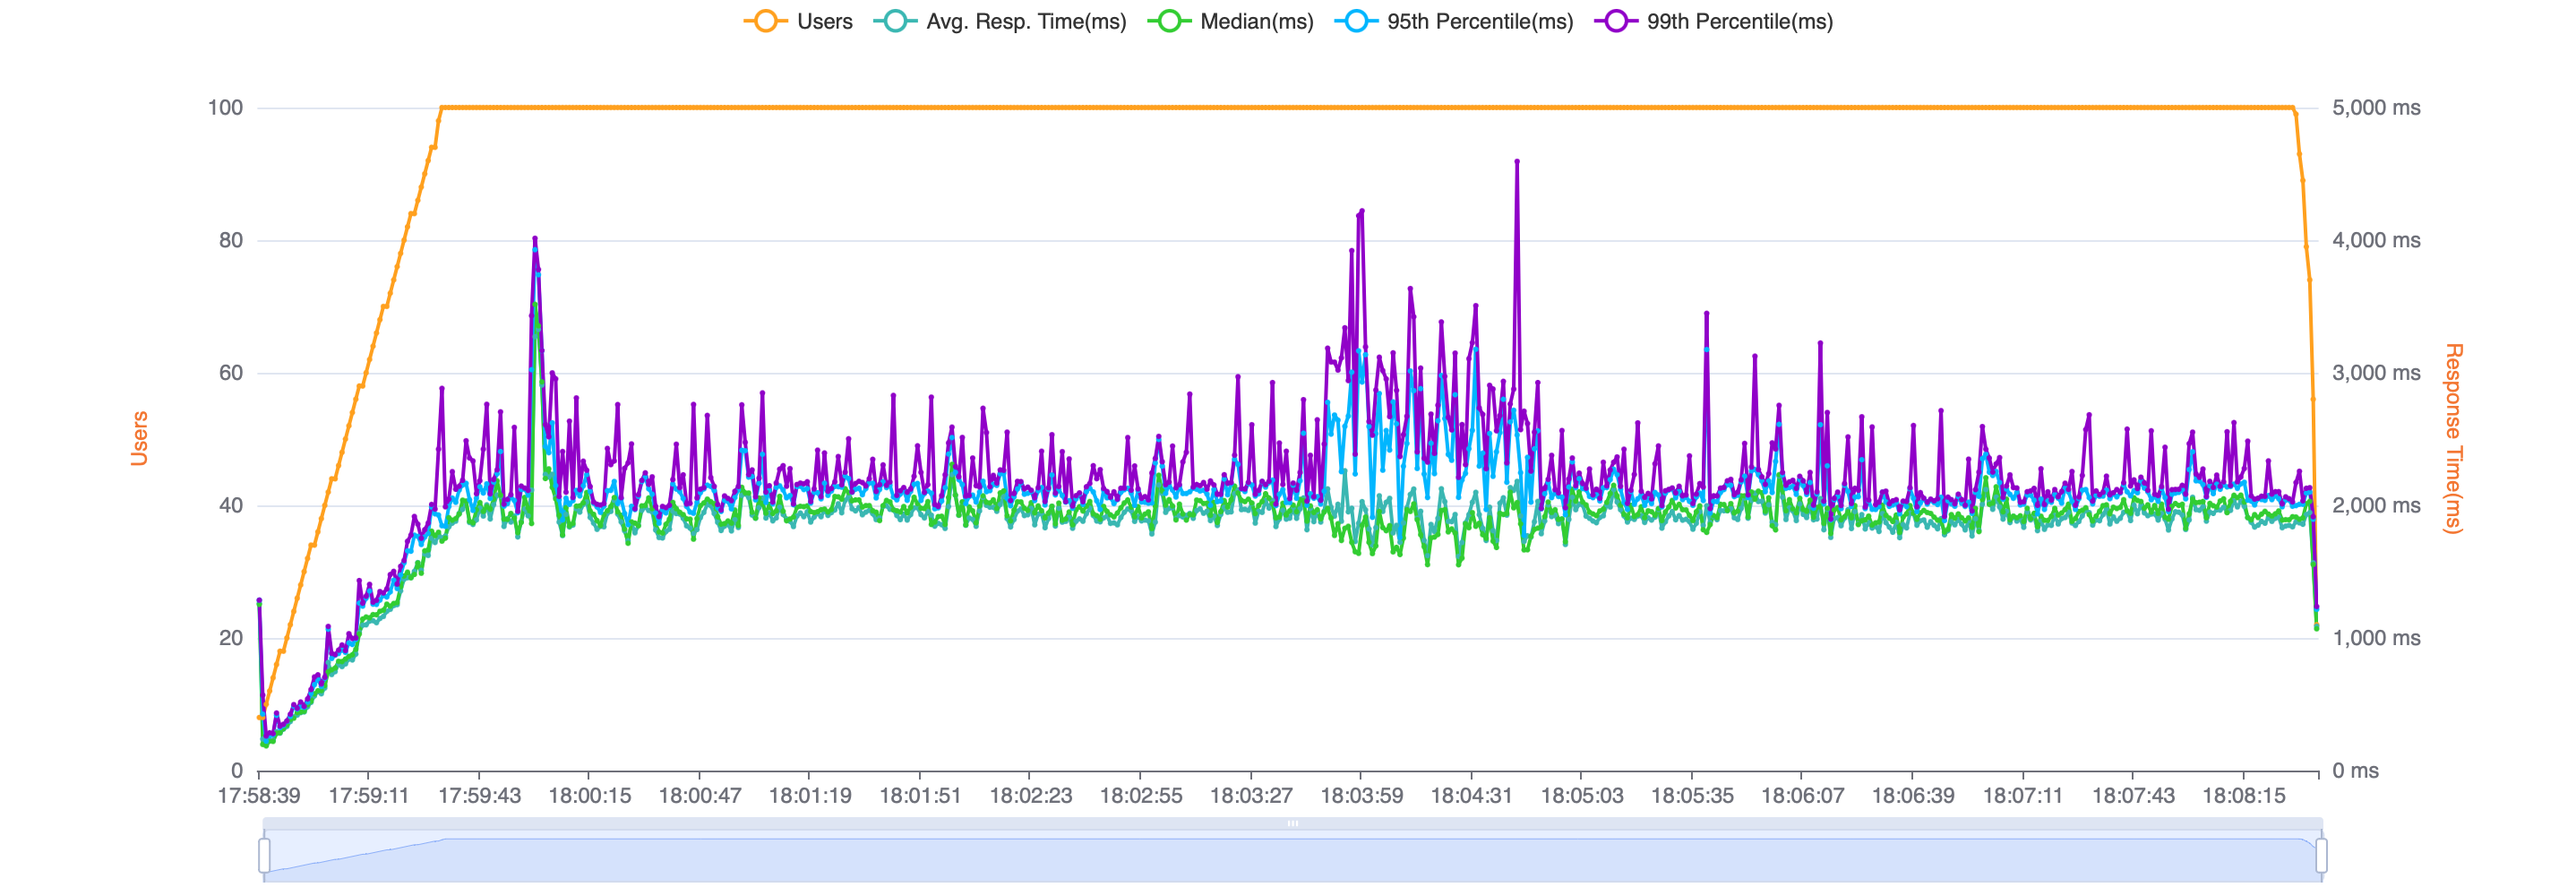
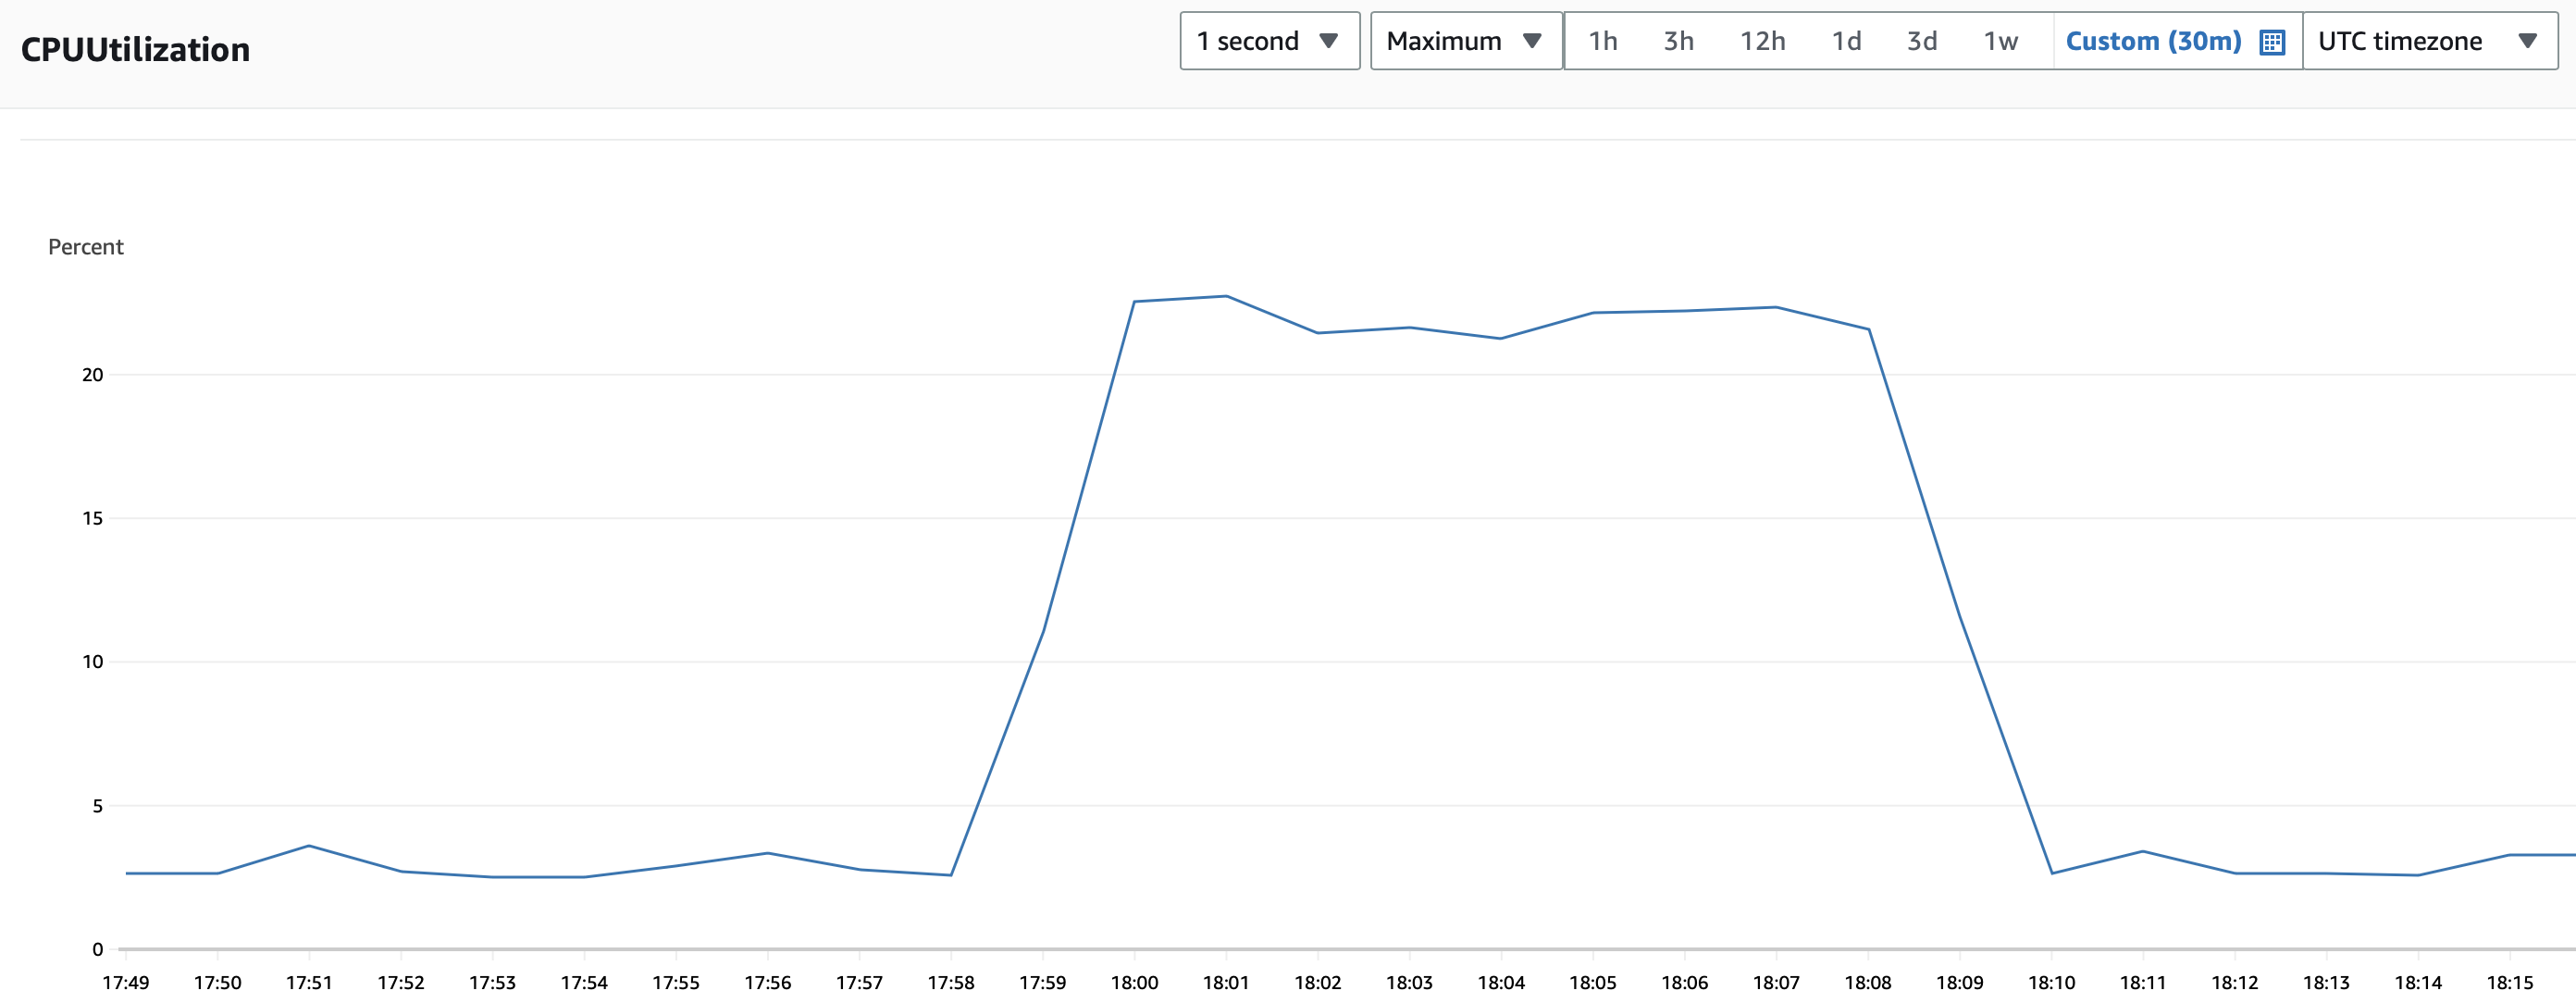
The RDS database CPU utilization peaked at 22% - still plenty of mileage there.
The site handled the onslaught better than I had expected. My free AWS-hosted blog might not survive a link from the front page of Hacker News, but it should be able to take anything else in its stride. And with better caching I reckon it could handle Hacker News too.
🚀 The Future
There are a few things I want to optimize and improve on the blog.
Build more features. My wife had things on her Wix blog like an Instagram wall and testimonials, and it would be super easy to build them on the Laravel blog. Also I will add landing pages for email lead capture - again really simple using Laravel.
Try using Laravel Octane to squeeze more performance out of the server.
Move static assets to a separate subdomain backed by CDN. Also add better caching, either through Cloudflare, nginx or Varnish.
Play around with nginx configuration to improve stress test performance - I'll report back.
When my free 12 months hosting ends with AWS, I will switch the server to an instance like t3a.small (2vCPU, 2GB RAM) and move the database off RDS and on to MySQL server running on the instance itself. RDS is way too expensive to justify using on something like this....
Thanks for reading. If you would like to follow along for more, connect with me on Twitter where I write about building products and startups.
Subscribe to my newsletter
Read articles from Hamza directly inside your inbox. Subscribe to the newsletter, and don't miss out.
Written by
