Automating SIH Team Registrations: Making Life Easier for College SPOCs
 Denil Bhatt
Automating SIH Team Registrations: Making Life Easier for College SPOCs
Hello, fellow developers and automation enthusiasts! If you've ever faced the daunting task of manually entering details for multiple teams into a portal, you'll love what's coming next. Today, I'm sharing how we automated the Smart India Hackathon (SIH) registration process for our college, saving countless hours of manual data entry.
The Challenge:
Registering numerous teams on the SIH portal. Each entry required information like team name, problem number, details of each team member, and a consent letter from the college.
The Solution:
After close inspection of the portal's registration flow, it was apparent that the entire process culminated in a singular POST request to their backend. This was our eureka moment! We realized we could automate the process by simulating this POST request.
Before we take a look at the script, let me show you the format I followed for the input csv file containing team details:
final_id,team_id,team_name,ps_number,category,status,Mentor Name,Mentor 2 Name,member_1,member_1_enrollment,member_1_gender,member_1_email,member_1_mobile,member_2,member_2_enrollment,member_2_gender,member_2_email,member_2_mobile,member_3,member_3_enrollment,member_3_gender,member_3_email,member_3_mobile,member_4,member_4_enrollment,member_4_gender,member_4_email,member_4_mobile,member_5,member_5_enrollment,member_5_gender,member_5_email,member_5_mobile,member_6,member_6_enrollment,member_6_gender,member_6_email,member_6_mobile
40,89,Study Stars,SIH1420,Software,shortlist,Dr. Alex Smith,John Doe,Michael Johnson,22ABC001,M,michael.j22@fakecollege.edu,1234567890,Emily Davis,22ABC002,F,emily.d22@fakecollege.edu,1234567891,James Martin,22ABC003,M,james.m22@fakecollege.edu,1234567892,Emma Thompson,22ABC004,F,emma.t22@fakecollege.edu,1234567893,William Jones,22ABC005,M,william.j22@fakecollege.edu,1234567894,Elizabeth Taylor,22ABC006,F,elizabeth.t22@fakecollege.edu,1234567895
41,72,Code Warriors,SIH1440,Software,shortlist,Dr. Brian Lee,0,Olivia Wilson,22ABC007,F,olivia.w22@fakecollege.edu,1234567896,David Brown,22ABC008,M,david.b22@fakecollege.edu,1234567897,Sophia Clark,22ABC009,F,sophia.c22@fakecollege.edu,1234567898,Liam Hall,22ABC010,M,liam.h22@fakecollege.edu,1234567899,Mia Turner,22ABC011,F,mia.t22@fakecollege.edu,12345678910,Noah White,22ABC012,M,noah.w22@fakecollege.edu,12345678911
42,53,DigiMinds,SIH1450,Software,shortlist,Dr. Charles Moore,0,Ava Taylor,22ABC013,F,ava.t22@fakecollege.edu,12345678912,Joseph Lewis,22ABC014,M,joseph.l22@fakecollege.edu,12345678913,Isabella Harris,22ABC015,F,isabella.h22@fakecollege.edu,12345678914,Ethan Robinson,22ABC016,M,ethan.r22@fakecollege.edu,12345678915,Isabelle Walker,22ABC017,F,isabelle.w22@fakecollege.edu,12345678916,Benjamin Wright,22ABC018,M,benjamin.w22@fakecollege.edu,12345678917
Additionally, I have stored the consent letters for each team in the ./data directory so that we can access them in our script like ./data/{final_id}.pdf.
Diving into the Script:
1. Centralized Configuration:
Instead of scattering configuration details across the code, we centralized them into a dictionary. This makes future updates or changes more manageable.
# Centralized Configuration
CONFIG = {
    "xsrf_token": "",
    "csrf_token": "",
    "larevel_token": "",
    "input_file_path": "input_file.csv",
    "output_file_path": "response.csv",
    "url": "https://sih.gov.in/TeamRegistration",
    "team_member_count": 6
}
Having configurations centralized is always a good approach. It allows you to change settings without diving deep into the code, making it easier for future modifications or when moving the script to a different environment.
2. Reading the CSV:
The team details were stored in a CSV. With the help of Python's pandas library, we read the data to be processed.
df = pd.read_csv(CONFIG["input_file_path"])
Using pandas to handle CSV files not only simplifies the reading process but also makes data manipulation a breeze. With just a single line, we can load the entire CSV into a DataFrame.
3. Extracting Student's Year:
We created a function to deduce the student's year from their roll number.
def get_student_year(roll_number):
    enrollment_year_str = roll_number[:2]
    year_mapping = {
        '23': '1st Year',
        '22': '2nd Year',
        '21': '3rd Year',
        '20': '4th Year'
    }
    return year_mapping.get(enrollment_year_str, "")
While the code may seem trivial, this function ensures that the student's year is correctly extracted from their enrollment number. It's these small details that make our automation robust.
4. Preparing Student Data:
To make the code more readable and maintainable, we split the data preparation into smaller chunks. Here, we focus on student-specific data.
def prepare_student_data(row):
    student_data = {
        f"student_row[]": [],
        f"student_name[]": [],
        f"student_email[]": [],
        f"student_mobile[]": [],
        f"student_gender[]": [],
        f"student_stream[]": [],
        f"student_year[]": [],
    }

    for i in range(1, CONFIG['team_member_count'] + 1):
        member_name = row.get(f"member_{i}", "")
        if not member_name:
            continue

        enrollment_year_str = row.get(f"member_{i}_enrollment", "")[:2]
        student_year = get_student_year(enrollment_year_str)
        gender = "Male" if row.get(f"member_{i}_gender", "") == "M" else "Female"

        student_data[f"student_row[]"].append(i - 1)
        student_data[f"student_name[]"].append(member_name)
        student_data[f"student_email[]"].append(row.get(f"member_{i}_email", ""))
        student_data[f"student_mobile[]"].append(str(row.get(f"member_{i}_mobile", "")))
        student_data[f"student_gender[]"].append(gender)
        student_data[f"student_stream[]"].append("B.Tech")
        student_data[f"student_year[]"].append(student_year)

    return student_data
*By modular
izing the data preparation, we can efficiently handle each team member's details without cluttering the main code.*
5. Assembling Form Data:
Using the student data, we assembled the complete form data required for the POST request.
def prepare_form_data(row):
    student_data = prepare_student_data(row)
    cookies = {"TOKEN": CONFIG["xsrf_token"], "laravel_session": CONFIG["larevel_token"]}

    form_data = {
        "_token": CONFIG["csrf_token"],
        "Team_name": row.get("team_name", ""),
        "team_ctgry": row.get("category", "Software"),
        "team_status": row.get("status", "waitlist"),
        "team_type": "This team will compete for the problem statements listed on SIH 2023 portal",
        **student_data
    }

    file_path = f"./data/{row.get('final_id', '')}.pdf"
    files = {
        "team_Registration_Consent_Letter": (
            os.path.basename(file_path),
            open(file_path, "rb"),
        )
    }

    return form_data, files, cookies
This function brings together various pieces of data into the format required by the SIH portal. It's essential to ensure that the data structure matches what the portal expects to avoid submission errors.
6. Making the POST Request:
The requests library in Python does the heavy lifting, sending our prepared data to the SIH portal.
def make_post_request(url, form_data, files, headers, cookies, attempt=1):
    try:
        Team_name = form_data["Team_name"]
        logger.debug(f"SUBMITTING: {Team_name}")

        with requests.post(url, data=form_data, files=files, headers=headers, cookies=cookies) as response:
            response.raise_for_status()
            r = response.json()

            if r["MSG"] == "Team Name Already Exists !":
                if attempt <= 3:
                    form_data["Team_name"] = form_data["Team_name"].lower().replace(" ", "_") + "_"
                else:
                    logger.error(f"TOO MANY ATTEMPTS: (NAME EXISTS) -> {Team_name}")
                    return False

                time.sleep(3)
                make_post_request(url, form_data, files, headers, cookies, attempt=attempt + 1)
            return True
    except requests.RequestException as e:
        logger.exception(f"Error making POST request. Error: {e}")
        return False
This function is the heart of our automation. It attempts to register each team on the portal and handles cases where the team name might already exist.
7. Processing and Logging:
We processed each row from our CSV, logged our progress, and captured any issues that arose. Logging is crucial as it helps monitor the script's progress and diagnose issues.
def process_dataframe(df):
    headers = {"X-CSRF-TOKEN": CONFIG["csrf_token"]}

    for index, row in df.iterrows():
        form_data, files, cookies = prepare_form_data(row)
        success = make_post_request(CONFIG["url"], form_data, files, headers, cookies)

        # Close the file after making a request
        files["team_Registration_Consent_Letter"][1].close()
        df.at[index, "success"] = success
        logger.debug(f"Row {index}, success: {success}")

        time.sleep(10)
    return df
Proper logging ensures we have a complete trace of the script's actions. This is invaluable for debugging and verifying the results.
8. Execution:
Finally, we assembled all these pieces in the main execution function.
def main():
    df = pd.read_csv(CONFIG["input_file_path"])

    try:
        df = process_dataframe(df)
    except Exception as e:
        logger.exception(f"Error processing DataFrame. Error: {e}")
    finally:
        df.to_csv(CONFIG["output_file_path"], index=False)
        logger.debug(f"DataFrame saved to {CONFIG['output_file_path']}")
The main function brings everything together, orchestrating the whole registration process from start to finish.
9. Logging:
Logging was set up to capture all details and errors during the process. This helps in debugging and ensuring all teams were registered correctly.
# Set up logging
logger = logging.getLogger(__name__)
logger.setLevel(logging.DEBUG)

# Create a file handler
handler = logging.FileHandler("team_registration.log")
handler.setLevel(logging.DEBUG)

# Create a console handler
console_handler = logging.StreamHandler()
console_handler.setLevel(logging.DEBUG)

# Create a logging format
formatter = logging.Formatter("%(asctime)s - %(name)s - %(levelname)s - %(message)s")
handler.setFormatter(formatter)
console_handler.setFormatter(formatter)

# Add the handlers to the logger
logger.addHandler(handler)
logger.addHandler(console_handler)
Proper logging is invaluable in any automation script. It provides insights into the script's workings and can be a lifesaver when troubleshooting issues.
Speeding Things Up:
Now, while the above solution works, it operates in a serial manner. Making HTTP requests is essentially IO time that the CPU is waiting for. How about speeding things up?
Parallel Processing with subprocess:
Python's subprocess library allows us to spawn new processes. By dividing our input data into chunks, we can assign each chunk to a separate subprocess. This would allow us to make multiple POST requests simultaneously, significantly reducing the overall time.
However, this brings up two challenges:
- Handling
response.csvfor multiple processes. - Ensuring proper logging from all subprocesses.
Solution:
- Instead of a single
response.csv, each subprocess can write to a separate CSV file. Later, these can be merged. - The logger can be set up to include the subprocess ID in the log messages, helping us trace logs from different subprocesses.
1. Using subprocess to Spawn New Processes:
The subprocess module in Python allows us to spawn new processes, connect to their input/output/error pipes, and obtain their return codes. To utilize this, we can create a new script dedicated to handling a chunk of our data and then call this script multiple times in parallel.
Here's a simple example:
import subprocess

def spawn_process(script_name, input_file):
    process = subprocess.Popen(["python", script_name, input_file])
    return process

# Example usage
processes = []
for i in range(number_of_chunks):
    p = spawn_process("handle_chunk.py", f"chunk_{i}.csv")
    processes.append(p)

# Wait for all processes to complete
for p in processes:
    p.wait()
2. Handling Separate Response Files:
As mentioned, each subprocess can write its results to a separate CSV file. After all processes are done, we can merge these files into one consolidated response file.
import pandas as pd

def merge_csvs(file_list, output_file):
    df_list = [pd.read_csv(file) for file in file_list]
    merged_df = pd.concat(df_list, ignore_index=True)
    merged_df.to_csv(output_file, index=False)

# Example usage
file_list = [f"response_chunk_{i}.csv" for i in range(number_of_chunks)]
merge_csvs(file_list, "final_response.csv")
3. Logging with Subprocess ID:
To ensure each subprocess logs uniquely, we can modify our logging setup:
import os

# Set up logging
logger = logging.getLogger(__name__)
logger.setLevel(logging.DEBUG)

# Create a file handler
handler = logging.FileHandler(f"team_registration_{os.getpid()}.log")
handler.setLevel(logging.DEBUG)

# ... rest of the logging setup remains the same
By using os.getpid(), each subprocess will have a unique log file based on its process ID.
Conclusion:
Automation can transform tedious tasks into swift, error-free processes. With just a simple Python script, our College SPOC bypassed hours of manual data entry, ensuring timely and accurate registrations.
Remember: Always look for automation opportunities. As developers, our time is best spent solving problems, not doing repetitive tasks.
Happy coding, and may you always find ways to "Automate the boring stuff!" If you have questions or suggestions, drop them in the comments below!
Appendix: Extracting Tokens from the Browser
For our script to work smoothly, it's essential to extract certain authentication tokens directly from the browser. If you're unfamiliar with this process, don't worry! This section will guide you step by step.
Preliminary Step: Logging In
Before you begin extracting tokens, ensure you are logged into the SIH portal. The tokens we need are generated post-login.
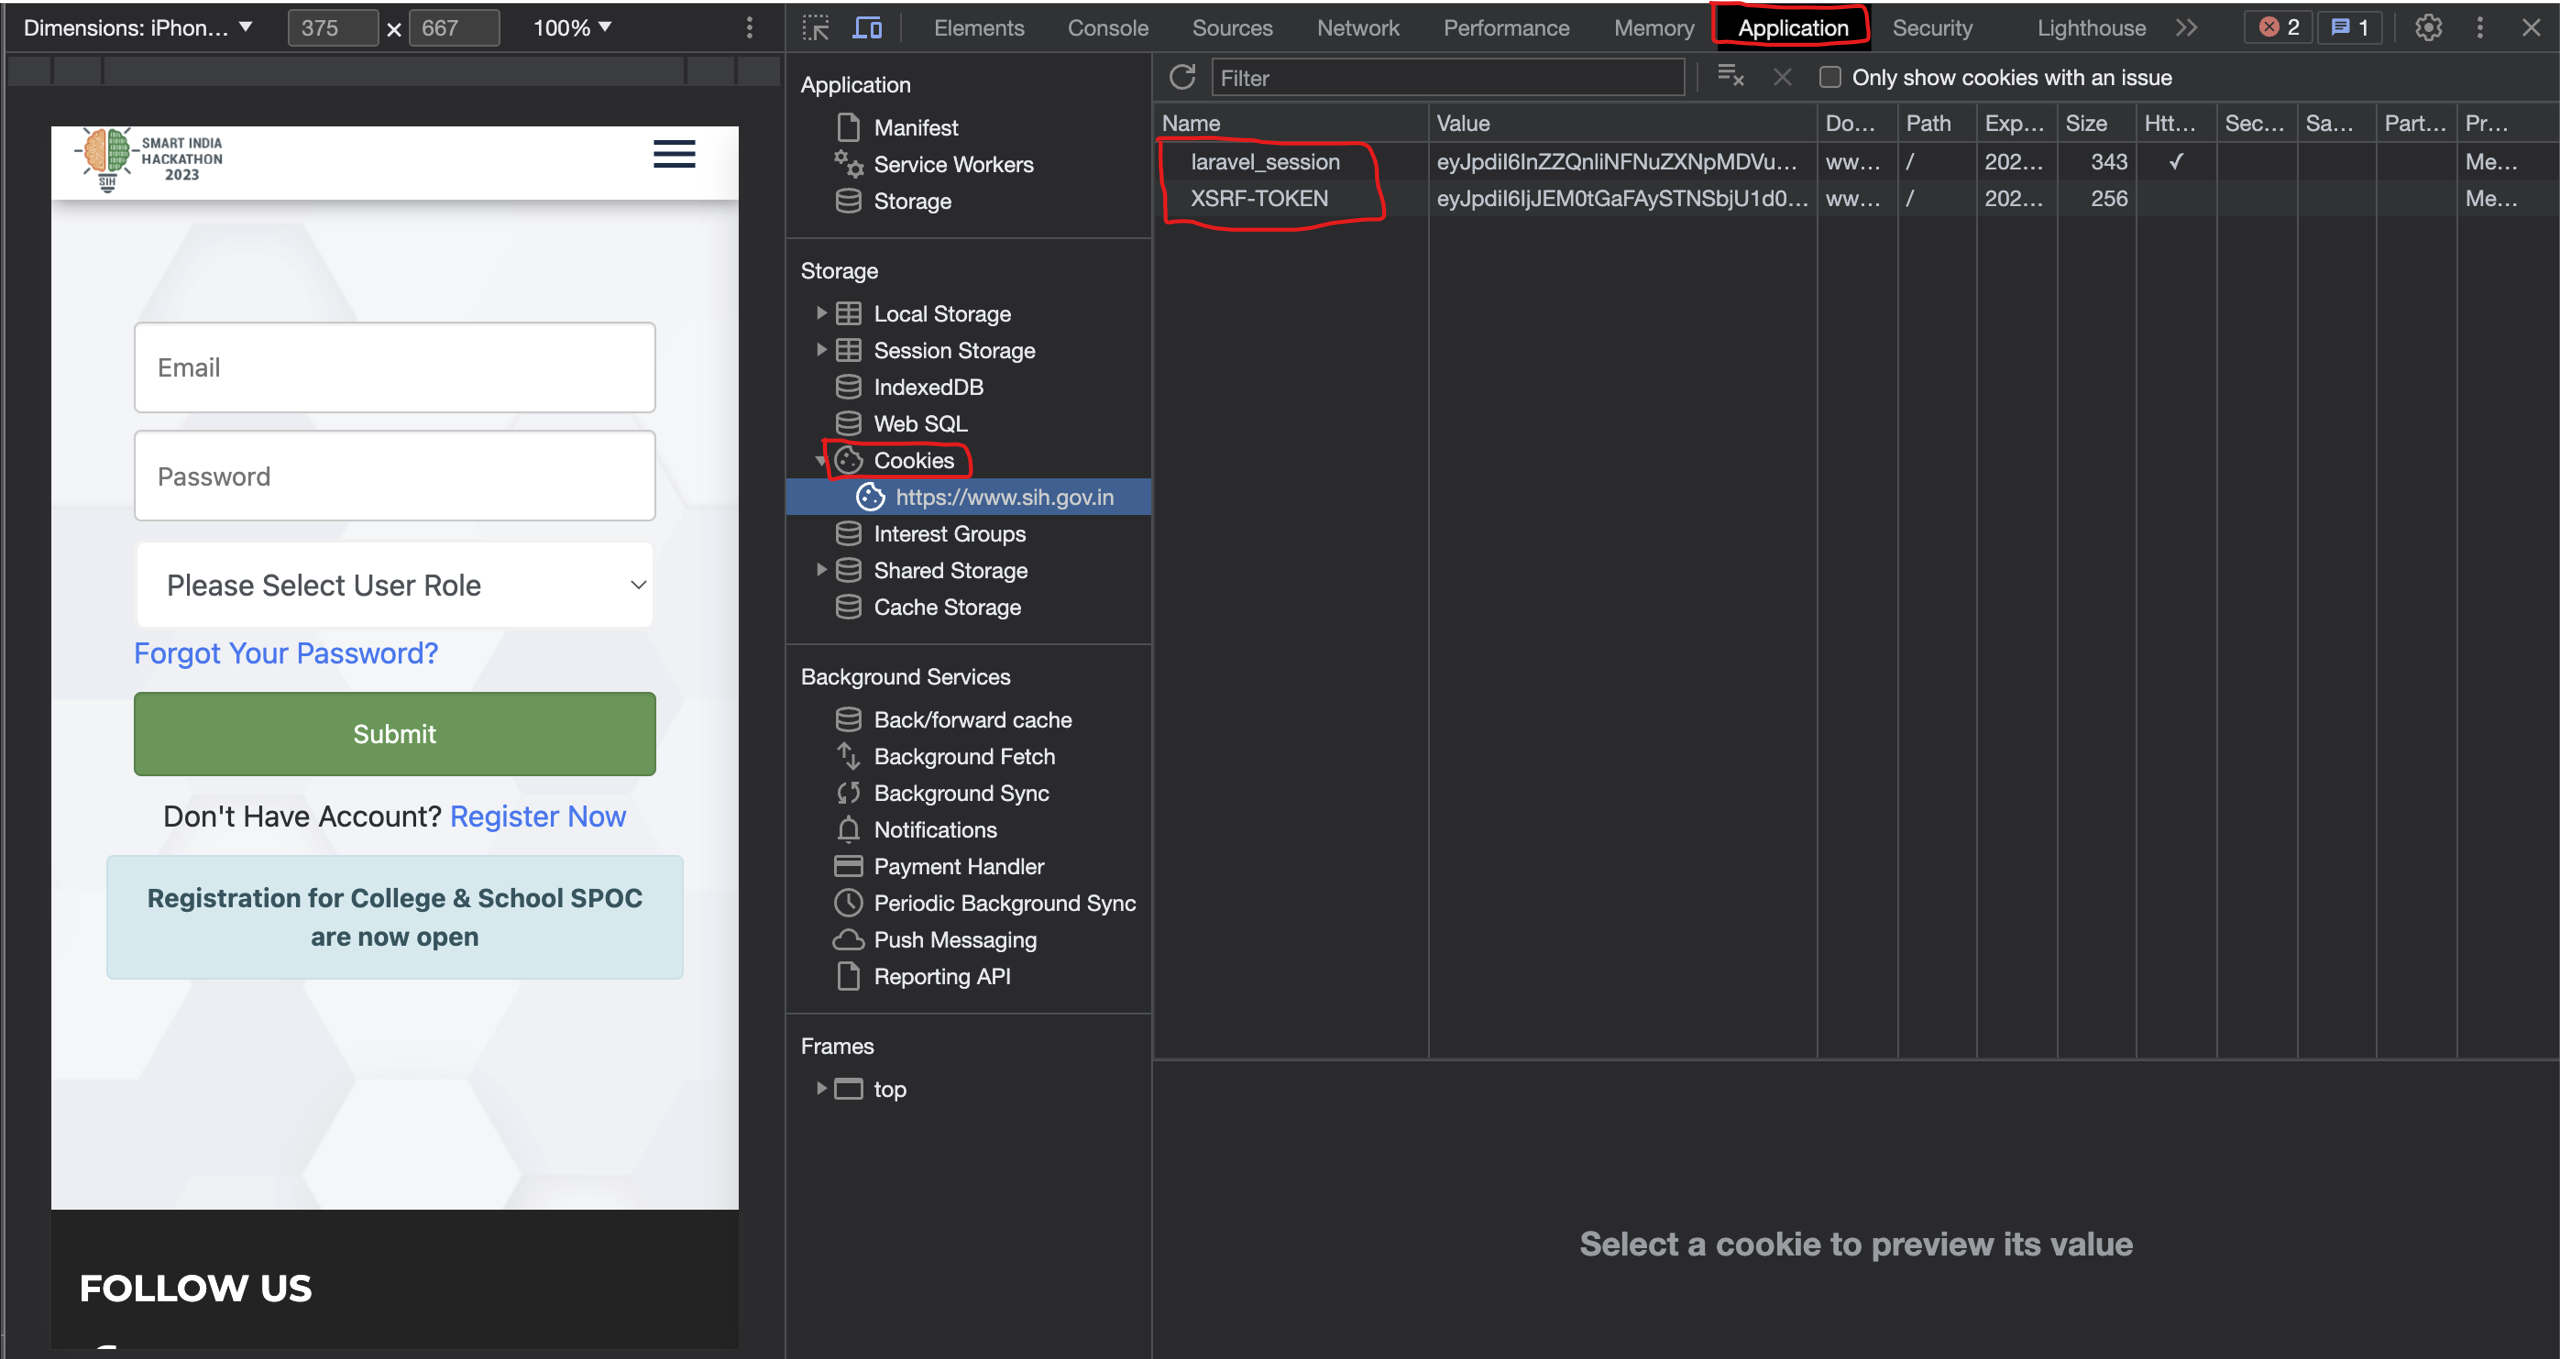
1. Extracting xsrf_token and laravel_token from Cookies:
- Once logged in, open the SIH portal in your browser.
- Right-click anywhere on the page and select 'Inspect' or 'Inspect Element' to open the browser's developer tools.
- Navigate to the 'Application' tab.
- In the left sidebar, under the 'Cookies' section, click on the SIH portal's URL.
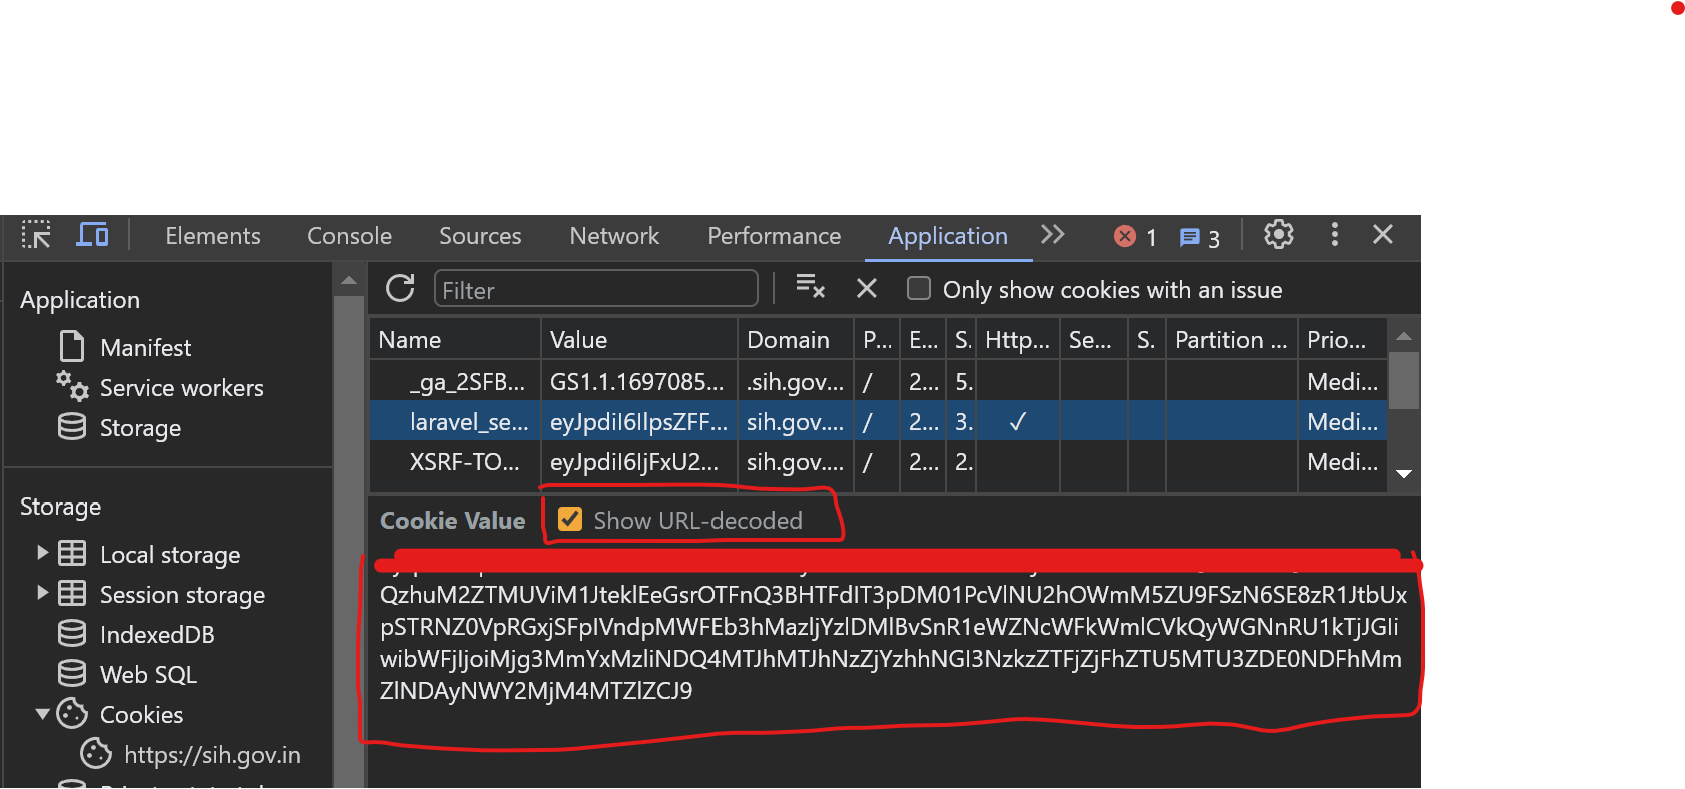
- Here, you'll find a list of cookies. Look for
xsrf_tokenandlaravel_token. - Before copying the token value, ensure you toggle on 'Show URL-encoded' (usually found at the bottom of the cookies panel).
- Copy the respective values of
xsrf_tokenandlaravel_token.


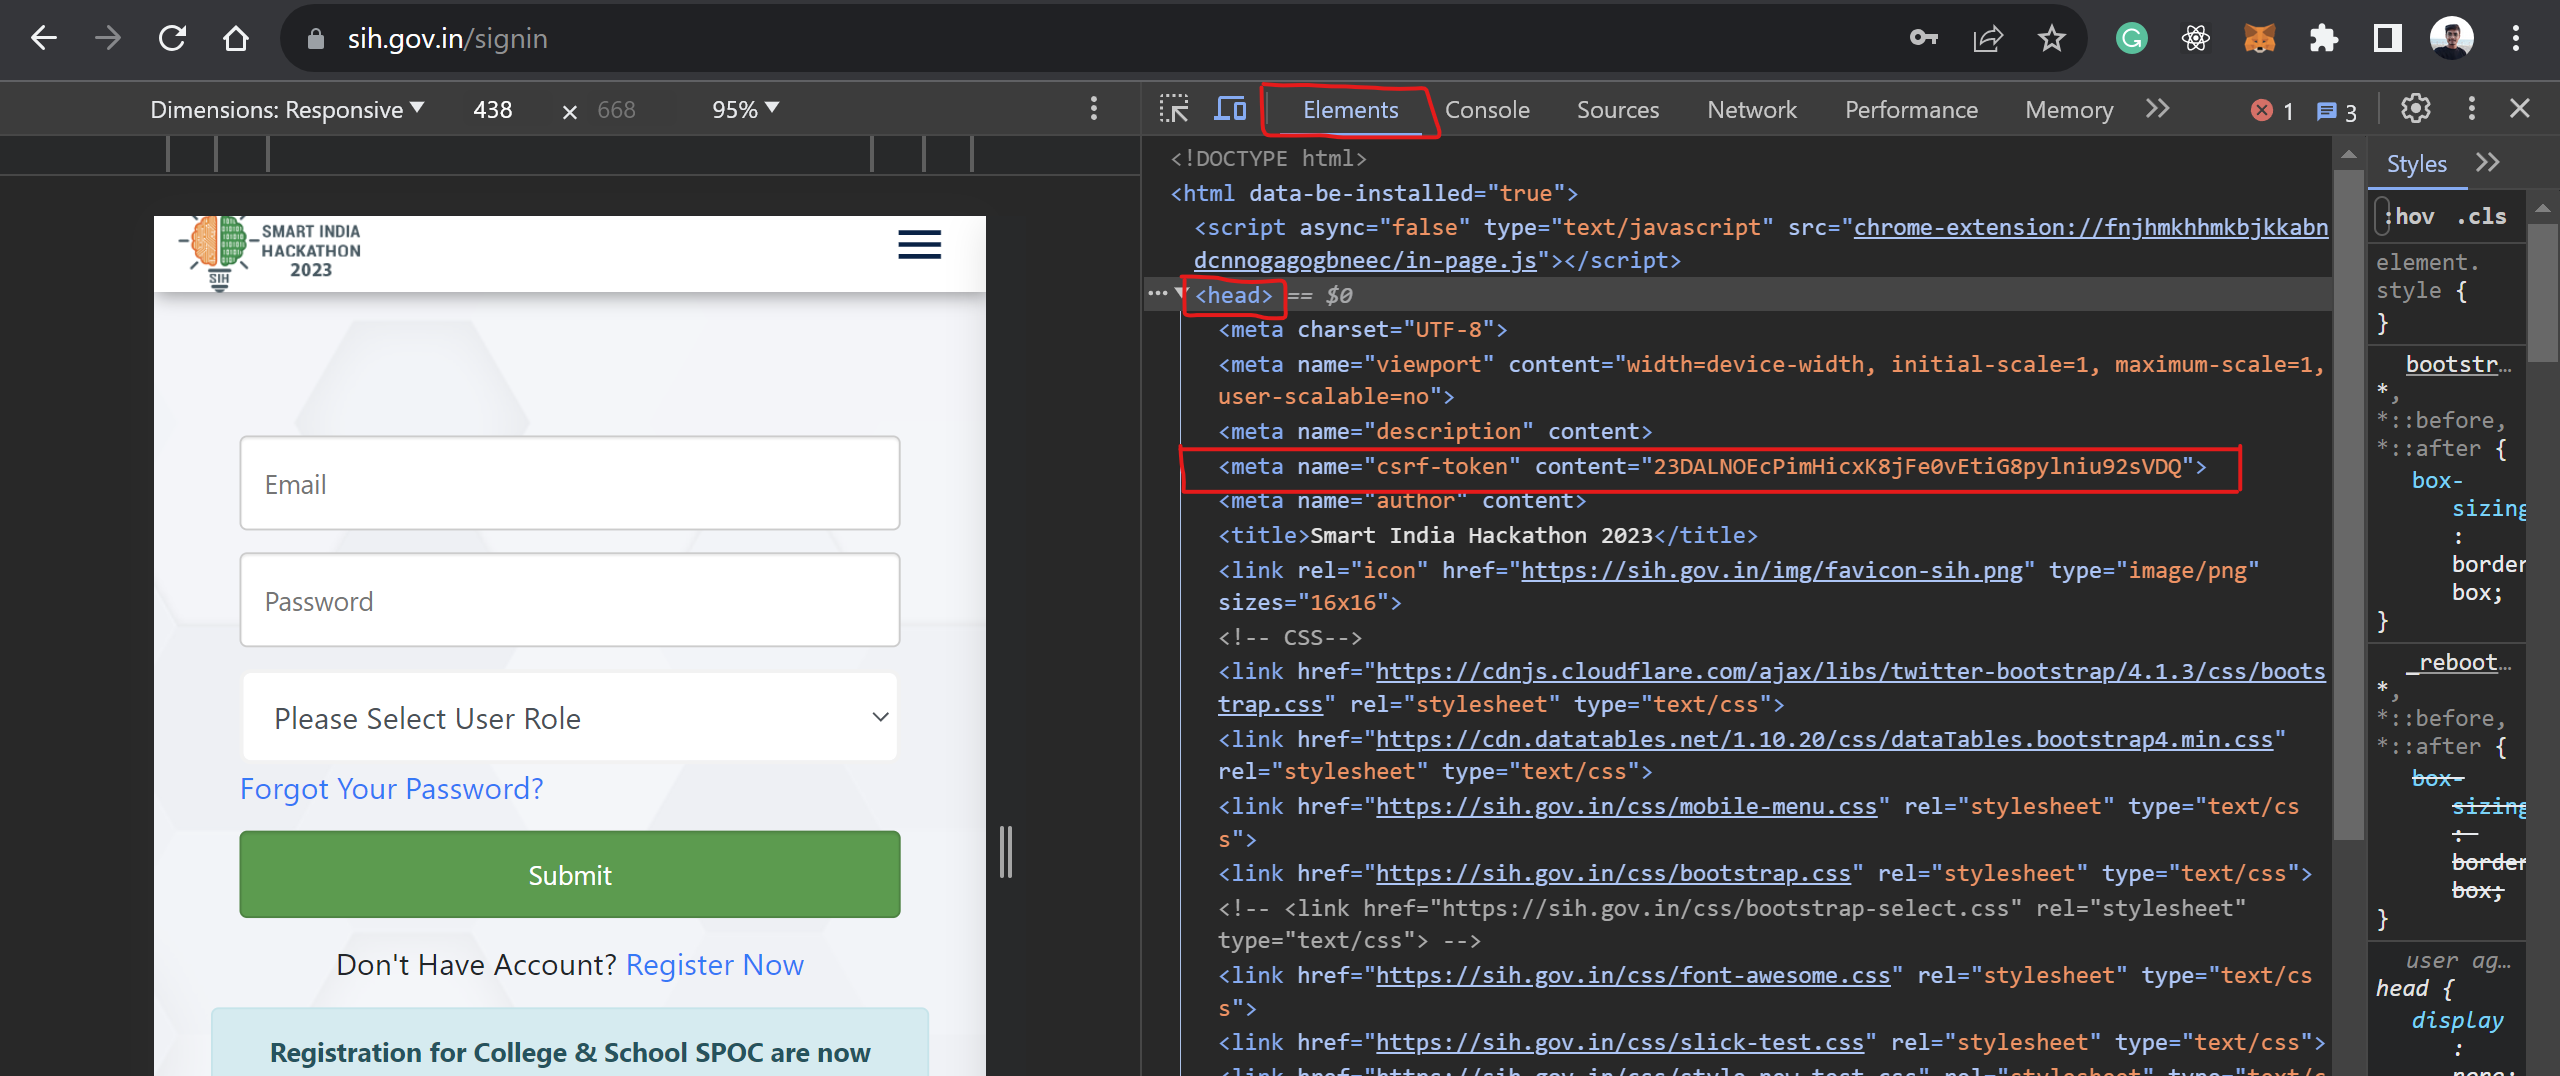
2. Extracting csrf_token from Meta Tags:
- While still on the SIH portal page, navigate to the 'Elements' tab in the developer tools.
- Here, you'll see the source HTML of the page. Look for meta tags (usually near the top).
- Find the meta tag with the attribute
nameset tocsrf-token. - Copy the content value of this meta tag, which is your
csrf_token.

Please refer to the attached screenshots for a visual guide on extracting these tokens.
Note: Always ensure you're using up-to-date tokens, as they may expire or change over time. If the script fails to authenticate, re-extract the tokens and try again.
Subscribe to my newsletter
Read articles from Denil Bhatt directly inside your inbox. Subscribe to the newsletter, and don't miss out.
Written by
