AWS temporary credential best practice for developer access
 Vincent Tjianattan
Background
I've seen numerous posts on Reddit about people getting hacked or their access keys leaked. So I started this blog to address the gap in the issue. While AWS launched AWS SSO in 2017, not a lot of people are aware of it and most of the time people still resort to using IAM Users or worse the root account for day to day operations.
Do note that this just improves security, making it harder for attackers to get access and is not a foolproof method to make your account unhackable. You can still get hacked in numerous ways like exposing your access key(it will still be valid up to 1 hour after you first generated it, if you use the default value) or setting a weak root/sso user password with no MFA and many more like granting a random person IAM role access etc. The attack surface is limitless so please still be careful.
Let's start, I am unsure of the level of this blog. But personally, I would put it at level 200.
If you want to setup without the need to install terraform, please refer to this blog post
Prerequisite
an AWS Account
Terraform installed -> If not yet you can use tfenv to install terraform on mac/linux, if you are on windows please follow the official guide
Git
Steps
Initial setup
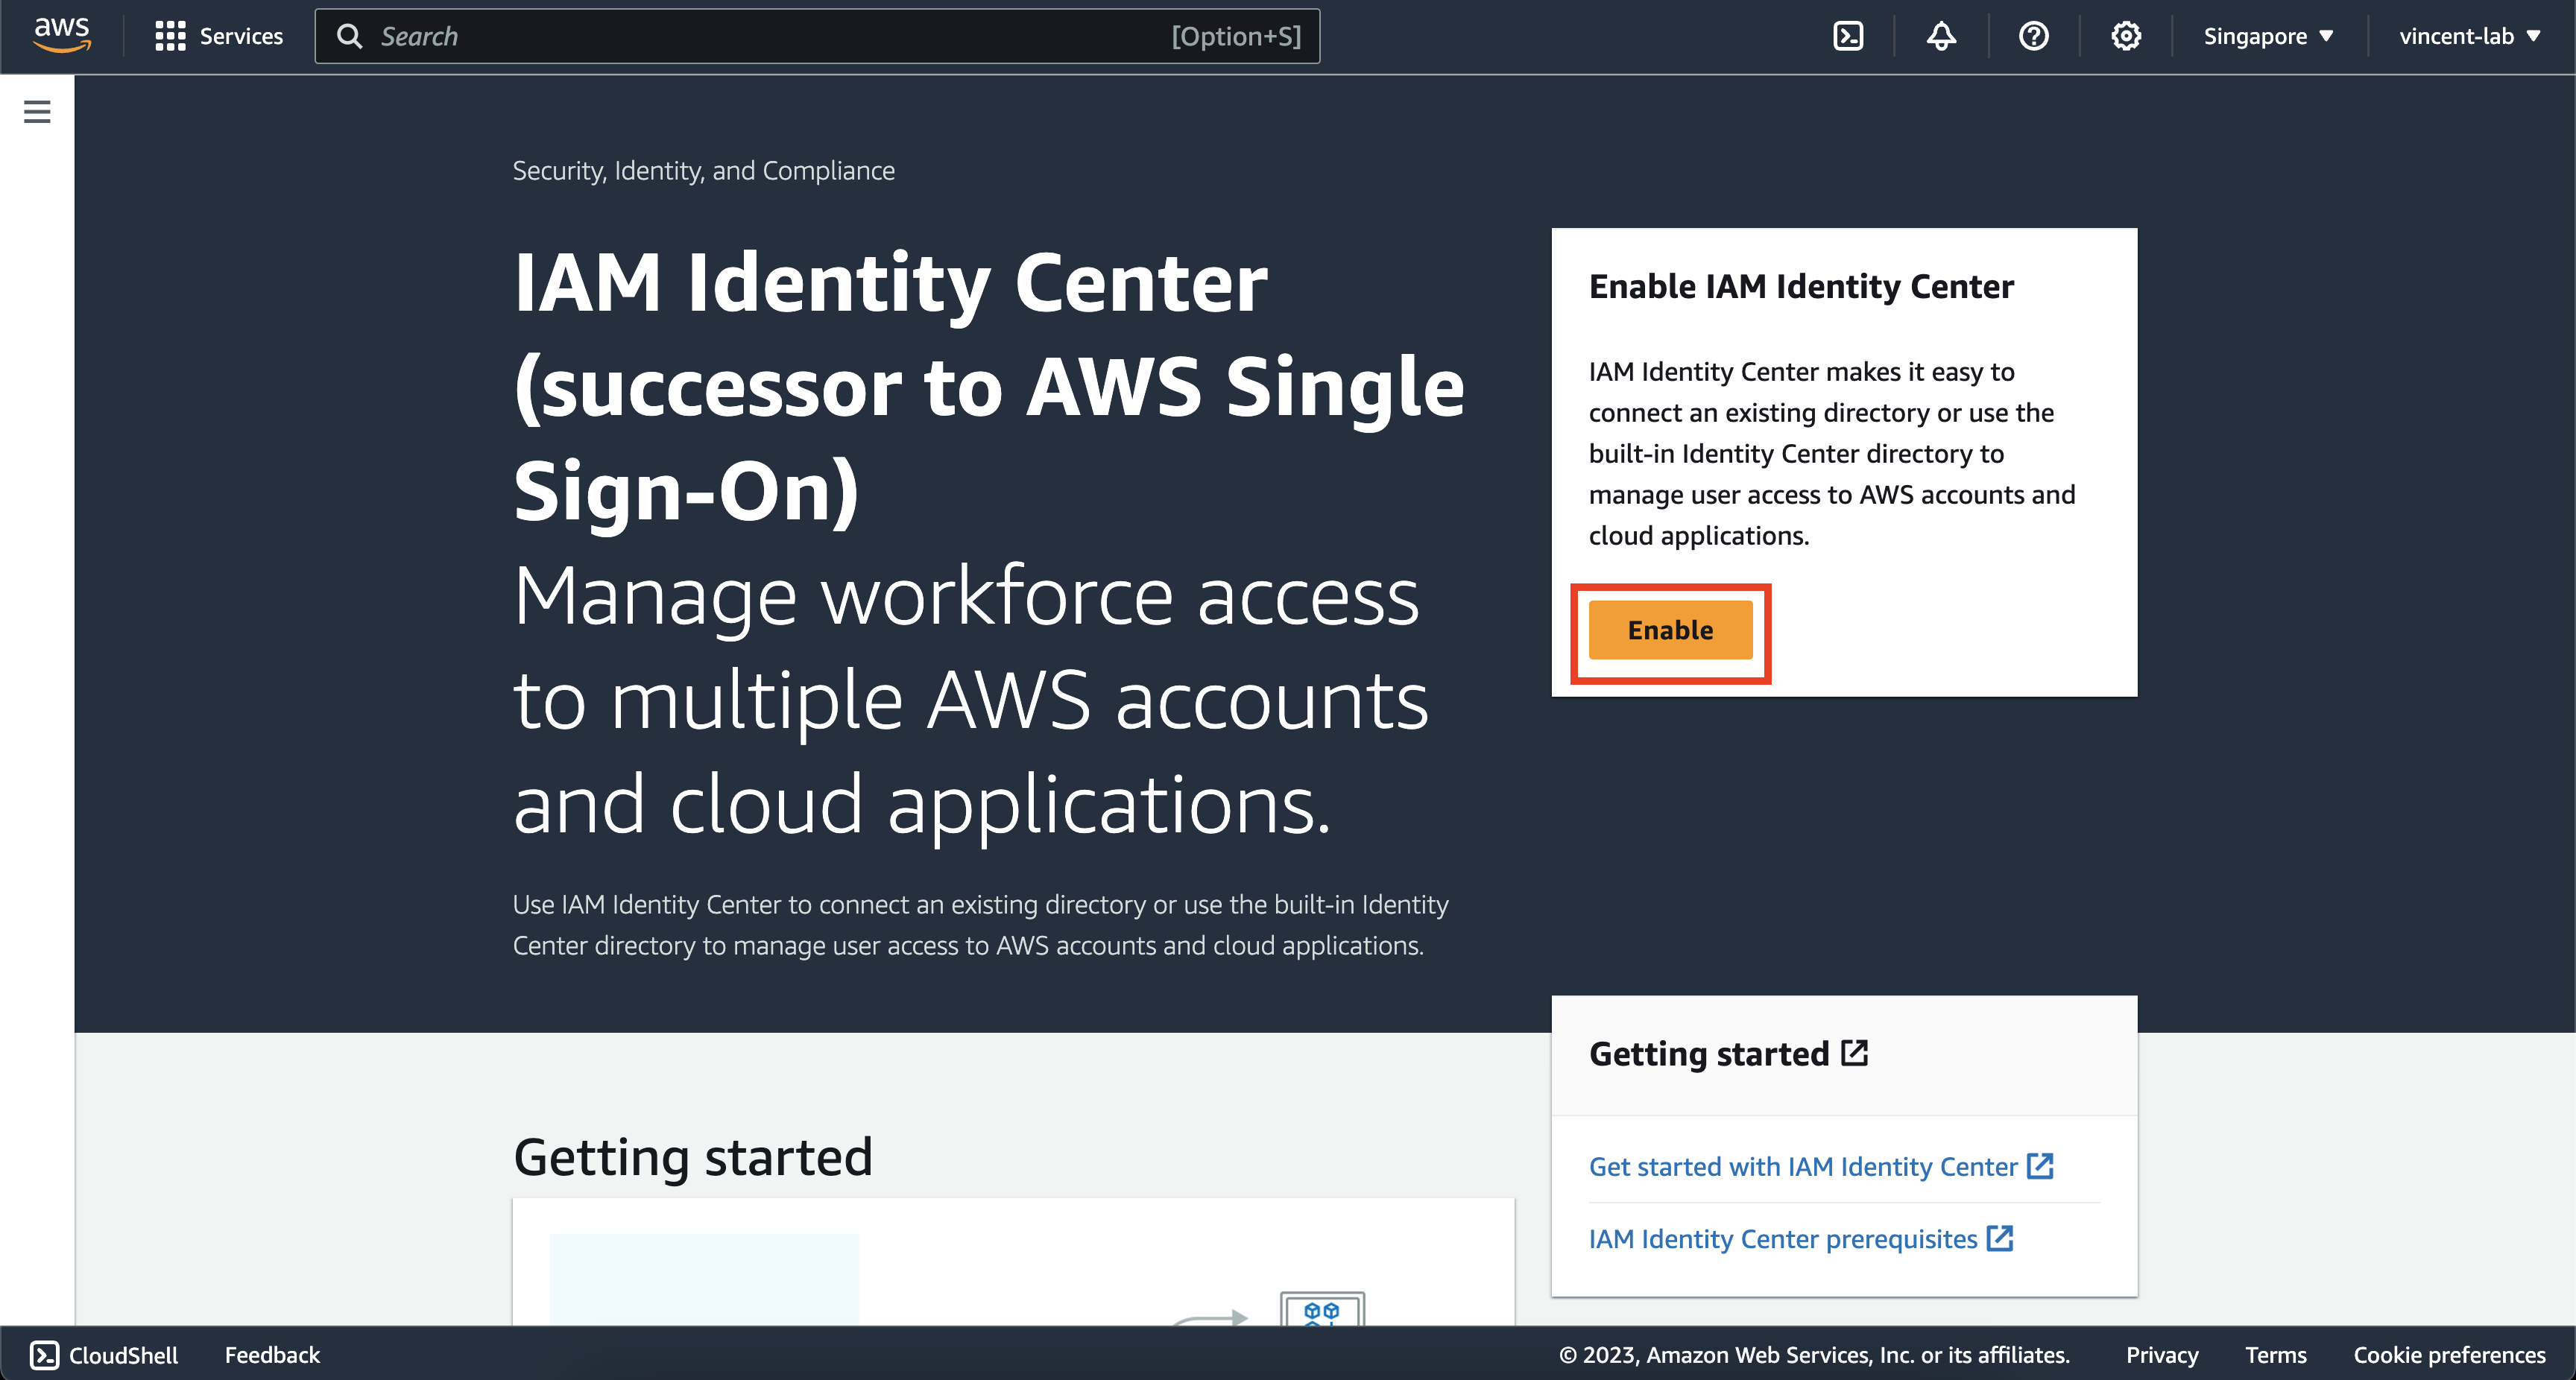
Go to https://console.aws.amazon.com/singlesignon/home on your AWS console then make sure that you have chosen the AWS region that is closest to you, for this example, I will be using the ap-southeast-1 region.
Go ahead and click Enable
Depending on whether you have enabled AWS Organization or not. You may or may not get this message. But if you do, click on Create AWS organization

Before continuing to create users, groups and permission sets. You will need to define some setup through the console. Unfortunately at the time of writing this blog AWS did not provide any API to enable these settings, so these steps must be done manually, I will probably be updating this guide when it's available.
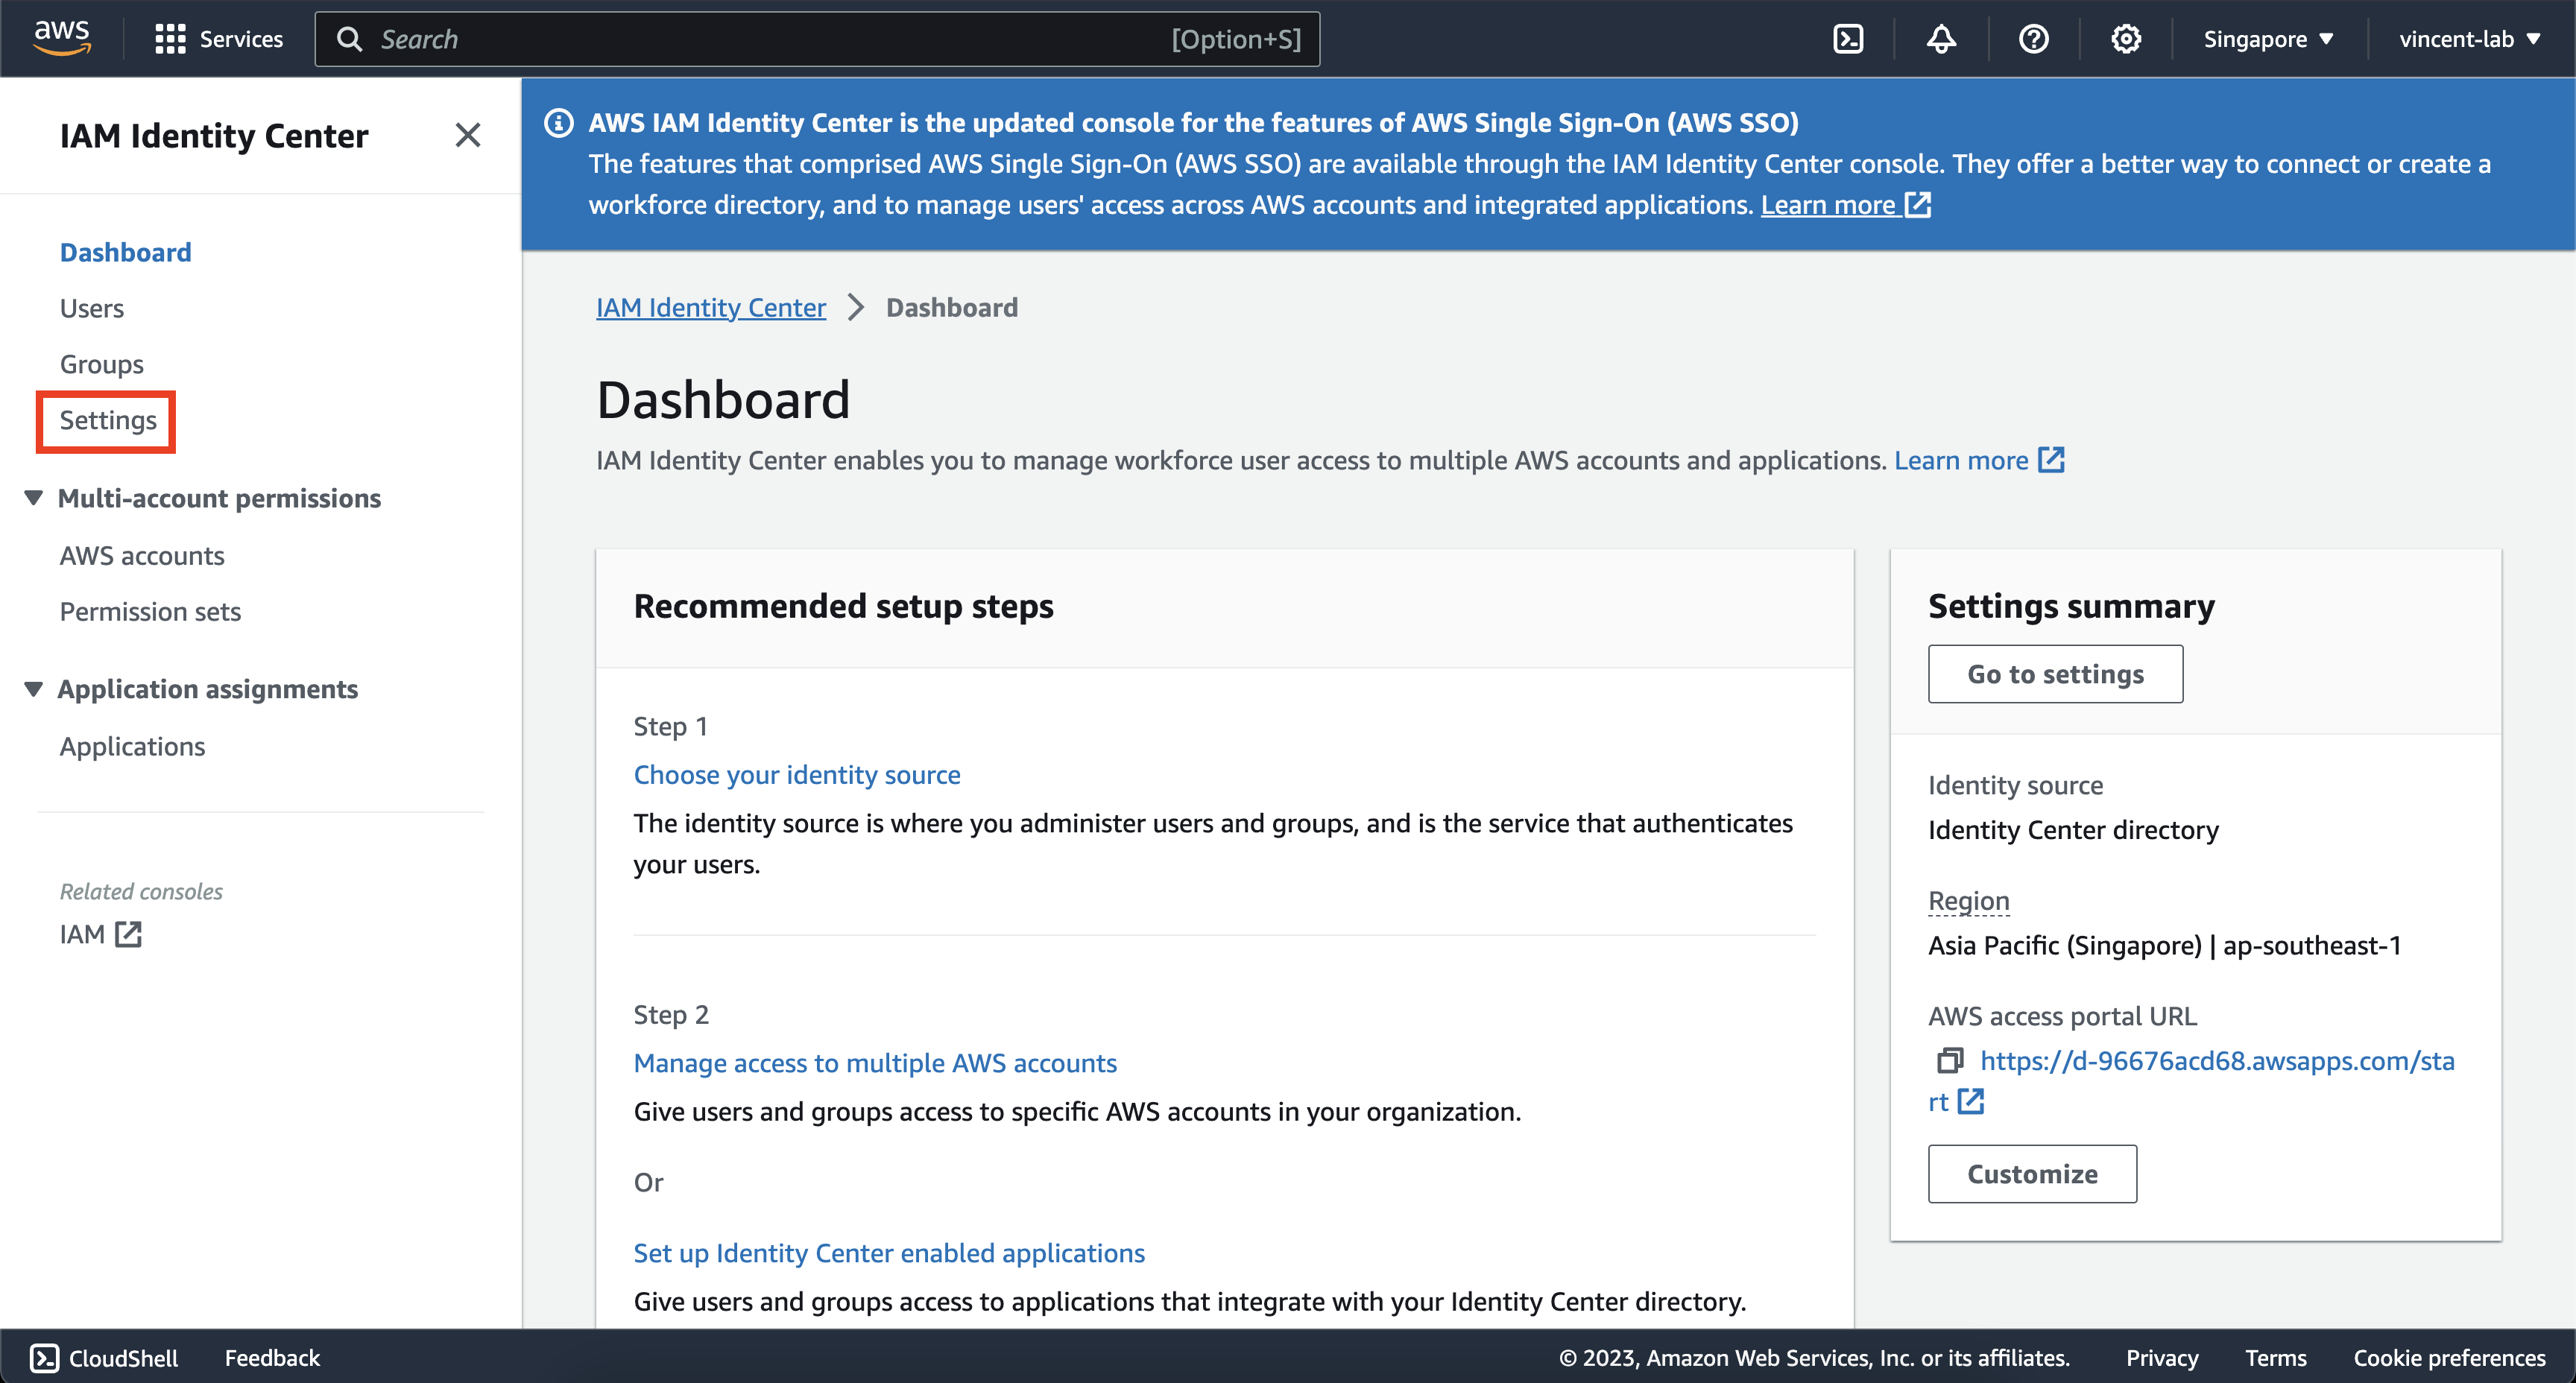
On your IAM Identity Center dashboard, click on settings on the left navigation bar
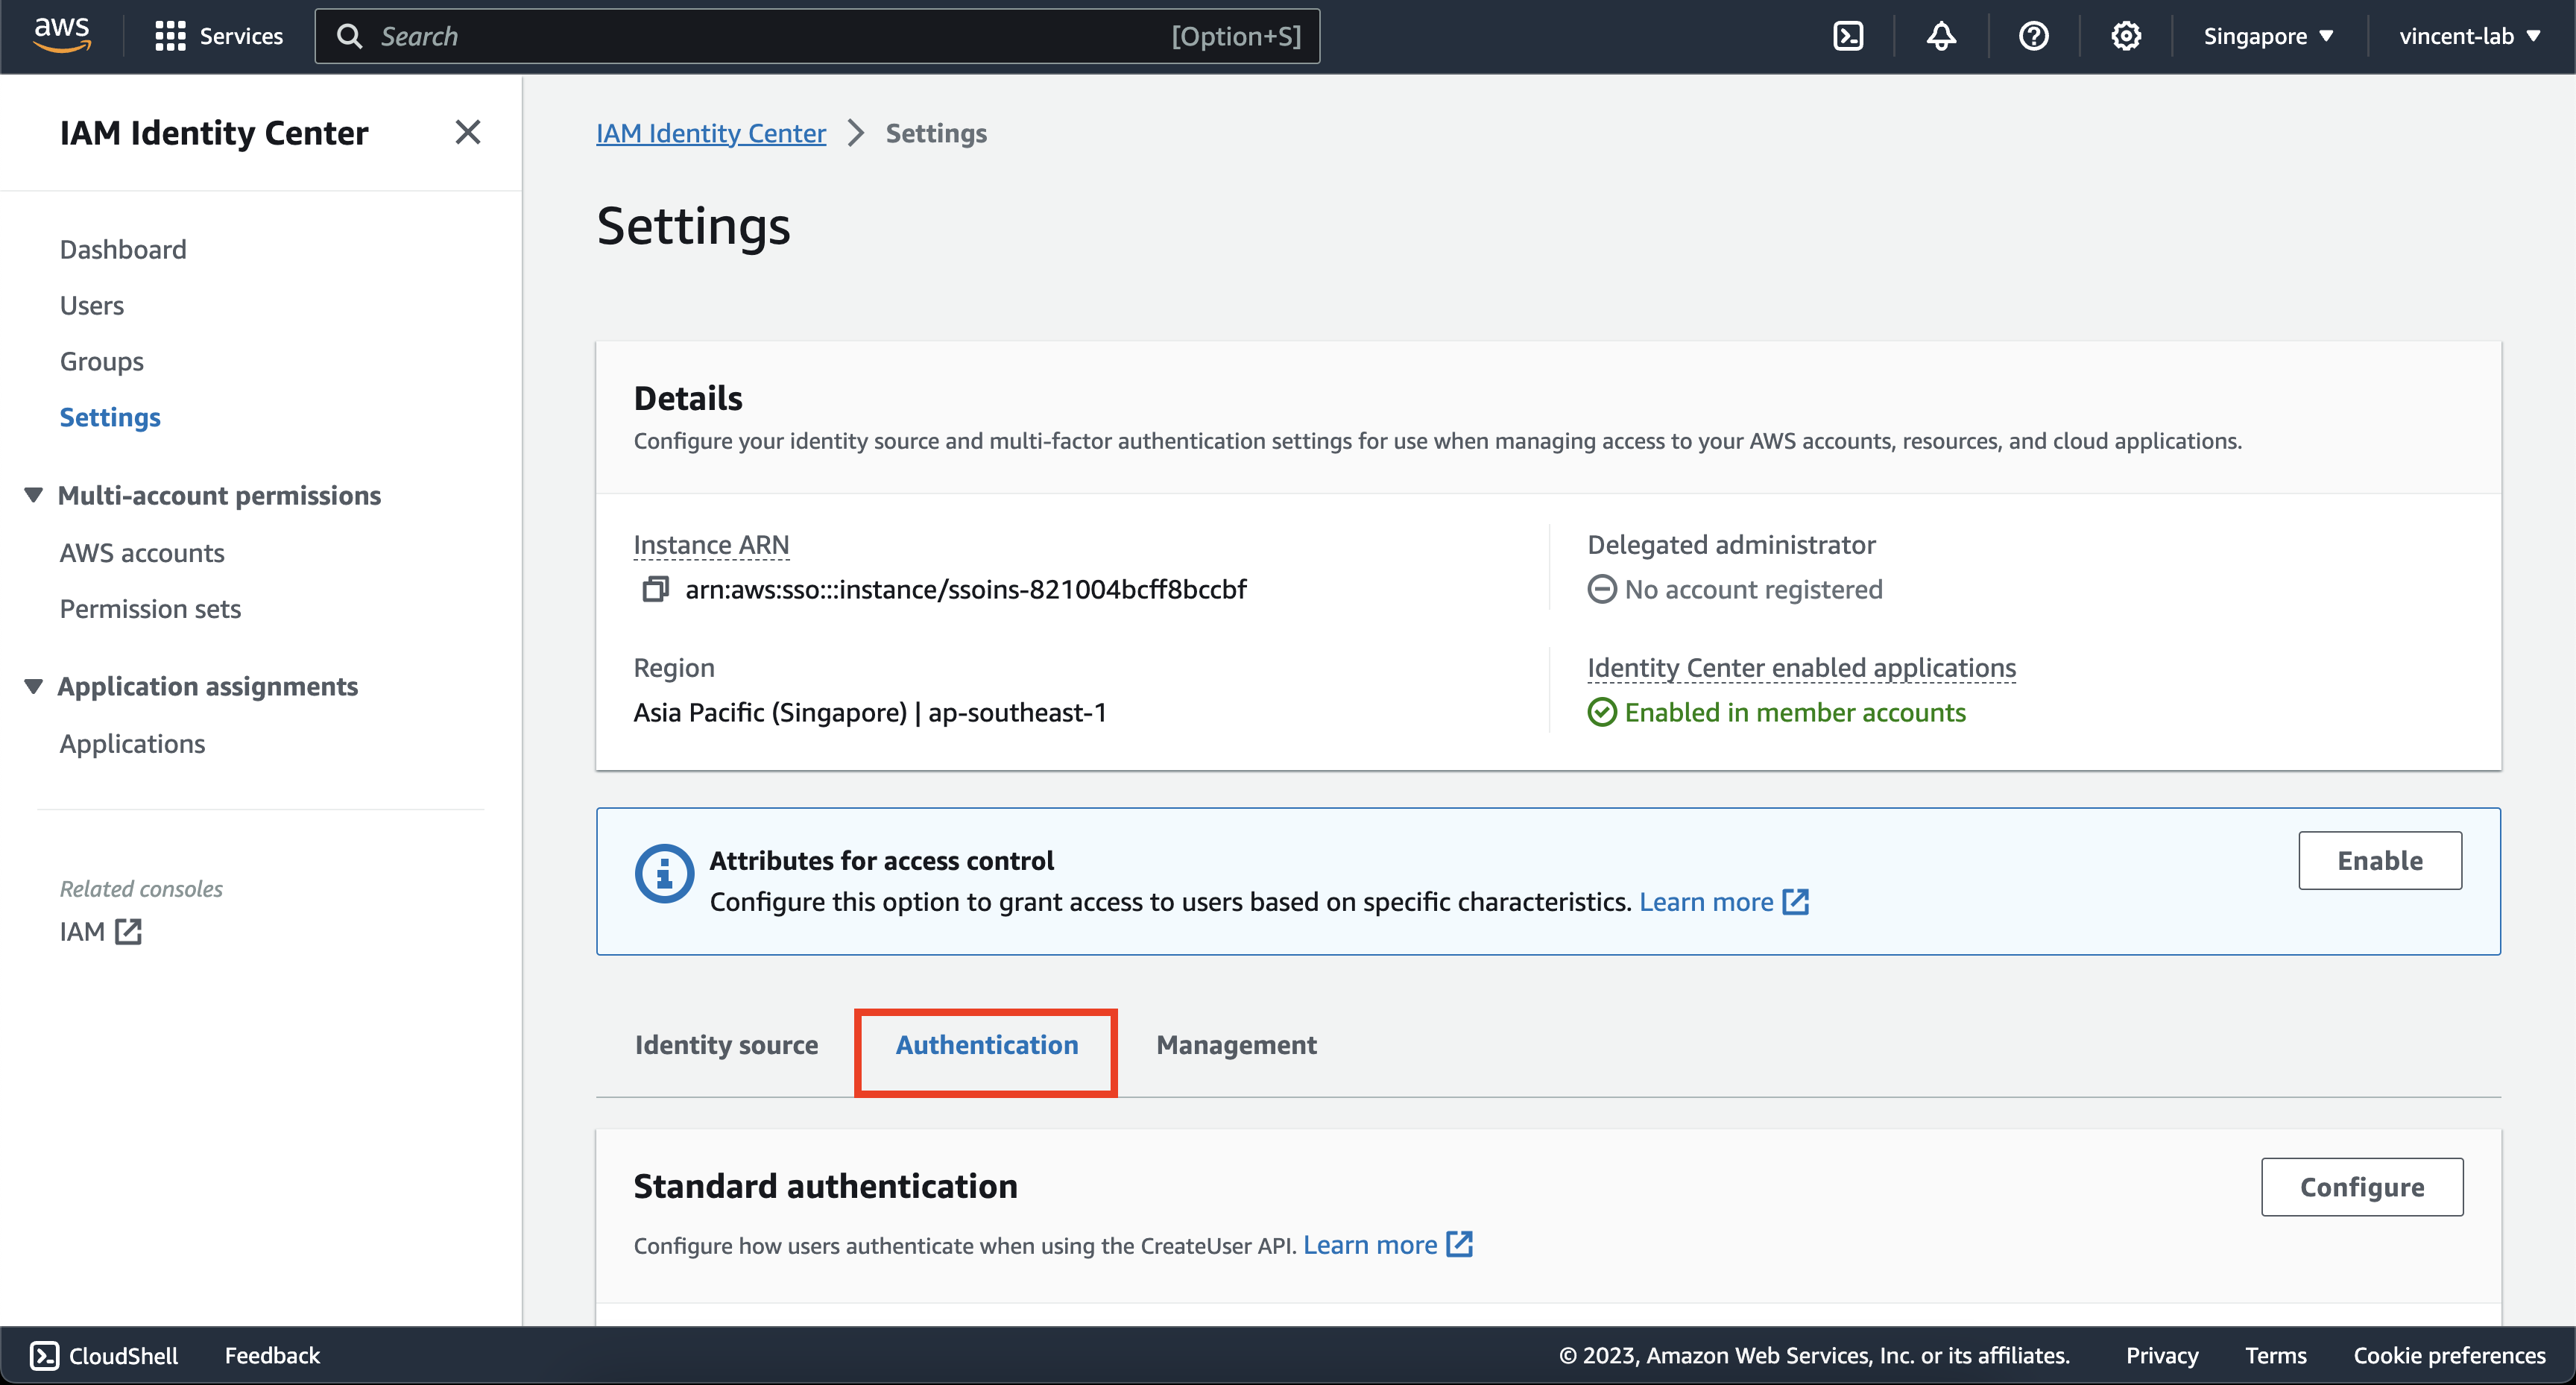
Click on Authentication
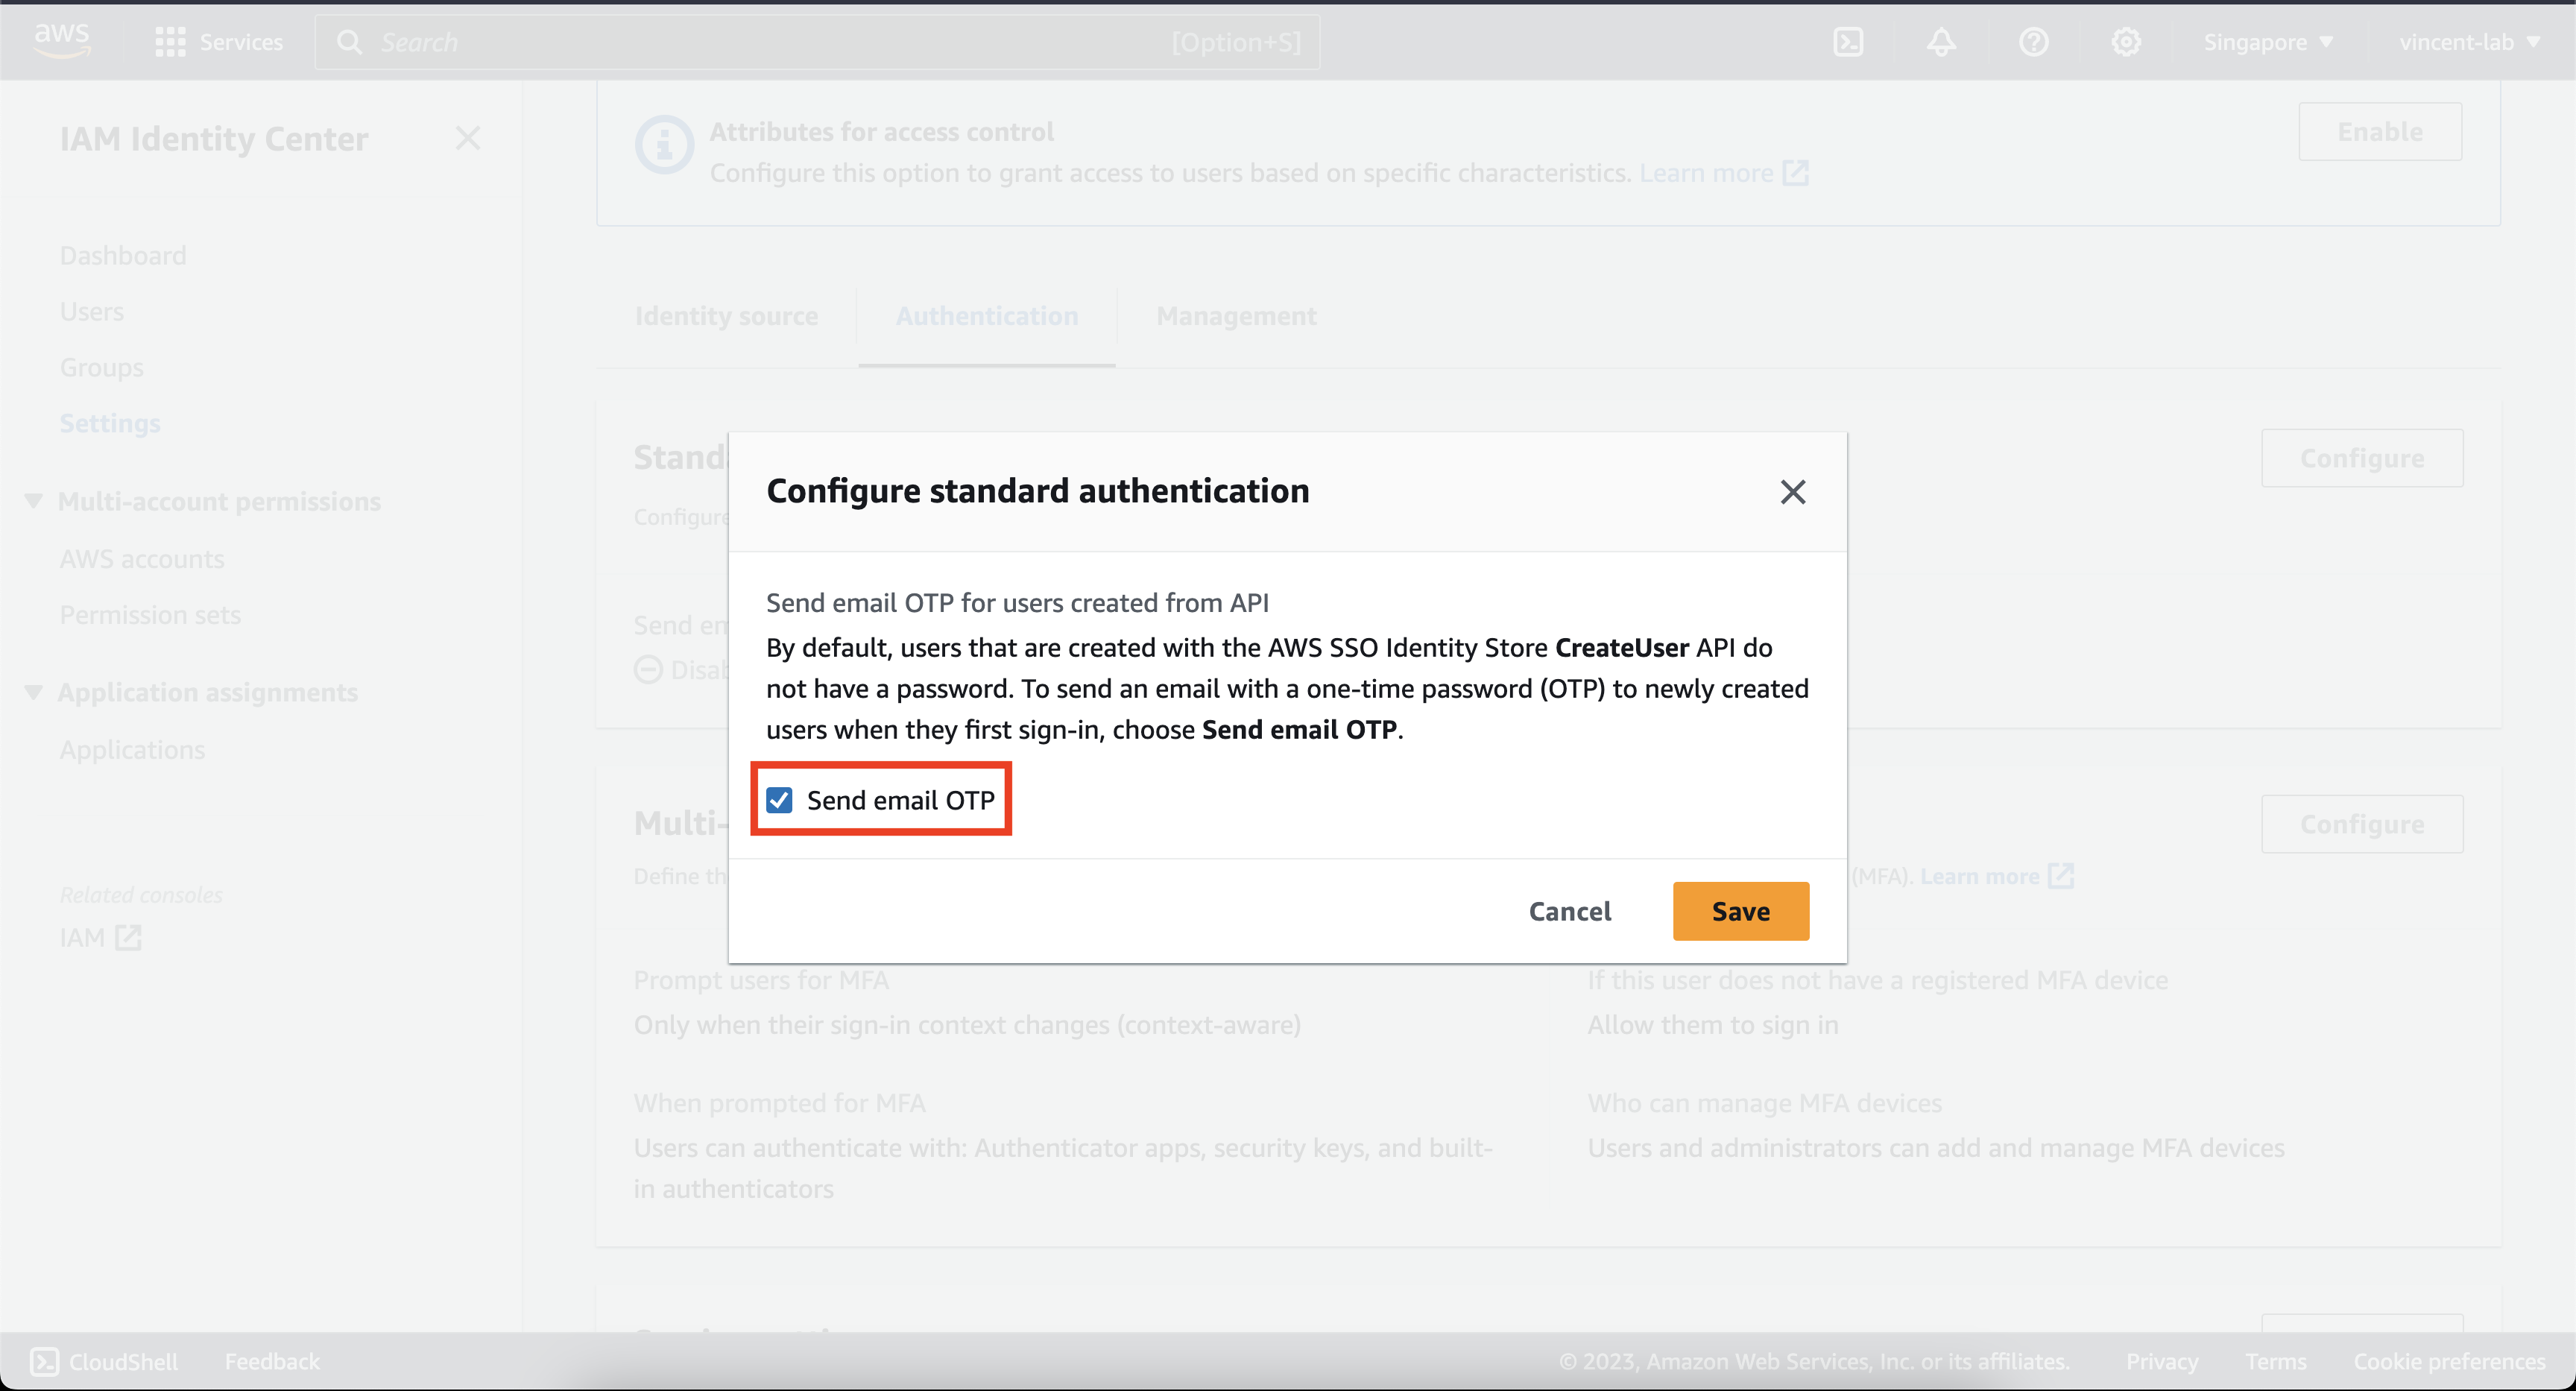
Click Configure on Standard authentication and then check the box on Send email OTP

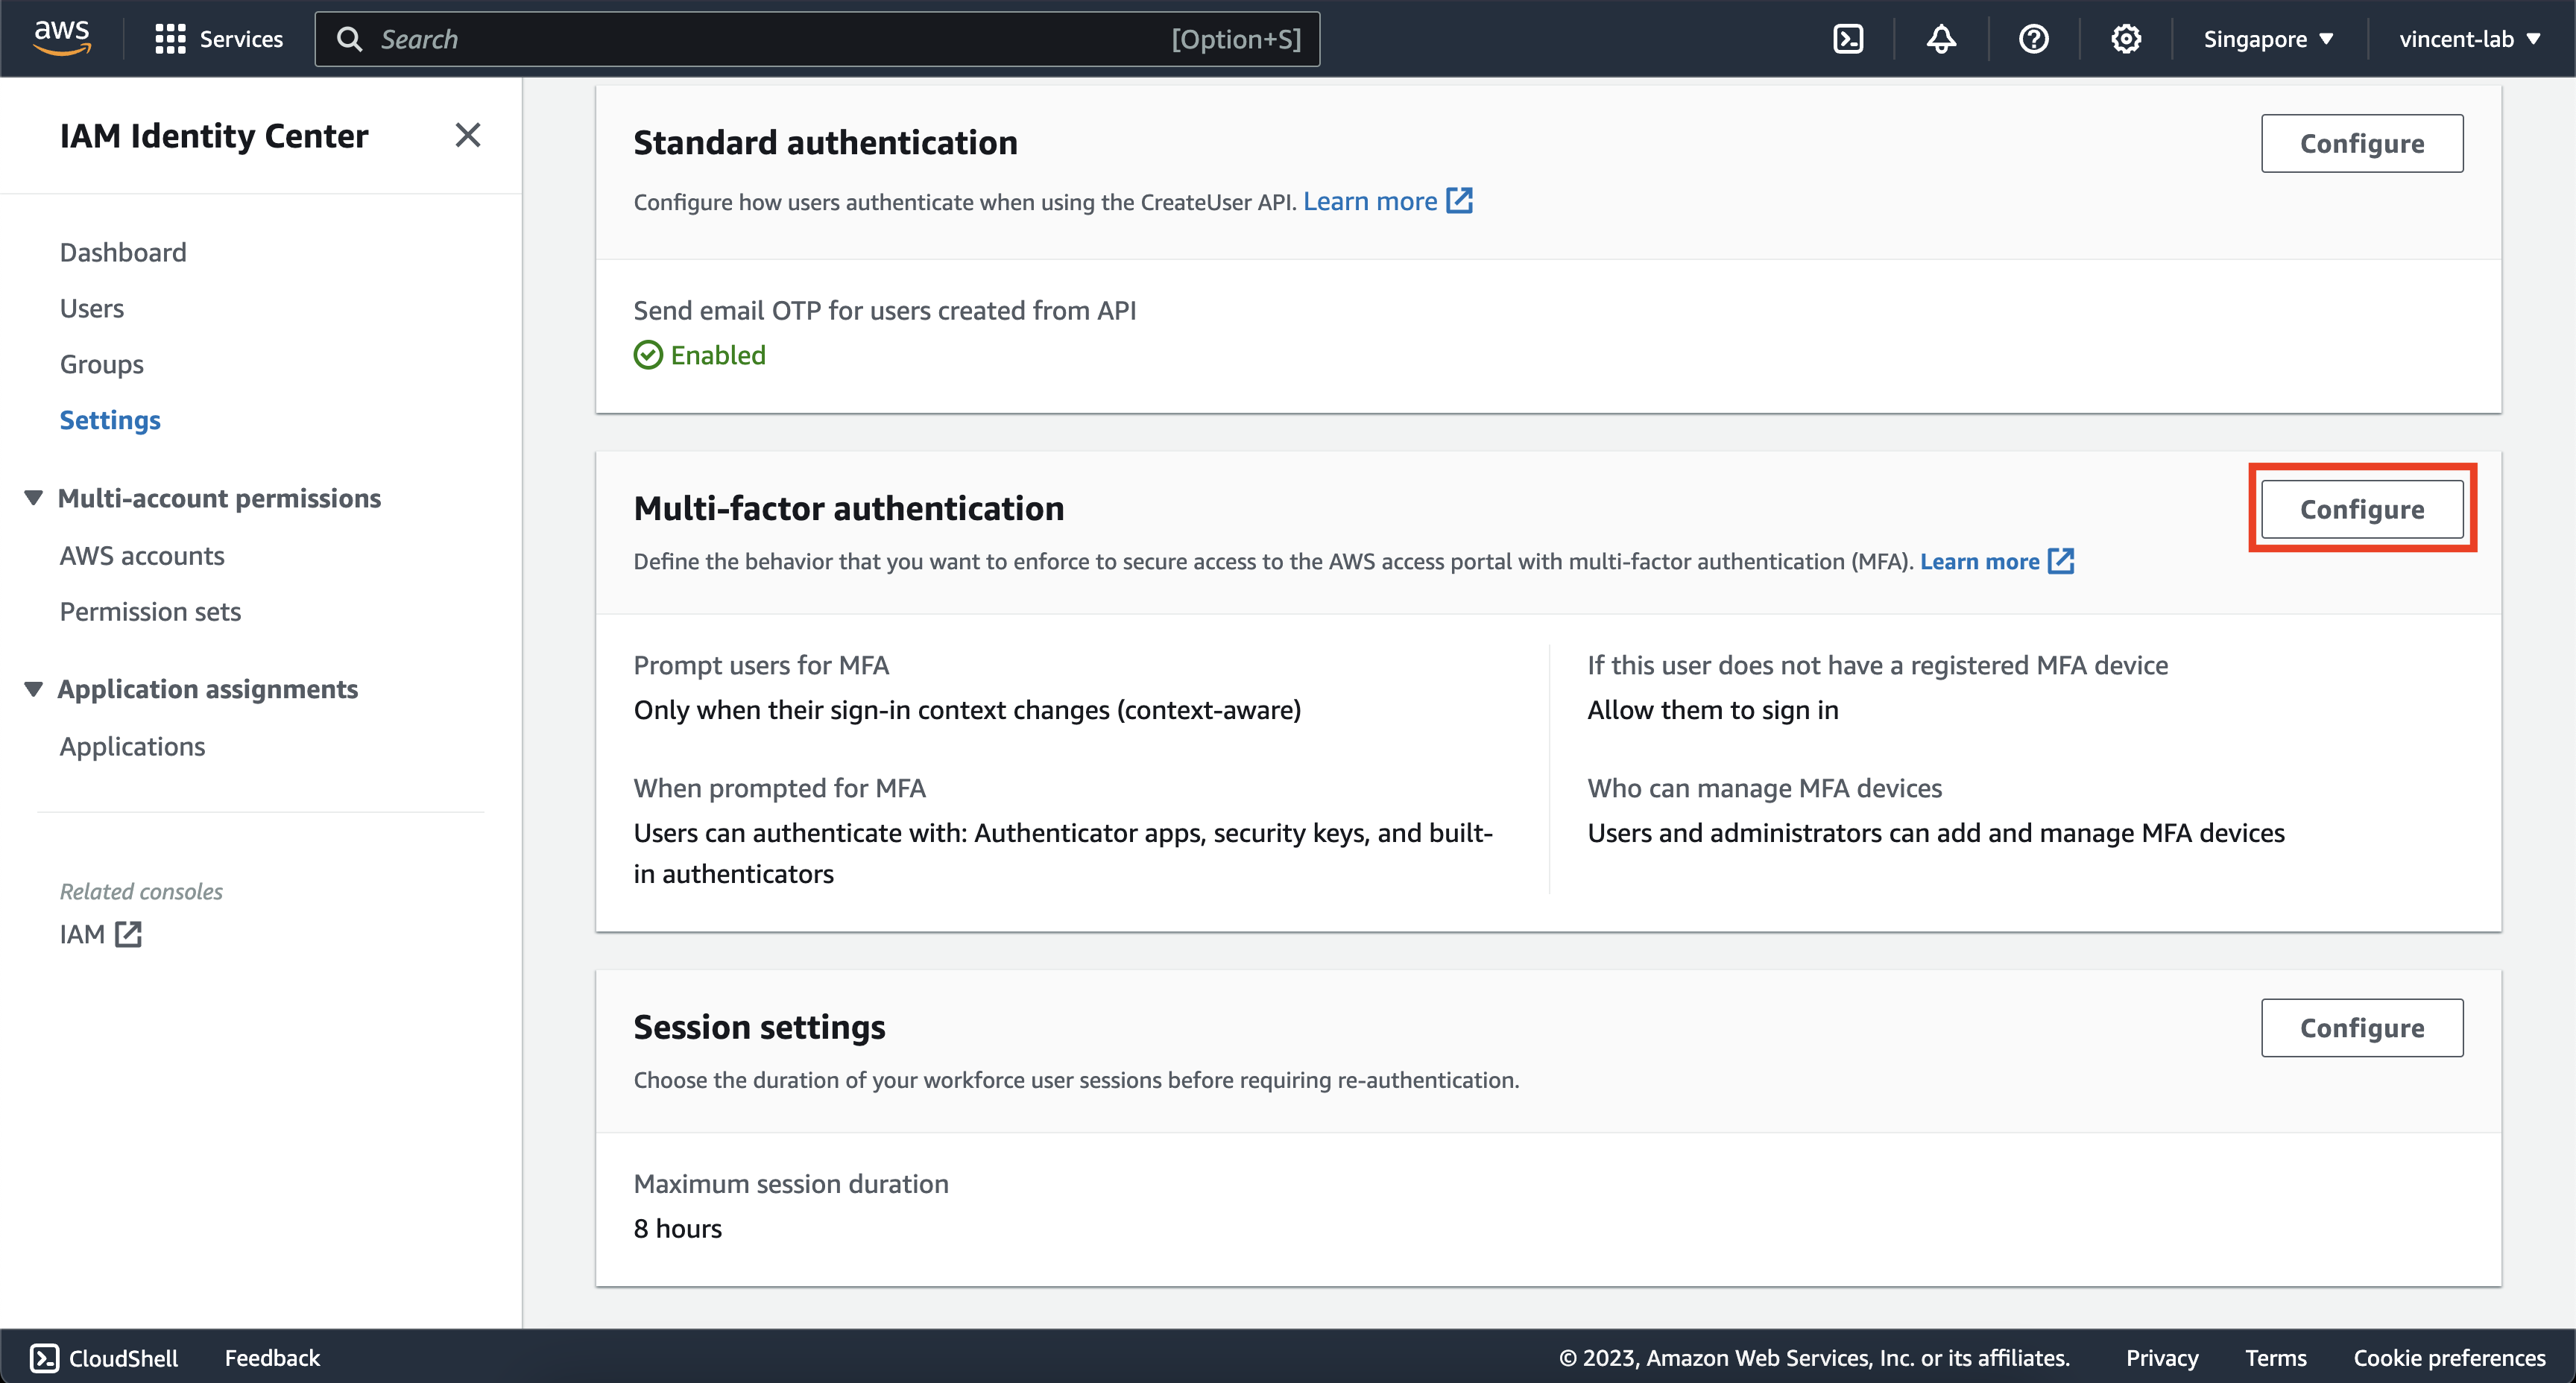
Next click Configure on Multi-factor Authentication
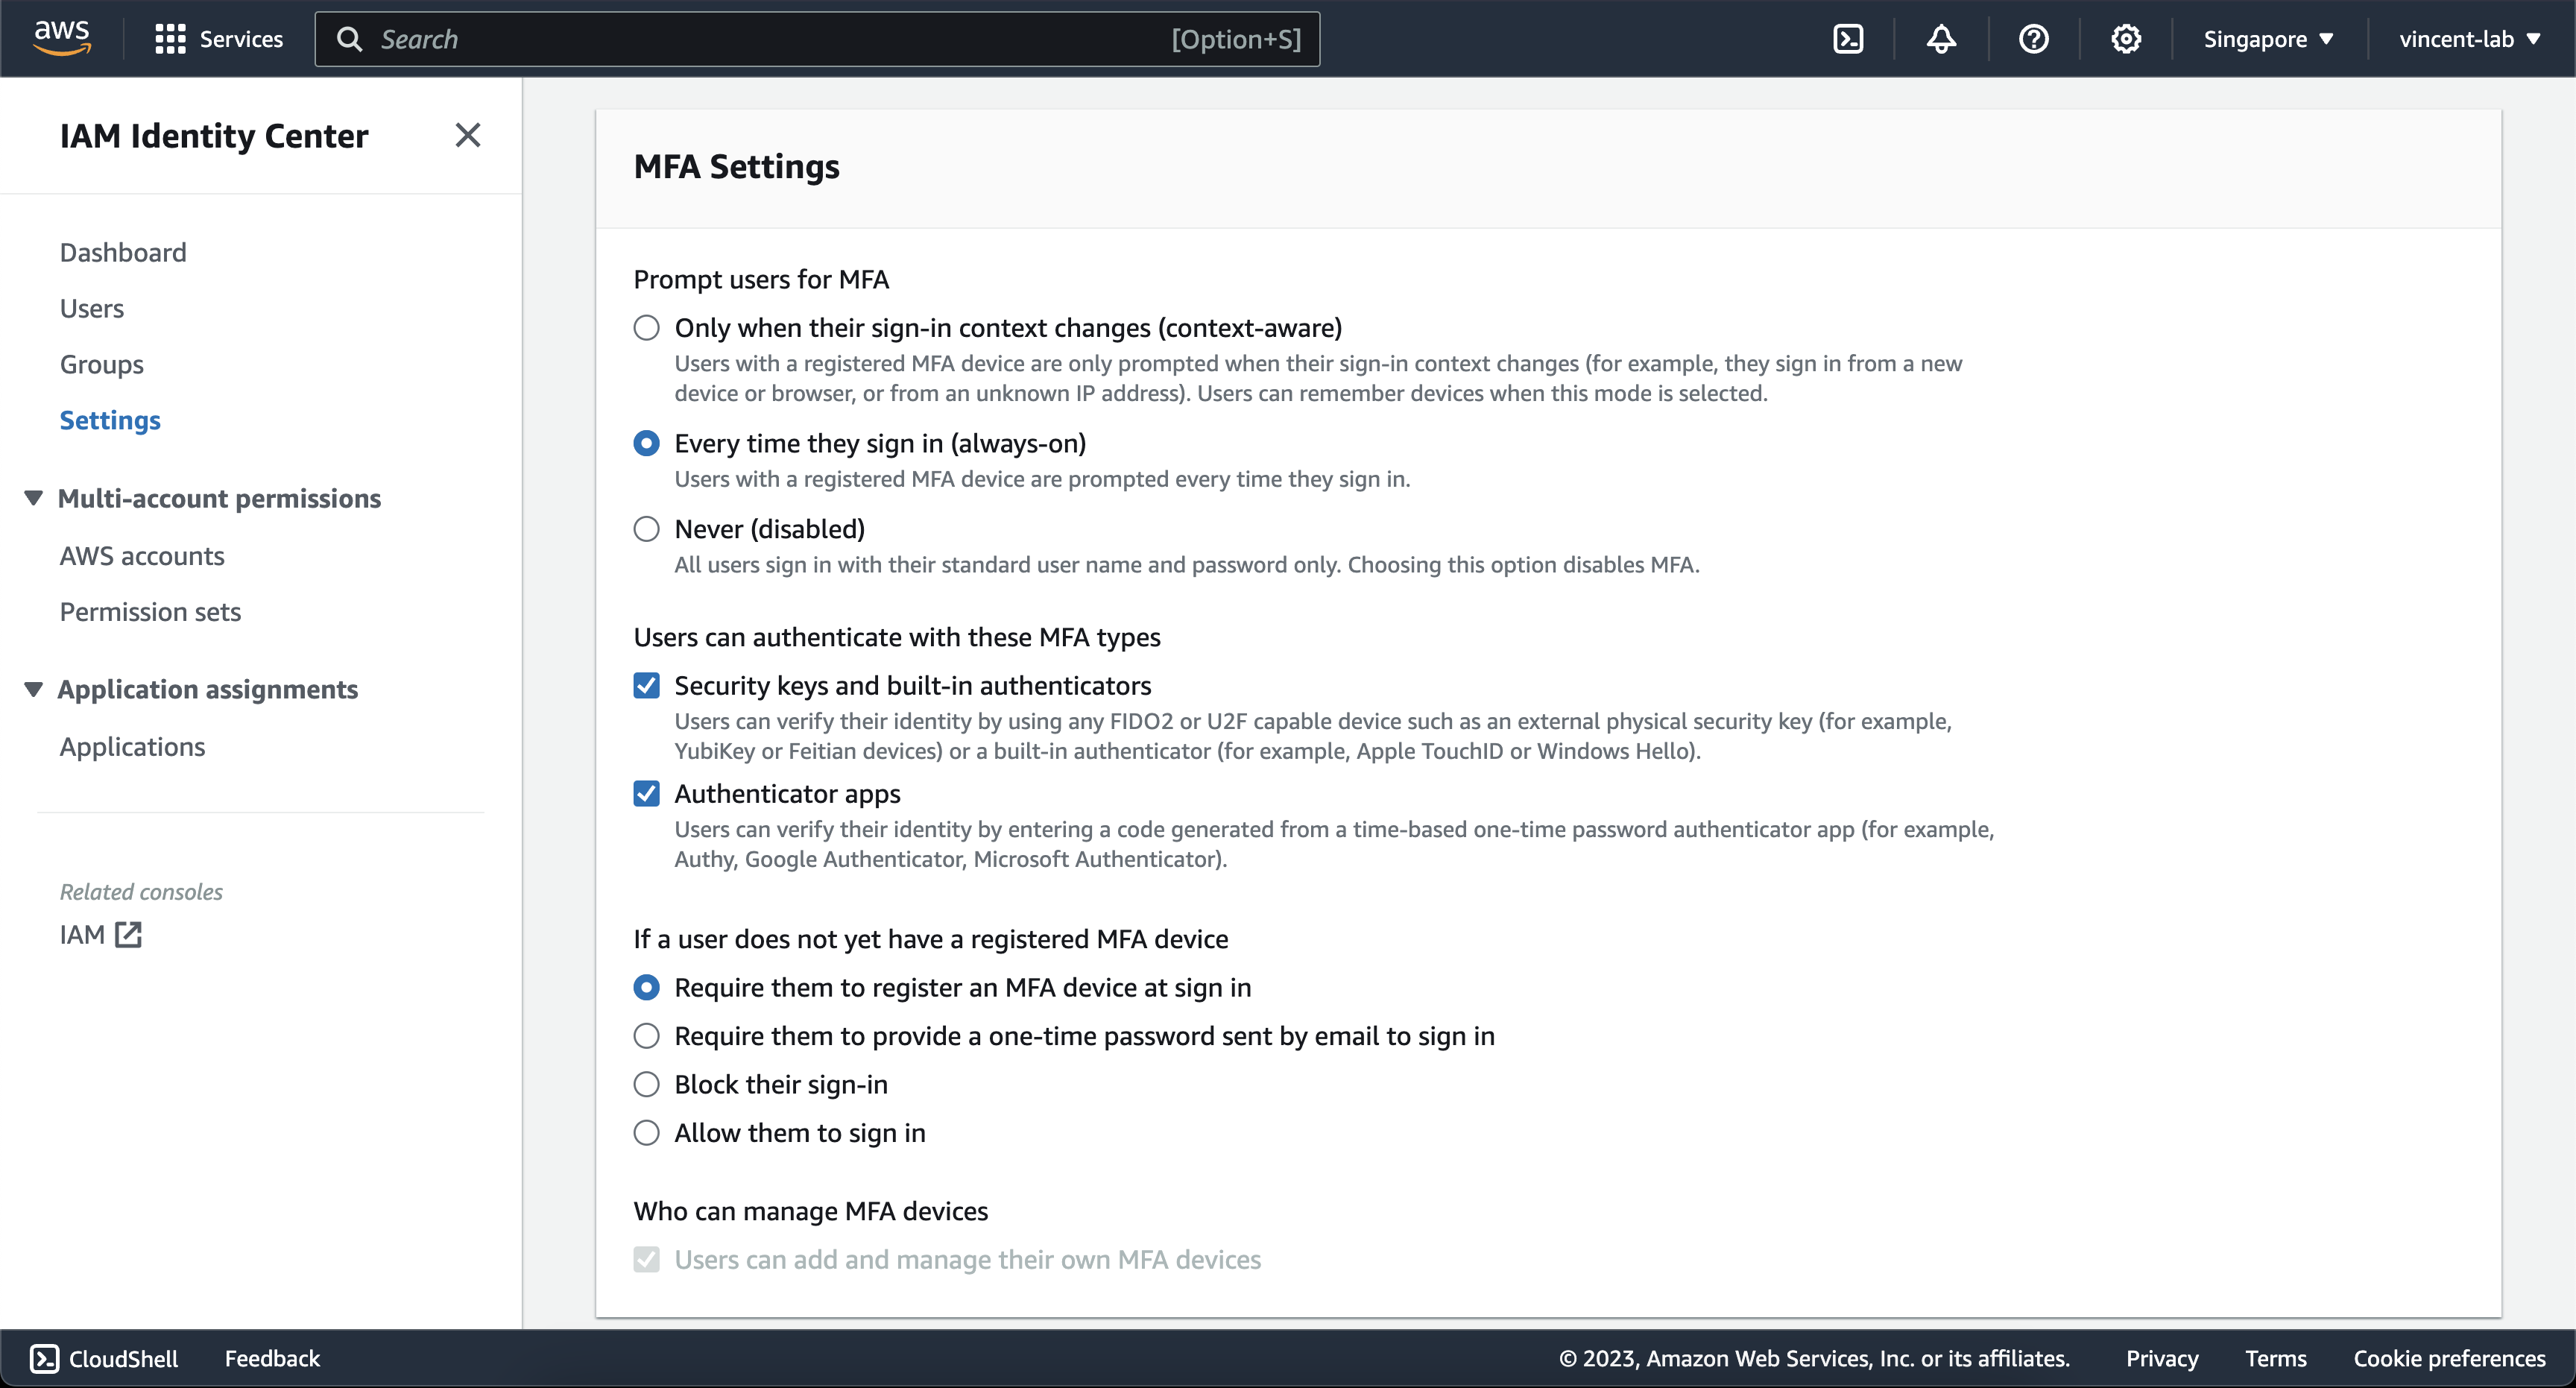
You can choose to be creative on this screen, but I would strongly advise that you copy the settings on the screen for maximum security. But you can be flexible between context-aware and always-on, as with anything on security, there's always a tradeoff between more secure and more comfortable, the more comfortable you are the less secure it is like not enforcing MFA.
Setup using terraform
Firstly you would need to get an AWS Access key,
Go to https://us-east-1.console.aws.amazon.com/iam/home#/security_credential

Check the I understand creating a root access key is not a best practice, but I still want to create one. then click on Create access keys. Don't worry this will only be temporary and we will be cleaning up the access keys at the end of this guide. Do note please never share this access key with anyone

Copy the Access key and enter the command below if you are on Mac/Linux
export AWS_ACCESS_KEY_ID=AKIAXXXXXXXXXXXXXXXX
Then copy the Secret access key and enter the command below if you are on Mac/Linux
export AWS_SECRET_ACCESS_KEY=XXXXXXXXXXXXXXX/XXXXXXXXXXXXXXXXXXXXXXXX
If you are on Windows
export to setx and remove the = (equal sign). Example setx AWS_ACCESS_KEY_ID AKIAIOSFODNN7EXAMPLENext you can open your favorite text editor and paste the text below into a file
main.tf
module "this" {
  source = "github.com/vincenttjia/terraform-aws-basic-aws-iam-identity-center-setup.git?ref=v1.0.0"

  users = [
    {
      email       = "example@example.com"
      given_name  = "John"
      family_name = "Doe"
    }
  ]
}

output "identity_center_url" {
  value = module.setup.identity_center_url
}

provider "aws" {
  region = "ap-southeast-1"
}
You can look at the example here https://github.com/vincenttjia/terraform-aws-basic-aws-iam-identity-center-setup/tree/master/example
You might also need to change the aws region, depending on what you choose earlier
Then open your terminal, and run the command
terraform init
terraform apply
Note: If you run into validating provider credentials error. you might need to redo the export command above if you run a new terminal session.
Then type yes on your terminal. You can confirm the changes on the AWS Console
Now that we have created the users, you need to assign them permission. In total we have 3 permission sets and you can choose between the 3. But if you want almost the same access as the root account. Please choose SuperAdmin and you will need at least 1 person acting as the SuperAdmin
You can add people using their email using the following configuration
module "this" {
  source = "github.com/vincenttjia/terraform-aws-basic-aws-iam-identity-center-setup.git?ref=v1.0.0"

  users = [
    {
      email       = "example@example.com"
      given_name  = "John"
      family_name = "Doe"
    }
    # ... more users
  ]

  super_admins   = ["example@example.com"]
  power_users    = ["example@example.com", "example1@example.com"]
  readonly_users = ["example@example.com", "example1@example.com"]
}

# ... other configurations
Then run
terraform apply
Now that everything is set up, you can click on the URL on your terminal and then skip to the account setup section.
Account Setup
Enter your email address and then click Next. You should receive an OTP on your email, which you can enter and finish your account setup.
Continue through the setup, by setting up your password and MFA.
You should now be arriving at this page

Now that you have confirmed that you have access, we can start on setting up your temporary credential on the cli.
aws configure sso
SSO session name (Recommended): <You can choose any>
SSO start URL [None]: <Use the url from earlier>
SSO region [None]: <The region that was used earlier>
SSO registration scopes [sso:account:access]: <Just leave blank and hit enter>
Example
SSO session name (Recommended): personal
SSO start URL [None]: https://d-1234acd5.awsapps.com/start/
SSO region [None]: ap-southeast-1
SSO registration scopes [sso:account:access]:
Confirm and continue, then allow it
CLI default client Region [ap-southeast-1]: <Use which ever region best for you>
CLI default output format [None]: <Use which ever format best for you>
CLI profile name [SuperAdmin-198266650228]: default
Example
CLI default client Region [ap-southeast-1]: ap-southeast-1
CLI default output format [None]: json
CLI profile name [SuperAdmin-198266650228]: default
--profile parameter every time you want to use themNow you should be able to use temporary credentials on your terminal and periodically run aws sso login when your session runs out
aws sso login
Cleanup(important)
Cleanup on the root account
Now that everything is done, there are a few cleanup that we need to do
Go to https://us-east-1.console.aws.amazon.com/iam/home#/security_credential
And delete the access keys that we generated earlier or any root access keys you might have generated(before deleting other access keys be sure that you are not using them for anything else or stuff will break).
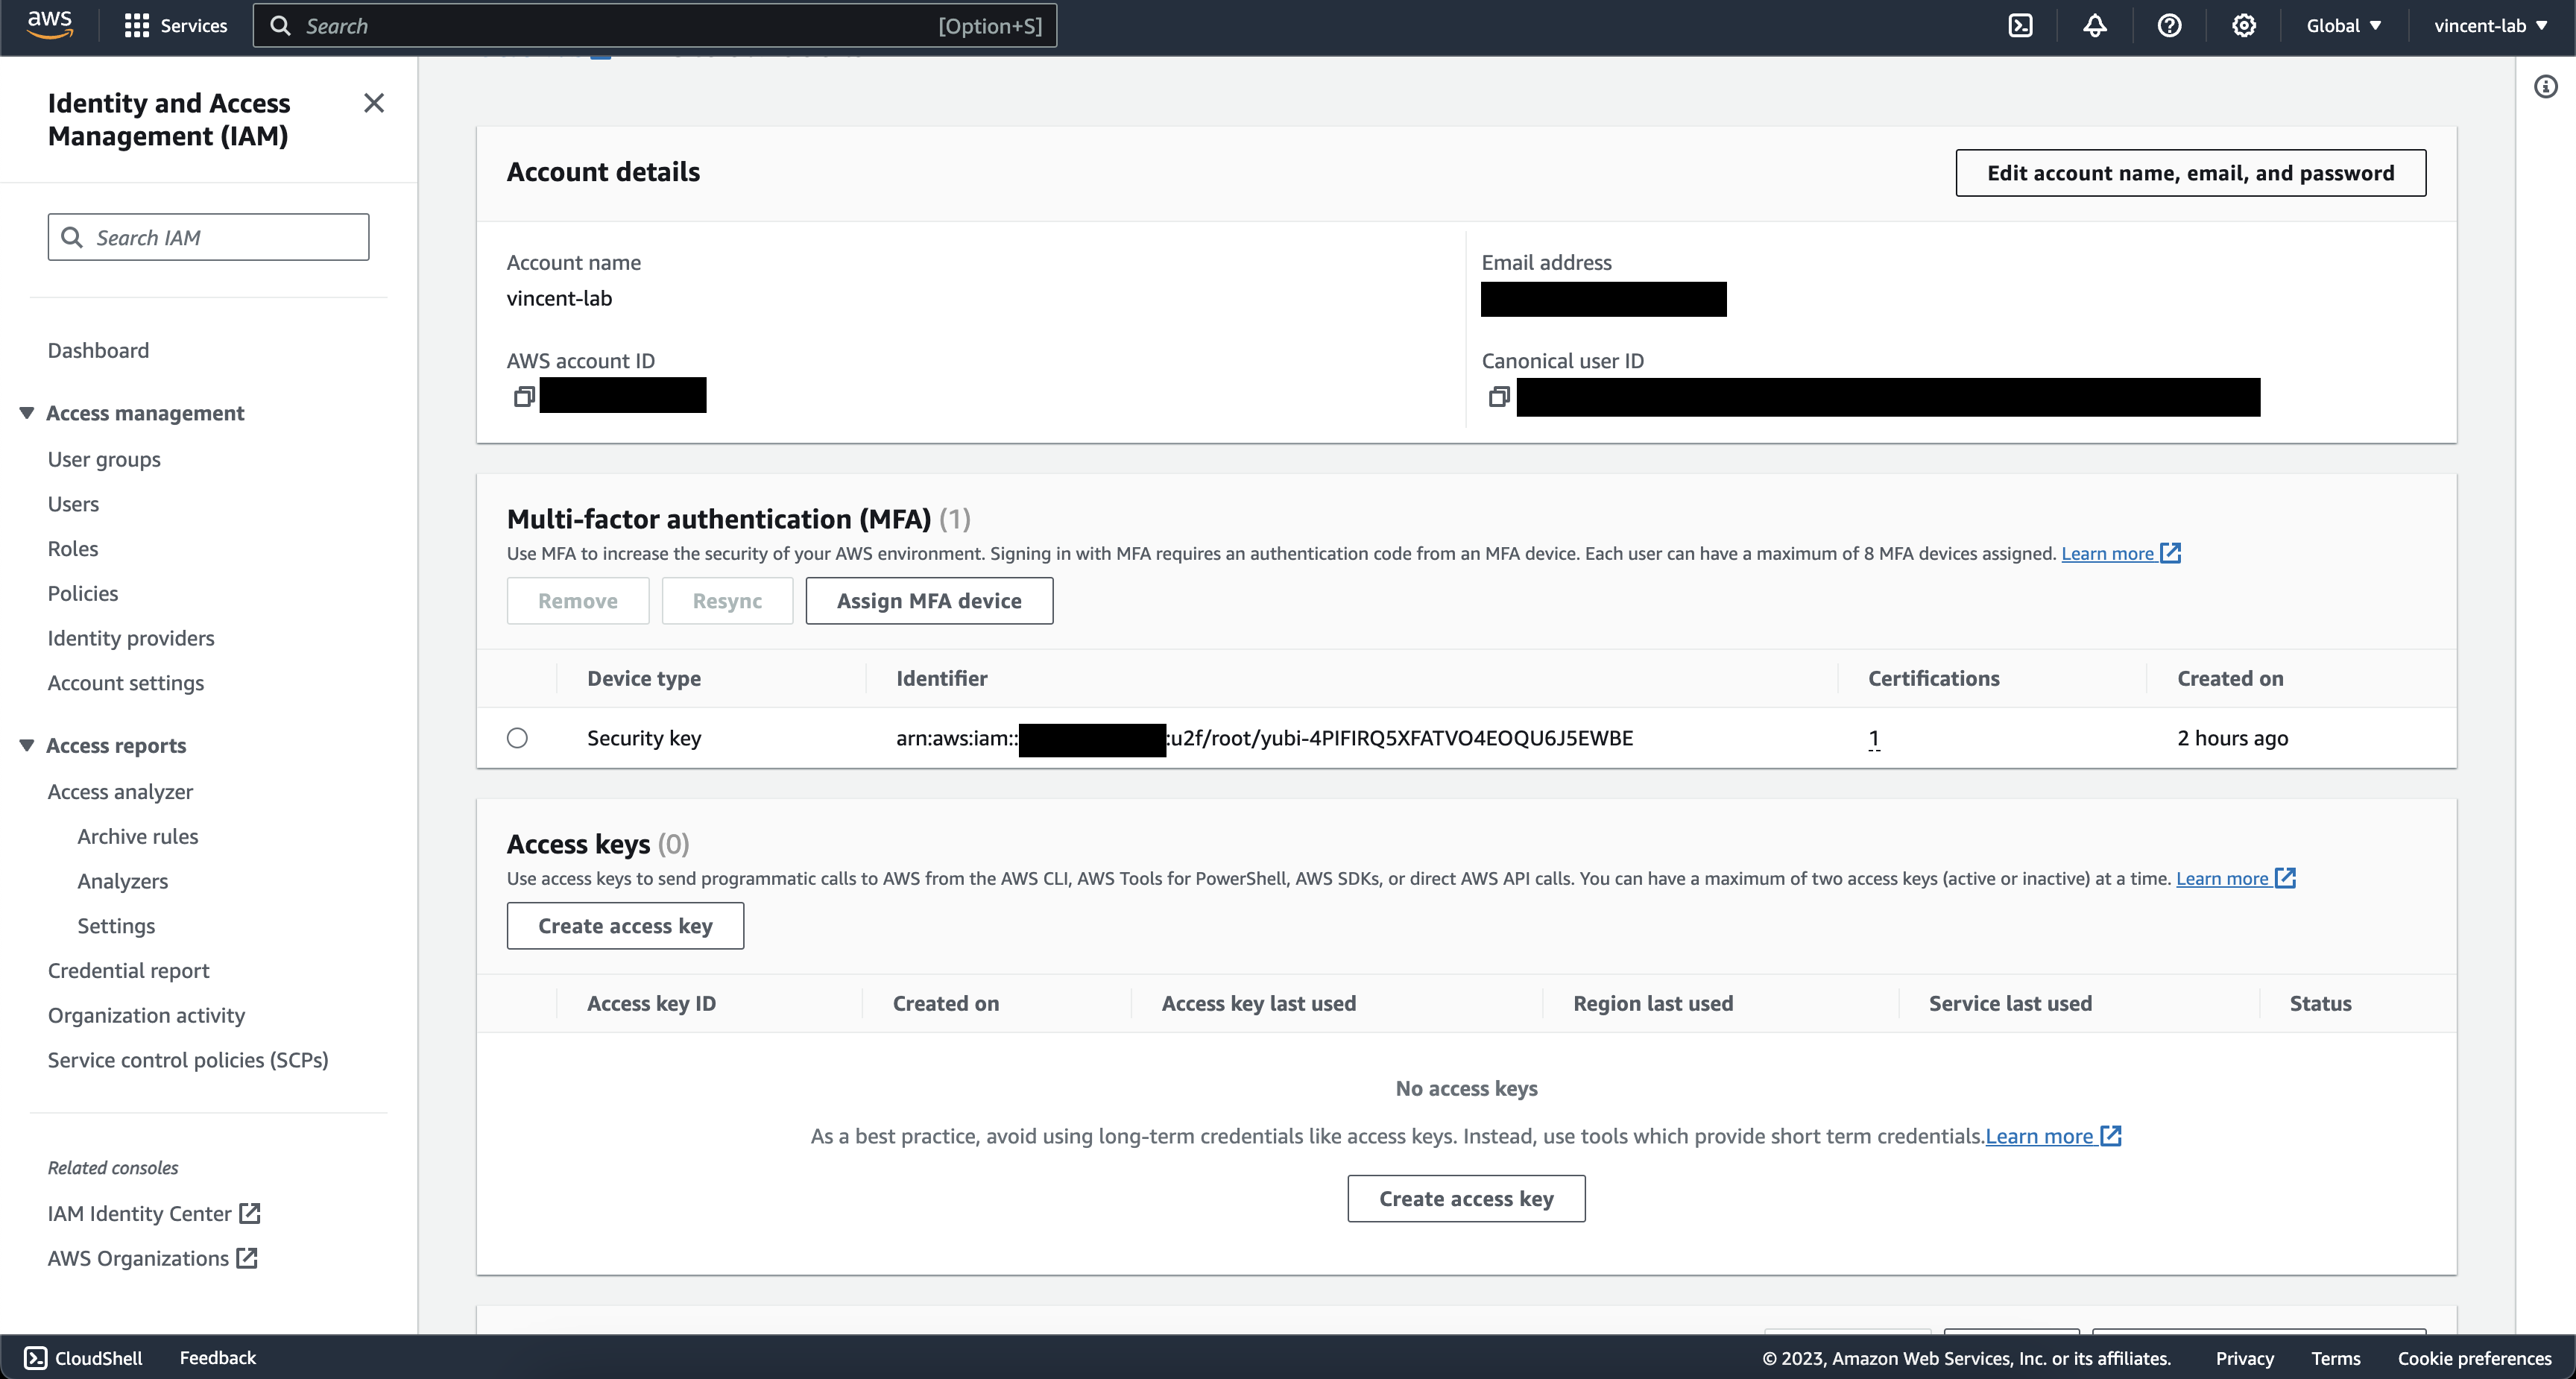
Secondly, generate a strong password using your password manager for your root account and don't forget to set up MFA to make sure that the root account is never compromised. I would suggest at least a 128-character password with a letter, number and symbol.
There are 2 approaches that you can use, you can store the password in your password manager if you ever need to use the root account in the future or you can choose not to store it and just request a password reset anytime you need to access the root account. This needs to be taken with a grain of salt as you will need to secure and maintain access to the email that is associated with the root account as well.
Ideally, it should look like this
Lastly, as root, you would want to give access to Billing for yourself
Go to https://us-east-1.console.aws.amazon.com/billing/home#/account
then scroll down until you find IAM user and role access to Billing information edit it and activate IAM access

Cleanup on IAM Users
Delete all existing IAM users on your account, but before deleting please be sure that you have re-created the user in IAM Identity Center, assigned the correct permission and you have communicated it clearly to the affected user the new method to login and assume cli access.
Nice to have
Custom domain
You can set a custom domain for your AWS SSO login portal
Go to the settings page we visited earlier from https://ap-southeast-1.console.aws.amazon.com/singlesignon/home -> Scroll down to Identity Source -> Actions -> Customize AWS access portal URL

Troubleshooting
Running issue into assuming different profiles
If you only used the default profile you will not be running into this issue. But if you set up multiple profiles you might have issues such as running the terraform version before 0.12
I would suggest you install Granted-cli and then you can just do
assume profileName
Subscribe to my newsletter
Read articles from Vincent Tjianattan directly inside your inbox. Subscribe to the newsletter, and don't miss out.
Written by
