To Run Custom Environment In AWS Sagemaker Notebook Instance
 Mohit Rohilla
Let's take the example of R
Many AWS customers already use the popular open-source statistical computing and graphics software environment R for big data analytics and data science. Amazon SageMaker is a fully managed service that lets you build, train, and deploy machine learning (ML) models quickly. Amazon SageMaker removes the heavy lifting from each step of the ML process to make it easier to develop high-quality models. In August 2019, Amazon SageMaker announced the availability of the pre-installed R kernel in all Regions. This capability is available out-of-the-box and comes with the reticulate library pre-installed, which offers an R interface for the Amazon SageMaker Python SDK so you can invoke Python modules from within an R script.
This post describes how to train, deploy, and retrieve predictions from an ML model using R on Amazon SageMaker notebook instances. The model predicts abalone age as measured by the number of rings in the shell. You use the reticulate package as an R interface to the Amazon SageMaker Python SDK to make API calls to Amazon SageMaker. The reticulate package translates between R and Python objects, and Amazon SageMaker provides a serverless data science environment to train and deploy ML models at scale.
To follow this post, you should have a basic understanding of R and be familiar with the following tidyverse packages: dplyr, readr, stringr, and ggplot2.
Creating an Amazon SageMaker notebook instance with the R kernel
To create an Amazon SageMaker Jupyter Notebook instance with the R kernel, complete the following steps:
- Go to AWS SageMaker and create a notebook instance page by below given link.
https://us-east-1.console.aws.amazon.com/sagemaker/home?region=us- east-1#/notebook-instances
2. Create a Notebook Instance

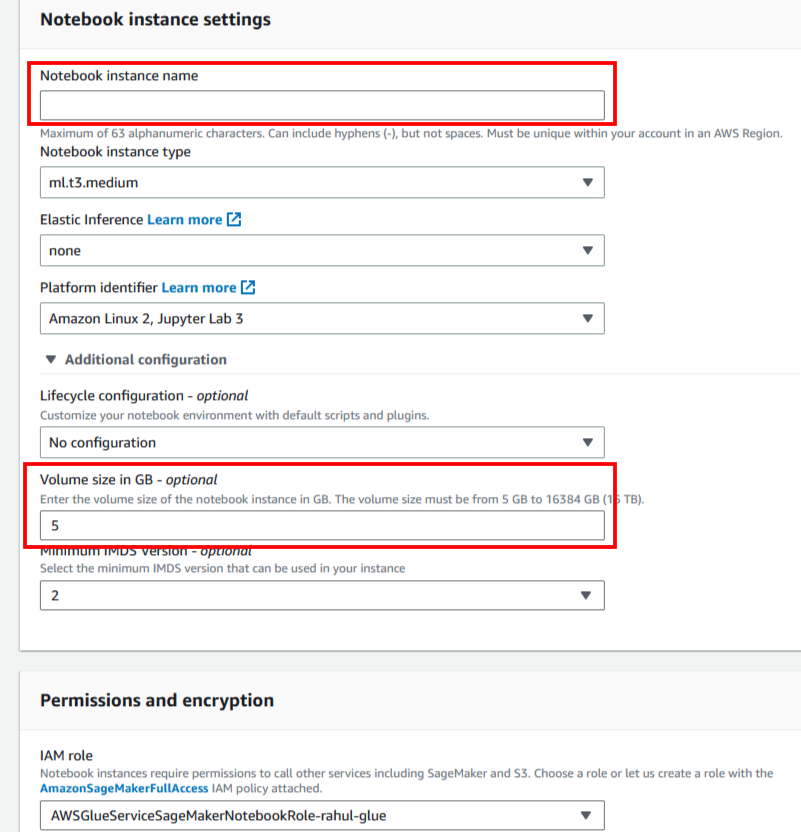
Give Your Notebook Instance a name and suitable instance type and instance volume and give an iam role after that create the instance
3. When the status of the notebook is InService, choose Open Jupyter.

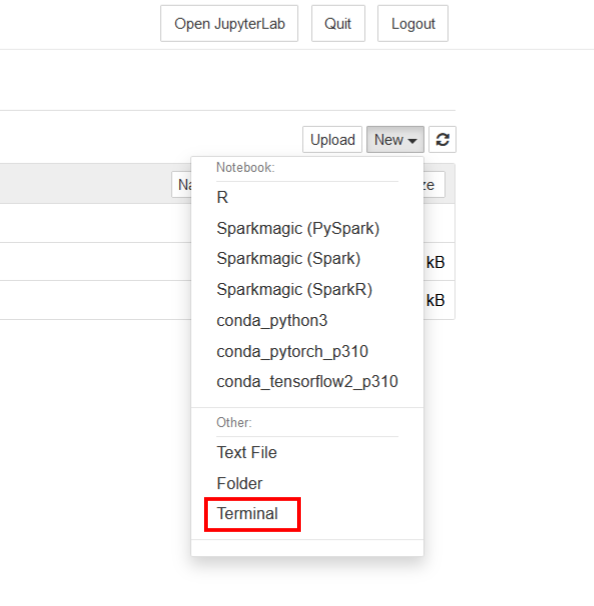
4. In the Jupyter environment, from the New drop-down menu, choose R.

When you create the new notebook, you should see the R logo in the upper right corner of the notebook environment, and also R as the kernel under that logo. This indicates that Amazon SageMaker has successfully launched the R kernel for this notebook.

The R kernel in Amazon SageMaker is built using the IRKernel package and comes with over 140 standard packages. For more information about creating a custom R environment for Amazon SageMaker Jupyter notebook instances, see Creating a persistent custom R environment for Amazon SageMaker.
5. If You Want To Install Other Package which is not in R standard Packages You Can run the below code in your jupyter notebook r terminal
install.packages(‘Robyn’,repo = ‘http://cran.rstudio.com',dependencies = TRUE)
here, I need Robyn So I choose Robyn you can choose your own package.
- Import that package to your R code with the following code:
library(Robyn)
7. Now you have installed a custom package for your R-language
8. But by default, Amazon SageMaker launches the base R kernel every time you stop and start an Amazon SageMaker instance. Any additional packages you install are lost when you stop the instance, and you have to reinstall the packages when you start the instance again. This is time-consuming and cumbersome. The solution is to save the environment on the EBS storage of the instance and link it to a custom R kernel upon startup using the Amazon SageMaker lifecycle configuration script.
Saving the environment on Amazon SageMaker EBS
10. You first need to save the environment on the instance’s EBS storage by cloning the environment. You can run the following script in the Amazon Sagemaker Jupyter bash terminal:
conda create --prefix /home/ec2-user/SageMaker/envs/custom-r --clone R

This creates an envs/custom-r folder under the Amazon SageMaker folder on your instance EBS, which you have access to. See the following screenshot.

Now, We Should make a zip file and copy our environment in s3 so that we can use the same environment when we will create a new notebook .
For this again go to your terminal and execute below commands .
zip -r ~/SageMaker/custom_r.zip ~/SageMaker/envs/
aws s3 cp ~/SageMaker/custom_r.zip s3://[YOUR BUCKET]/
Lifecycle configuration to create new instances with the custom R environment
To create a new instance and use the custom environment in that instance, you need to bring the .zip environment from Amazon S3 to the instance. You can do this automatically on the Amazon SageMaker console with the lifecycle configuration script. This script downloads the .zip file from Amazon S3 to the /SageMaker/ folder on the instance’s EBS unzips the file, recreates the /envs/ folder, and removes the redundant folders.
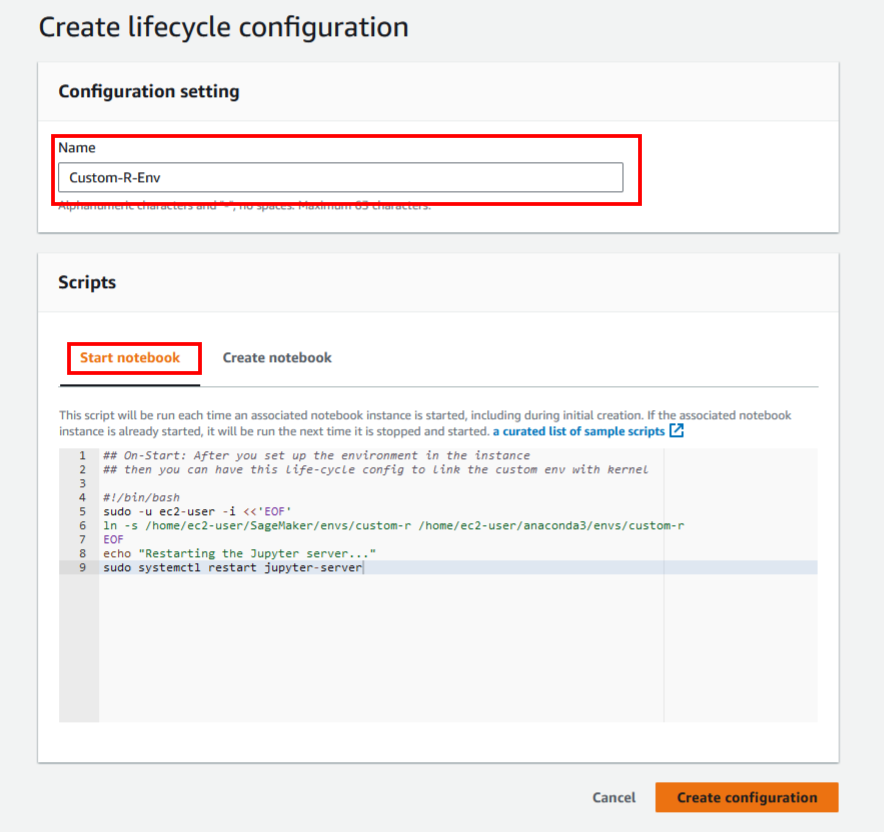
On the Amazon SageMaker console**, under Admin Configuration,** choose Lifecycle Configurations (Notebook Instance).
Select Create Configuration
Name it
Custom-R-Env.
On the Create notebook tab, enter the following script
For Start Notebook
## On-Start: After you set up the environment in the instance
## then you can have this life-cycle config to link the custom env with kernel

#!/bin/bash
sudo -u ec2-user -i <<'EOF'
ln -s /home/ec2-user/SageMaker/envs/custom-r /home/ec2-user/anaconda3/envs/custom-r
EOF
echo "Restarting the Jupyter server..."
sudo systemctl restart jupyter-server
For Create Notebook
## On-Create: Bringing custom environment from S3 to SageMaker instance
## NOTE: Your SageMaker IAM role should have access to this bucket

#!/bin/bash
sudo -u ec2-user -i <<'EOF'
aws s3 cp s3://[[Your-S3-Bucket]]/custom_r.zip ~/SageMaker/
unzip ~/SageMaker/custom_r.zip -d ~/SageMaker/
mv ~/SageMaker/home/ec2-user/SageMaker/envs/ ~/SageMaker/envs
rm -rf ~/SageMaker/home/
rm ~/SageMaker/custom_r.zip
EOF

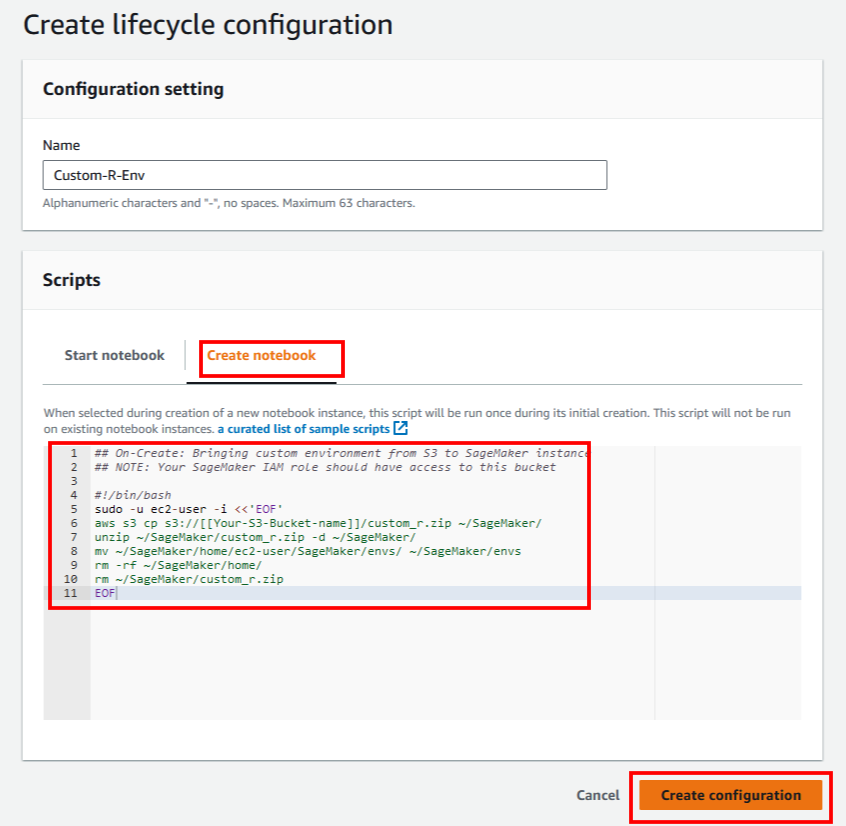

Now our configuration is ready and let's try to make a new notebook instance with custom configurations and check if the environment is available or not in the newly created notebook instance.

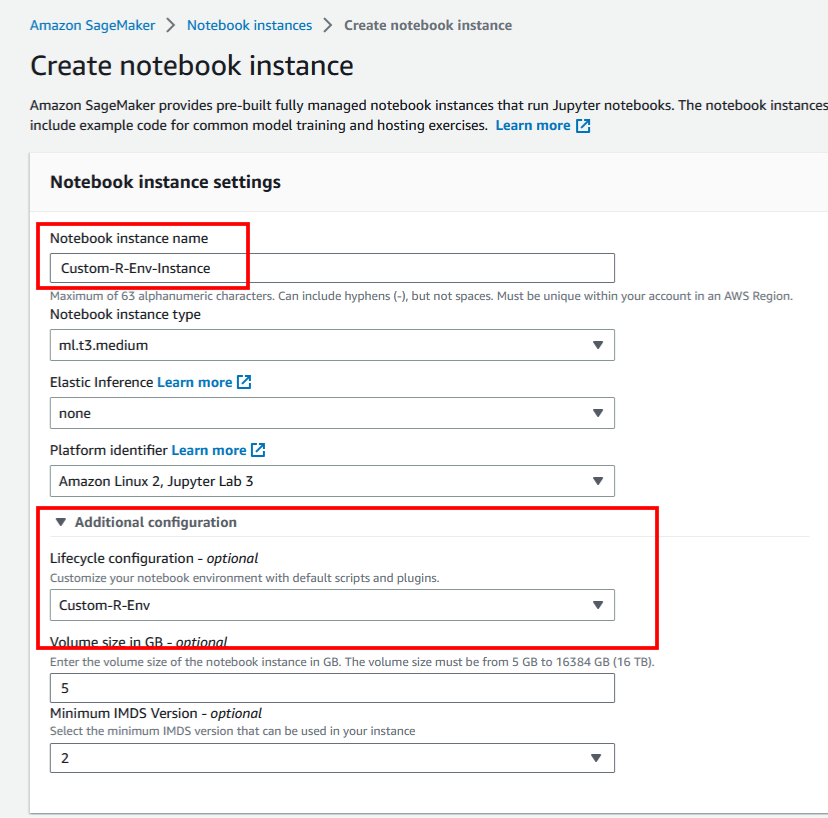
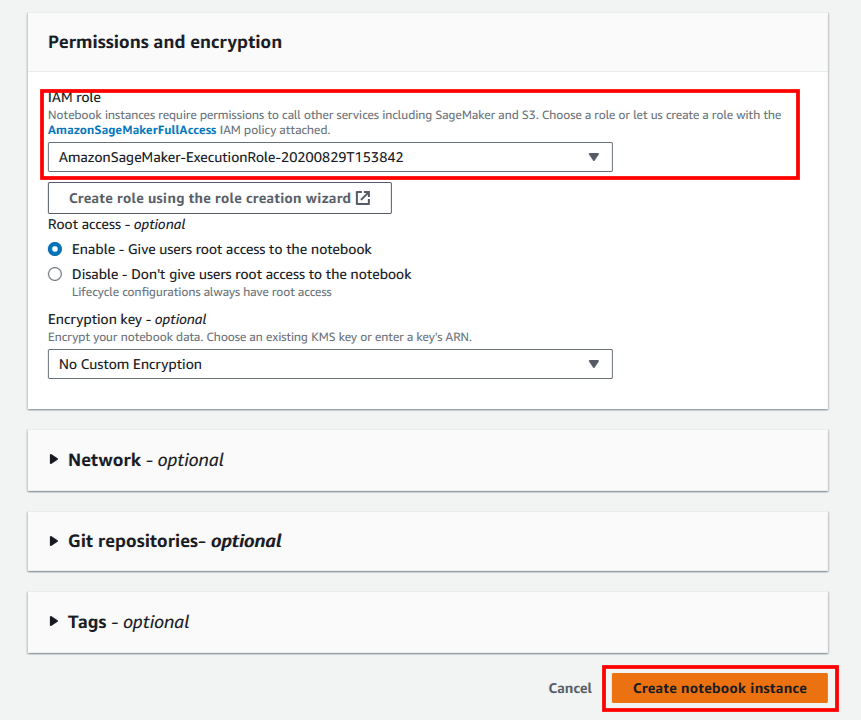

wait some time (5 min) to change status pending to in service .

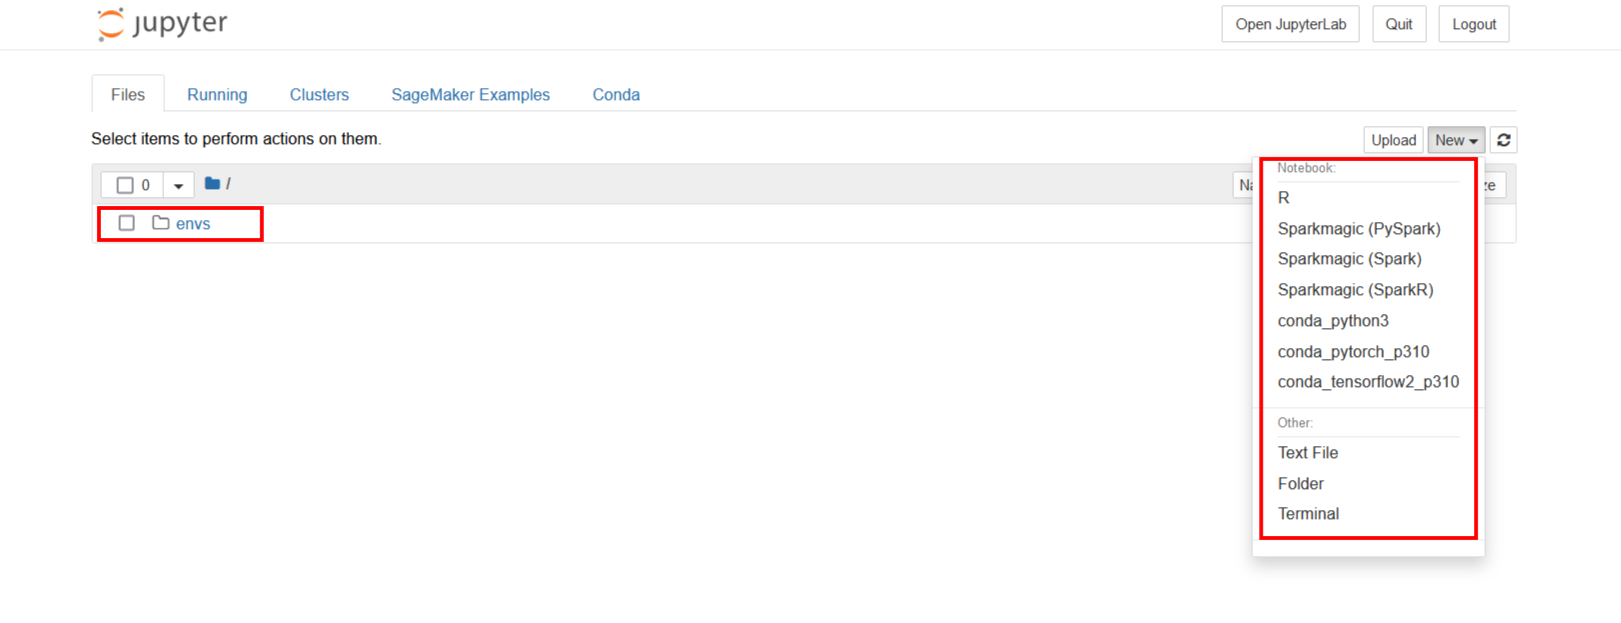
As you can see envs folder is there in the notebook instance but our custom enviorenment is not mentioned in the list, so please don't panic it will take some time to execute or configuration to run after creating instance .
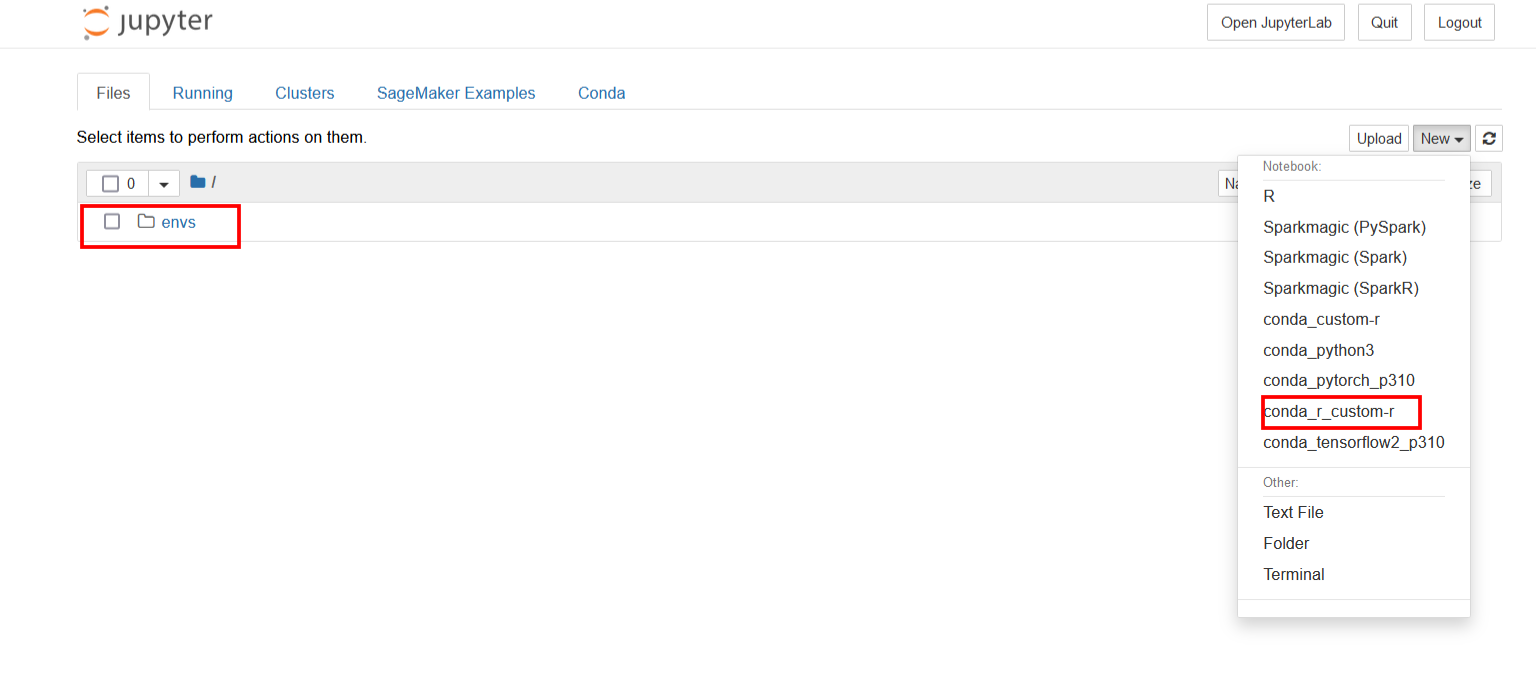
you will see two new enviorenment here one is conda_custom_r and other is conda_r_custom_r and a new notebook will open with r terminal

as you can see our new package has imported successfully and doesn't give any error after executing it .
Thanx For Reading This Blog...
Don't Forget To Follow me on LinkedIn
Mohit-Rohilla LinkedIn Profile
Message Me On LinkedIn If You Have Any Doubt...
Subscribe to my newsletter
Read articles from Mohit Rohilla directly inside your inbox. Subscribe to the newsletter, and don't miss out.
Written by
