Empower Your Database Security: Creating a Postgres Read-Only User with Terraform
 Mahira Technology Private Limited

Introduction :-
In this guide, we will walk you through the process of creating a read-only user for a #PostgreSQL database using #Terraform. By following this step-by-step tutorial, you will be able to leverage Terraform’s #infrastructure-as-code capabilities to provision and manage your #PostgreSQL database resources, while ensuring the #security and access control of your data.
Prerequisites: To follow along with this tutorial, you will need the following:-
An AWS account with appropriate permissions to create resources like Ec2 Instances, RDS instances, and #Terraform access.
#Terraform installed on your local machine.
Basic knowledge of #PostgreSQL and #AWS RDS (Relational Database Service).
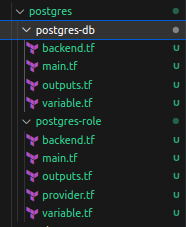
Step 1 :- Create a folder named postgres in your home directory and with in the postgres folder create two more folders with name postgres-db and postgres-role as shown below.
Step 2 :- Now create a RDS instance and Bastion-host instance within the postgre-db folder main.tf file using terraform.(Refer Below code)
resource "random_password" "db_master_password" {
  length  = 16
  special = false
}

resource "random_password" "db_read_only_password" {
  length  = 16
  special = false
}

resource "aws_secretsmanager_secret" "postgres_db" {
  name = var.secret_name
  recovery_window_in_days = 0
}

resource "aws_secretsmanager_secret_version" "postgres_db" {
  secret_id     = aws_secretsmanager_secret.postgres_db.id
  secret_string = <<EOT
{
  "master_username": "${var.db_username}",
  "master_password": "${random_password.db_master_password.result}",
  "read_only_username": "${var.db_username}_db",
  "read_only_password": "${random_password.db_read_only_password.result}",
}
EOT
}

resource "aws_vpc" "default" {
  cidr_block = var.vpc_cidr_block
  tags = {
    Name = "${var.vpc_name}"
  }
}

resource "aws_subnet" "public_subnet" {
  count                   = var.count_index
  vpc_id                  = aws_vpc.default.id
  cidr_block              = var.public_subnet_cidr_blocks[count.index]
  availability_zone       = var.azs[count.index]
  tags = {
    Name = "Public Subnet"
  }
}

resource "aws_subnet" "db_subnet" {
  count             = var.count_index
  vpc_id            = aws_vpc.default.id
  cidr_block        = var.db_subnets_cidr_blocks[count.index]
  availability_zone = var.azs[count.index]  # Replace with your desired availability zone
  tags = {
    Name = "Database Subnets"
  }
}

# Create Internet Gateway
resource "aws_internet_gateway" "igw" {
  vpc_id = aws_vpc.default.id

  tags = {
    Name = "postgres IGW"
  }
}

# Create Web layber route table
resource "aws_route_table" "web-rt" {
  vpc_id = aws_vpc.default.id
  route {
    cidr_block = "0.0.0.0/0"
    gateway_id = aws_internet_gateway.igw.id
  }
  tags = {
    Name = "WebRT"
  }
}

resource "aws_security_group" "allow_all" {
  name   = "sg_for_rds"
  vpc_id = aws_vpc.default.id
  description = "RDS instance security group"
  ingress {
    description = "All Traffic"
    from_port   = 5432
    to_port     = 5432
    protocol    = "tcp"
    cidr_blocks = [var.public_subnet_cidr_blocks[0],
    var.public_subnet_cidr_blocks[1],
    var.public_subnet_cidr_blocks[2],
    var.db_subnets_cidr_blocks[0],
    var.db_subnets_cidr_blocks[1],
    var.db_subnets_cidr_blocks[2]]
  }

  egress {
    from_port   = 0
    to_port     = 0
    protocol    = "-1"
    cidr_blocks = ["0.0.0.0/0"]
  }
  tags = {
    Name        = "allow_all"
  }
}
resource "aws_db_instance" "postgres_rds" {
  allocated_storage    = var.allocated_storage
  identifier           = var.identifier
  storage_type         = var.storage_type
  engine               = var.engine
  engine_version       = var.engine_version
  instance_class       = var.instance_class
  db_name              = var.db_name
  username             = var.db_username
  password             = random_password.db_read_only_password.result
  parameter_group_name = var.parameter_group_name
  db_subnet_group_name = aws_db_subnet_group.db-subnet.name
  skip_final_snapshot = true
}

resource "aws_db_subnet_group" "db-subnet" {
  name = var.db_subnet_group_name
  subnet_ids  = [
   aws_subnet.db_subnet[0].id,
   aws_subnet.db_subnet[1].id,
   aws_subnet.db_subnet[2].id
  ]
}

data "http" "my_ip" {
  url = "http://checkip.amazonaws.com/"
}

resource "aws_iam_role" "bastion_role" {
  name               = "bastion-role"
  assume_role_policy = jsonencode({
    Version = "2012-10-17"
    Statement = [
      {
        Action = "sts:AssumeRole"
        Effect = "Allow"
        Sid    = ""
        Principal = {
          Service = "ec2.amazonaws.com"
        }
      },
    ]
  })
}

resource "aws_security_group" "sg-bastion-host" {
  name        = "sg_for_bastion-host"
  description = "security group for bastion host"
  vpc_id      = aws_vpc.default.id

ingress {
    description = "ssh"
    from_port   = 22
    to_port     = 22
    protocol    = "tcp"
    cidr_blocks = ["${chomp(data.http.my_ip.body)}/32"]
  }

  egress {
    from_port        = 0
    to_port          = 0
    protocol         = "-1"
    cidr_blocks      = ["0.0.0.0/0"]
  }

  tags = {
    Name          = "sg_for_bastion"

  }
}
resource "aws_iam_instance_profile" "iam_profile" {
  name = "bastion-profile"
  role = aws_iam_role.bastion_role.name
}

resource "aws_instance" "bastion_host" {
  ami                    = var.ami_id
  instance_type          = var.instance_type
  vpc_security_group_ids = [aws_security_group.sg-bastion-host.id]
  key_name               = aws_key_pair.bastion-key.key_name
  iam_instance_profile    = aws_iam_instance_profile.iam_profile.id
  subnet_id               = aws_subnet.public_subnet[0].id
  tags = {
    Name = "bastion-host"
  }
}

resource "tls_private_key" "this" {
  algorithm = "RSA"
}

resource "aws_key_pair" "bastion-key" {
  key_name   = var.key_name
  public_key = tls_private_key.this.public_key_openssh

  provisioner "local-exec" { # Create a "myKey.pem" to your computer!!
    command = "echo '${tls_private_key.this.private_key_pem}' > ~/${var.key_name}.pem"
  }
}
variable "identifier" {
  default = "postgres-rds-db"
}
variable "allocated_storage" {
  default = 20
}
variable "storage_type" {
 default = "gp2"
}
variable "engine" {
  default = "postgres"
}
variable "engine_version" {
  default = 14.7
}
variable "instance_class" {
  default = "db.t3.micro"
}
variable "db_name" {
  default = "postgres_db"
}
variable "parameter_group_name" {
  default = "default.postgres14"
}

variable "public_subnet_cidr_blocks" {
  type    = list(string)
  default = ["10.50.0.0/24", "10.50.1.0/24", "10.50.2.0/24"]
}

variable "db_subnets_cidr_blocks" {
  type    = list(string)
  default = ["10.50.16.0/24", "10.50.32.0/24", "10.50.64.0/24"]
}

variable "vpc_cidr_block" {
  description = "CIDR block for VPC"
  default     = "10.50.0.0/16"
}

variable "vpc_name" {
  description = "Name of the VPC"
  default     = "open-source_projects"
}

variable "azs" {
  type    = list(string)
  default = ["us-east-1a", "us-east-1b", "us-east-1c"]
}

variable "count_index" {
  type = number
  default = 3
}

variable "db_subnet_group_name" {
  type = string
  default = "db-subnet-group"
}

variable "secret_name" {
  type = string
  default = "Open-source"
}

variable "key_name" {
  type = string
  default = "postgres-key"
}

variable "ami_id" {
  type = string
  default = "ami-06ca3ca175f37dd66"
}

variable "instance_type" {
  type = string
  default = "t2.micro"
}

variable "db_username" {
  type = string
  default = "read_only_user"
}

variable "subnet_count" {
  type = number
  default = 1
}
Step 3:- Deploy the above code to create a postgre-db.
Step 4:- Next create a main.tf and variable.tf , provider.tf files in the postgres-role directory to create a db-read-only-user using terraform
Step 5:- Refer the below code to Create the postgres user and role .
# main.tf
provider "postgresql" {
  host            = "127.0.0.1"
  port            = "5434"
  database        = "postgres"
  username        = "${var.db_username}"
  password        = "${var.db_master_password}"
  sslmode         = "require"
  connect_timeout = 15
  superuser = false
}

resource "postgresql_role" "readonly" {
  name = "readonly"
}

resource postgresql_grant "readonly_public" {
  database    = "postgres"
  role        = postgresql_role.readonly.name
  schema      = "public"
  object_type = "table"
  privileges  = ["SELECT"]
}

resource "postgresql_role" "readonly_user" {
  name     = "${var.db_username}-db-role"
  password = "${var.db_read_only_password}"
  login    = true
  roles = [postgresql_role.readonly.name]
}
# variables.tf
variable "db_username" {
  type = string
  default = "read_only_user"
}

variable "secret_name" {
  type = string
  default = "Open-source"
}

# Note:- Login to aws management console, then navigate to secrets manager service and find the Open-source secret. Retrieve the secret values in Open-source secret to copy the master_password & db_read_only_password.
variable "db_master_password" {
  type = string
  description = "The master pasword of the postgres-db"
  default = "GJpdsI2IhnAaMWaZ"
}

variable "db_read_only_password" {
  type = string
  description = "read only password of the postgres-db"
  default = "myn1JubEHNTeZ9ju"
}
# provider.tf
terraform {
  required_providers {
    postgresql = {
      source = "cyrilgdn/postgresql"
      version = "1.19.0"
    }
    aws = {
      source = "hashicorp/aws"
      version = "5.8.0"
    }
  }
}
Step 6:- First we need to run the tunneling command to #deploy the above postgres read only user creation code. Tunneling command will looks like below.
Step 7 :- Replace the below command values with your postgres-db and instance values. After replacing the values Open a terminal window and run the command.
ssh -i <.pem> -f -N -L 5434:<db-endponit>:5432 ec2-user@<bastion-host-public ip> -v
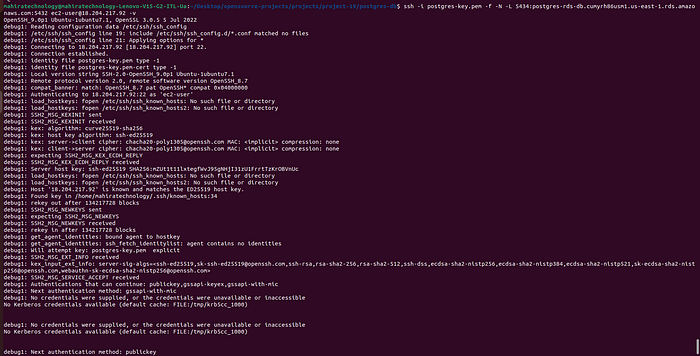
Step 8:- Keep the tunneling running on and open another terminal to deploy the postgres read only user code.
Step 9:- Once the code deploy’s successfully. Connect to your #pgadmin4 and check the user and role is being created or not. To connect to your pgadmin refer the below figure
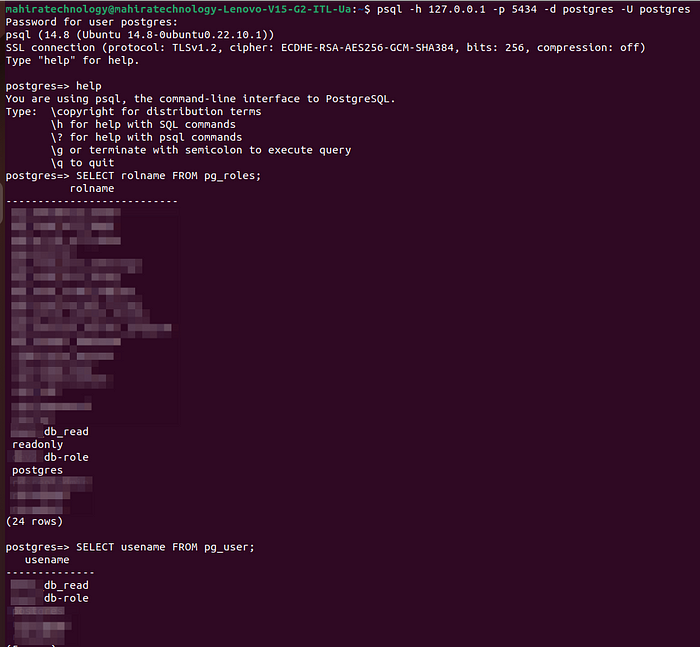
Step 9 :- As u can see the read-only-user and role is being created in postgres db (or) else u can verify by downloading the pgadmin4 and connecting to the db
Step 10 :- once u have connected with Desktop #PGadmin4. First register u r credentials in pgadmin4. as shown like below
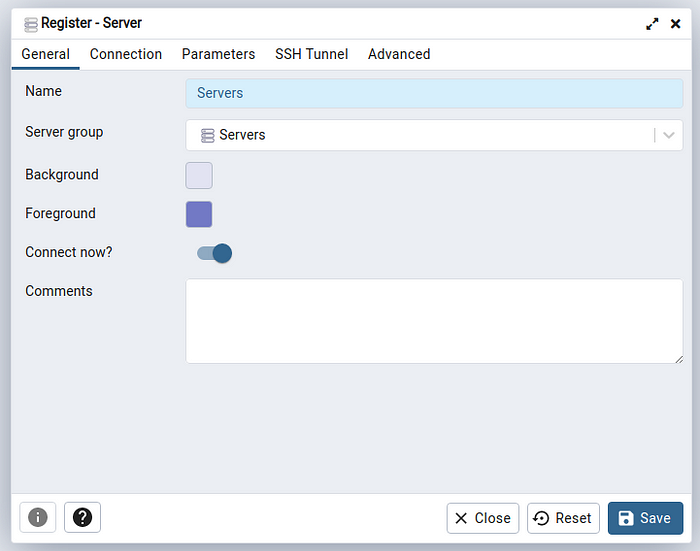
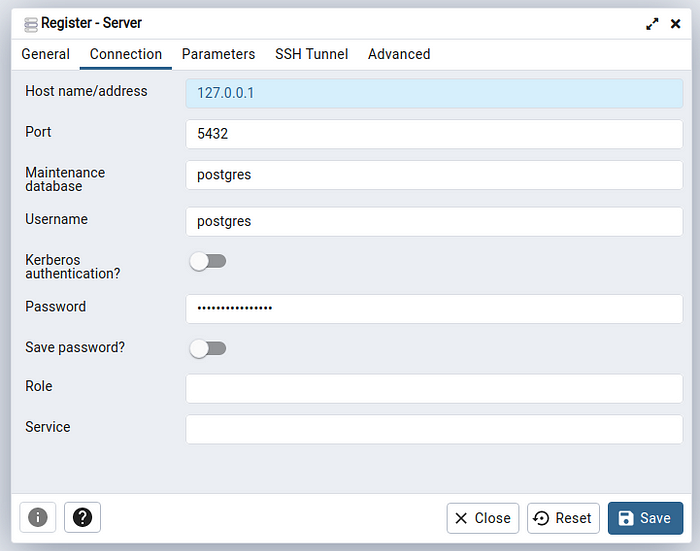
Step 11 :- after filling the db details, click on save to login to the #PgAdmin4.
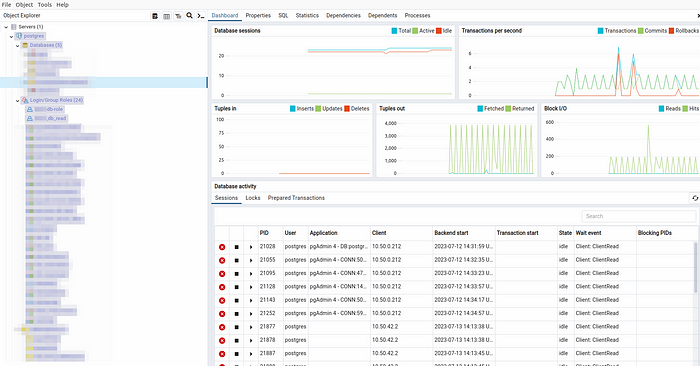
Step 12 :- Once u registered the postgresdb. You are able to see the read-only-user in the postgresdb, as shown in below .
Conclusion :-
In this guide, we have demonstrated how to create a read-only user for a #PostgreSQL database using #Terraform. By following the step-by-step tutorial, users can leverage Terraform’s #infrastructure-as-code capabilities to provision and manage PostgreSQL database resources while ensuring data #security and access control.
The process involves creating an RDS instance, a bastion host, and the necessary security groups. Then, we use Terraform to create a read-only user, a role, and grant the necessary privileges to the user on the public schema of the PostgreSQL database.
By using #infrastructure as code, we can easily reproduce this setup across multiple environments with consistent configuration and #security. #Terraform allows us to version-control our infrastructure code, making it easier to track changes and #collaborate with a team.
Subscribe to my newsletter
Read articles from Mahira Technology Private Limited directly inside your inbox. Subscribe to the newsletter, and don't miss out.
Written by

Mahira Technology Private Limited
Mahira Technology Private Limited
A leading tech consulting firm specializing in innovative solutions. Experts in cloud, DevOps, automation, data analytics & more. Trusted technology partner.